Easy Chocolate Bark Recipe – The Perfect Homemade Gift or Sweet Treat!
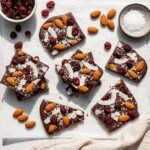
This Easy Chocolate Bark Recipe creates beautiful, customizable chocolate treats perfect for gifting or snacking. Simply melt your favorite chocolate, spread it on a pan, add delicious toppings, and let it set. The result is professional-looking bark that tastes incredible and requires no baking skills whatsoever!
- Prep Time: 10 minutes
- Cook Time: 15-20 minutes
- Total Time: 30 minutes
- Yield: 16-20 pieces 1x
- Category: Dessert, Candy, Snack
- Method: No-Bake
- Cuisine: American
- Diet: Vegetarian
Ingredients
Scale
- 12 oz (340g) chocolate chips or chopped chocolate (dark, milk, or white chocolate)
- 1 teaspoon coconut oil or vegetable shortening (optional, for shine)
- ½ cup chopped nuts (almonds, pecans, walnuts, or pistachios)
- ¼ cup dried cranberries or raisins
- ¼ cup shredded coconut (sweetened or unsweetened)
- 2 tablespoons crushed candy canes or toffee bits (optional)
- ½ teaspoon flaky sea salt
- Additional toppings as desired: mini chocolate chips, crushed cookies, pretzels, etc.
Instructions
- Prepare Your Pan: Line a baking sheet (approximately 9×13 inches) with parchment paper or a silicone baking mat, making sure it covers the entire bottom and slightly up the sides. Set aside.
- Melt the Chocolate: Place chocolate chips and coconut oil (if using) in a microwave-safe bowl. Microwave in 30-second intervals, stirring thoroughly between each interval, until chocolate is completely smooth and melted. This usually takes 1-2 minutes total. Be careful not to overheat – chocolate can burn quickly. Alternatively, melt chocolate using a double boiler over simmering water, stirring constantly.
- Spread the Chocolate: Pour the melted chocolate onto the prepared baking sheet. Use a rubber spatula or offset spatula to spread it into an even layer about ¼-inch thick. You can spread it to the edges for uniform pieces or leave it more organic-shaped for rustic bark. Work relatively quickly as chocolate begins setting.
- Add Toppings: Immediately sprinkle your chosen toppings evenly over the melted chocolate. Press them down gently with your hands or the back of a spoon so they stick when the chocolate hardens. This is your moment to be creative – make patterns, create sections with different toppings, or go wild with a mix of everything!
- Season with Salt: Sprinkle flaky sea salt lightly across the entire surface. Don’t skip this step – it really makes the flavors pop!
- Set the Bark: Place the baking sheet in the refrigerator for 15-20 minutes, or in the freezer for about 10 minutes, until the chocolate is completely firm and set. You’ll know it’s ready when it’s hard to the touch and no longer glossy.
- Break Into Pieces: Once fully hardened, lift the bark off the pan using the parchment paper. Break it into irregular pieces with your hands, or use a sharp knife for more uniform pieces. The irregular, natural breaks are part of bark’s charm!
- Serve or Store: Enjoy immediately or store in an airtight container with parchment paper between layers if stacking.
Notes
- Chocolate Quality Matters: Use good-quality chocolate for best results. Avoid “chocolate-flavored” products.
- Don’t Overheat: Overheated chocolate becomes grainy and seizes. Heat gently and stir frequently.
- Topping Timing: Add toppings immediately after spreading – chocolate sets quickly!
- Layered Bark: Create two-tone bark by melting dark and white chocolate separately, spreading one layer, letting it set slightly, then adding the second layer.
- Storage: Keep bark in a cool, dry place. Avoid humid environments which can cause chocolate to “bloom” (develop white spots – still safe to eat but less attractive).
- Gift Packaging: Package bark in clear cellophane bags, mason jars, or decorative tins for beautiful homemade gifts.
Nutrition
- Serving Size: 1 piece (approximately 1 oz)
- Calories: 145
- Sugar: 12g
- Sodium: 45mg
- Fat: 9g
- Saturated Fat: 5g
- Unsaturated Fat: 3.5g
- Trans Fat: 0g
- Carbohydrates: 15g
- Fiber: 2g
- Protein: 2g
- Cholesterol: 3g
Find it online: https://focialy.com/chocolate-bark-recipe/