Easter Cake Recipe
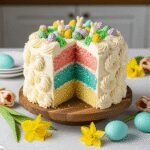
This fluffy Easter cake features tender vanilla layers paired with smooth buttercream frosting that’s perfect for springtime celebrations. Easy enough for beginners yet impressive enough for any holiday gathering, this classic cake can be decorated as simply or elaborately as you desire.
- Prep Time: 25 minutes
- Cook Time: 28 minutes
- Total Time: 53 minutes (plus cooling time)
- Yield: 12-16 servings 1x
- Category: Dessert
- Method: Baking
- Cuisine: American
- Diet: Vegetarian
Ingredients
For the Cake:
- 3 cups all-purpose flour
- 2½ teaspoons baking powder
- ½ teaspoon baking soda
- 1 teaspoon salt
- 1 cup (2 sticks) unsalted butter, room temperature
- 2 cups granulated sugar
- 4 large eggs, room temperature
- 1 tablespoon pure vanilla extract
- 1½ cups whole milk, room temperature
For the Buttercream Frosting:
- 1½ cups (3 sticks) unsalted butter, room temperature
- 6 cups powdered sugar, sifted
- ¼ cup heavy cream
- 2 teaspoons pure vanilla extract
- ¼ teaspoon salt
- Gel food coloring in pastel shades (optional)
- Sprinkles, edible flowers, or decorations of choice
Instructions
Step 1: Prep Your Pans and Oven
Preheat your oven to 350°F (175°C). Grease two 9-inch round cake pans generously with butter or baking spray, then line the bottoms with parchment paper circles. Grease the parchment too. This double insurance ensures your cakes will release perfectly. Set aside.
Step 2: Combine Dry Ingredients
In a medium bowl, sift together the flour, baking powder, baking soda, and salt. Sifting isn’t just for show – it removes lumps and aerates the flour, contributing to that light, fluffy texture we’re after. Set this bowl aside.
Step 3: Cream Butter and Sugar
In the bowl of your stand mixer fitted with the paddle attachment (or using a hand mixer with a large bowl), beat the room temperature butter on medium speed for about 2 minutes until smooth and creamy. Gradually add the sugar, about ½ cup at a time, beating well after each addition. Continue beating on medium-high speed for 4-5 minutes until the mixture is very light, fluffy, and pale in color – almost white. This creaming process is crucial for a light cake, so don’t rush it!
Step 4: Add Eggs and Vanilla
Reduce mixer speed to medium-low. Add eggs one at a time, beating well after each addition and scraping down the sides of the bowl as needed. The mixture might look slightly curdled after the eggs – that’s normal and will come together once you add the flour. Beat in the vanilla extract.
Step 5: Alternate Dry and Wet Ingredients
With the mixer on low speed, add the flour mixture in three additions, alternating with the milk in two additions. Start and end with the flour mixture (flour-milk-flour-milk-flour). Mix each addition just until no streaks of flour remain – overmixing at this stage develops gluten and creates a tough cake. Use your rubber spatula to scrape the bottom and sides of the bowl, ensuring everything is evenly incorporated.
Step 6: Divide and Bake
Divide the batter evenly between your prepared pans (I use a kitchen scale for precision – about 680-700g per pan). Smooth the tops with your spatula. Tap each pan firmly on the counter 3-4 times to release any large air bubbles. Bake for 26-30 minutes, or until a toothpick inserted in the center comes out clean or with just a few moist crumbs. The cakes should be golden on top and spring back when gently pressed.
Step 7: Cool the Cakes
Let the cakes cool in the pans on wire racks for 15 minutes. Run a knife around the edges, then invert onto the racks, peel off the parchment, and flip right-side up to cool completely. This takes about 1-2 hours. Cakes MUST be completely cool before frosting or the buttercream will melt.
Step 8: Make the Buttercream
In a clean mixer bowl with the paddle attachment, beat the room temperature butter on medium speed for 3-4 minutes until very smooth and creamy. Reduce speed to low and gradually add the sifted powdered sugar, 1 cup at a time. Once all the sugar is added, increase speed to medium and beat for 2 minutes. Add the heavy cream, vanilla extract, and salt. Beat on medium-high for 4-5 minutes until light, fluffy, and very smooth. If the frosting seems too thick, add more cream 1 tablespoon at a time. If too thin, add more powdered sugar ¼ cup at a time.
Step 9: Divide and Color Frosting (Optional)
If you want multiple colors, divide the buttercream into separate bowls. Add gel food coloring a tiny bit at a time (a toothpick amount) and stir until you reach your desired pastel shade. Remember, colors deepen as they sit, so start lighter than you think you need.
Step 10: Level and Assemble
If your cake layers domed during baking, use a long serrated knife to carefully level off the tops, creating flat surfaces. Place the first layer cut-side down on your cake board or serving plate. Spread about 1 cup of buttercream evenly across the top, going all the way to the edges. Place the second layer on top, cut-side down, and gently press to adhere.
Step 11: Crumb Coat
Apply a thin layer of frosting all over the top and sides of the cake. This “crumb coat” seals in crumbs and creates a smooth base. Don’t worry about it looking perfect – you’ll barely see this layer. Refrigerate for 20-30 minutes until the frosting is firm.
Step 12: Final Frosting and Decoration
Apply a generous, smooth layer of frosting over the entire cake, using an offset spatula for smooth sides and top. If using a turntable, rotate it while holding your spatula still against the cake for ultra-smooth sides. Get creative with your decorations – pipe rosettes around the borders, add Easter candies, create a basket-weave pattern, or keep it simple with smooth frosting and sprinkles. There’s no wrong way to decorate your Easter masterpiece!
Notes
- Temperature matters: All ingredients should be at room temperature (65-70°F) for best results. This ensures proper emulsification and a tender crumb.
- Don’t overmix: Once you add the flour, mix just until combined. Overmixing develops gluten, creating a tough, chewy cake.
- Measure flour correctly: Spoon flour into measuring cups and level off with a knife. Scooping directly from the bag compacts the flour, leading to dry cake.
- Test for doneness: Oven temperatures vary. Start checking at 26 minutes. The cake should spring back when touched and a toothpick should have moist crumbs, not wet batter.
- Make it ahead: Unfrosted cake layers can be wrapped tightly and refrigerated for 2 days or frozen for 3 months. Bring to room temperature before frosting.
- Frosting consistency: If your kitchen is warm, the buttercream may soften. Refrigerate for 10-15 minutes to firm it up. If too stiff, let it sit at room temperature briefly.
Nutrition
- Serving Size: 1 slice (1/14 of cake)
- Calories: 625
- Sugar: 68g
- Sodium: 285mg
- Fat: 32g
- Saturated Fat: 20g
- Unsaturated Fat: 10g
- Trans Fat: 0g
- Carbohydrates: 81g
- Fiber: 1g
- Protein: 5g
- Cholesterol: 135mg
Find it online: https://focialy.com/easter-cake-recipe/