No Flour Cookies Recipe
These easy No Flour Cookies are naturally gluten-free, made with wholesome oats and nut butter for a chewy, delicious treat that comes together in just one bowl! Perfect for satisfying your cookie cravings with simple pantry ingredients.
- Prep Time: 10 minutes
- Cook Time: 10 minutes
- Total Time: 20 minutes
- Yield: 18-20 cookies 1x
- Category: Dessert
- Method: Baking
- Cuisine: American
- Diet: Vegetarian
Ingredients
Scale
- 2 cups old-fashioned rolled oats (certified gluten-free if needed)
- 1 cup natural peanut butter or almond butter (creamy, well-stirred)
- ½ cup honey or pure maple syrup
- 1 large egg (or flax egg for vegan version)
- 1 teaspoon pure vanilla extract
- ½ teaspoon baking soda
- ¼ teaspoon fine sea salt
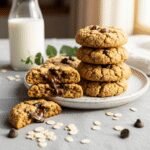
- ¾ cup chocolate chips (optional but highly recommended)
- ¼ cup chopped nuts or dried fruit (optional)
Instructions
- Preheat and Prepare: Preheat your oven to 350°F (175°C). Line two baking sheets with parchment paper or silicone baking mats. This prevents sticking and ensures easy cleanup.
- Mix Wet Ingredients: In a large mixing bowl, combine the peanut butter, honey, egg, and vanilla extract. Stir vigorously with a wooden spoon or sturdy spatula until the mixture is smooth and well combined. The natural oils in the nut butter should emulsify with the other wet ingredients, creating a creamy base.
- Add Dry Ingredients: Add the rolled oats, baking soda, and salt directly to the wet mixture. Stir everything together until all the oats are fully coated and no dry patches remain. The dough will be thick and slightly sticky—this is exactly what you want!
- Fold in Mix-ins: If using chocolate chips, nuts, or dried fruit, fold them into the dough now. Make sure they’re evenly distributed throughout for chocolate in every bite.
- Shape the Cookies: Using a cookie scoop or tablespoon, portion the dough into balls (about 1.5 tablespoons each) and place them on your prepared baking sheets, spacing them about 2 inches apart. The cookies will spread slightly but maintain their shape nicely.
- Flatten (Optional): For more traditional-looking cookies, gently press each dough ball down with the back of a fork, creating a crisscross pattern. This also helps them bake more evenly. If you prefer thicker, chewier cookies, skip this step.
- Bake: Place the baking sheets in the preheated oven and bake for 9-11 minutes. The cookies are done when the edges are golden brown and the centers look just slightly underdone. They will continue to firm up as they cool.
- Cool: Remove from the oven and let the cookies cool on the baking sheet for 5 minutes—this is crucial! They’ll be very soft when hot but will firm up perfectly as they cool. After 5 minutes, transfer them to a wire cooling rack to cool completely.
- Serve and Enjoy: Enjoy your cookies warm or at room temperature. Store any leftovers in an airtight container at room temperature for up to 5 days, in the refrigerator for up to 2 weeks, or freeze for up to 3 months.
Notes
- Nut Butter Consistency Matters: Make sure your natural nut butter is well-stirred before measuring. If the oils have separated, stir thoroughly to reincorporate them for the best texture.
- Don’t Overbake: These cookies continue to cook on the hot baking sheet after removing from the oven. Slightly underdone centers = perfectly chewy cookies.
- Certified Gluten-Free Oats: If cooking for someone with celiac disease, always use certified gluten-free oats to avoid cross-contamination.
- Dough Too Sticky? Refrigerate for 15-20 minutes to make it easier to handle, or lightly wet your hands when shaping.
- Customize Your Add-ins: Try dried cranberries and white chocolate chips, chopped walnuts and cinnamon, or mini M&Ms for a fun variation!
Nutrition
- Serving Size: 1 cookie
- Calories: 145
- Sugar: 9g
- Sodium: 85mg
- Fat: 8g
- Saturated Fat: 1.5g
- Unsaturated Fat: 6g
- Trans Fat: 0g
- Carbohydrates: 16g
- Fiber: 2g
- Protein: 4g
- Cholesterol: 10mg
Find it online: https://focialy.com/no-flour-cookies-recipe/