Tuiles Recipe
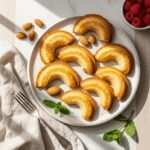
Elegant French tuiles are crispy, delicate cookies that curve beautifully over ice cream or stand alone as a sophisticated treat. With just five ingredients and a simple technique, you’ll create bakery-quality cookies that impress every time.
- Prep Time: 10 minutes
- Cook Time: 8 minutes per batch
- Total Time: 30 minutes (including multiple batches)
- Yield: 15-18 cookies 1x
- Category: Dessert
- Method: Baking
- Cuisine: French
- Diet: Gluten Free
Ingredients
- 2 large egg whites, room temperature
- ½ cup (100g) granulated sugar
- 6 tablespoons (45g) all-purpose flour
- 4 tablespoons (56g) unsalted butter, melted and slightly cooled
- 1 teaspoon pure vanilla extract
- Pinch of salt (optional, but recommended)
- Optional: ⅓ cup sliced almonds, orange zest, or other flavorings
Instructions
Step 1: Prepare Your Workspace
Preheat your oven to 350°F (175°C). Line a baking sheet with a silicone baking mat or parchment paper. Have your rolling pin or wine bottle ready nearby for shaping. This is crucial because you’ll need to work quickly once the cookies come out of the oven.
Step 2: Make the Batter
In a medium bowl, lightly whisk the egg whites until slightly frothy but not stiff—you’re not making meringue here. Add the sugar and whisk until well combined and the mixture is smooth, about 1 minute.
Step 3: Add Dry Ingredients
Sift the flour over the egg white mixture and gently fold it in with a spatula or whisk until no streaks remain. The batter should be smooth and lump-free.
Step 4: Incorporate Butter and Vanilla
Pour in the melted butter and vanilla extract. Whisk gently until completely incorporated and the batter is silky smooth. Let the batter rest for 5 minutes—this helps it spread more easily.
Step 5: Shape and Spread
Drop 1 tablespoon of batter onto your prepared baking sheet. Using the back of a spoon or an offset spatula, spread the batter into a thin 3-4 inch circle. Make it as thin as possible—the thinner it is, the crispier your tuile will be. Only do 3-4 cookies per baking sheet as they spread during baking and you’ll need room to work when shaping them.
Step 6: Add Optional Toppings
If using sliced almonds or other toppings, sprinkle them lightly over the unbaked circles now.
Step 7: Bake
Bake for 6-8 minutes, watching carefully. The edges should turn golden brown while the centers remain slightly lighter. They’ll crisp up as they cool, so don’t overbake. Every oven is different, so watch your first batch carefully to learn the perfect timing for your oven.
Step 8: Shape While Hot
This is the crucial step! As soon as the cookies come out of the oven, work quickly. Using a thin metal spatula, carefully lift each cookie and immediately drape it over a rolling pin or wine bottle. Hold it in place for just 10-15 seconds until it starts to firm up and holds its curved shape. If a cookie hardens before you can shape it, return it to the oven for 15-20 seconds to soften.
Step 9: Cool Completely
Transfer the shaped tuiles to a wire rack to cool completely. They’ll continue to crisp as they cool. Once completely cool, they should be crispy and delicate.
Step 10: Repeat and Store
Continue with remaining batter, working in small batches. Once cooled, store tuiles in an airtight container at room temperature with parchment paper between layers to prevent breaking.
Notes
- Temperature matters: Work with room temperature egg whites for smoother batter
- Don’t rush the spreading: Take time to spread batter very thin for the crispiest results
- Work fast when shaping: You have only 30-60 seconds to shape each cookie after baking
- Humidity is the enemy: Store in an airtight container with a small packet of silica gel if you live in a humid climate
- Batter can be refrigerated: Make batter up to 2 days ahead; bring to room temperature before using
- Consistent size matters: Use a tablespoon measure for even-sized cookies that bake uniformly
Nutrition
- Serving Size: 1 tuile Calories
- Calories: 45
- Sugar: 6g
- Sodium: 10mg
- Fat: 2g
- Saturated Fat: 1g
- Unsaturated Fat: 1g
- Trans Fat: 0g
- Carbohydrates: 7g
- Fiber: 0g
- Protein: 1g
- Cholesterol: 5mg
Find it online: https://focialy.com/tuiles-recipe/