Ube Cake Recipe
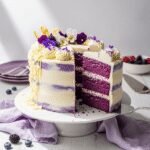
This stunning ube cake features moist, tender purple yam-flavored layers topped with tangy cream cheese frosting. A Filipino-inspired dessert that’s perfect for celebrations and guaranteed to impress with its gorgeous natural purple color and unique, delicious flavor.
- Prep Time: 25 minutes
- Cook Time: 30 minutes
- Total Time: 55 minutes (plus cooling and frosting time)
- Yield: 12-14 servings 1x
- Category: Dessert
- Method: Baking
- Cuisine: Filipino-American
- Diet: Vegetarian
Ingredients
For the Ube Cake:
- 2¾ cups all-purpose flour
- 2½ teaspoons baking powder
- ½ teaspoon baking soda
- ½ teaspoon salt
- 1 cup unsalted butter, softened to room temperature
- 2 cups granulated sugar
- 4 large eggs, room temperature
- 1 cup ube halaya (purple yam jam)
- 1 tablespoon ube extract (optional, for enhanced color and flavor)
- 1½ teaspoons vanilla extract
- 1¼ cups buttermilk, room temperature
For the Cream Cheese Frosting:
- 16 ounces cream cheese, softened to room temperature
- 1 cup unsalted butter, softened to room temperature
- 6 cups powdered sugar, sifted
- 2 teaspoons vanilla extract
- ¼ cup ube halaya (optional, for purple-tinted frosting)
- 2-3 tablespoons heavy cream, if needed for consistency
- Pinch of salt
For Decoration (Optional):
- White chocolate shavings
- Edible flowers
- Fresh berries
- Purple sprinkles
Instructions
Prepare Your Pans:
- Preheat your oven to 350°F (175°C). Grease three 8-inch or 9-inch round cake pans with butter or non-stick spray, then line the bottoms with parchment paper circles. Grease the parchment paper as well. This double-greasing ensures your cakes will release perfectly.
Mix Dry Ingredients: 2. In a large bowl, whisk together the flour, baking powder, baking soda, and salt until well combined. Set this mixture aside. Sifting these dry ingredients together ensures even distribution of the leavening agents.
Cream Butter and Sugar: 3. In your stand mixer bowl (or large mixing bowl if using a hand mixer), beat the softened butter on medium speed for about 2 minutes until it’s creamy and smooth. Gradually add the sugar and continue beating for 4-5 minutes until the mixture is light, fluffy, and pale in color. This creaming process incorporates air, which helps create a light, tender cake.
Add Eggs and Ube: 4. Add the eggs one at a time, beating well after each addition (about 30 seconds per egg). Scrape down the sides of the bowl as needed. Mix in the ube halaya, ube extract (if using), and vanilla extract until fully incorporated. The batter will turn a beautiful purple color.
Alternate Wet and Dry: 5. With your mixer on low speed, add the flour mixture in three additions, alternating with the buttermilk in two additions. Begin and end with the flour mixture. The pattern should be: flour, buttermilk, flour, buttermilk, flour. Mix just until combined after each addition—overmixing can create a tough, dense cake.
Final Mix: 6. Once all ingredients are added, give the batter a few final stirs with a rubber spatula, scraping the bottom and sides of the bowl to ensure everything is evenly mixed. The batter should be smooth, thick, and gorgeously purple.
Divide and Bake: 7. Divide the batter evenly among your three prepared pans (I recommend using a kitchen scale for precision—each pan should have about 550-600 grams of batter). Smooth the tops with your spatula and gently tap the pans on the counter 2-3 times to release any air bubbles.
Bake the Cakes: 8. Bake for 28-32 minutes, or until a toothpick inserted into the center comes out with just a few moist crumbs (not wet batter). The cakes should spring back when lightly pressed, and the edges should just start pulling away from the pan sides.
Cool Completely: 9. Let the cakes cool in their pans on wire racks for 15 minutes. Then carefully run a knife around the edges and invert the cakes onto the racks. Peel off the parchment paper and let the cakes cool completely—this is crucial! Frosting warm cakes will cause the frosting to melt.
Make the Frosting: 10. While the cakes cool, prepare your cream cheese frosting. Beat the softened cream cheese and butter together on medium speed for 3-4 minutes until completely smooth, fluffy, and no lumps remain.
Add Powdered Sugar: 11. Reduce mixer speed to low and gradually add the sifted powdered sugar, one cup at a time, mixing well after each addition. Add the vanilla extract, salt, and ube halaya if using. Once incorporated, increase speed to medium-high and beat for 2-3 minutes until light and fluffy. If the frosting is too thick, add heavy cream one tablespoon at a time until you reach your desired consistency.
Level the Cakes: 12. Once cakes are completely cool, use a serrated knife or cake leveler to trim any domed tops, creating flat, level surfaces. This ensures your cake layers stack beautifully and evenly.
Assemble the Cake: 13. Place your first cake layer on your serving plate or cake stand. If you’re worried about mess, tuck strips of parchment paper under the edges (you’ll remove these later). Spread about 1 cup of frosting evenly over the top, going all the way to the edges.
Add Second Layer: 14. Place the second cake layer on top, gently pressing down to adhere. Add another cup of frosting and spread evenly.
Add Final Layer: 15. Place the third cake layer on top, bottom-side up (for the flattest surface). Press gently.
Crumb Coat: 16. Apply a thin layer of frosting all over the cake—top and sides. This “crumb coat” seals in the crumbs. Refrigerate for 30 minutes until the frosting is firm.
Final Frosting: 17. Apply your final, generous layer of frosting over the chilled crumb coat. Use your offset spatula to create smooth sides and top, or create decorative swirls. Get creative with your design!
Decorate: 18. Add your chosen decorations—white chocolate shavings, edible flowers, fresh berries, or purple sprinkles all look stunning on ube cake.
Chill and Serve: 19. Refrigerate the cake for at least 1-2 hours before serving to allow the frosting to set and the flavors to meld. Remove from the refrigerator 30 minutes before serving for the best texture and flavor.
Notes
- Room temperature ingredients are crucial: Cold eggs and buttermilk can cause the batter to curdle and affect the cake’s texture. Set these out 1-2 hours before baking.
- Don’t overmix: Once you add the flour, mix just until combined. Overmixing develops gluten, creating a tough cake.
- Proper measuring matters: Spoon flour into your measuring cup and level off with a knife, or weigh it (2¾ cups = 345 grams). Scooping directly from the bag packs in too much flour.
- Test for doneness: Start checking at 28 minutes. Overbaking creates dry cake, so it’s better to check early.
- Frosting consistency: The frosting should be spreadable but hold its shape. If it’s too soft, chill for 15 minutes. If too stiff, add more cream.
- Make it extra purple: For deeper color, add 1-2 drops of purple gel food coloring to the batter or frosting.
Nutrition
- Serving Size: 1 slice (based on 14 servings)
- Calories: 645
- Sugar: 68g
- Sodium: 285mg
- Fat: 32g
- Saturated Fat: 20g
- Unsaturated Fat: 10g
- Trans Fat: 0g
- Carbohydrates: 85g
- Fiber: 1g
- Protein: 6g
- Cholesterol: 135mg
Find it online: https://focialy.com/ube-cake-recipe/