Ube Halaya Recipe
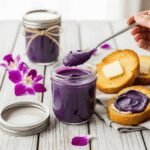
This authentic Filipino ube halaya features silky-smooth purple yam transformed into a rich, sweet spread perfect for toast, desserts, or enjoying by the spoonful. Made with coconut milk, condensed milk, and real ube for that stunning natural purple color.
- Prep Time: 30 minutes (plus 1 hour if cooking fresh ube)
- Cook Time: 1 hour 30 minutes
- Total Time: 2 hours (or 3 hours with fresh ube prep)
- Yield: 12 servings (about 3 cups) 1x
- Category: Dessert, Spread, Condiment
- Method: Stovetop
- Cuisine: Filipino
- Diet: Vegetarian
Ingredients
Scale
- 2 pounds fresh ube (purple yam), peeled and cubed, or 2 pounds frozen grated ube, thawed
- 1 can (13.5 oz) full-fat coconut milk
- 1 can (14 oz) sweetened condensed milk
- 1 can (12 oz) evaporated milk
- 1 cup granulated sugar (adjust to taste)
- 4 tablespoons unsalted butter, divided
- 1 teaspoon vanilla extract (optional)
- Pinch of salt
Instructions
- Prepare the ube: If using fresh ube, place cubed ube in a large pot, cover with water, and boil for 20-30 minutes until fork-tender. Drain and let cool slightly. Mash thoroughly with a potato masher or pass through a ricer for smooth texture. If using frozen grated ube, simply thaw and proceed.
- Blend for smoothness: Transfer the cooked and mashed ube (or thawed frozen ube) to a blender or food processor. Add half of the coconut milk and blend until completely smooth with no lumps remaining. This step is crucial for that signature silky texture.
- Combine ingredients: In a large heavy-bottomed pot or wok, combine the blended ube mixture, remaining coconut milk, condensed milk, evaporated milk, sugar, and a pinch of salt. Stir well to combine all ingredients thoroughly.
- Begin cooking: Place the pot over medium heat and bring the mixture to a gentle simmer, stirring constantly with a wooden spoon or sturdy spatula. The mixture will be quite liquid at first—this is normal.
- The long stir: Reduce heat to medium-low and continue cooking, stirring constantly in a figure-eight motion to prevent sticking and burning. This process takes 60-90 minutes. The mixture will gradually thicken and darken to a deep purple color. Your arm will get a workout, but this constant stirring is what creates the perfect texture.
- Test for doneness: The ube halaya is ready when it pulls away from the sides of the pot, has a thick jam-like consistency, and becomes difficult to stir. It should coat the back of your spoon thickly. Remember, it will thicken further as it cools.
- Add butter and vanilla: Remove from heat and stir in 3 tablespoons of butter and vanilla extract (if using) until fully incorporated. The butter adds richness and beautiful shine.
- Cool and store: Grease a glass dish or container with the remaining tablespoon of butter to prevent sticking. Transfer the hot ube halaya into the prepared container and smooth the top. Let it cool to room temperature, then cover and refrigerate.
- Serve and enjoy: Once chilled, the ube halaya will firm up beautifully. Serve as desired—spread on toast, swirl into ice cream, use as a cake filling, or enjoy straight from the jar!
Notes
- The cooking time can vary depending on your stove and pot size. Be patient—rushing this process leads to lumpy or unevenly cooked halaya.
- If the mixture seems to be cooking too fast or sticking, reduce the heat slightly.
- For an even smoother texture, strain the blended ube mixture through a fine-mesh strainer before cooking.
- The halaya will appear lighter in color when hot and will darken as it cools and sets.
- Store in sterilized glass jars for gifting—it keeps for 2-3 weeks refrigerated when properly sealed.
Nutrition
- Serving Size: ¼ cup (about 60g)
- Calories: 245
- Sugar: 28g
- Sodium: 85mg
- Fat: 9g
- Saturated Fat: 7g
- Unsaturated Fat: 1.5g
- Trans Fat: 0g
- Carbohydrates: 38g
- Fiber: 2g
- Protein: 4g
- Cholesterol: 15mg
Find it online: https://focialy.com/ube-halaya-recipe/