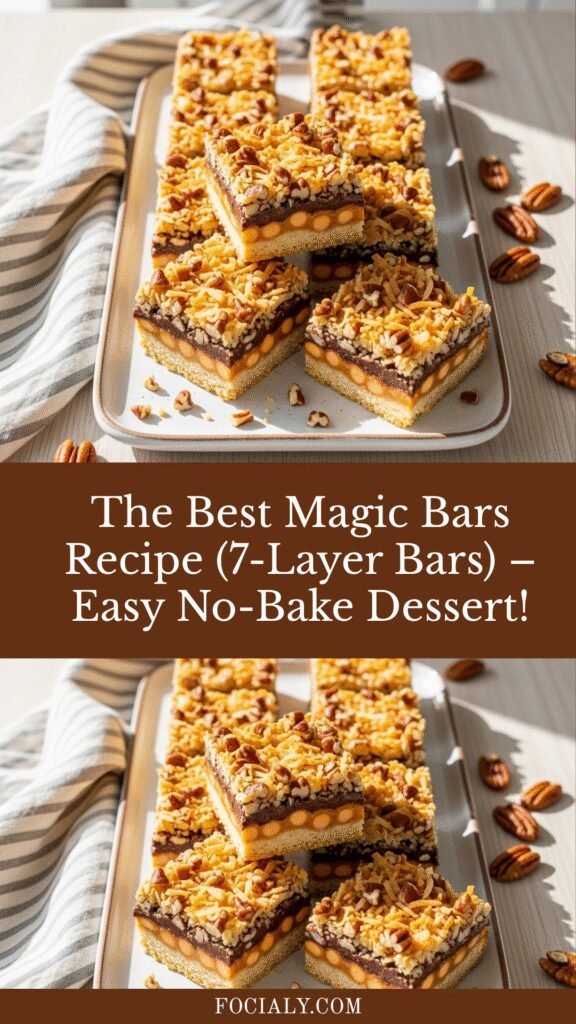
The Best Magic Bars Recipe (7-Layer Bars) – Easy No-Bake Dessert!
If you’re looking for a dessert that’s ridiculously easy, crowd-pleasing, and absolutely irresistible, let me introduce you to Magic Bars! These heavenly treats are also known as Seven-Layer Bars or Hello Dolly Bars, and they’re about to become your go-to recipe for potlucks, bake sales, holiday gatherings, and weeknight sweet cravings.
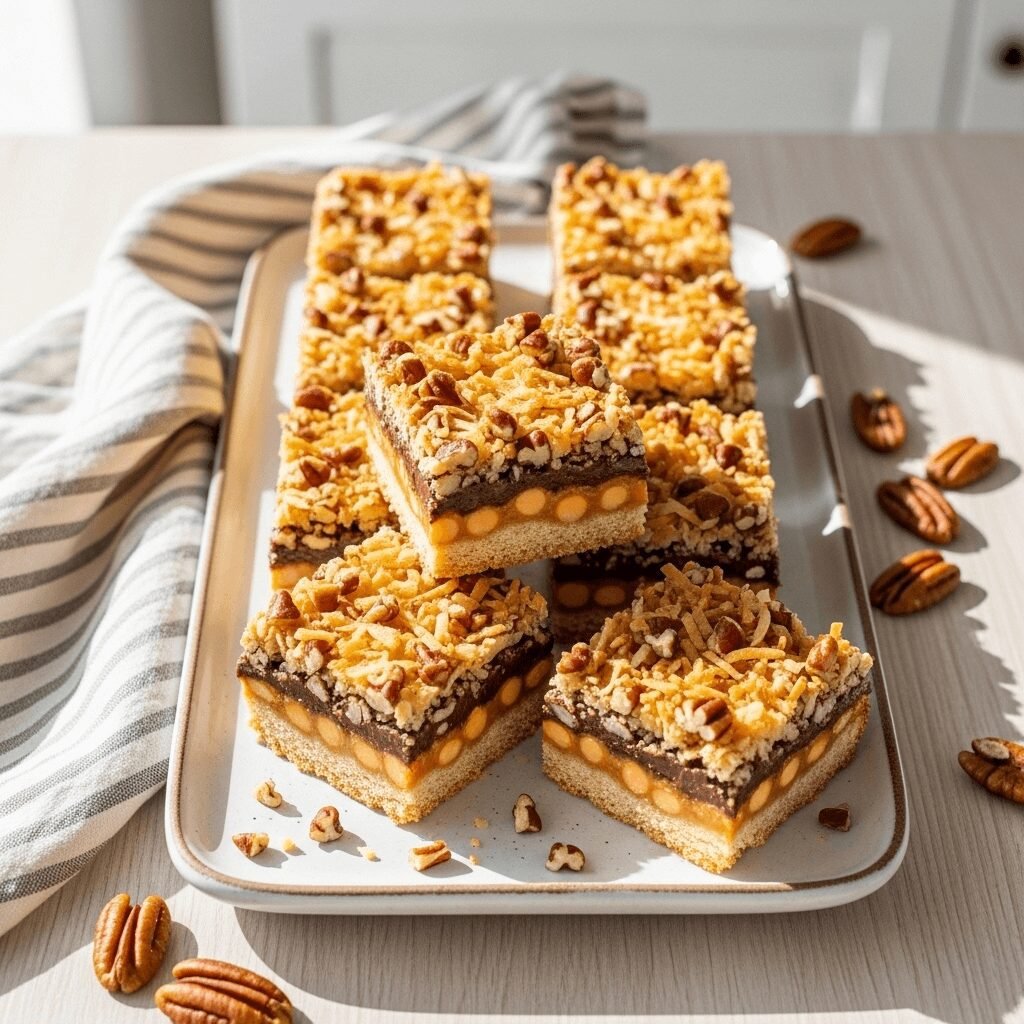
What makes these bars truly magical? They require minimal effort—no mixer, no fancy techniques, just layer, bake, and devour. With a buttery graham cracker crust topped with chocolate chips, butterscotch chips, shredded coconut, and chopped pecans, all held together with sweetened condensed milk, these bars deliver an explosion of flavor and texture in every single bite. They’re chewy, crunchy, sweet, and absolutely addictive.
Magic Bars are perfect for busy home cooks who want impressive results without spending hours in the kitchen. Whether you’re bringing dessert to a church potluck, feeding a crowd at a birthday party, or simply treating your family to something special, these bars deliver every single time. The best part? You can customize them endlessly with your favorite mix-ins, making them truly your own signature dessert.
History / Background
Magic Bars have a fascinating history rooted in American home baking tradition. These beloved treats first gained popularity in the 1960s when Eagle Brand Sweetened Condensed Milk began printing the recipe on their cans. The marketing genius behind this move transformed a simple pantry staple into a household necessity, and Magic Bars became a staple of American dessert culture.
The original recipe was called “Magic Cookie Bars” by Eagle Brand, though they’ve been affectionately known by many names over the decades—Seven-Layer Bars (referring to the multiple layers of goodness), Hello Dolly Bars (particularly popular in the South), and even Dream Bars in some regions. The “magic” in the name comes from how these simple ingredients transform into something absolutely spectacular with minimal effort. There’s truly something magical about how the sweetened condensed milk seeps through all the layers, binding everything together into chewy, gooey perfection.
During the 1970s and 1980s, Magic Bars became a staple at church bake sales, school functions, and community gatherings across America. They represented the epitome of convenience baking—affordable ingredients, foolproof method, and universally loved results. Mothers passed the recipe to daughters, and it became one of those cherished family traditions that transcends generations.
Today, Magic Bars remain just as popular, with countless variations appearing on food blogs and Pinterest boards. While the classic recipe is still beloved, creative bakers have developed versions featuring different chips, nuts, and even seasonal ingredients like pumpkin spice or peppermint. Despite these modern twists, the original combination remains the gold standard for a reason—it’s simply perfect.
Why You’ll Love This Recipe
Magic Bars are the ultimate dessert for anyone who loves big flavor with minimal effort. These bars deliver restaurant-quality results that’ll have everyone asking for the recipe, but they’re actually one of the easiest desserts you’ll ever make. No complicated steps, no special skills required—just layer and bake!
Here’s why this recipe will become your new favorite:
- Incredibly Easy – No mixer needed, no dough to roll, no complicated techniques. If you can layer ingredients, you can make these bars!
- Ready in 35 Minutes – From start to finish, including baking time, you’ll have a complete dessert ready in about half an hour (plus cooling time).
- Crowd-Pleaser – I’ve never met anyone who doesn’t love Magic Bars. They’re universally adored by kids and adults alike.
- Highly Customizable – Swap chips, change nuts, add dried fruit—these bars are your canvas for creativity.
- Perfect for Gifting – Cut them into pretty squares, wrap them up, and you have beautiful homemade gifts.
- Budget-Friendly – Made with affordable pantry staples, this recipe won’t break the bank.
- No-Mixer Required – Save yourself the cleanup! This entire recipe comes together with just your hands and a spatula.
- Feeds a Crowd – One 9×13 pan yields about 24 generous bars, perfect for parties and gatherings.
- Make-Ahead Friendly – These bars actually taste better the next day, making them ideal for advance preparation.
Ingredient Notes
Let’s talk about what makes these bars so incredibly delicious. Each ingredient plays a crucial role in creating that signature Magic Bar texture and flavor.
Graham Cracker Crumbs – The foundation of your bars! Graham crackers create a sweet, slightly honeyed crust that holds everything together. You can buy pre-made crumbs or make your own by crushing whole crackers. I actually prefer crushing my own because the texture is slightly coarser, which creates better structure. If you can’t find graham crackers, digestive biscuits or vanilla wafer crumbs work beautifully as substitutes.
Butter – Use real butter, not margarine. Butter provides rich flavor and helps bind the crust together. Melted butter mixed with graham cracker crumbs creates that classic pressed crust. I always use unsalted butter so I can control the salt level in the recipe.
Sweetened Condensed Milk – This is the true magic ingredient! Sweetened condensed milk is thick, sweet, and incredibly sticky. As it bakes, it seeps down through all the layers, creating that characteristic chewy, gooey texture that holds everything together. Make sure you use sweetened condensed milk, NOT evaporated milk—they’re completely different products and not interchangeable.
Semi-Sweet Chocolate Chips – Chocolate chips add pockets of melty chocolate goodness throughout the bars. Semi-sweet balances the overall sweetness, but you can use milk chocolate for a sweeter result or dark chocolate for a more sophisticated flavor.
Butterscotch Chips – These add a caramel-like richness that’s absolutely divine. The butterscotch flavor pairs beautifully with chocolate and coconut. If you’re not a butterscotch fan, you can substitute with peanut butter chips, white chocolate chips, or even more chocolate chips.
Sweetened Shredded Coconut – Coconut adds tropical sweetness and wonderful chewy texture. The flakes toast slightly as they bake, adding nutty flavor. Use sweetened coconut for best results, but if you prefer less sweetness, unsweetened coconut works too—just know your bars will be less sweet overall.
Pecans or Walnuts – Nuts provide crunchy contrast and buttery richness. Pecans are traditional and have a sweeter, more delicate flavor, while walnuts offer a slightly earthier taste. Toast your nuts before adding them for even more depth of flavor! If you have nut allergies, simply omit them or substitute with sunflower seeds.
Equipment Needed
The beauty of Magic Bars is that you need very little specialized equipment. Here’s what you’ll use:
- 9×13-inch Baking Pan – This is the standard size for this recipe. A metal or glass pan works equally well.
- Parchment Paper or Aluminum Foil – Lining your pan makes removal SO much easier and cleanup a breeze.
- Medium Saucepan or Microwave-Safe Bowl – For melting the butter.
- Measuring Cups and Spoons – For accurate measurements.
- Mixing Bowl – For combining the graham cracker crumbs and butter.
- Spatula – For spreading and smoothing layers.
- Sharp Knife – For cutting the cooled bars into perfect squares.
- Cooling Rack – Allows air circulation for even cooling.
Magic Bars Recipe

These classic Magic Bars (Seven-Layer Bars) feature a buttery graham cracker crust topped with chocolate chips, butterscotch chips, coconut, and pecans, all bound together with sweetened condensed milk. They’re incredibly easy, perfectly sweet, and absolutely irresistible!
- Prep Time: 10 minutes
- Cook Time: 25 minutes
- Total Time: 35 minutes (plus 2 hours cooling time)
- Yield: 24 bars 1x
- Category: Dessert
- Method: Baking
- Cuisine: American
- Diet: Vegetarian
Ingredients
For the Crust:
- 2 cups (about 16 whole crackers) graham cracker crumbs
- ½ cup (1 stick) unsalted butter, melted
For the Topping:
- 1 (14-ounce) can sweetened condensed milk
- 1½ cups semi-sweet chocolate chips
- 1½ cups butterscotch chips
- 1⅓ cups sweetened shredded coconut
- 1 cup chopped pecans or walnuts, lightly toasted
Instructions
Step 1: Prepare Your Pan
Preheat your oven to 350°F (175°C). Line a 9×13-inch baking pan with parchment paper, leaving overhang on the sides for easy removal later. You can also use aluminum foil sprayed with nonstick cooking spray. This step is crucial for easy cleanup and perfect bar removal!
Step 2: Make the Crust
In a medium bowl, combine the graham cracker crumbs and melted butter. Stir with a fork until the mixture resembles wet sand and all the crumbs are evenly moistened. The mixture should hold together when pressed. Pour this mixture into your prepared pan and press firmly into an even layer across the entire bottom. Use the bottom of a measuring cup or your hands to really pack it down—a firm crust prevents it from crumbling later.
Step 3: Layer the Chocolate Chips
Sprinkle the semi-sweet chocolate chips evenly over the graham cracker crust. Try to distribute them uniformly so every bar gets plenty of chocolate. Don’t press them down—just let them sit on top of the crust.
Step 4: Add the Butterscotch Chips
Sprinkle the butterscotch chips evenly over the chocolate chips. Again, distribute them evenly for consistent flavor in every bite.
Step 5: Add the Coconut
Sprinkle the shredded coconut in an even layer over the chips. The coconut will toast slightly during baking, adding wonderful flavor and texture.
Step 6: Add the Nuts
Scatter the chopped pecans or walnuts evenly over the coconut layer. If you toasted your nuts beforehand (highly recommended!), make sure they’ve cooled before adding them.
Step 7: Pour the Sweetened Condensed Milk
Here comes the magic! Open your can of sweetened condensed milk and pour it evenly over the entire surface of your layered bars. Start from one corner and drizzle back and forth, trying to cover as much surface area as possible. Use a spoon to help spread it if needed, but don’t worry about getting every single spot—the milk will spread as it bakes. The key is to distribute it relatively evenly so all areas get that wonderful gooey texture.
Step 8: Bake
Place the pan in your preheated oven and bake for 25-28 minutes, or until the top is golden brown and the edges are bubbling. The bars should look set but will still be a bit jiggly in the center—that’s perfect! They’ll firm up as they cool. Keep an eye on the coconut; if it’s browning too quickly, you can tent the pan with foil for the last 5 minutes of baking.
Step 9: Cool Completely
This is the hardest part—waiting! Remove the pan from the oven and place it on a cooling rack. Let the bars cool in the pan for at least 2 hours, or until completely cooled to room temperature. For cleaner cuts, you can refrigerate them for 1 hour after they’ve cooled to room temperature. The bars need this time to set properly; cutting them too early will result in messy, gooey pieces (though admittedly still delicious!).
Step 10: Cut and Serve
Once completely cooled, use the parchment paper overhang to lift the entire block of bars out of the pan and onto a cutting board. Use a large, sharp knife to cut into 24 squares (6 rows by 4 rows). For the cleanest cuts, wipe your knife clean between each cut. Serve and watch them disappear!
Notes
- Make sure to press the crust firmly – A well-packed crust holds together better and provides better structure for the layers above.
- Don’t skip the cooling time – Patience is essential! Properly cooled bars cut much more cleanly and have better texture.
- Storage matters – Store bars in an airtight container at room temperature for up to 5 days, or refrigerate for up to 2 weeks.
- Customize freely – Feel free to swap out chips or nuts based on your preferences or what you have on hand.
- Line your pan – This single step makes removal and cleanup exponentially easier!
Serving Size: 1 bar (1/24 of recipe)
Calories: 245
Sugar: 24g
Sodium: 85mg
Fat: 14g
Saturated Fat: 7g
Unsaturated Fat: 6g
Nutrition
- Serving Size: 1 bar (1/24 of recipe)
- Calories: 245
- Sugar: 24g
- Sodium: 85mg
- Fat: 14g
- Saturated Fat: 7g
- Unsaturated Fat: 6g
- Trans Fat: 0g
- Carbohydrates: 29g
- Fiber: 2g
- Protein: 3g
- Cholesterol: 15mg
Note: Nutritional information is approximate and will vary based on specific brands and ingredients used.
Tips & Variations
Magic Bars are wonderfully versatile! Here are some delicious ways to customize them:
Flavor Variations:
- Peanut Butter Magic Bars – Replace butterscotch chips with peanut butter chips and use peanuts instead of pecans
- Triple Chocolate – Use all chocolate chips (semi-sweet, milk, and white chocolate) and omit butterscotch
- S’mores Magic Bars – Add mini marshmallows in the last 5 minutes of baking and use milk chocolate chips
- Tropical Paradise – Add dried pineapple and macadamia nuts, and increase coconut to 2 cups
- Turtle Magic Bars – Add chopped soft caramels between layers and use pecans
- Mint Chocolate – Use mint chocolate chips and add a bit of peppermint extract to the crust
- Pumpkin Spice – Add ½ teaspoon pumpkin pie spice to the graham cracker crust during fall
Dietary Modifications:
- Gluten-Free – Use gluten-free graham crackers or crushed gluten-free cookies for the crust
- Nut-Free – Omit nuts entirely or substitute with roasted sunflower seeds
- Less Sweet – Use unsweetened coconut and dark chocolate chips to reduce overall sweetness
- Vegan – Use vegan butter, coconut condensed milk, and dairy-free chips (though results may vary slightly in texture)
Pro Chef Tips
Want your Magic Bars to turn out absolutely perfect every time? Here are my professional insights:
Toast Your Nuts First – This extra step takes just 5 minutes but adds incredible depth of flavor. Toast pecans or walnuts in a 350°F oven for 5-7 minutes until fragrant. Let them cool completely before adding to your bars. The toasting brings out natural oils and intensifies the nutty flavor dramatically.
Press the Crust Firmly and Evenly – Use the bottom of a flat-bottomed measuring cup or glass to press the graham cracker crust very firmly into the pan. Pay special attention to the corners and edges. A well-compacted crust provides better structure and won’t crumble when you cut the bars. If your crust is too loose, the bars may fall apart when served.
Room Temperature Sweetened Condensed Milk Spreads Better – If your sweetened condensed milk has been stored in the refrigerator, let it come to room temperature before using. Cold condensed milk is very thick and difficult to pour evenly. Room temperature milk flows more easily and distributes more uniformly over the layers.
Create Strategic Sweetened Condensed Milk Coverage – When pouring the condensed milk, start at one corner and work in a zigzag pattern across the entire pan. Don’t worry about covering every millimeter—as the bars bake, the milk will spread and seep down through the layers. However, try to get reasonable coverage over the entire surface for the most consistent results.
Use Parchment with Overhang – Line your pan with parchment paper that extends up the sides and over the edges by at least 2 inches. This creates handles that allow you to lift the entire block of bars out of the pan for clean, professional-looking cuts. Trust me, this makes serving so much easier!
Cool Completely Before Cutting – I cannot stress this enough! Magic Bars need at least 2 hours to cool and set properly. The sweetened condensed milk needs time to firm up and bind all the layers together. For the cleanest cuts, refrigerate for an hour after they’ve cooled to room temperature. Cold bars cut much more cleanly than room-temperature ones.
Wipe Your Knife Between Cuts – For bakery-quality presentation, wipe your knife clean with a damp towel between each cut. This prevents dragging chocolate and coconut from one bar to another and creates clean, professional edges.
Rotate Pan Halfway Through Baking – Ovens have hot spots, so rotating your pan 180 degrees at the halfway point ensures even baking and prevents one side from browning more than the other.
Common Mistakes to Avoid
Even though Magic Bars are incredibly simple, a few common pitfalls can affect your results. Here’s what to watch out for:
Mistake #1: Using Evaporated Milk Instead of Sweetened Condensed Milk – These are NOT interchangeable! Evaporated milk is unsweetened and much thinner; it won’t create the signature gooey texture. Always use sweetened condensed milk. The can should be thick, sweet, and sticky—if you can pour it easily, it’s the wrong product.
Mistake #2: Cutting the Bars Too Soon – This is the most common mistake! If you cut into the bars while they’re still warm, they’ll be gooey, messy, and won’t hold their shape. The bars need at least 2 hours to cool and set properly. For best results, let them cool completely at room temperature, then refrigerate for an hour before cutting. Your patience will be rewarded with clean, beautiful bars that hold together perfectly.
Mistake #3: Not Pressing the Crust Firmly Enough – A loosely packed crust will crumble when you try to cut and serve the bars. Take the time to really press that graham cracker mixture firmly and evenly into the pan. Use significant pressure—you want it compact and solid. Think of it like pressing a pie crust.
Mistake #4: Uneven Layer Distribution – If your chocolate chips are all piled in one area or your nuts are clustered together, you’ll have inconsistent bars where some pieces are loaded with goodies and others are sparse. Take an extra minute to distribute each layer evenly across the entire surface. Every bar should have a good balance of all the ingredients.
Mistake #5: Overbaking – Magic Bars should be baked just until the edges are bubbly and the top is lightly golden. If you overbake them, the coconut can burn and the bars will be dry instead of chewy and gooey. Set a timer and start checking at 25 minutes. The center should still look slightly underdone when you remove them from the oven—they’ll continue to set as they cool.
Mistake #6: Skipping the Pan Liner – I cannot emphasize enough how much easier parchment paper or foil makes this recipe. Without it, you’ll struggle to remove the bars cleanly from the pan, and your first few servings will be mangled messes. Always line your pan!
Storage & Meal Prep
Magic Bars store beautifully, making them perfect for make-ahead desserts, gifts, or batch baking.
Room Temperature Storage: Store Magic Bars in an airtight container at room temperature for up to 5 days. Layer parchment paper between stacks to prevent sticking. They’ll stay chewy and delicious, though the texture may become slightly more firm as the days pass. Keep them away from direct sunlight and heat sources.
Refrigerator Storage: For longer storage, refrigerate Magic Bars in an airtight container for up to 2 weeks. The cooler temperature actually enhances the chewy texture, and many people prefer them chilled! Let them sit at room temperature for 10-15 minutes before serving if you prefer them less cold. The chocolate chips will be more firm when cold but will soften as they warm up.
Room Temperature vs. Refrigerated: Both storage methods work well, but there’s a textural difference. Room temperature bars are softer and chewier, while refrigerated bars are firmer and more dense. Try both and see which you prefer!
Reheating: While Magic Bars are typically enjoyed at room temperature or chilled, you can warm individual bars in the microwave for 10-15 seconds if you’d like to enjoy them warm with melty chocolate. They’re absolutely divine served slightly warm with a scoop of vanilla ice cream!
Make-Ahead & Freezer Notes
Magic Bars are fantastic for advance preparation, making them ideal for stress-free entertaining.
Make-Ahead Instructions: You can prepare Magic Bars 3-4 days in advance. In fact, they often taste even better after sitting for a day, as all the flavors have time to meld together. Make them, let them cool completely, cut them, and store in an airtight container at room temperature or in the refrigerator. This is perfect for holiday baking or preparing desserts for parties and gatherings.
Freezing Whole Pan: After baking and cooling completely, you can freeze the entire uncut block of bars. Wrap the cooled bars (still in the pan or lifted out) tightly in plastic wrap, then wrap again in aluminum foil or place in a freezer-safe bag. Freeze for up to 3 months. Thaw overnight in the refrigerator or at room temperature for several hours before cutting and serving.
Freezing Individual Bars: For ultimate convenience, cut the bars after they’ve cooled, then wrap each bar individually in plastic wrap or parchment paper. Place all wrapped bars in a large freezer-safe bag or container. This method allows you to grab individual bars as needed—perfect for packing lunches or enjoying a quick treat. Individual bars thaw in about 30 minutes at room temperature.
Best Thawing Method: For best texture and flavor, thaw frozen Magic Bars in the refrigerator overnight, then bring to room temperature before serving. If you’re in a hurry, you can let them sit at room temperature for 2-3 hours. Avoid microwaving frozen bars to thaw them, as this can make them soggy and affect the texture.
Pro Tip for Freezing: Magic Bars freeze exceptionally well because of the sweetened condensed milk, which helps maintain moisture and prevents freezer burn. They taste just as fresh after freezing as they did the day you made them!
Serving Suggestions
Magic Bars are delicious on their own, but here are some wonderful ways to serve them:
Classic Presentation: Cut into perfect squares and arrange on a pretty platter or cake stand. Dust lightly with powdered sugar for an elegant touch. They’re beautiful enough to serve at any gathering just as they are!
With Ice Cream: Serve slightly warm Magic Bars with a scoop of vanilla ice cream for an incredible dessert. The warm, gooey bars paired with cold, creamy ice cream create amazing textural contrast. Caramel or dulce de leche ice cream is also phenomenal with these bars.
Coffee Time: Magic Bars pair beautifully with coffee or espresso. The sweetness of the bars complements the bitterness of coffee perfectly, making them ideal for an afternoon coffee break or after-dinner treat.
With Whipped Cream: A dollop of fresh whipped cream and a drizzle of chocolate sauce transforms these bars into an elegant plated dessert. Add a few fresh berries for color and a restaurant-quality presentation.
Tea Party Dessert: Cut the bars into smaller bite-sized pieces (cut each regular bar in half) for a perfect tea party or shower dessert. They’re easy to eat with your fingers and look lovely arranged on a tiered stand with other small desserts.
Gift Giving: Wrap individual bars in cellophane bags tied with ribbon for beautiful homemade gifts. Package several bars in a decorative tin or box for teachers, neighbors, or hostess gifts. Include the recipe card so recipients can make their own!
Dessert Boards: Include Magic Bars on a dessert charcuterie board alongside fresh fruit, chocolate-covered strawberries, cookies, and other sweet treats. They add wonderful variety in both flavor and texture.
FAQs Section
Q: Can I make Magic Bars without nuts?
A: Absolutely! Simply omit the nuts entirely, or substitute with roasted sunflower seeds or pepitas (pumpkin seeds) for crunch without tree nuts. The bars will still be delicious and hold together perfectly. Many people make nut-free versions for school events or those with allergies.
Q: Why are my Magic Bars falling apart when I cut them?
A: The most common reason is cutting them too soon before they’ve completely cooled and set. The sweetened condensed milk needs at least 2 hours to firm up properly. Additionally, make sure you pressed the graham cracker crust firmly enough—a loose crust leads to crumbly bars. For the cleanest cuts, refrigerate the cooled bars for an hour before cutting.
Q: Can I use a different size pan?
A: The 9×13-inch pan is really ideal for this recipe, as it creates bars with the perfect thickness and ratio of crust to topping. However, you can use an 8×8-inch or 9×9-inch pan if you’re making a smaller batch—just cut the recipe in half and reduce baking time by about 5 minutes. For thicker bars, you can use a 9×9-inch pan with the full recipe, but increase baking time by 5-8 minutes.
Q: Can I make these gluten-free?
A: Yes! Simply substitute gluten-free graham crackers for the regular graham crackers. Kinnikinnick and Pamela’s both make excellent gluten-free graham crackers that work perfectly in this recipe. Everything else in the recipe is naturally gluten-free, so this is an easy substitution.
Q: My sweetened condensed milk didn’t cover all the layers. Is that okay?
A: Yes, that’s completely normal and fine! The condensed milk doesn’t need to cover every inch of the surface. As the bars bake, it will spread, seep down through all the layers, and distribute itself throughout the bars. Don’t worry if you see some dry spots on top—the magic happens during baking.
Q: Can I add other ingredients to Magic Bars?
A: Absolutely! Magic Bars are incredibly versatile. Popular additions include: dried cranberries or cherries, toffee bits, M&Ms, white chocolate chips, different types of nuts, shredded sweetened or unsweetened coconut varieties, or even a layer of caramel. Just keep the total amount of mix-ins roughly the same as the original recipe so the bars set properly.
Q: How do I know when the bars are done baking?
A: Magic Bars are done when the edges are bubbly and golden brown, and the top looks set but might still be slightly jiggly in the center. The coconut should be lightly toasted and golden. Start checking at 25 minutes—overbaking will make them dry. Remember, they continue to set as they cool, so it’s better to slightly underbake than overbake.
Q: Why are they called “Magic Bars”?
A: They’re called Magic Bars because of how magically simple they are to make—no mixing, no complex steps, just layer and bake—and how the sweetened condensed milk magically binds everything together into cohesive, delicious bars. It’s also partly marketing magic from Eagle Brand, who popularized the recipe!
Conclusion
There you have it—the ultimate guide to making perfect Magic Bars! These seven-layer wonders truly live up to their name, delivering maximum flavor and satisfaction with minimal effort. Whether you’re a busy parent looking for a quick dessert, a beginning baker building confidence, or an experienced home cook seeking a crowd-pleasing treat, Magic Bars deliver every single time.
The beauty of this recipe lies in its simplicity and versatility. The classic combination of chocolate, butterscotch, coconut, and pecans bound together with sweetened condensed milk is absolutely timeless, but don’t be afraid to make these bars your own! Experiment with different chips, nuts, and add-ins until you create your signature version.
I hope this recipe becomes a staple in your household like it has in mine. There’s something special about a dessert that brings people together, and Magic Bars have a way of doing exactly that. They’re the bars that disappear first at potlucks, the dessert everyone requests for birthdays, and the sweet treat that creates lasting memories.
Now it’s your turn to experience the magic! Gather your ingredients, preheat that oven, and get ready to fall in love with the easiest, most delicious bars you’ll ever make. Your friends and family will think you spent hours in the kitchen—but we’ll know it only took minutes.
Ready to make Magic Bars? Pin this recipe to your dessert board so you’ll have it whenever a craving strikes! Drop a comment below and let me know how yours turned out—I love hearing from you! And if you make any fun variations, I’d love to hear about those too. Happy baking! 🍫🥥✨