The Best Classic Lemon Tart Recipe – Silky, Tangy & Simply Divine

There’s something absolutely magical about a perfectly made lemon tart. That first bite—where the buttery, crisp pastry shell gives way to smooth, tangy lemon custard—is pure bliss. This classic lemon tart recipe delivers restaurant-quality results right in your home kitchen, and it’s easier than you might think!
A lemon tart is an elegant French-inspired dessert that balances bright citrus flavors with rich, creamy custard all nestled in a sweet pastry crust. It’s the perfect ending to a dinner party, a stunning centerpiece for holiday gatherings, or simply a special treat when you’re craving something both refreshing and indulgent. Unlike heavy chocolate desserts, this lemon tart feels light and sophisticated while still satisfying your sweet tooth.
Whether you’re hosting Easter brunch, celebrating a spring birthday, or just want to impress your family with your baking skills, this homemade lemon tart is guaranteed to steal the show. The combination of zesty lemon curd and delicate pastry creates a dessert that’s both timeless and crowd-pleasing. Best of all, while it looks incredibly fancy, the technique is straightforward enough for intermediate home bakers to master with confidence.
History / Background
The lemon tart, known as “tarte au citron” in France, has been a cornerstone of French patisserie for centuries. Its origins trace back to medieval times when citrus fruits were considered exotic luxuries in Europe. Lemons arrived in France through Mediterranean trade routes, and French pastry chefs quickly recognized their potential in dessert-making.
By the 19th century, the lemon tart had evolved into the refined dessert we know today. French pâtissiers perfected the art of creating a crisp pâte sucrée (sweet pastry dough) paired with a silky lemon curd filling. The dessert became a staple in Parisian bakeries and eventually spread throughout Europe and beyond.
What makes the French lemon tart special is its emphasis on simplicity and quality ingredients. Unlike American lemon meringue pie with its fluffy topping, the classic French version celebrates the pure, unadulterated flavor of lemons. The tart became particularly popular in the French Riviera, where lemon groves flourish in the sunny Mediterranean climate.
Today, variations of lemon tart appear in bakeries worldwide, from London to New York to Sydney. However, the traditional French approach—focusing on a thin, buttery crust and intensely lemony filling—remains the gold standard. This recipe honors that classic French technique while making it accessible for American home kitchens, using readily available ingredients and clear, foolproof instructions.
Why You’ll Love This Recipe
This classic lemon tart recipe strikes the perfect balance between impressive presentation and achievable technique. While it may look like something from a fancy French bakery, you’ll be amazed at how manageable it is to create at home. The process is actually quite meditative—there’s something wonderfully satisfying about whisking together the glossy lemon curd and watching it transform into silky perfection.
Here’s why this recipe will become your go-to elegant dessert:
- Restaurant-quality results – Tastes like it came from a high-end patisserie but costs a fraction of the price
- Make-ahead friendly – Prepare components in advance for stress-free entertaining
- Stunning presentation – Guaranteed to impress guests without complicated decorating skills
- Perfect flavor balance – Not too sweet, with bright citrus notes that refresh your palate
- Versatile for any occasion – Works beautifully for everything from casual family dinners to formal celebrations
- Uses simple ingredients – No exotic or hard-to-find components required
- Customizable tartness – Easy to adjust the lemon intensity to your personal preference
- Crisp, buttery crust – The pastry stays wonderfully crunchy even after filling
- Elegant yet approachable – Sophisticated enough for special occasions but not intimidating to make
Ingredient Notes
For the Pastry Crust:
All-purpose flour – Forms the structure of your tart shell. Make sure it’s fresh for the best texture. You can substitute with a 1:1 gluten-free baking blend if needed.
Unsalted butter – Must be cold and cubed for a flaky, tender crust. European-style butter with higher fat content creates an even richer flavor. Never substitute with margarine.
Powdered sugar – Creates a more tender, cookie-like crust compared to granulated sugar. Also called confectioner’s sugar or icing sugar.
Egg yolk – Binds the dough together and adds richness. The fat in the yolk creates that signature buttery texture.
Vanilla extract – A touch of pure vanilla enhances the overall flavor. Always use real vanilla extract, not imitation.
Salt – Balances sweetness and enhances all the other flavors in the pastry.
For the Lemon Filling:
Fresh lemons – The star of the show! Use fresh lemons only—bottled lemon juice won’t give you the same bright, complex flavor. You’ll need both zest and juice.
Granulated sugar – Sweetens the tart filling and balances the citrus acidity.
Large eggs and egg yolks – Create the custard base and give the filling its silky, luxurious texture. The extra yolks make it extra rich.
Unsalted butter – Stirred in at the end for a glossy, smooth finish and added richness.
Heavy cream – Makes the filling incredibly creamy and luscious. You can substitute half-and-half in a pinch, though it won’t be quite as rich.
Equipment Needed
- 9-inch tart pan with removable bottom (essential for clean presentation)
- Rolling pin
- Food processor or pastry cutter
- Medium heavy-bottomed saucepan
- Fine-mesh strainer or sieve
- Whisk
- Microplane or zester
- Citrus juicer
- Mixing bowls (various sizes)
- Measuring cups and spoons
- Parchment paper or pie weights
- Rubber spatula
- Sharp knife for trimming pastry
- Cooling rack
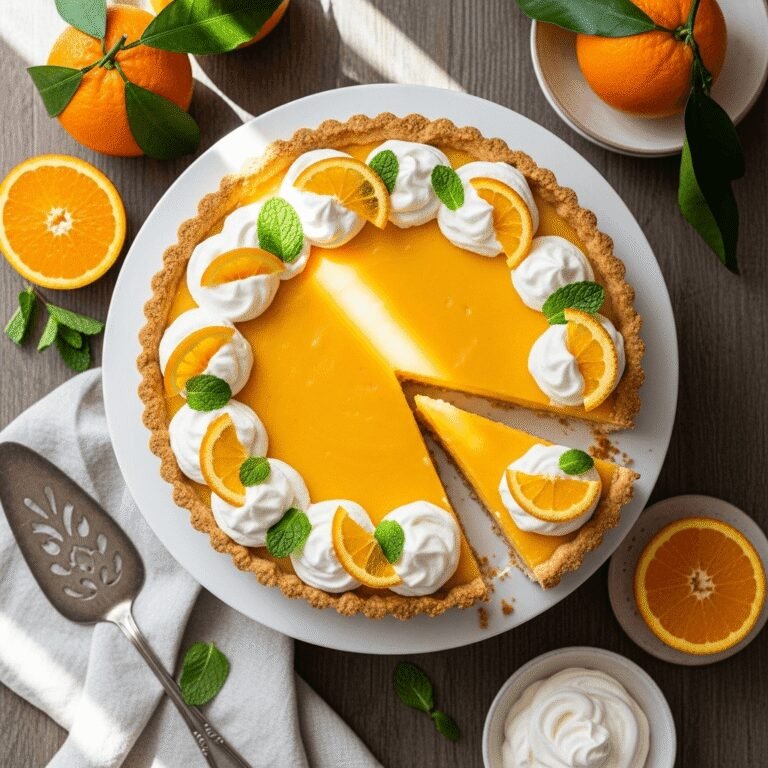
Lemon Tart Recipe

A stunning French-style lemon tart featuring a buttery, crisp pastry shell filled with silky smooth, tangy lemon curd. This elegant dessert balances sweet and tart flavors perfectly, creating a restaurant-quality treat that’s surprisingly achievable at home.
- Prep Time: 30 minutes (plus 1 hour chilling time)
- Cook Time: 45 minutes
- Total Time: 2 hours 15 minutes
- Yield: 8-10 servings 1x
- Category: Dessert
- Method: Baking
- Cuisine: American
- Diet: Vegetarian
Ingredients
For the Sweet Pastry Crust:
- 1¼ cups (156g) all-purpose flour
- ½ cup (57g) powdered sugar
- ¼ teaspoon salt
- ½ cup (113g) cold unsalted butter, cut into small cubes
- 1 large egg yolk
- 1 teaspoon pure vanilla extract
- 1-2 tablespoons ice-cold water (if needed)
For the Lemon Filling:
- 4-5 large lemons (for ¾ cup fresh lemon juice and 2 tablespoons zest)
- 1 cup (200g) granulated sugar
- 4 large eggs
- 3 large egg yolks
- ½ cup (113g) unsalted butter, cut into pieces
- ⅓ cup (80ml) heavy cream
- Pinch of salt
For Garnish (optional):
- Powdered sugar for dusting
- Fresh berries
- Candied lemon slices
- Whipped cream
Instructions
Make the Pastry Crust:
- Prepare the dough: In a food processor, pulse together flour, powdered sugar, and salt. Add cold butter cubes and pulse until mixture resembles coarse crumbs with some pea-sized butter pieces remaining. Add egg yolk and vanilla, pulse until just combined. If dough seems too dry and won’t hold together when pinched, add ice water one tablespoon at a time.
- Chill the dough: Turn dough out onto a clean surface and gently knead just until it comes together. Shape into a flat disk, wrap tightly in plastic wrap, and refrigerate for at least 1 hour or up to 2 days.
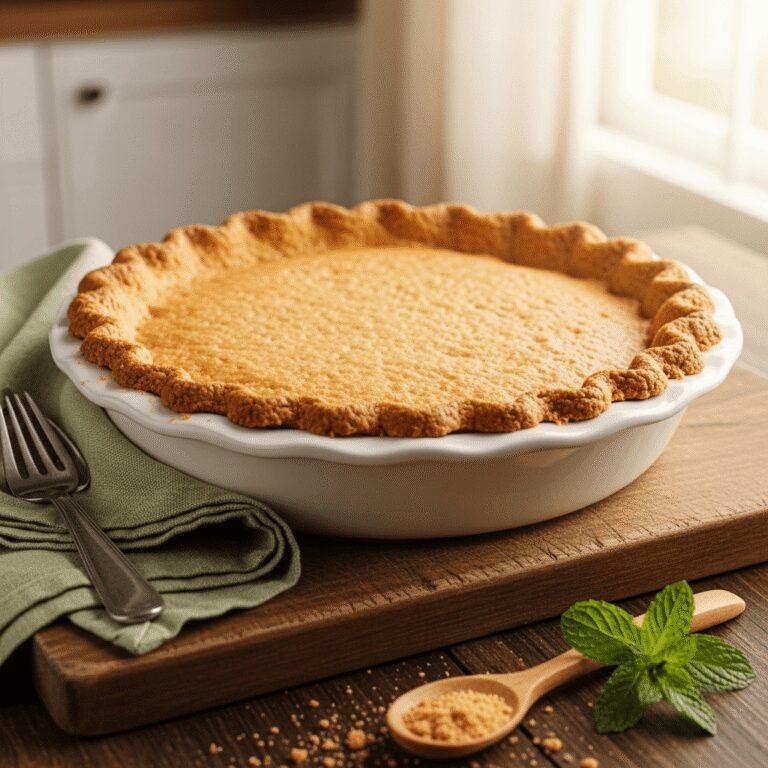
- Roll and fit the pastry: On a lightly floured surface, roll chilled dough into an 11-12 inch circle about ⅛-inch thick. Carefully transfer to your 9-inch tart pan, gently pressing into the bottom and up the sides. Trim excess dough by rolling your rolling pin across the top of the pan. Prick the bottom with a fork several times. Freeze for 15 minutes.
- Blind bake: Preheat oven to 375°F (190°C). Line the frozen tart shell with parchment paper and fill with pie weights or dried beans. Bake for 20 minutes, then carefully remove parchment and weights. Continue baking for 8-10 minutes more until the crust is golden brown and fully cooked. Let cool completely. Reduce oven temperature to 300°F (150°C).
Make the Lemon Filling:
- Zest and juice the lemons: Finely zest 2 tablespoons of lemon zest, being careful to avoid the bitter white pith. Juice enough lemons to get ¾ cup of fresh juice. Strain out any seeds.
- Cook the lemon curd: In a medium heavy-bottomed saucepan, whisk together sugar, eggs, egg yolks, lemon juice, lemon zest, and a pinch of salt. Add the butter pieces. Cook over medium-low heat, whisking constantly, for 8-12 minutes until the mixture thickens enough to coat the back of a spoon (should reach about 170°F on a thermometer). Do not let it boil or the eggs will scramble.
- Strain and finish: Remove from heat and immediately strain the curd through a fine-mesh sieve into a clean bowl to remove any bits of cooked egg and zest. Stir in the heavy cream until smooth and well combined.
- Fill and bake: Pour the warm lemon filling into the cooled tart shell. Carefully transfer to the 300°F oven and bake for 15-20 minutes, just until the filling is set around the edges but still has a slight wobble in the center.
- Cool completely: Remove from oven and let cool to room temperature on a wire rack, then refrigerate for at least 2 hours or until fully set before serving.
- Serve: Carefully remove the tart from the pan by pushing up the removable bottom. Dust with powdered sugar if desired, slice with a sharp knife (wiping clean between cuts), and serve chilled or at cool room temperature.
Notes
- Preventing a soggy crust: Make sure your tart shell is fully baked and golden before adding the filling. The crust should look dry and cooked through, not pale.
- Lemon intensity: For a more intense lemon flavor, add an extra tablespoon of zest. For a milder version, reduce lemon juice to ⅔ cup and increase cream to ½ cup.
- Smooth filling: Straining the lemon curd is crucial for achieving that professional, silky-smooth texture without any lumps.
- Setting time: The filling will continue to firm up as it cools. Don’t worry if it seems slightly soft when warm—refrigeration will set it perfectly.
- Make-ahead: This tart actually tastes better the next day after the flavors have melded. Store covered in the refrigerator.
Nutrition
- Serving Size: 1 slice (based on 10 servings)
- Calories: 385
- Sugar: 24g
- Sodium: 95mg
- Fat: 24g
- Saturated Fat: 14g
- Unsaturated Fat: 8g
- Trans Fat: 0g
- Carbohydrates: 38g
- Fiber: 1g
- Protein: 6g
- Cholesterol: 215mg
Tips & Variations
Make it Extra Lemony: Double the lemon zest for an even more pronounced citrus flavor. You can also add a few drops of lemon extract to intensify the taste without adding more acidity.
Meyer Lemon Tart: Substitute regular lemons with Meyer lemons for a sweeter, more floral flavor profile. Meyer lemons are less acidic and have a unique taste that’s absolutely divine in tarts.
Italian Twist: Add a tablespoon of limoncello to the lemon filling for an adult version with sophisticated Italian flair.
Mixed Citrus Version: Use a combination of lemon, lime, and orange juice (keeping the same total volume) for a complex citrus flavor. Try ½ cup lemon, ¼ cup lime, and ¼ cup orange juice.
Add Texture: Top the cooled tart with toasted coconut flakes, crushed pistachios, or candied lemon peel for added visual appeal and textural contrast.
Chocolate-Lemon Combination: Spread a thin layer of melted dark chocolate on the baked crust before adding the lemon filling. Let it set, then proceed with the recipe.
Individual Tartlets: Instead of one large tart, make mini versions using a muffin tin or small tartlet pans. Adjust baking time to 10-12 minutes for the filling.
Lavender Lemon Tart: Add 1 teaspoon of culinary lavender to the sugar when making the filling. Strain it out with the zest for a subtle floral note.
Healthy Swaps: Use coconut sugar instead of white sugar for a lower glycemic option. You can also reduce sugar slightly if you prefer a more tart flavor.
Gluten-Free Option: Use a 1:1 gluten-free flour blend for the crust. The texture will be slightly different but still delicious.
Pro Chef Tips
Temperature control is everything: When cooking the lemon curd, maintaining medium-low heat and constant whisking prevents curdling. If you notice any small lumps forming, immediately remove from heat and whisk vigorously or strain.
The cold butter technique: Keeping your butter very cold when making the pastry creates steam pockets during baking, resulting in a flakier, more tender crust. Some bakers even freeze their butter and grate it into the flour.
Blind baking perfection: To ensure your tart shell doesn’t puff up during blind baking, make sure to dock it thoroughly (poke holes) and freeze before baking. The freezing step is not optional—it helps the pastry hold its shape.
Shine matters: For that professional glossy finish on your lemon filling, the butter and cream additions at the end are crucial. They create an emulsion that gives the curd its signature sheen.
Room temperature eggs: While the butter should be cold for the crust, eggs should be at room temperature for the filling. This helps them incorporate more smoothly and cook more evenly without curdling.
The wobble test: Your filling is perfectly set when the edges are firm but the center still has a gentle wobble when you shake the pan. It will continue setting as it cools—overbaking makes it grainy.
Sharp slicing: For clean, beautiful slices, use a sharp chef’s knife dipped in hot water and wiped dry between each cut. This prevents the filling from sticking and creating messy slices.
Zest before juicing: Always zest your lemons before juicing them. It’s nearly impossible to zest a juiced lemon, and you’ll get much more zest from whole, firm lemons.
Common Mistakes to Avoid
Overworking the pastry dough: The more you handle and knead the dough, the tougher your crust will be. Mix just until combined—a few dry streaks are fine; they’ll hydrate during chilling.
Not chilling the dough long enough: Rushing this step leads to shrinkage during baking. The gluten needs time to relax, and the butter needs to firm up. One hour minimum is essential.
Using bottled lemon juice: Pre-bottled juice lacks the bright, fresh flavor and natural oils that fresh lemons provide. It will result in a flat, artificial-tasting filling that doesn’t compare to the real thing.
Cooking the filling too hot or too fast: High heat will scramble your eggs, creating a grainy, curdled texture instead of silky smooth custard. Patience and low heat are your friends here.
Skipping the straining step: Even the most careful cook will have some cooked egg bits or zest fibers. Straining ensures professional, velvety-smooth results. Don’t skip this crucial step!
Adding filling to a warm crust: If your tart shell is still warm when you add the filling, the butter in the pastry can soften, leading to a soggy bottom. Always let it cool completely first.
Cutting into the tart too soon: I know it’s tempting, but slicing before the tart is fully chilled will result in a runny filling that doesn’t hold its shape. Give it those full 2 hours in the fridge.
Storage & Meal Prep
Refrigerator Storage: Store your lemon tart covered in the refrigerator for up to 4 days. The crust will gradually lose some crispness over time, but the flavor actually improves as it sits. Cover loosely with plastic wrap or place in an airtight container, being careful not to damage the surface.
At Room Temperature: Once fully set, the tart can sit at room temperature for 2-3 hours for serving. However, don’t leave it out longer than that, as the egg-based filling needs refrigeration for food safety. If your kitchen is very warm, keep it chilled until serving time.
Reheating: This dessert is best served chilled or at cool room temperature—never reheat it! The beauty of a lemon tart is its refreshing, cool temperature that contrasts with the buttery richness.
Storing Components Separately: If making ahead, you can store the baked tart shell at room temperature (wrapped well) for up to 2 days, and the lemon curd covered in the refrigerator for up to 5 days. Assemble and bake together when ready.
Preventing Condensation: When removing from the refrigerator, let the tart sit for 10-15 minutes before serving. This prevents condensation from forming on the surface when it hits warmer air.
Make-Ahead & Freezer Notes
Make-Ahead Timeline: This is one of the best make-ahead desserts! In fact, making it a day in advance allows the flavors to develop and meld beautifully. The filling sets more firmly, making it easier to slice cleanly.
Freezing the Unbaked Tart Shell: You can freeze the shaped, unbaked tart shell (in the pan) wrapped tightly for up to 3 months. Bake directly from frozen, adding 5 extra minutes to the blind-baking time.
Freezing the Baked Tart: While possible, freezing the completed tart isn’t ideal as the filling texture can become slightly grainy upon thawing. If you must freeze it, wrap extremely well in plastic wrap and aluminum foil, and freeze for up to 1 month.
Thawing Instructions: If freezing the completed tart, thaw overnight in the refrigerator, never at room temperature. The slow thaw helps maintain the best texture possible.
Freezing the Lemon Curd: The filling alone freezes beautifully! Make a double batch and freeze half for up to 3 months. Thaw overnight in the fridge, whisk until smooth, and use as needed.
Best Make-Ahead Strategy: For optimal results, bake your tart shell up to 2 days ahead and store at room temperature. Make your lemon curd the day before and refrigerate. Assemble and do the final bake the day you plan to serve, then chill until serving time.
Advance Assembly: You can assemble and bake the complete tart up to 2 days before serving. Keep refrigerated and bring to cool room temperature about 30 minutes before slicing.
Serving Suggestions
This elegant lemon tart pairs beautifully with so many complementary flavors and textures. Here are the best accompaniments to make your dessert course truly memorable:
Classic Pairings:
- Lightly sweetened whipped cream – The richness balances the tart’s acidity perfectly
- Fresh berries – Raspberries, blueberries, or strawberries add color and complementary flavor
- Vanilla ice cream or gelato – The cold, creamy contrast is divine
- Crème fraîche – A sophisticated, slightly tangy alternative to whipped cream
Beverage Pairings:
- Sparkling wine or Champagne – The bubbles and acidity complement the citrus beautifully
- Earl Grey tea – The bergamot in Earl Grey is a natural match for lemon
- Sweet dessert wine – Try Sauternes or late-harvest Riesling
- Limoncello – Serve a small glass alongside for a true Italian experience
- Iced lemon tea – Perfect for summer gatherings
Additional Garnishes:
- Candied lemon slices for an elegant, professional look
- Fresh mint leaves for a pop of color and fresh flavor
- A dusting of powdered sugar just before serving
- Edible flowers like pansies or violets for special occasions
- Toasted sliced almonds for textural contrast
Occasion-Specific Serving:
- Dinner parties: Serve individual slices on white dessert plates with a small dollop of whipped cream and three fresh raspberries
- Easter or spring brunches: Cut into smaller pieces and arrange on a platter with fresh flowers
- Summer picnics: Transport whole and slice on-site; the tart travels well chilled
- Holiday celebrations: Dust with powdered sugar in a decorative pattern using a stencil
FAQs Section
Can I make this tart without a food processor?
Absolutely! You can make the pastry by hand using a pastry cutter or even two knives to cut the cold butter into the flour mixture. You can also use your fingertips to rub the butter into the flour, working quickly so your hands don’t warm the butter too much. The texture will be just as good, though it takes a bit more arm work.
Why is my lemon filling grainy instead of smooth?
Grainy texture usually happens when the eggs cook too quickly at too high a temperature, causing them to curdle. Always cook the lemon curd over medium-low heat and whisk constantly. If you see any signs of curdling, immediately remove from heat and whisk vigorously. Straining the mixture also helps remove any small bits of cooked egg. Using a candy thermometer and keeping the temperature around 170°F ensures perfect results.
How do I prevent my tart crust from shrinking during baking?
Shrinkage happens when the gluten in the dough hasn’t had enough time to relax. Make sure you chill your dough for at least 1 hour before rolling, and then freeze the shaped tart shell for 15 minutes before blind baking. Don’t stretch the dough when fitting it into the pan—let it gently settle into place. These steps allow the gluten strands to relax, preventing shrinkage.
Can I use a regular pie pan instead of a tart pan?
While a tart pan with a removable bottom gives you the most professional presentation, you can absolutely use a 9-inch pie pan. The tart will taste exactly the same, though you won’t get those beautiful fluted edges and you won’t be able to remove it from the pan for serving. Simply serve slices directly from the pie pan.
My tart shell cracked during blind baking—can I still use it?
Yes! Small cracks in the crust are easy to fix. While the tart shell is still warm from the oven, press some of the trimmed raw dough scraps into any cracks to seal them. The heat from the baked shell will soften the raw dough just enough to create a seal. You can also brush with a bit of beaten egg white and return to the oven for 2 minutes to seal larger cracks.
How tart should the filling be?
This is entirely personal preference! The recipe as written provides a balanced sweet-tart flavor that most people find perfect. If you prefer a more tart, puckery flavor, reduce the sugar by ¼ cup. If you like it sweeter and less acidic, add an extra ¼ cup of sugar or reduce the lemon juice slightly. Taste the curd while cooking (before the eggs fully set) and adjust sweetness as needed.
Can I use lime or other citrus instead of lemon?
Definitely! Key lime tart is a delicious variation—just substitute lime juice and zest for the lemon. You can also make orange tart, grapefruit tart, or a mixed citrus version. Keep in mind that different citrus fruits have varying levels of acidity, so you may need to adjust the sugar slightly. Limes tend to be more acidic (use a bit more sugar), while oranges are sweeter (use a bit less sugar).
Conclusion
There you have it—a complete guide to creating a show-stopping classic lemon tart that tastes like it came straight from a French patisserie! While this recipe might seem involved, each step builds on the last to create something truly special. The buttery, crisp crust paired with that silky, tangy lemon filling is absolutely worth every minute of effort.
The beauty of this lemon tart is that it works for virtually any occasion. Dress it up with candied lemon slices and edible flowers for an elegant dinner party, or keep it simple with a dusting of powdered sugar for a weekend family dessert. Either way, you’re guaranteed compliments and requests for the recipe!
I hope you give this classic lemon tart a try and experience the pure joy of creating something so beautiful and delicious in your own kitchen. There’s nothing quite like that moment when you slice into your homemade tart and see that perfect, smooth lemon filling against the golden crust. Pure magic!
Now it’s your turn! Have you made this lemon tart recipe? I’d love to hear how it turned out! Drop a comment below sharing your experience, any modifications you made, or questions you have. And if you loved this recipe, please save it to your favorite Pinterest board so you can find it again—and help other home bakers discover it too!
Happy baking, and enjoy every tangy, buttery bite! 🍋✨