The Best Peanut Butter Cookies Recipe (Soft, Chewy & Irresistible!)

There’s something magical about the aroma of freshly baked peanut butter cookies wafting through your kitchen. These classic American treats are the ultimate comfort food—soft, chewy, and packed with that rich, nutty flavor we all crave. Whether you’re baking for an afternoon snack, a holiday cookie exchange, or simply satisfying a sweet tooth, peanut butter cookies never disappoint.
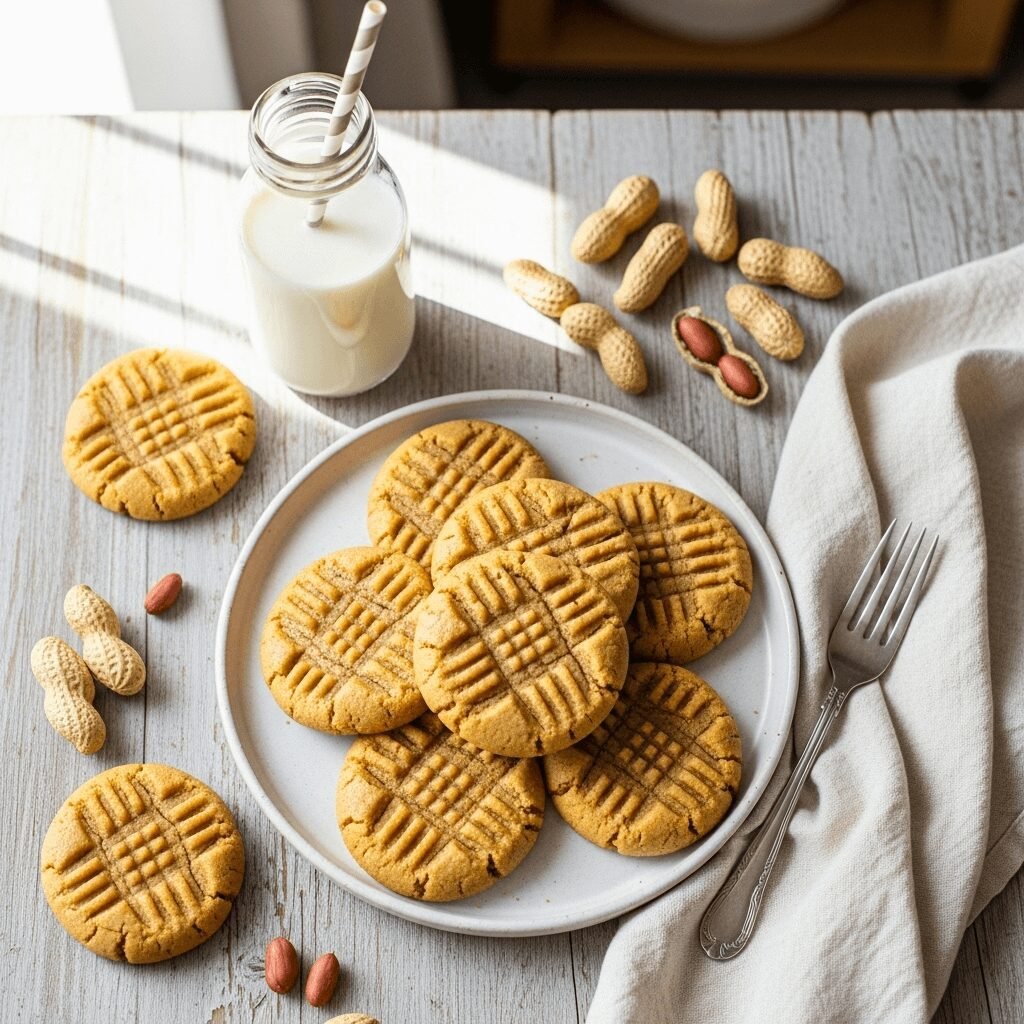
What makes this recipe truly special is its simplicity. With just a handful of pantry staples and about 30 minutes from start to finish, you can create bakery-quality cookies right in your own kitchen. The signature crisscross fork pattern on top isn’t just decorative—it helps these cookies bake evenly while giving them that nostalgic, homemade appearance that makes everyone smile.
Perfect for beginners and experienced bakers alike, these peanut butter cookies strike the ideal balance between crispy edges and soft, melt-in-your-mouth centers. They’re wonderful for lunchboxes, coffee breaks, or as a heartfelt homemade gift that shows you care.
History / Background
The beloved peanut butter cookie has deep roots in American culinary history, dating back to the early 1900s when peanut butter itself was becoming a household staple. George Washington Carver, the renowned agricultural scientist, promoted peanuts as a versatile crop and developed hundreds of uses for them, helping peanut butter gain widespread popularity across the United States.
The first peanut butter cookie recipe appeared in print around 1916, but it wasn’t until the 1930s that the iconic crisscross pattern became standard. The Schenectady Gazette published one of the earliest recipes featuring the fork-pressed design in 1932, and Pillsbury cemented this tradition in their 1933 cookbook. The practical reason for this technique was that peanut butter cookie dough is dense and doesn’t spread much during baking—the fork marks help flatten the cookies for even cooking while creating that recognizable texture we associate with the perfect peanut butter cookie.
During the Great Depression and World War II, peanut butter cookies gained even more popularity because the ingredients were affordable and readily available when other baking supplies were rationed. Peanut butter provided protein and satisfaction during challenging times, making these cookies both economical and nourishing.
Today, peanut butter cookies remain one of America’s most cherished desserts, passed down through generations and adapted into countless variations. From classic three-ingredient versions to elaborate chocolate-studded creations, the humble peanut butter cookie continues to hold a special place in American baking culture.
Why You’ll Love This Recipe
This isn’t just another peanut butter cookie recipe—it’s the one you’ll turn to again and again because it delivers perfect results every single time. The texture is absolutely divine: soft and chewy in the middle with slightly crispy, caramelized edges that provide the most satisfying contrast. The peanut butter flavor shines through beautifully without being overwhelming, and there’s just the right amount of sweetness to balance the natural nuttiness.
Here’s why this recipe will become your new favorite:
- Incredibly simple – No complicated techniques or special skills required; if you can mix ingredients in a bowl, you can make these cookies
- Quick and convenient – From mixing to eating in under 30 minutes, perfect for last-minute cravings or unexpected guests
- Uses pantry staples – Most ingredients are probably already in your kitchen right now, no special shopping trip needed
- Kid-friendly baking project – Children love helping press the fork patterns and the dough is easy to work with
- Consistently delicious – Foolproof recipe that delivers bakery-quality results even for beginner bakers
- Budget-friendly – Makes about 24 cookies for just a few dollars worth of ingredients
- Customizable – Easy to adapt with chocolate chips, honey, different nut butters, or flavor variations
- Great for gifting – These cookies stay fresh for days and transport beautifully in tins or gift bags
- Crowd-pleaser guaranteed – Universally loved by both kids and adults, perfect for any occasion
Ingredient Notes
Understanding your ingredients is the secret to baking success. Let’s break down what makes these peanut butter cookies so irresistibly delicious:
Peanut Butter – The star of the show! Use creamy peanut butter for smooth, uniform cookies. Standard brands like Jif or Skippy work beautifully because they contain added oils and sugar that contribute to the cookie’s texture. Avoid natural peanut butter (the kind where oil separates on top) as it lacks stabilizers and can make cookies dry and crumbly. For a fun twist, try crunchy peanut butter for extra texture.
Granulated Sugar – Provides sweetness and helps create those beautifully caramelized crispy edges. The sugar also helps the cookies spread properly during baking.
Brown Sugar – Adds moisture, chewiness, and a deeper caramel flavor thanks to its molasses content. Light or dark brown sugar both work, though dark will give a richer taste.
Butter – Must be softened (not melted!) to room temperature so it creams properly with the sugars. This creates air pockets that give cookies their tender texture. Unsalted butter is preferred so you can control the salt level, but salted butter works in a pinch—just reduce the added salt by half.
Egg – Acts as a binder and adds moisture and richness. Bring it to room temperature for best results. For egg-free alternatives, try a flax egg (1 tablespoon ground flaxseed mixed with 3 tablespoons water).
Vanilla Extract – Enhances all the other flavors and adds warmth. Pure vanilla extract is always better than imitation, but use what you have.
All-Purpose Flour – The structure-builder of your cookies. Be sure to measure properly by spooning flour into your measuring cup and leveling off—scooping directly can pack too much flour and make cookies dry.
Baking Soda – The leavening agent that helps cookies rise and spread. It also promotes browning for those golden edges.
Salt – Essential for balancing sweetness and enhancing the peanut butter flavor. Don’t skip it!
Equipment Needed
You won’t need any fancy gadgets for this recipe—just basic kitchen tools that make the process smooth and enjoyable:
- Mixing bowls (2) – One large for wet ingredients, one medium for dry ingredients
- Electric mixer or hand whisk – Stand mixer, hand mixer, or good old elbow grease all work
- Measuring cups and spoons – For accurate ingredient measurements
- Baking sheets (2) – Light-colored aluminum sheets work best for even browning
- Parchment paper or silicone baking mats – Prevents sticking and makes cleanup a breeze
- Fork – For creating the classic crisscross pattern
- Wire cooling rack – Allows air circulation so cookies cool evenly without getting soggy
- Cookie scoop or spoon – A tablespoon-sized cookie scoop ensures uniform cookies
- Rubber spatula – For scraping down bowl sides and transferring dough
- Oven thermometer (optional but helpful) – Ensures your oven temperature is accurate
Peanut Butter Cookies Recipe

Classic homemade peanut butter cookies with soft, chewy centers and crispy edges. This easy recipe uses simple ingredients for perfectly delicious cookies every time!
- Prep Time: 10 minutes
- Cook Time: 12 minutes
- Total Time: 22 minutes
- Yield: 24 cookies 1x
- Category: Dessert
- Method: Baking
- Cuisine: American
- Diet: Vegetarian
Ingredients
- 1 cup creamy peanut butter
- ½ cup unsalted butter, softened to room temperature
- ½ cup granulated sugar
- ½ cup packed light brown sugar
- 1 large egg, room temperature
- 1 teaspoon vanilla extract
- 1¼ cups all-purpose flour
- ¾ teaspoon baking soda
- ½ teaspoon salt
- Additional granulated sugar for rolling (about ¼ cup)
Instructions
- Preheat your oven to 350°F (175°C). Line two baking sheets with parchment paper or silicone baking mats and set aside.
- Cream the butter and sugars together in a large mixing bowl using an electric mixer on medium speed. Beat for about 2-3 minutes until the mixture becomes light, fluffy, and pale in color. Scrape down the sides of the bowl as needed.
- Add the peanut butter to the butter-sugar mixture and beat for another minute until fully incorporated and smooth. The mixture should look creamy and well-combined.
- Mix in the egg and vanilla extract, beating on medium speed until the egg is completely incorporated. The batter should be smooth and slightly glossy.
- Combine the dry ingredients in a separate medium bowl. Whisk together the flour, baking soda, and salt until evenly distributed.
- Add dry ingredients to wet ingredients gradually, mixing on low speed or stirring by hand with a wooden spoon. Mix just until no flour streaks remain—be careful not to overmix, which can make cookies tough.
- Roll the dough into balls using about 1 tablespoon of dough for each cookie (a cookie scoop makes this easy!). Roll each ball in granulated sugar to coat completely.
- Place dough balls on prepared baking sheets, spacing them about 2 inches apart to allow for spreading. They’ll expand during baking.
- Create the crisscross pattern by pressing down on each dough ball with a fork in one direction, then rotating 90 degrees and pressing again to form a hashtag pattern. This flattens the cookies to about ½-inch thickness.
- Bake for 10-12 minutes or until the edges are lightly golden brown. The centers may look slightly underbaked—that’s perfect! They’ll firm up as they cool.
- Cool on the baking sheet for 5 minutes, allowing the cookies to set. They’ll be very soft when they first come out of the oven.
- Transfer to a wire rack using a spatula and let cool completely. Cookies will continue to firm up as they cool to that perfect chewy texture.
Notes
- Don’t overbake! Cookies continue cooking on the hot pan after being removed from the oven. Take them out when edges are golden but centers look soft.
- For thicker cookies, chill the dough for 30 minutes before baking.
- If your peanut butter is unsalted, increase the salt in the recipe to ¾ teaspoon.
- Cookies taste even better the next day once flavors have melded together.
- Store in an airtight container with a slice of bread to keep cookies soft.
Nutrition
- Serving Size: 1 cookie
- Calories: 165
- Sugar: 12g
- Sodium: 125mg
- Fat: 9g
- Saturated Fat: 3.5g
- Unsaturated Fat: 3.5g
- Trans Fat: 0g
- Carbohydrates: 18g
- Fiber: 1g
- Protein: 4g
- Cholesterol: 18mg
Tips & Variations
Make them your own with these creative twists:
Chocolate Peanut Butter Cookies – Fold in ¾ cup chocolate chips, peanut butter chips, or chopped chocolate chunks after mixing the dough. The chocolate adds delightful pockets of melty richness.
Extra Crunchy Version – Substitute crunchy peanut butter for creamy, or stir in ½ cup chopped roasted peanuts for even more texture and nutty crunch.
Healthier Option – Replace half the butter with unsweetened applesauce, use coconut sugar instead of white sugar, or try whole wheat flour for half the all-purpose flour for added fiber.
Peanut Butter Kiss Cookies – Skip the fork marks and instead press a chocolate Kiss candy into the center of each cookie immediately after baking for a classic variation.
Honey Peanut Butter Cookies – Replace ¼ cup of the sugar with honey for a more complex sweetness and softer texture. You may need to reduce baking time by 1-2 minutes.
Gluten-Free Adaptation – Use a 1:1 gluten-free flour blend in place of all-purpose flour. The texture will be slightly more delicate but still delicious.
Mini Cookies – Make bite-sized treats by using a teaspoon of dough instead of a tablespoon. Reduce baking time to 8-10 minutes.
Salted Caramel Twist – Sprinkle flaky sea salt on top before baking and drizzle cooled cookies with caramel sauce for a gourmet touch.
Pro Chef Tips
Temperature matters tremendously – Room temperature ingredients blend together more smoothly, creating a better texture. Take butter and eggs out of the refrigerator 30-60 minutes before starting.
Don’t overmix the dough – Once you add the flour, mix just until combined. Overmixing develops gluten, which makes cookies tough and cakey instead of tender and chewy. Stop mixing as soon as you don’t see flour streaks.
Chill for thicker cookies – If you prefer thicker, puffier cookies, refrigerate the dough for 30 minutes to 2 hours before baking. Cold dough spreads less in the oven, resulting in a thicker final cookie.
Use parchment paper – This isn’t just for easy cleanup. Parchment paper provides more even heat distribution than unlined or greased pans, preventing bottom-burning while ensuring perfect golden edges.
Rotate your baking sheets halfway – Even the best ovens have hot spots. Rotate your pan 180 degrees halfway through baking for the most uniform golden color and even texture.
The toothpick test doesn’t work here – Unlike cakes, cookies should look slightly underbaked in the center when you remove them. They’ll finish cooking on the hot pan and become perfectly chewy as they cool.
Brown your butter for next-level flavor – For an advanced technique, try browning the butter before using it (you’ll need to chill it back to solid form first). This adds incredible nutty, caramelized notes that complement the peanut butter beautifully.
Common Mistakes to Avoid
Using natural peanut butter – Natural peanut butter lacks stabilizers and has a different oil content, which results in dry, crumbly cookies that don’t hold together well. Stick with conventional brands like Jif, Skippy, or Peter Pan for best results.
Overbaking the cookies – This is the number one mistake! Peanut butter cookies should look slightly soft and underdone in the center when you remove them from the oven. They’ll firm up perfectly as they cool. Overbaked cookies become dry and hard instead of chewy.
Not pressing the dough flat enough – The crisscross fork marks aren’t just decorative. Peanut butter cookie dough is dense and won’t spread much on its own. If you don’t flatten them enough, you’ll end up with thick, undercooked centers and burnt edges.
Measuring flour incorrectly – Scooping flour directly from the bag packs it down, giving you too much flour and resulting in dry, crumbly cookies. Always spoon flour into your measuring cup and level it off with a knife for accurate measurement.
Crowding the baking sheet – Cookies need space to spread. Place them at least 2 inches apart, and don’t try to fit too many on one sheet. Crowded cookies will merge together and bake unevenly.
Storage & Meal Prep
Room Temperature Storage – Store completely cooled cookies in an airtight container at room temperature for up to 1 week. To keep them extra soft, add a slice of white bread to the container—the cookies will absorb moisture from the bread and stay perfectly chewy.
Refrigerator Storage – While not necessary, you can refrigerate peanut butter cookies in an airtight container for up to 2 weeks. They’ll become firmer when cold but will soften again at room temperature within 15-20 minutes.
Stacking Cookies – Layer cookies with parchment paper or wax paper between layers to prevent sticking and preserve that beautiful fork pattern texture.
Reheating – For that fresh-from-the-oven experience, microwave a cookie for 8-10 seconds or warm in a 300°F oven for 3-5 minutes. The warmth makes them soft and gooey again—absolutely heavenly with a glass of cold milk!
Lunchbox Prep – These cookies are perfect for packing in lunches. They travel well and don’t get soggy or crumble easily. Wrap individually in plastic wrap or place in small reusable containers.
Make-Ahead & Freezer Notes
Freezing Baked Cookies – Peanut butter cookies freeze beautifully! Place completely cooled cookies in a freezer-safe container or zip-top bag with parchment paper between layers. They’ll keep for up to 3 months. Thaw at room temperature for 15-20 minutes or enjoy them frozen for a firmer texture.
Freezing Cookie Dough – This is a game-changer for fresh-baked cookies anytime! Roll dough into balls, place on a baking sheet, and freeze until solid (about 2 hours). Transfer frozen dough balls to a freezer bag and store for up to 3 months. Bake directly from frozen, adding 1-2 extra minutes to the baking time.
Pre-Made Dough Logs – Roll the entire batch of dough into a log shape, wrap tightly in plastic wrap, and freeze. When you’re ready to bake, thaw slightly, slice into rounds, press with a fork, and bake as directed.
Weekend Batch Baking – Make multiple batches of dough on Sunday, freeze in portions, and enjoy freshly baked cookies throughout the week by baking small batches as needed.
Thawing Tips – For frozen dough balls, you can let them thaw in the refrigerator overnight before baking, or bake directly from frozen. For frozen baked cookies, thaw at room temperature for best texture, or warm briefly in the oven.
Serving Suggestions
Peanut butter cookies are wonderfully versatile and pair beautifully with so many treats and beverages!
Classic Pairings – There’s nothing quite like peanut butter cookies dunked in ice-cold milk. The combination is nostalgic, comforting, and absolutely perfect. Coffee and hot chocolate are also excellent choices that complement the nutty sweetness.
Ice Cream Sandwiches – Use two cookies to sandwich a scoop of vanilla, chocolate, or peanut butter ice cream for an indulgent dessert. Roll the edges in mini chocolate chips or chopped peanuts for extra flair.
Dessert Platters – Serve alongside brownies, chocolate chip cookies, and oatmeal cookies for a varied dessert spread that appeals to everyone at parties and gatherings.
Cheese and Fruit Boards – Surprisingly, peanut butter cookies complement cheese beautifully! Add them to a dessert cheese board with mild cheddar, cream cheese, apple slices, and grapes.
After-School Snack – Pair with fresh fruit like apple slices, banana, or strawberries, plus a glass of milk for a balanced snack that kids love.
Coffee Shop Style – Serve warm with a latte, cappuccino, or chai tea for a café-quality afternoon treat at home.
Holiday Cookie Trays – Peanut butter cookies are essential for Christmas cookie exchanges and holiday gift tins. Their classic appeal makes them universally loved.
FAQs Section
Can I use natural peanut butter instead of regular?
It’s not recommended. Natural peanut butter has a different consistency and oil content, which results in dry, crumbly cookies that don’t hold together well. The stabilizers in regular peanut butter are important for the proper texture. If you must use natural, try adding 2 tablespoons of vegetable oil to compensate.
Why are my cookies too dry or crumbly?
This usually happens from too much flour or overbaking. Make sure you’re measuring flour correctly by spooning it into the cup and leveling off, not scooping directly. Also, remove cookies from the oven when centers still look slightly soft—they’ll firm up as they cool.
Can I make these cookies without eggs?
Yes! For a vegan-friendly version, substitute the egg with a flax egg (1 tablespoon ground flaxseed mixed with 3 tablespoons water, let sit 5 minutes), or use a commercial egg replacer. You can also try ¼ cup unsweetened applesauce, though texture will be slightly different.
Why don’t my cookies spread in the oven?
Peanut butter cookie dough is naturally dense and doesn’t spread much, which is why we press them with a fork. Make sure your butter is properly softened (not melted), and flatten the dough balls to about ½ inch thickness before baking. If dough is too cold, it won’t spread at all.
How do I make my cookies softer and chewier?
Don’t overbake them! Remove cookies when edges are golden but centers look slightly underdone. Also, the brown sugar content adds chewiness, so you could increase brown sugar to ¾ cup and reduce white sugar to ¼ cup. Storing with a bread slice also helps maintain softness.
Can I add chocolate chips to this recipe?
Absolutely! Fold in ¾ to 1 cup of chocolate chips after mixing the dough. Peanut butter and chocolate are a match made in heaven. You can use semi-sweet, milk chocolate, or even white chocolate chips.
My cookies turned out flat and greasy—what happened?
This usually means the butter was too soft or melted. Butter should be softened but still hold its shape—you should be able to leave an indent when you press it with your finger, but it shouldn’t be greasy or melted. Also, make sure you’re measuring ingredients accurately and your oven temperature is correct.
Conclusion
There you have it—the ultimate guide to baking perfect peanut butter cookies that will become a staple in your recipe collection! These classic treats are so much more than just a cookie; they’re memories in the making, comfort in edible form, and proof that the simplest recipes are often the most beloved.
Whether you’re baking these for a special occasion, treating yourself to a well-deserved sweet reward, or creating memories with your family in the kitchen, these peanut butter cookies will never let you down. The combination of crispy edges and soft, chewy centers with that unmistakable peanut butter flavor is simply irresistible.
I’d absolutely love to hear how your peanut butter cookies turn out! Did you try any of the variations? Did you add chocolate chips or keep them classic? Drop a comment below and share your experience. And if you loved this recipe, please share it on Pinterest so other home bakers can enjoy these delicious cookies too! Your pins help other bakers discover recipes that bring joy to their kitchens.
Happy baking, and may your kitchen always smell like freshly baked cookies! 🥜🍪