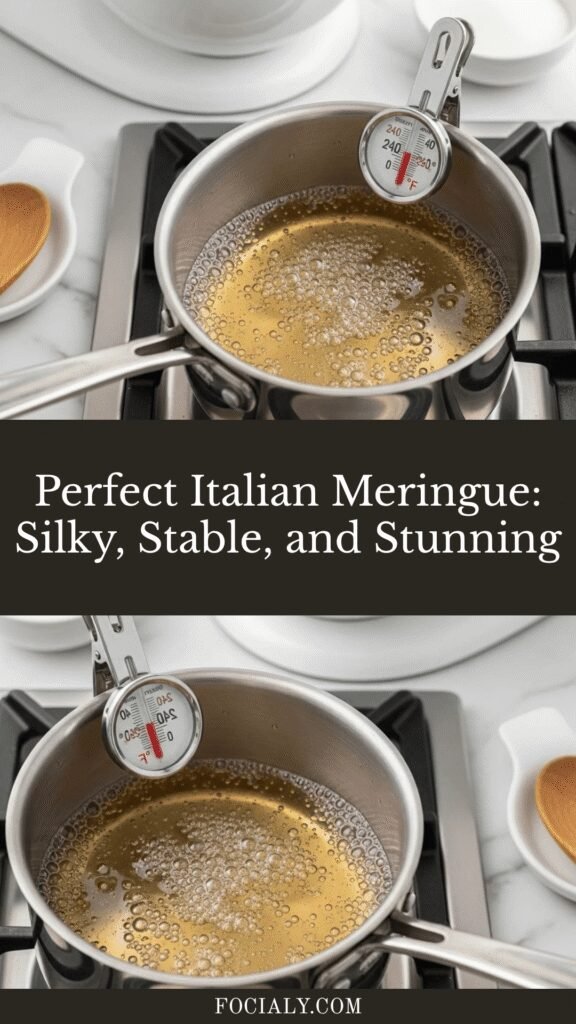
Perfect Italian Meringue: Silky, Stable, and Stunning
Italian meringue is the silkiest, most stable, and most versatile of all the meringue types—a glossy, marshmallow-like frosting that’s cooked to perfection and safe to eat without further baking. Unlike its cousins (French and Swiss meringue), this Italian meringue recipe uses hot sugar syrup poured into whipping egg whites, creating a luxuriously smooth texture that holds its shape beautifully and doesn’t weep or deflate.
This professional Italian meringue technique produces a frosting that’s perfect for topping pies, filling cakes, piping onto cupcakes, or torching for that dramatic brûléed finish. It’s the secret weapon of professional pastry chefs because it’s incredibly stable, can be made ahead, and has a silky texture that’s far superior to simple buttercream or whipped cream.
Perfect for lemon meringue pie, baked Alaska, Swiss meringue buttercream (yes, you start with Italian meringue!), macarons, or simply piped onto desserts and torched for that Instagram-worthy finish, this stable meringue recipe is a fundamental skill that elevates your baking game. While it requires a candy thermometer and careful timing, the technique is straightforward once you understand the process, and the results are nothing short of spectacular—glossy, stable, and absolutely delicious.
History / Background
Meringue as a concept dates back to the early 17th century, with its exact origins debated among food historians. Some credit the Swiss village of Meiringen, while others point to Italian or French pastry chefs. What we do know is that by the 18th century, meringue had become a staple in European pastry kitchens, with different countries developing their own techniques.
Italian meringue specifically is believed to have originated in Italy (hence the name), where pastry chefs developed the technique of pouring hot sugar syrup into whipping egg whites. This method was revolutionary because it solved several problems that plagued traditional meringue: it’s more stable (doesn’t weep or deflate easily), it’s food-safe to eat without baking (the hot syrup cooks the egg whites), and it has a smoother, silkier texture than raw meringue.
The technique became fundamental in classical French pastry-making, adopted by legendary chefs like Marie-Antoine Carême and Auguste Escoffier in the 19th century. Italian meringue became the base for numerous classic desserts: the elaborate Baked Alaska (meringue-covered ice cream cake invented in the 1860s), Swiss meringue buttercream (still the preferred frosting of professional cake decorators), and the delicate French macaron (which uses Italian meringue for stability).
The science behind Italian meringue is fascinating. When hot sugar syrup (heated to 240°F/116°C, the “soft ball” stage) is poured into whipping egg whites, it denatures the proteins and cooks them, creating a stable foam. The sugar syrup also dissolves completely, creating that signature glossy, smooth texture without any graininess. The result is a meringue that’s stable at room temperature, food-safe, and incredibly versatile.
In professional kitchens, Italian meringue is prized for its stability and workability. It can be made hours ahead without deflating, it pipes beautifully, and it can be torched for a dramatic finish without weeping or becoming soggy. It’s the backbone of countless classic and modern desserts, from traditional lemon meringue pie to contemporary deconstructed pavlovas.
Today, Italian meringue remains the gold standard for professional pastry work, though home bakers often shy away from it due to the perceived complexity. In reality, with a candy thermometer and attention to timing, it’s entirely achievable—and once you master it, you’ll wonder why you ever bothered with other frostings.
Why You’ll Love This Recipe
This Italian meringue recipe demystifies a professional technique and makes it accessible to home bakers. While it requires more attention than simple whipped cream, the result is a frosting that’s leagues above anything store-bought and more stable than any other meringue method.
Here’s why this recipe will transform your dessert-making:
- Incredibly Stable: Won’t weep, deflate, or separate like French meringue
- Food-Safe: Cooked to a safe temperature, no risk from raw eggs
- Silky Smooth Texture: Glossy and marshmallow-like, never grainy
- Holds Shape Perfectly: Ideal for piping decorative designs
- Torches Beautifully: Creates that stunning brûléed finish
- Versatile: Use for frosting, filling, or as a base for buttercream
- Make-Ahead Friendly: Stays stable for hours at room temperature
- Professional Quality: Achieves bakery-level results at home
- Impressive: Wows guests with its glossy appearance and silky texture
- Sugar-Forward: Simple ingredients let technique shine
Whether you’re making your first lemon meringue pie or perfecting Swiss meringue buttercream, this stable Italian meringue recipe gives you the foundation for countless spectacular desserts.
Ingredient Notes
Italian meringue has remarkably few ingredients—it’s all about technique and proportion:
Egg Whites: The foundation of your meringue. Use fresh eggs at room temperature for maximum volume. The proteins in egg whites trap air bubbles, creating that characteristic foam. You’ll need 4 large egg whites for this recipe. Save those yolks for custard or carbonara!
Granulated Sugar: Divided into two portions—one for the syrup and a small amount for stabilizing the whites as they whip. The sugar provides structure, sweetness, and that glossy appearance. Superfine sugar dissolves more easily, but regular granulated works perfectly. Don’t substitute with powdered sugar (contains cornstarch) or brown sugar (moisture content is different).
Water: Just enough to dissolve the sugar and create a syrup. Use room temperature water for best results. The water-to-sugar ratio is crucial—too much water means longer cooking time, too little makes it hard to dissolve the sugar.
Cream of Tartar: Optional but highly recommended. This acidic ingredient stabilizes the egg whites and helps them hold their structure. It also makes the meringue more forgiving. If you don’t have it, substitute with 1/2 teaspoon lemon juice or white vinegar, or simply omit (though your meringue will be less stable).
Vanilla Extract or Other Flavorings: Optional additions after the meringue is made. Pure vanilla extract is classic, but you can also use almond extract, lemon extract, or other flavorings. Add these at the very end, after the syrup is incorporated.
Salt: Just a tiny pinch enhances all the flavors and balances the sweetness. It’s optional but recommended.
Equipment Needed
Having the right tools is essential for Italian meringue success:
- Candy Thermometer or Digital Instant-Read Thermometer: Non-negotiable! You must accurately measure the sugar syrup temperature (240°F/116°C). Clip-on candy thermometers work well, or use an instant-read thermometer.
- Stand Mixer with Whisk Attachment: Strongly recommended. You need one hand free to pour hot syrup while the other controls the mixer. Hand mixers work but are challenging—you’d need a helper.
- Small Heavy-Bottomed Saucepan: For making the sugar syrup. Heavy-bottomed prevents hot spots and burning. 2-quart size is perfect.
- Heatproof Measuring Cup or Small Pitcher: For pouring the hot syrup. A measuring cup with a spout makes controlled pouring easier.
- Silicone Spatula: For scraping down the bowl and stirring the sugar syrup.
- Measuring Cups and Spoons: Accuracy matters in meringue-making!
- Clean Metal or Glass Bowl: For whipping egg whites. Must be completely grease-free. Plastic bowls can retain oils that prevent proper whipping.
- Piping Bag and Tips (Optional): If using for decorative purposes.
- Kitchen Torch (Optional): For torching the finished meringue
Perfect Italian Meringue

This Italian meringue recipe creates a silky, stable, and glossy frosting that’s perfect for topping pies, frosting cakes, or piping decorations. Made with hot sugar syrup poured into whipping egg whites, this professional meringue technique is food-safe, holds its shape beautifully, and torches to perfection.
- Prep Time: 10 minutes
- Cook Time: 15 minutes
- Total Time: 25 minutes
- Yield: About 4 cups 1x
- Category: Frosting
- Method: Stovetop
- Cuisine: Italian
- Diet: Gluten Free
Ingredients
For the Meringue:
- 4 large egg whites (about 1/2 cup or 120g), at room temperature
- 1 cup (200g) granulated sugar, divided
- 1/4 cup (60ml) water
- 1/4 teaspoon cream of tartar (optional but recommended)
- Pinch of salt (optional)
- 1 teaspoon vanilla extract (optional, added at the end)
Instructions
- Prep Your Workspace: Before starting, make sure your mixing bowl and whisk attachment are completely clean and dry—any grease will prevent the egg whites from whipping properly. Have your candy thermometer ready and all ingredients measured. This process moves quickly once you start!
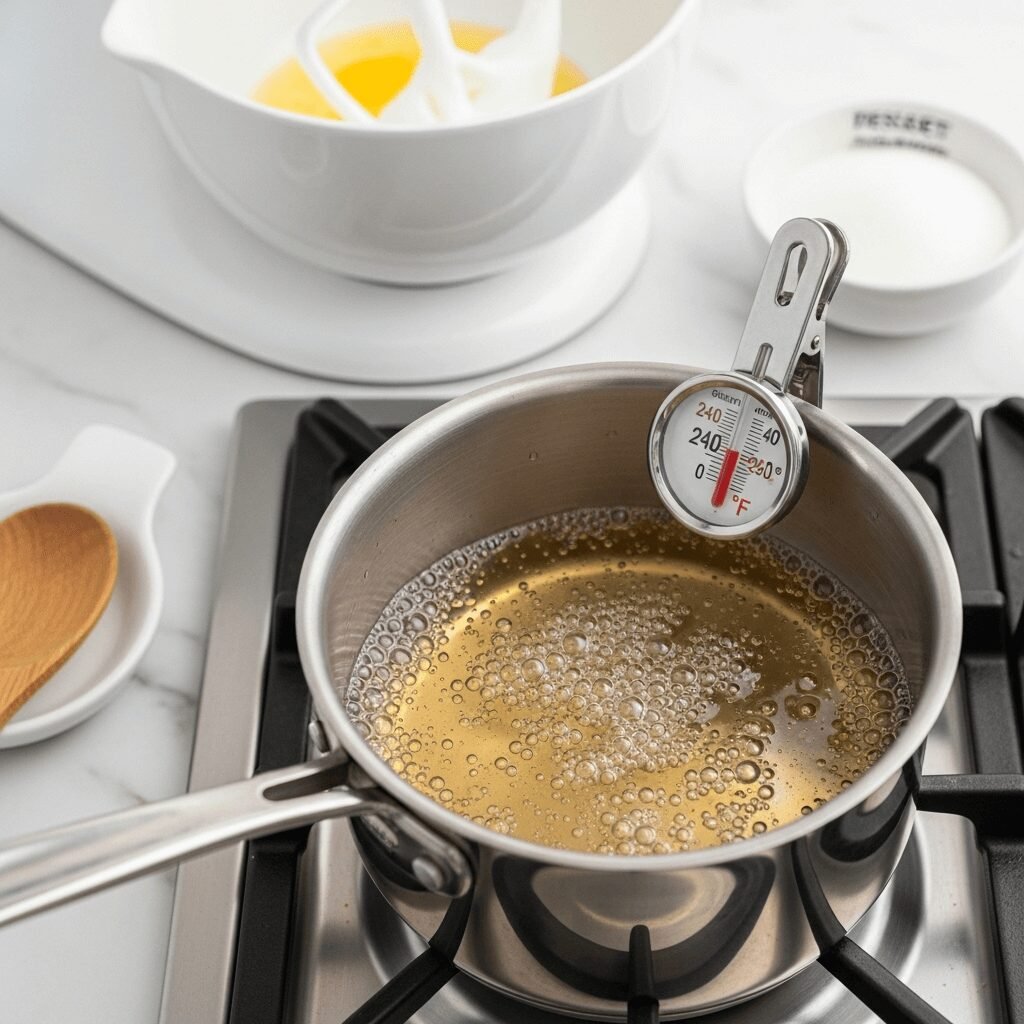
- Start the Sugar Syrup: In a small, heavy-bottomed saucepan, combine 3/4 cup (150g) of the sugar with the water. Stir gently over medium heat until the sugar dissolves completely, about 2-3 minutes. Once dissolved, stop stirring completely (stirring can cause crystallization). Clip your candy thermometer to the side of the pan, making sure the bulb doesn’t touch the bottom.
- Begin Whipping Egg Whites: While the sugar syrup heats, place egg whites in the bowl of your stand mixer fitted with the whisk attachment. Add cream of tartar and salt if using. Begin beating on medium speed until foamy, about 1 minute.
- Add Sugar to Whites: With the mixer still running on medium speed, gradually add the remaining 1/4 cup (50g) of sugar in a slow, steady stream. Once all the sugar is added, increase speed to medium-high and continue beating until soft peaks form—the whites should be thick, glossy, and hold a peak that gently droops when you lift the whisk. This takes about 2-3 minutes.
- Monitor Syrup Temperature: Keep an eye on your sugar syrup. It needs to reach exactly 240°F (116°C), which is the “soft ball” stage. At this temperature, a small amount dropped into ice water forms a soft, pliable ball. This usually takes 5-7 minutes from when it starts boiling. Don’t rush it—temperature accuracy is crucial.
- The Critical Pour: Once the syrup reaches 240°F (116°C), immediately remove from heat. With the mixer running on medium speed (NOT high—this prevents splattering), very slowly pour the hot syrup in a thin, steady stream down the side of the bowl, aiming between the whisk and the bowl wall. Avoid pouring directly onto the whisk or it will splatter. This step takes 1-2 minutes—don’t rush the pour!
- Whip to Perfection: Once all the syrup is incorporated, increase mixer speed to medium-high and continue beating until the meringue is thick, glossy, and the bowl feels just barely warm to the touch (not hot), about 5-8 minutes. The meringue should form stiff, glossy peaks that stand straight up when you lift the whisk.
- Add Flavorings: If using vanilla or other extracts, add them now and beat for 10 more seconds to incorporate.
- Use Immediately or Hold: Italian meringue is ready to use immediately! Pipe onto pies, spread onto cakes, or use as directed in your recipe. It can also be covered and held at room temperature for up to 2 hours, or refrigerated for up to 24 hours (let come to room temperature and re-whip briefly before using).
Notes
- Temperature is Everything: The sugar syrup MUST reach 240°F (116°C). Too cool and the meringue will be runny; too hot and you’ll get crunchy sugar bits.
- Timing Coordination: Start your egg whites whipping when the syrup reaches about 230°F, so they’re at soft peaks right when the syrup hits 240°F.
- Clean Equipment is Crucial: Any fat or grease prevents egg whites from whipping. Wipe bowl with white vinegar or lemon juice if unsure.
- Room Temperature Eggs: They whip to greater volume than cold eggs. To quickly warm eggs, place (in shells) in a bowl of warm water for 5 minutes.
- Don’t Skip the Slow Pour: Pouring too fast can “cook” the egg whites into scrambled egg bits. Slow and steady wins!
- Storage: Cover and refrigerate up to 24 hours. The texture firms up slightly but can be re-whipped gently.
Nutrition
- Serving Size: 1/4 cup (about 1/12 of recipe)
- Calories: 70
- Sugar: 17g
- Sodium: 20mg
- Fat: 0g
- Saturated Fat: 0g
- Unsaturated Fat: 0g
- Trans Fat: 0g
- Carbohydrates: 17g
- Fiber: 0g
- Protein: 1g
- Cholesterol: 0mg
Perfect Italian Meringue: Silky, Stable, and Stunning
Introduction of Recipe
Italian meringue is the silkiest, most stable, and most versatile of all the meringue types—a glossy, marshmallow-like frosting that’s cooked to perfection and safe to eat without further baking. Unlike its cousins (French and Swiss meringue), this Italian meringue recipe uses hot sugar syrup poured into whipping egg whites, creating a luxuriously smooth texture that holds its shape beautifully and doesn’t weep or deflate.
This professional Italian meringue technique produces a frosting that’s perfect for topping pies, filling cakes, piping onto cupcakes, or torching for that dramatic brûléed finish. It’s the secret weapon of professional pastry chefs because it’s incredibly stable, can be made ahead, and has a silky texture that’s far superior to simple buttercream or whipped cream.
Perfect for lemon meringue pie, baked Alaska, Swiss meringue buttercream (yes, you start with Italian meringue!), macarons, or simply piped onto desserts and torched for that Instagram-worthy finish, this stable meringue recipe is a fundamental skill that elevates your baking game. While it requires a candy thermometer and careful timing, the technique is straightforward once you understand the process, and the results are nothing short of spectacular—glossy, stable, and absolutely delicious.
History / Background
Meringue as a concept dates back to the early 17th century, with its exact origins debated among food historians. Some credit the Swiss village of Meiringen, while others point to Italian or French pastry chefs. What we do know is that by the 18th century, meringue had become a staple in European pastry kitchens, with different countries developing their own techniques.
Italian meringue specifically is believed to have originated in Italy (hence the name), where pastry chefs developed the technique of pouring hot sugar syrup into whipping egg whites. This method was revolutionary because it solved several problems that plagued traditional meringue: it’s more stable (doesn’t weep or deflate easily), it’s food-safe to eat without baking (the hot syrup cooks the egg whites), and it has a smoother, silkier texture than raw meringue.
The technique became fundamental in classical French pastry-making, adopted by legendary chefs like Marie-Antoine Carême and Auguste Escoffier in the 19th century. Italian meringue became the base for numerous classic desserts: the elaborate Baked Alaska (meringue-covered ice cream cake invented in the 1860s), Swiss meringue buttercream (still the preferred frosting of professional cake decorators), and the delicate French macaron (which uses Italian meringue for stability).
The science behind Italian meringue is fascinating. When hot sugar syrup (heated to 240°F/116°C, the “soft ball” stage) is poured into whipping egg whites, it denatures the proteins and cooks them, creating a stable foam. The sugar syrup also dissolves completely, creating that signature glossy, smooth texture without any graininess. The result is a meringue that’s stable at room temperature, food-safe, and incredibly versatile.
In professional kitchens, Italian meringue is prized for its stability and workability. It can be made hours ahead without deflating, it pipes beautifully, and it can be torched for a dramatic finish without weeping or becoming soggy. It’s the backbone of countless classic and modern desserts, from traditional lemon meringue pie to contemporary deconstructed pavlovas.
Today, Italian meringue remains the gold standard for professional pastry work, though home bakers often shy away from it due to the perceived complexity. In reality, with a candy thermometer and attention to timing, it’s entirely achievable—and once you master it, you’ll wonder why you ever bothered with other frostings.
Why You’ll Love This Recipe
This Italian meringue recipe demystifies a professional technique and makes it accessible to home bakers. While it requires more attention than simple whipped cream, the result is a frosting that’s leagues above anything store-bought and more stable than any other meringue method.
Here’s why this recipe will transform your dessert-making:
- Incredibly Stable: Won’t weep, deflate, or separate like French meringue
- Food-Safe: Cooked to a safe temperature, no risk from raw eggs
- Silky Smooth Texture: Glossy and marshmallow-like, never grainy
- Holds Shape Perfectly: Ideal for piping decorative designs
- Torches Beautifully: Creates that stunning brûléed finish
- Versatile: Use for frosting, filling, or as a base for buttercream
- Make-Ahead Friendly: Stays stable for hours at room temperature
- Professional Quality: Achieves bakery-level results at home
- Impressive: Wows guests with its glossy appearance and silky texture
- Sugar-Forward: Simple ingredients let technique shine
Whether you’re making your first lemon meringue pie or perfecting Swiss meringue buttercream, this stable Italian meringue recipe gives you the foundation for countless spectacular desserts.
Ingredient Notes
Italian meringue has remarkably few ingredients—it’s all about technique and proportion:
Egg Whites: The foundation of your meringue. Use fresh eggs at room temperature for maximum volume. The proteins in egg whites trap air bubbles, creating that characteristic foam. You’ll need 4 large egg whites for this recipe. Save those yolks for custard or carbonara!
Granulated Sugar: Divided into two portions—one for the syrup and a small amount for stabilizing the whites as they whip. The sugar provides structure, sweetness, and that glossy appearance. Superfine sugar dissolves more easily, but regular granulated works perfectly. Don’t substitute with powdered sugar (contains cornstarch) or brown sugar (moisture content is different).
Water: Just enough to dissolve the sugar and create a syrup. Use room temperature water for best results. The water-to-sugar ratio is crucial—too much water means longer cooking time, too little makes it hard to dissolve the sugar.
Cream of Tartar: Optional but highly recommended. This acidic ingredient stabilizes the egg whites and helps them hold their structure. It also makes the meringue more forgiving. If you don’t have it, substitute with 1/2 teaspoon lemon juice or white vinegar, or simply omit (though your meringue will be less stable).
Vanilla Extract or Other Flavorings: Optional additions after the meringue is made. Pure vanilla extract is classic, but you can also use almond extract, lemon extract, or other flavorings. Add these at the very end, after the syrup is incorporated.
Salt: Just a tiny pinch enhances all the flavors and balances the sweetness. It’s optional but recommended.
Equipment Needed
Having the right tools is essential for Italian meringue success:
- Candy Thermometer or Digital Instant-Read Thermometer: Non-negotiable! You must accurately measure the sugar syrup temperature (240°F/116°C). Clip-on candy thermometers work well, or use an instant-read thermometer.
- Stand Mixer with Whisk Attachment: Strongly recommended. You need one hand free to pour hot syrup while the other controls the mixer. Hand mixers work but are challenging—you’d need a helper.
- Small Heavy-Bottomed Saucepan: For making the sugar syrup. Heavy-bottomed prevents hot spots and burning. 2-quart size is perfect.
- Heatproof Measuring Cup or Small Pitcher: For pouring the hot syrup. A measuring cup with a spout makes controlled pouring easier.
- Silicone Spatula: For scraping down the bowl and stirring the sugar syrup.
- Measuring Cups and Spoons: Accuracy matters in meringue-making!
- Clean Metal or Glass Bowl: For whipping egg whites. Must be completely grease-free. Plastic bowls can retain oils that prevent proper whipping.
- Piping Bag and Tips (Optional): If using for decorative purposes.
- Kitchen Torch (Optional): For torching the finished meringue.
📋 Recipe Card
Prep Time: 10 minutes
Cook Time: 15 minutes
Total Time: 25 minutes
Yield: About 4 cups (enough to frost 12 cupcakes or one 9-inch pie)
Category: Frosting/Topping
Method: Stovetop + Mixer
Cuisine: Italian/French
Diet: Gluten-Free, Dairy-Free, Vegetarian
Description
This Italian meringue recipe creates a silky, stable, and glossy frosting that’s perfect for topping pies, frosting cakes, or piping decorations. Made with hot sugar syrup poured into whipping egg whites, this professional meringue technique is food-safe, holds its shape beautifully, and torches to perfection.
Ingredients
For the Meringue:
- 4 large egg whites (about 1/2 cup or 120g), at room temperature
- 1 cup (200g) granulated sugar, divided
- 1/4 cup (60ml) water
- 1/4 teaspoon cream of tartar (optional but recommended)
- Pinch of salt (optional)
- 1 teaspoon vanilla extract (optional, added at the end)
Instructions
- Prep Your Workspace: Before starting, make sure your mixing bowl and whisk attachment are completely clean and dry—any grease will prevent the egg whites from whipping properly. Have your candy thermometer ready and all ingredients measured. This process moves quickly once you start!
- Start the Sugar Syrup: In a small, heavy-bottomed saucepan, combine 3/4 cup (150g) of the sugar with the water. Stir gently over medium heat until the sugar dissolves completely, about 2-3 minutes. Once dissolved, stop stirring completely (stirring can cause crystallization). Clip your candy thermometer to the side of the pan, making sure the bulb doesn’t touch the bottom.
- Begin Whipping Egg Whites: While the sugar syrup heats, place egg whites in the bowl of your stand mixer fitted with the whisk attachment. Add cream of tartar and salt if using. Begin beating on medium speed until foamy, about 1 minute.
- Add Sugar to Whites: With the mixer still running on medium speed, gradually add the remaining 1/4 cup (50g) of sugar in a slow, steady stream. Once all the sugar is added, increase speed to medium-high and continue beating until soft peaks form—the whites should be thick, glossy, and hold a peak that gently droops when you lift the whisk. This takes about 2-3 minutes.
- Monitor Syrup Temperature: Keep an eye on your sugar syrup. It needs to reach exactly 240°F (116°C), which is the “soft ball” stage. At this temperature, a small amount dropped into ice water forms a soft, pliable ball. This usually takes 5-7 minutes from when it starts boiling. Don’t rush it—temperature accuracy is crucial.
- The Critical Pour: Once the syrup reaches 240°F (116°C), immediately remove from heat. With the mixer running on medium speed (NOT high—this prevents splattering), very slowly pour the hot syrup in a thin, steady stream down the side of the bowl, aiming between the whisk and the bowl wall. Avoid pouring directly onto the whisk or it will splatter. This step takes 1-2 minutes—don’t rush the pour!
- Whip to Perfection: Once all the syrup is incorporated, increase mixer speed to medium-high and continue beating until the meringue is thick, glossy, and the bowl feels just barely warm to the touch (not hot), about 5-8 minutes. The meringue should form stiff, glossy peaks that stand straight up when you lift the whisk.
- Add Flavorings: If using vanilla or other extracts, add them now and beat for 10 more seconds to incorporate.
- Use Immediately or Hold: Italian meringue is ready to use immediately! Pipe onto pies, spread onto cakes, or use as directed in your recipe. It can also be covered and held at room temperature for up to 2 hours, or refrigerated for up to 24 hours (let come to room temperature and re-whip briefly before using).
Notes
- Temperature is Everything: The sugar syrup MUST reach 240°F (116°C). Too cool and the meringue will be runny; too hot and you’ll get crunchy sugar bits.
- Timing Coordination: Start your egg whites whipping when the syrup reaches about 230°F, so they’re at soft peaks right when the syrup hits 240°F.
- Clean Equipment is Crucial: Any fat or grease prevents egg whites from whipping. Wipe bowl with white vinegar or lemon juice if unsure.
- Room Temperature Eggs: They whip to greater volume than cold eggs. To quickly warm eggs, place (in shells) in a bowl of warm water for 5 minutes.
- Don’t Skip the Slow Pour: Pouring too fast can “cook” the egg whites into scrambled egg bits. Slow and steady wins!
- Storage: Cover and refrigerate up to 24 hours. The texture firms up slightly but can be re-whipped gently.
Nutrition Facts Table
Serving Size: 1/4 cup (about 1/12 of recipe)
Calories: 70
Sugar: 17g
Sodium: 20mg
Fat: 0g
Saturated Fat: 0g
Unsaturated Fat: 0g
Trans Fat: 0g
Carbohydrates: 17g
Fiber: 0g
Protein: 1g
Cholesterol: 0mg
Nutritional information is approximate and will vary based on exact measurements and any additions like vanilla extract.
Tips & Variations
Swiss Meringue Buttercream: Once your Italian meringue has cooled to room temperature (bowl should feel cool), gradually add 1½ cups (3 sticks) of softened butter, beating until smooth and creamy. This creates the most luxurious buttercream frosting!
Flavored Meringue: Add different extracts at the end: almond, lemon, peppermint, coconut, or coffee extract. For chocolate, fold in 2 tablespoons cocoa powder once meringue is finished.
Colored Meringue: Add gel food coloring at the end for pastel or vibrant colored meringue. Gel colors work best—liquid can make meringue runny.
Coffee Italian Meringue: Dissolve 1 tablespoon instant espresso powder in the water before making the syrup for sophisticated coffee flavor.
Citrus Meringue: Replace vanilla with 1 teaspoon lemon, lime, or orange extract. Add 1 teaspoon finely grated citrus zest at the end.
Smaller or Larger Batch: This recipe scales easily. Keep the ratio of 1 egg white to 1/4 cup sugar. For a larger batch, double everything; for smaller, halve the recipe.
Without Cream of Tartar: Use 1/2 teaspoon lemon juice or white vinegar instead, or simply omit (though meringue will be slightly less stable).
Pro Chef Tips
The Hot Sugar Syrup Test: If you don’t have a thermometer (though you really should!), test the syrup by dropping a small amount into ice water. At 240°F, it should form a soft, pliable ball that you can pick up but easily squash. This is called the “soft ball” stage.
Perfect Timing Coordination: Start heating your sugar syrup first, then begin whipping egg whites when the syrup reaches about 230°F. This ensures your whites reach soft peaks right as the syrup hits 240°F. If whites reach soft peaks before syrup is ready, reduce mixer to low speed until syrup is ready.
The Clean Bowl Test: To ensure your bowl is truly grease-free, wipe it with white vinegar or lemon juice on a paper towel, then dry thoroughly. Even a tiny bit of fat prevents proper whipping.
Preventing Crystallization: Once your sugar dissolves, stop stirring the syrup completely. Stirring encourages sugar crystals to form, which creates a grainy meringue. You can gently swirl the pan if needed, but no stirring!
The Pour Technique: Pour the hot syrup in a thin stream down the side of the bowl between the whisk and the bowl wall. This allows it to incorporate gradually without splashing everywhere or cooking the whites into scrambled eggs.
Test for Doneness: Properly made Italian meringue should form stiff, glossy peaks, and the bowl should feel just barely warm or room temperature. If still hot, keep beating—the residual heat can cause weeping later.
Humidity Warning: Like all meringues, Italian meringue doesn’t love humidity. On very humid days, it may not whip as stiff or hold as long. Use it the same day if possible when humidity is high.
Common Mistakes to Avoid
Using Cold Egg Whites: Cold eggs don’t whip to their full volume. Always use room temperature eggs. If you forgot to take them out ahead, place whole eggs in a bowl of warm (not hot) water for 5-10 minutes.
Getting Yolk in the Whites: Even a tiny speck of yolk (which contains fat) can prevent egg whites from whipping properly. Separate eggs carefully, and if any yolk gets in, remove it with a piece of eggshell or start over with fresh whites.
Wrong Sugar Syrup Temperature: Too cool (under 235°F) creates runny, unstable meringue that deflates. Too hot (over 245°F) creates hard sugar bits in your meringue. Use a reliable thermometer and hit that 240°F target.
Pouring Syrup Too Fast: Dumping hot syrup in quickly can scramble the egg whites, creating white cooked bits in your meringue. Pour in a slow, thin stream taking 1-2 minutes to pour it all. Patience is key!
Not Beating Long Enough: After adding the syrup, you must continue beating until the bowl is no longer hot (just barely warm or room temp). This usually takes 5-8 minutes. If you stop too soon, the meringue will be warm and unstable, causing it to weep or deflate.
Dirty Equipment: This bears repeating because it’s so important. Any grease, oil, or yolk in your bowl or on your whisk will prevent proper whipping. Make sure everything is spotlessly clean and dry.
Storage & Meal Prep
Room Temperature Storage: Italian meringue can be covered and stored at room temperature for up to 2 hours before using. Any longer and you should refrigerate it. It remains quite stable at room temperature, which is part of what makes it so useful for professional bakers.
Refrigerator Storage: Cover the meringue with plastic wrap (press it directly onto the surface to prevent a skin from forming) and refrigerate for up to 24 hours. The texture will firm up slightly in the fridge. Before using, let come to room temperature and give it a quick whip with the mixer to restore some volume and smoothness.
On Desserts: Once piped or spread onto desserts, meringue-topped items should be served within a few hours for best texture. Meringue can weep (develop liquid droplets) over time, especially in humid conditions. Refrigerate meringue-topped desserts if holding longer than 2 hours.
Torched Meringue: If you’ve torched your meringue for that brûléed finish, serve within 1-2 hours for the best texture. The torched sugar can become soft over time.
Texture Changes: While Italian meringue is very stable, it will gradually lose some volume and become slightly denser if stored too long. For absolute best results, use the same day you make it.
Make-Ahead & Freezer Notes
Make-Ahead Instructions: Italian meringue can be made up to 24 hours ahead. Store covered in the refrigerator. Before using, let come to room temperature (about 30 minutes), then re-whip briefly on medium speed to restore smoothness and volume. Don’t over-whip or you’ll deflate it.
Freezing Italian Meringue: Plain Italian meringue doesn’t freeze well—it becomes watery and grainy when thawed. However, Swiss meringue buttercream (made with Italian meringue base plus butter) freezes beautifully for up to 3 months.
Freezing Meringue-Topped Desserts: Some meringue-topped desserts can be frozen successfully. Lemon meringue pie can be frozen for up to 1 month (though texture changes slightly). Baked Alaska is specifically designed to be frozen! Individual pavlovas freeze well for up to 2 months.
Desserts Made with Italian Meringue: Most desserts made with Italian meringue are best enjoyed fresh. Lemon meringue pie should be served the day it’s made. French macarons (made with Italian meringue) actually improve after 24 hours in the refrigerator.
Best Practice: For most applications, make Italian meringue the same day you plan to use it. If you need to make something ahead, consider recipes where you incorporate the meringue (like Swiss meringue buttercream) rather than using it as a topping.
Serving Suggestions
Classic Uses:
- Lemon meringue pie (the quintessential use)
- Key lime pie with torched meringue topping
- Baked Alaska (meringue-covered ice cream cake)
- Topping for sweet potato pie
- Filling for cream pies
Modern Applications:
- Piped onto cupcakes and torched for dramatic effect
- S’mores-style topping (torch it for that campfire flavor)
- Pavlova base (pipe into nests, bake until crisp)
- Topping for hot chocolate or coffee drinks
- Frosted berries or fruit
As a Buttercream Base:
- Swiss meringue buttercream for layer cakes
- Filling for macarons
- Frosting for wedding cakes (very stable)
- Decorated birthday cakes
Piping Ideas:
- Classic swirls on pies
- Rosettes on cupcakes
- Decorative peaks and valleys
- Piped borders on tarts
- Individual meringue kisses (pipe small amounts on parchment, bake low and slow)
Presentation Tips:
- Torch with a kitchen torch for caramelized peaks
- Dust with cocoa powder or cinnamon
- Top with fresh berries
- Sprinkle with toasted coconut
- Garnish with fresh mint leaves
FAQs Section
Q: What’s the difference between Italian, French, and Swiss meringue?
A: French meringue is raw egg whites beaten with sugar (simplest but least stable). Swiss meringue is egg whites and sugar heated together over a double boiler, then whipped (medium stability). Italian meringue uses hot sugar syrup poured into whipping whites (most stable, food-safe, and professional). Italian is best for frostings and toppings that won’t be baked.
Q: Is Italian meringue safe to eat without baking?
A: Yes! The hot sugar syrup (240°F/116°C) cooks the egg whites to a food-safe temperature. This is one of the major advantages of Italian meringue over French meringue, which uses raw eggs. Italian meringue is completely safe to eat without further cooking.
Q: My meringue is runny. What went wrong?
A: Most likely the sugar syrup didn’t reach the proper temperature (240°F). If syrup is too cool, it won’t set the meringue properly. Other causes: adding syrup too quickly (cools it down too fast), not beating long enough after adding syrup, or humid conditions. Make sure to beat until the bowl feels barely warm or room temperature.
Q: Can I make Italian meringue without a candy thermometer?
A: It’s very difficult and not recommended for beginners. You can test using the “soft ball” method (drop syrup in ice water—it should form a soft, pliable ball), but a thermometer ($10-15) makes success much more likely. It’s a worthwhile investment for any baker.
Q: Why does my meringue weep (develop liquid)?
A: Weeping happens when meringue is undercooked (syrup too cool), overbeaten (proteins break down), or from humidity. Italian meringue is the most weep-resistant, but it can still happen in very humid conditions or if not used promptly. Using cream of tartar helps prevent weeping.
Q: Can I color Italian meringue?
A: Yes! Use gel food coloring, not liquid, which can make meringue runny. Add coloring at the very end after the meringue is fully whipped. Start with a tiny amount—gel colors are very concentrated. Beat briefly to incorporate evenly.
Q: How do I fix grainy Italian meringue?
A: Graininess usually means sugar crystals formed, either from stirring the syrup after sugar dissolved or from sugar crystallizing on the side of the pan. Next time, don’t stir once sugar dissolves, and brush down the sides of the pan with a wet pastry brush if you see crystals forming. You can try warming slightly and beating again, but prevention is best.
Conclusion
Mastering Italian meringue is like unlocking a secret level in baking—suddenly, a whole world of professional-quality desserts becomes accessible. Yes, it requires attention to detail and a candy thermometer, but the technique is genuinely straightforward once you understand the timing and process. The first time you pour that hot syrup into whipping egg whites and watch it transform into silky, glossy meringue, you’ll feel like a pastry chef.
What makes Italian meringue so special isn’t just the impressive results—it’s the versatility and stability. This is the meringue that won’t let you down, that holds its shape for hours, that torches to perfection, and that serves as the foundation for countless spectacular desserts. From the classic lemon meringue pie to elegant Swiss meringue buttercream, from show-stopping Baked Alaska to delicate macarons, this single technique opens the door to so many possibilities.
The best part? Once you nail it the first time (and you will!), it becomes second nature. You’ll find yourself making Italian meringue for all sorts of occasions, impressing guests with your bakery-quality creations, and wondering why you ever bothered with inferior frostings.
Ready to master this professional technique? I’d love to hear how your Italian meringue turns out! Did you make lemon meringue pie? Try Swiss meringue buttercream? Have questions about the technique? Drop a comment below—I’m here to help troubleshoot and celebrate your successes!
Pin this recipe to your Pinterest boards! Save it to your “Advanced Baking Techniques,” “Frosting Recipes,” or “Professional Baking” collections so you can find it whenever you need that perfect, stable meringue. And if this recipe helps you create something spectacular, please share it with fellow bakers who want to level up their dessert game.
Here’s to silky, glossy peaks, perfectly stable frosting, and the magic of mastering Italian meringue!