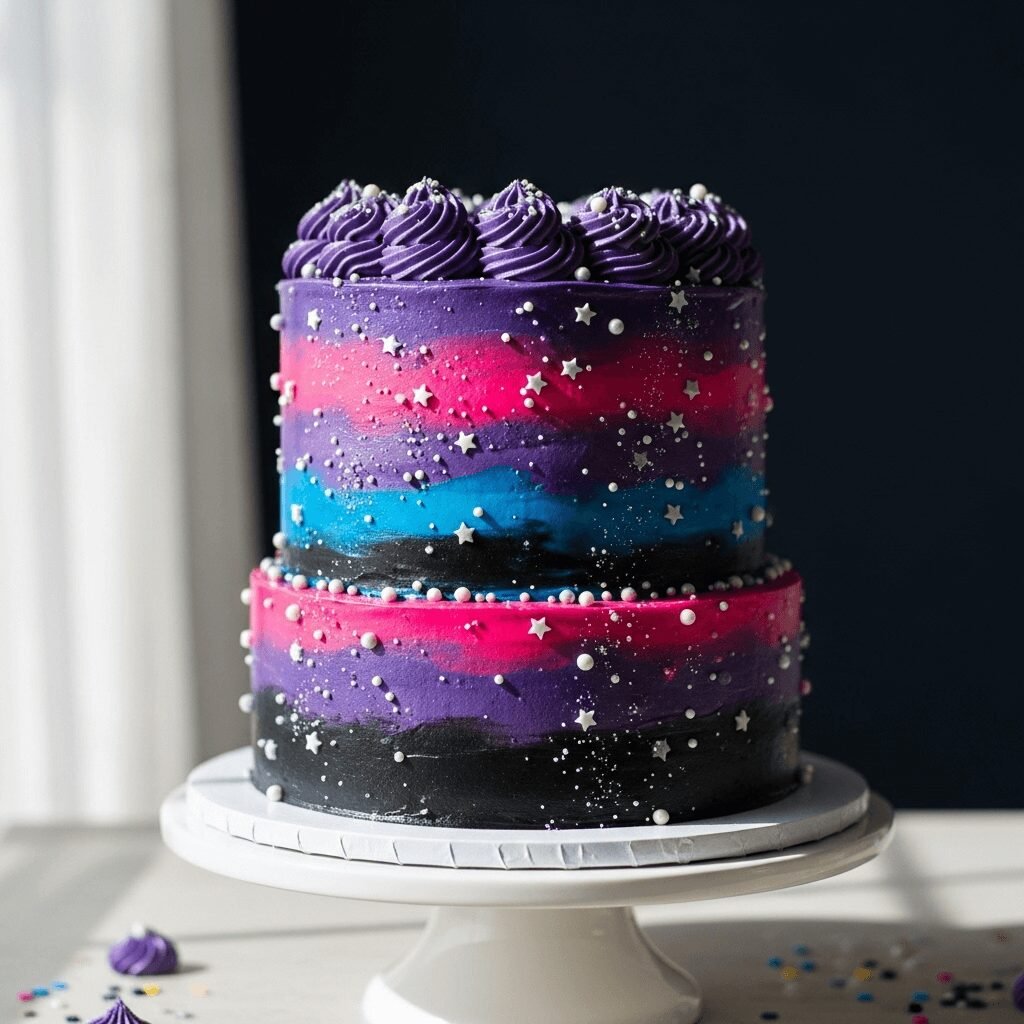
Stunning Galaxy Cake Recipe: A Cosmic Dessert That’s Out of This World
Get ready to create the most show-stopping dessert you’ve ever made! This galaxy cake recipe transforms a simple cake into an edible work of art featuring swirls of deep purples, electric blues, vibrant pinks, and shimmering stars. Whether you’re planning a space-themed birthday party, celebrating an astronomy enthusiast, or just want to wow your friends and family with your baking skills, this DIY galaxy cake delivers that “wow” moment every single time.
What makes this galaxy cake so special is that it looks incredibly complex and professional, but the techniques are actually quite forgiving and beginner-friendly. You’ll be using basic cake layers, buttercream frosting, and simple painting techniques with food coloring to create those mesmerizing cosmic swirls. The result? A stunning galaxy birthday cake that looks like it came from a high-end bakery, but was made with love right in your own kitchen. Perfect for birthdays, space-themed celebrations, science parties, or any time you want to create something truly unforgettable.
History / Background
The galaxy cake trend exploded onto the baking scene around 2015-2016, riding the wave of the social media food phenomenon where visual appeal became just as important as taste. Unlike traditional cakes with centuries of history, the galaxy cake is a thoroughly modern creation born from the creativity of contemporary cake artists and the inspiration of NASA’s stunning space photography.
The trend can be traced back to innovative cake decorators on Instagram and Pinterest who were experimenting with watercolor techniques and ombre effects. When the buttercream galaxy technique emerged—using palette knives to blend deep space colors directly onto frosted cakes—it went viral almost overnight. Bakers everywhere were captivated by how simple tools and food coloring could recreate the breathtaking beauty of nebulas, star clusters, and the infinite cosmos.
What’s particularly fascinating is how this cake represents a perfect marriage of art and science appreciation. The growing public interest in space exploration, fueled by SpaceX launches, Mars missions, and stunning images from the Hubble and James Webb telescopes, created a cultural moment where “space” became incredibly trendy. The galaxy cake became the edible expression of our collective wonder at the universe, making it the go-to choice for science-loving kids, astronomy enthusiasts, and anyone who wanted a cake that was genuinely unique.
Today, the homemade galaxy cake has evolved beyond just birthdays—it’s shown up at graduation parties (reaching for the stars!), baby showers (over the moon with joy!), and even weddings for couples who want something different from traditional white cakes. The beauty of this trend is its accessibility; you don’t need special equipment or advanced decorating skills, just a willingness to play with color and embrace the abstract, organic nature of space.
Why You’ll Love This Recipe
This easy galaxy cake recipe is proof that you can create bakery-worthy, Instagram-stunning desserts right at home without any professional training. The decorating process is actually quite therapeutic—there’s something almost meditative about blending those cosmic colors together, and because space is naturally abstract and unpredictable, there’s really no wrong way to do it!
Here’s what makes this galaxy cake recipe absolutely stellar:
- Stunning visual impact that makes everyone stop and stare—it’s the ultimate showstopper dessert
- Surprisingly simple technique that uses basic tools you probably already own
- No piping skills required—unlike fancy floral cakes, this relies on spreading and blending
- Endlessly customizable colors so you can create your own unique cosmic masterpiece
- Perfect for all skill levels from beginner bakers to experienced decorators looking for something fun
- Makes any celebration memorable with a cake people will be talking about for years
- Fun family project that kids can help with (they love choosing colors and adding stars!)
- Budget-friendly wow factor using inexpensive food coloring and standard ingredients
- Photograph beautifully for Pinterest, Instagram, and treasured party photos
- Delicious beneath the decoration with moist, flavorful cake that tastes as good as it looks
Ingredient Notes
For the Cake:
All-Purpose Flour (3 cups): The foundation of your cake structure. Measure correctly by spooning into the cup and leveling off. Substitution: Cake flour creates an even more tender crumb—use 3¼ cups if substituting.
Granulated Sugar (2 cups): Sweetens and tenderizes the cake while helping create that perfect moist texture. Substitution: Can use superfine sugar for even finer crumb texture.
Eggs (4 large, room temperature): Provide structure, moisture, and help the cake rise beautifully. Room temperature eggs emulsify better with other ingredients. Substitution: For egg-free galaxy cake, use commercial egg replacer following package directions.
Unsalted Butter (1 cup, softened): Creates rich flavor and tender texture. The key is softened, not melted—it should leave a slight indent when pressed. Substitution: Vegetable oil works but changes texture slightly; use ¾ cup if substituting.
Whole Milk (1 cup, room temperature): Adds moisture and helps create a tender crumb. Substitution: Any dairy-free milk like almond or oat milk works perfectly.
Vanilla Extract (2 tablespoons): Enhances all other flavors without overpowering. Use pure extract for best results.
Baking Powder (1 tablespoon): Gives the cake its lift and light, fluffy texture. Make sure it’s fresh!
Salt (1 teaspoon): Balances sweetness and enhances all the flavors.
For the Galaxy Buttercream:
Unsalted Butter (2 cups, softened): The base of your frosting—must be properly softened for smooth, fluffy buttercream.
Powdered Sugar (6-7 cups): Sweetens and gives structure. Sift it to avoid lumps in your frosting.
Heavy Cream (¼ cup): Thins the buttercream to perfect spreading consistency. Substitution: Whole milk works in a pinch.
Vanilla Extract (2 teaspoons): Adds depth and masks any “powdered sugar” taste.
Gel Food Colors (Purple, Blue, Pink, Black): Gel colors are crucial—they’re concentrated and won’t thin your buttercream like liquid colors. You’ll need deep space colors: purple, royal blue, bright pink, and black.
Edible Star Sprinkles or Luster Dust: Creates that magical starry effect. Silver, gold, and pearl colors work beautifully.
Equipment Needed
Having the right tools makes creating your galaxy cake much easier:
- Three 8-inch or 9-inch round cake pans for layer cake
- Electric mixer (stand mixer or handheld)
- Large mixing bowls (at least 2)
- Measuring cups and spoons
- Wire cooling racks
- Offset spatula (essential for spreading frosting smoothly)
- Rotating cake stand (makes decorating so much easier, but not absolutely required)
- Palette knives or butter knives (for creating galaxy swirls)
- Small bowls (for dividing and coloring buttercream—you’ll need 4-5)
- Parchment paper for lining pans
- Toothpicks for testing doneness and creating texture
- Cake leveler or serrated knife for leveling layers
- Cake board or serving plate
- Piping bags or plastic bags (optional, for more controlled color application)
- Small paintbrush (for applying luster dust)
Stunning Galaxy Cake Recipe
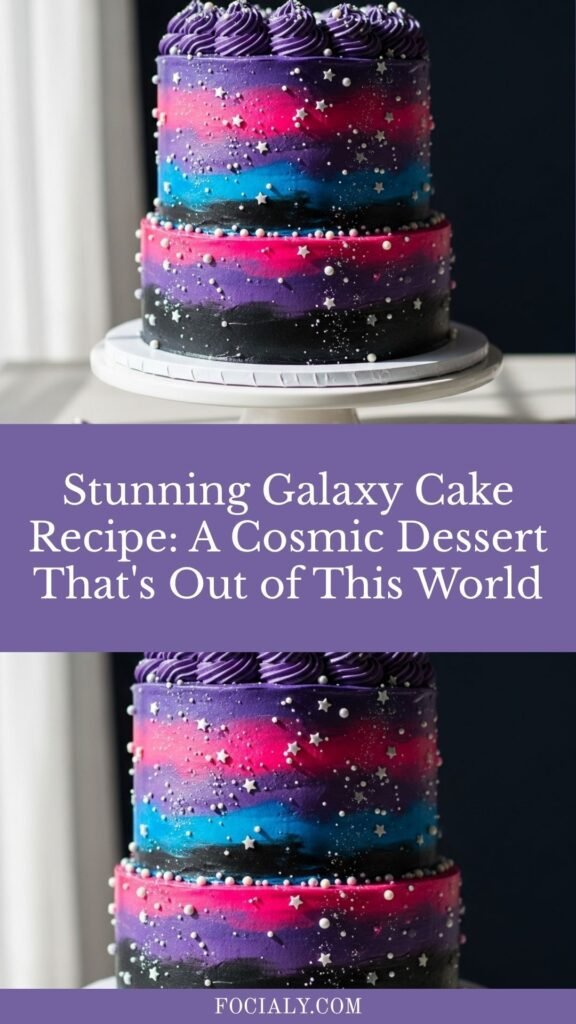
This show-stopping galaxy cake features layers of moist vanilla cake covered in cosmic swirls of purple, blue, and pink buttercream with shimmering edible stars. Perfect for space-themed parties, this DIY galaxy cake looks professionally decorated but uses simple techniques anyone can master.
- Prep Time: 45 minutes
- Cook Time: 30 minutes
- Total Time: 2 hours 15 minutes (including cooling and decorating)
- Yield: 12-16 servings 1x
- Category: Dessert
- Method: Baking
- Cuisine: American
- Diet: Vegetarian
Ingredients
For the Cake:
- 3 cups all-purpose flour
- 1 tablespoon baking powder
- 1 teaspoon salt
- 1 cup unsalted butter (softened)
- 2 cups granulated sugar
- 4 large eggs (room temperature)
- 1 cup whole milk (room temperature)
- 2 tablespoons vanilla extract
For the Galaxy Buttercream:
- 2 cups unsalted butter (softened, 4 sticks)
- 6-7 cups powdered sugar (sifted)
- ¼ cup heavy cream
- 2 teaspoons vanilla extract
- Gel food colors (purple, blue, pink, black)
- Edible star sprinkles or silver luster dust
- Edible glitter or pearl dust (optional)
Instructions
Making the Cake:
- Prepare your oven and pans: Preheat oven to 350°F (175°C). Grease three 8-inch or 9-inch round cake pans with butter or cooking spray, then line the bottoms with parchment paper circles. Grease the parchment too for easy release.
- Mix dry ingredients: In a large bowl, whisk together the flour, baking powder, and salt. Set aside while you prepare the wet ingredients.
- Cream butter and sugar: In your mixer bowl, beat the softened butter and sugar on medium-high speed for 4-5 minutes until light, fluffy, and pale in color. This step incorporates air for a lighter cake, so don’t rush it.
- Add eggs: Add eggs one at a time, beating well after each addition. The mixture might look slightly curdled at first—this is normal. Add the vanilla extract and mix until combined.
- Alternate dry and wet ingredients: With mixer on low speed, add the flour mixture in three parts, alternating with the milk in two parts. Start and end with flour (flour-milk-flour-milk-flour). Mix just until you can’t see dry streaks—overmixing creates tough cake.
- Divide and bake: Divide batter evenly between your three prepared pans (about 2 cups per pan for 8-inch pans). Smooth the tops with a spatula. Bake for 28-32 minutes, until a toothpick inserted in the center comes out with just a few moist crumbs. The tops should spring back when lightly touched.
- Cool completely: Let cakes cool in pans for 15 minutes, then turn out onto wire racks. Remove parchment paper and let cool completely before decorating—at least 1 hour. Warm cake will melt your buttercream!
Making the Galaxy Buttercream:
- Beat the butter: In a large, clean mixing bowl, beat the softened butter on medium speed for 3-4 minutes until smooth and creamy.
- Add sugar gradually: With mixer on low, gradually add the powdered sugar, one cup at a time. Once all the sugar is incorporated, increase speed to medium-high and beat for 3 minutes.
- Add cream and vanilla: Add the heavy cream and vanilla extract. Beat on high speed for 4-5 minutes until the buttercream is light, fluffy, and smooth. It should be spreadable but hold its shape.
Assembling and Decorating:
- Level your cakes: If the cake layers domed during baking, use a cake leveler or serrated knife to trim them flat. This ensures stable, even layers.
- Create base layer: Place your first cake layer on a cake board or serving plate. Spread about ¾ cup of plain white buttercream on top, going almost to the edges. Add second layer and repeat. Top with third layer, bottom-side up for a flat top surface.
- Apply crumb coat: Spread a thin layer of white buttercream all over the entire cake—top and sides. This is your crumb coat that traps loose crumbs. It doesn’t need to look perfect. Refrigerate for 20-30 minutes until firm.
- Divide and color buttercream: Divide remaining buttercream into 4-5 bowls. Leave one bowl white (or light purple). Color others with gel food coloring: one deep purple, one royal blue, one hot pink, and optionally one black or very dark purple. Make colors vibrant and saturated.
- Apply galaxy effect: Using an offset spatula or butter knife, apply large dollops of your colored buttercream randomly over the entire cake. Don’t overthink placement—space is naturally chaotic! Start with larger areas of purple and blue, then add pink accents.
- Blend the colors: Using a clean offset spatula or palette knife, gently blend where colors meet, creating swirls and gradients. Use light strokes and don’t overblend—you want distinct color areas that flow into each other, not one muddy color. Rotate the cake stand (or walk around your cake) as you work.
- Add depth with black: Take tiny amounts of black buttercream and swirl it into the darker areas for depth. Less is more here—just a few strategic touches.
- Smooth technique: For a smoother finish, dip your spatula in hot water, wipe it dry, and gently smooth areas while maintaining the color variation.
- Add the stars: While buttercream is still soft, scatter edible star sprinkles across the cake, concentrating them in certain areas like real star clusters. You can also use a small brush to apply silver or pearl luster dust for a shimmery effect.
- Final touches: For extra magic, dust the entire cake lightly with edible glitter. Step back and admire your cosmic creation! Refrigerate for 30 minutes to set before slicing.
Notes
- Color intensity: Gel food colors give the most vibrant results. Start with less color than you think you need—you can always add more, but you can’t take it away.
- Buttercream consistency: If your buttercream is too thick to spread smoothly, add cream one teaspoon at a time. If too thin, add more powdered sugar.
- Galaxy effect tips: Look at real nebula photos for inspiration! There’s no “wrong” way to create your galaxy—embrace the abstract nature.
- Working with buttercream: If your kitchen is very warm, the buttercream may soften too much. Pop it in the fridge for 10-15 minutes if needed.
- Make it sparkle: Edible luster dust works better than sprinkles for a sophisticated shimmer. Apply it last, after the buttercream has set slightly.
Nutrition
- Serving Size: 1 slice (1/12 of cake)
- Calories: 685
- Sugar: 78g
- Sodium: 285mg
- Fat: 32g
- Saturated Fat: 20g
- Unsaturated Fat: 10g
- Trans Fat: 0g
- Carbohydrates: 95g
- Fiber: 1g
- Protein: 4g
- Cholesterol: 135mg
Tips & Variations
Chocolate Galaxy Cake: Use chocolate cake layers instead of vanilla for an even richer, more cosmic vibe. The dark cake provides beautiful contrast with the colorful frosting.
Different Color Schemes: Try teal, emerald, and gold for a mermaid galaxy theme, or reds, oranges, and yellows for a fiery supernova effect. Black, silver, and white creates an elegant monochrome space theme.
Mini Galaxy Cupcakes: Use this same decorating technique on cupcakes for individual servings. Perfect for parties where you need easy distribution!
Inside Surprise: Add gel food coloring to your cake batter for a subtle color swirl inside that echoes the outside decoration. Divide batter and add colors, then marble together before baking.
Flavor Variations: Try almond extract instead of vanilla for a subtle nutty note, or add a tablespoon of instant espresso powder to the cake batter for a mocha galaxy.
Textured Galaxy: After applying colors, use a toothpick to drag through the buttercream in swirling motions, creating more defined nebula-like textures.
Planet Accents: Make small fondant or buttercream planets to place on top—Saturn with rings is always popular!
Pro Chef Tips
Color like a pro: Start with your lightest colors and work toward darker ones. It’s easier to deepen colors than to lighten them. When blending, use directional strokes that follow the “flow” of your galaxy rather than random circles.
Temperature is everything: Both cake and buttercream need to be at the right temperature. Cake must be completely cool (even slightly chilled is better), and buttercream should be at room temperature—not too soft, not too stiff. This prevents disaster during assembly.
The crumb coat is non-negotiable: I know it feels like an extra step, but it’s the secret to professional-looking cakes. That thin first layer traps all the crumbs, so your final coat is pristine and smooth.
Create depth with layering: Apply your galaxy colors in two passes. First, create your base color scheme. Let it set for 10 minutes in the fridge, then add a second layer of strategic color placements. This creates dimensional depth that makes the galaxy feel more realistic.
Master the hot spatula technique: Dipping your offset spatula in hot water and wiping it dry before smoothing gives you that bakery-smooth finish while maintaining color distinction. The warmth slightly melts the buttercream for seamless blending.
Less is more with black: Black buttercream can be overpowering and make your galaxy look muddy. Use it sparingly for dramatic depth in just a few strategic spots, or skip it entirely and use very deep purple instead.
Star placement strategy: Don’t scatter stars uniformly—create clusters with empty areas between them, just like real space. This looks more natural and creates visual interest.
Common Mistakes to Avoid
Overblending the colors: The biggest mistake is overworking the buttercream, which turns your beautiful cosmic swirls into one muddy purple-ish mess. Stop blending when colors are distinct but flow together—you should see clear purple, blue, and pink areas.
Decorating warm cake: If your cake isn’t completely cool, your buttercream will melt and slide right off, creating a disaster. Be patient and let those layers cool completely, or even chill them before decorating.
Using liquid food coloring: Regular liquid food coloring will thin your buttercream and create pale, washed-out colors. Always use gel or paste food coloring for vibrant, saturated hues that maintain buttercream consistency.
Skipping the crumb coat: Jumping straight to the colored buttercream means cake crumbs will mix into your beautiful colors, dulling them and creating a messy appearance. The crumb coat takes 10 minutes but makes a world of difference.
Not making enough buttercream: Running out of buttercream mid-decoration is frustrating. This recipe makes plenty, but if you’re working with larger cake layers or want very thick frosting, consider making 1.5x the buttercream recipe. Leftover buttercream freezes beautifully!
Storage & Meal Prep
Room Temperature Storage: This galaxy birthday cake can sit at room temperature for up to 2 days if your kitchen is cool (below 70°F). Cover loosely with a cake dome or large bowl—don’t wrap tightly or you’ll smudge the decoration.
Refrigerator Storage: For longer storage or warm weather, refrigerate the cake. It will keep for up to 5 days covered loosely. Let slices come to room temperature for 20-30 minutes before serving for the best flavor and texture. Buttercream can harden in the fridge, but it softens beautifully once warmed.
Preventing Drying: Buttercream naturally seals in moisture, so your cake will stay moist for several days. If cutting only part of the cake, press a piece of plastic wrap directly against the cut edge to prevent drying.
Slice and Store: Individual slices can be stored in airtight containers with parchment paper between layers to prevent sticking. This makes it easy to grab a single serving!
Make-Ahead & Freezer Notes
Bake Ahead Strategy: Bake the cake layers up to 2 days ahead. Wrap each cooled layer tightly in plastic wrap, then aluminum foil, and store at room temperature. This actually makes assembly easier as chilled cake is more stable and less likely to break.
Freeze Unfrosted Layers: Wrap cooled cake layers individually in plastic wrap, then foil. Freeze for up to 3 months. Thaw in the refrigerator overnight, still wrapped, then bring to room temperature before decorating.
Freeze Decorated Cake: Yes, you can freeze the fully decorated galaxy cake! Place it in the freezer uncovered for 1 hour until the buttercream firms up, then wrap carefully or place in a large cake container. Freeze for up to 2 months. Thaw overnight in the refrigerator, still covered.
Buttercream Prep: Make buttercream up to 1 week ahead and refrigerate in an airtight container. Bring to room temperature and re-whip before using to restore its fluffy texture.
Best Thawing Method: For frozen cake, move it to the refrigerator 24 hours before serving, keeping it covered. Let it come to room temperature for 1-2 hours before serving for the best texture and flavor.
Decorating Timeline: If you’re short on time, decorate the cake completely 1-2 days before your event. The colors actually look even better after settling. Just keep it refrigerated and bring to room temperature before serving.
Serving Suggestions
This stunning DIY galaxy cake is a dessert that stands on its own, but the right accompaniments can elevate the experience even more.
Beverage Pairings:
- Cold milk (classic and kid-friendly)
- Hot coffee or espresso for adults
- Sparkling cider or champagne for celebrations
- Galaxy-themed blue cocktails or mocktails
- Milk tea or bubble tea for a fun party drink
Ice Cream Companions:
- Vanilla bean ice cream (lets the cake shine)
- Cotton candy or bubblegum flavored ice cream (continues the fun, whimsical theme)
- Cookies and cream for extra texture
- Purple sweet potato or ube ice cream for a color-coordinated presentation
Party Presentation Ideas:
- Serve on metallic silver or iridescent plates that echo the space theme
- Add dry ice to the serving table for a foggy, cosmic atmosphere (keep food safe!)
- Surround the cake with LED string lights for a starry effect
- Use constellation-printed napkins and space-themed party decorations
- Serve alongside moon pies, star-shaped cookies, or astronaut ice cream for a full space dessert table
Fresh Accompaniments:
- Fresh berries (blueberries and blackberries echo the purple/blue theme)
- Whipped cream or whipped coconut cream
- A drizzle of white chocolate ganache for extra decadence
FAQs Section
How far in advance can I make a galaxy cake?
You can bake the cake layers 2 days ahead and store them wrapped at room temperature, or freeze them for up to 3 months. The fully decorated cake stays fresh for 2-3 days at room temperature or 5 days refrigerated. Many bakers find the colors actually look better the day after decorating as they settle and meld slightly. For best results, decorate 1 day before your event.
Can I make this cake without a stand mixer?
Absolutely! A handheld electric mixer works perfectly fine for this recipe. You’ll just need to beat the buttercream a bit longer (5-7 minutes instead of 3-4) to get it light and fluffy. You can even make the cake batter by hand with a whisk and some arm strength, though a mixer makes the buttercream much easier.
What if I don’t have gel food coloring?
While gel food coloring gives the most vibrant results without thinning the buttercream, you can use liquid food coloring in a pinch. You’ll need to use more drops to achieve vivid colors, which may slightly thin your buttercream. To compensate, add 1-2 extra tablespoons of powdered sugar to maintain spreading consistency. The colors won’t be quite as intense, but you’ll still create a beautiful galaxy effect.
Help! My buttercream is too soft/too stiff. How do I fix it?
If your buttercream is too soft and won’t hold its shape, add more powdered sugar, ¼ cup at a time, beating well after each addition. If it’s too stiff and difficult to spread, add heavy cream or milk, one teaspoon at a time, until you reach the perfect consistency. Temperature matters too—if your kitchen is very warm, pop the buttercream in the fridge for 10-15 minutes to firm up.
Can I use this galaxy technique on other desserts?
Yes! This decorating method works beautifully on cupcakes, cookies (using royal icing or buttercream), donuts, macarons, and even cheesecakes. The technique translates to any smooth surface you can spread buttercream or icing on. Galaxy cupcakes are especially popular for parties since they’re individually portioned.
Do I need special skills to make the galaxy effect look good?
Not at all! That’s the beauty of galaxy cake decorating—space is naturally chaotic and abstract, so there’s really no “wrong” way to do it. Unlike precise piping or smooth ombre techniques that require practice, the galaxy effect is forgiving. As long as you use vibrant colors and don’t overblend them into one muddy color, you’ll create something beautiful. Every galaxy cake is unique, just like every galaxy in the universe!
What’s the best way to cut and serve this cake without ruining the design?
Use a sharp knife dipped in hot water and wiped dry for each cut—this gives clean slices through the buttercream. Cut straight down rather than sawing back and forth. The galaxy design actually looks beautiful when sliced since you see the colorful outer layer against the white or colored cake interior. Take photos before cutting, then embrace that first slice—it’s the most dramatic moment!
Conclusion
There you have it—your complete guide to creating an absolutely stunning galaxy cake that will have everyone asking “Did you really make that yourself?!” This homemade galaxy cake proves that you don’t need years of decorating experience or professional equipment to create something truly spectacular. With simple techniques, basic tools, and a playful approach to color, you can transform ordinary cake layers into an extraordinary cosmic masterpiece.
What I love most about this easy galaxy cake recipe is how it encourages creativity and self-expression. No two galaxy cakes ever look exactly alike, which means yours will be completely unique—a one-of-a-kind creation that reflects your own artistic vision. Whether you follow the color scheme exactly or venture into your own cosmic color combinations, you’re going to create something magical that tastes just as amazing as it looks.
So grab your food coloring and get ready to become the star baker at your next celebration! This galaxy birthday cake is guaranteed to create lasting memories and plenty of “wow” moments. I’d absolutely love to see your cosmic creations—tag your photos on Pinterest and Instagram so I can admire your galaxy masterpiece! Drop a comment below and let me know: what occasion are you making this cake for? Are you going with classic purple and blue, or creating your own unique color combination? Don’t forget to pin this recipe so you can find it easily when cake inspiration strikes!
May your kitchen adventures be as infinite and wonderful as the universe itself. Happy baking, space explorers!