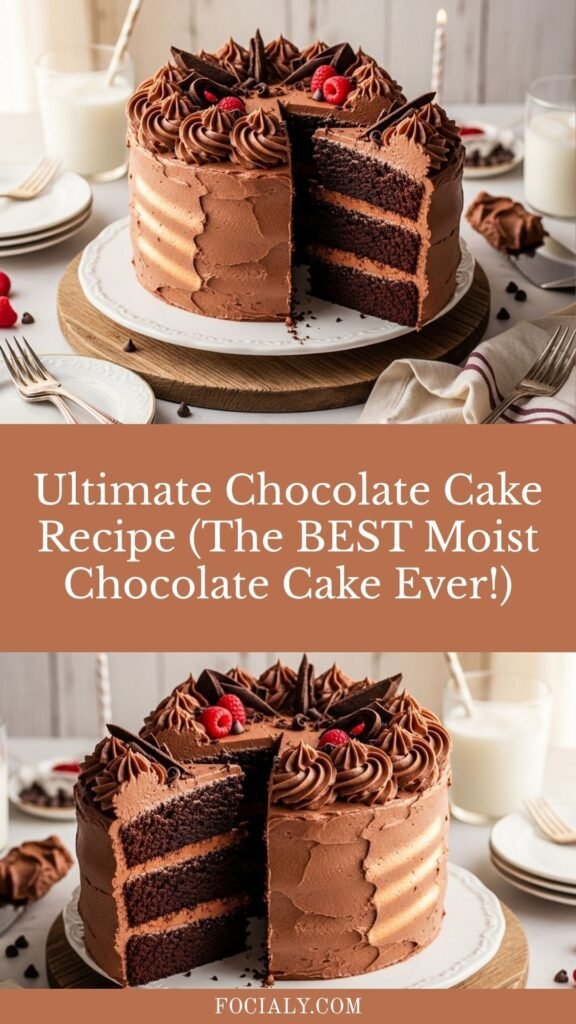
Ultimate Chocolate Cake Recipe (The BEST Moist Chocolate Cake Ever!)
Get ready to bake the most incredible ultimate chocolate cake recipe that’s impossibly moist, deeply chocolatey, and guaranteed to become your go-to dessert for every celebration! This is hands-down the best chocolate cake you’ll ever make – with a tender crumb that melts in your mouth, rich chocolate flavor in every bite, and a texture so perfect it’s almost magical. Whether you’re celebrating birthdays, holidays, or just treating yourself to something special, this moist chocolate cake recipe delivers bakery-quality results every single time.
What makes this homemade chocolate cake truly ultimate? It’s the perfect combination of high-quality cocoa powder, hot coffee (which intensifies the chocolate flavor without tasting like coffee), and the ideal ratio of ingredients that creates that signature moist, tender crumb. This cake stays incredibly soft for days and pairs beautifully with any frosting you love – classic chocolate buttercream, cream cheese frosting, or simple whipped cream. It’s perfect for layer cakes, sheet cakes, cupcakes, or even a bundt cake. Plus, it comes together easily in one bowl with ingredients you probably already have in your pantry!
History / Background
The quest for the perfect chocolate cake has been a beloved pursuit of American bakers for well over a century, and the evolution of chocolate cake tells a fascinating story about changing tastes, technology, and ingredient availability.
Chocolate itself was introduced to European cuisine in the 16th century after Spanish conquistadors brought cacao beans back from the Americas. However, chocolate desserts as we know them didn’t emerge until the 18th and 19th centuries. Early chocolate cakes were quite different from today’s versions – they were dense, less sweet, and chocolate was often used as a flavoring rather than the main ingredient.
The breakthrough came in the late 1800s when several innovations transformed baking: chemical leavening agents (baking powder and baking soda) became widely available, making cakes lighter; cocoa powder processing improved dramatically; and American kitchens began to standardize measurements and recipes. The 1886 publication of the Boston Cooking School Cookbook included one of the first recognizable chocolate cake recipes.
However, the style of chocolate cake we call “ultimate” or “perfect” today – intensely chocolatey, incredibly moist, with a tender crumb – really came into its own in the mid-20th century. During the 1940s and 1950s, bakers discovered that adding hot liquid (water or coffee) to chocolate cake batter created a more tender, moist texture. This technique, sometimes called “doctoring,” became a secret weapon for home bakers seeking professional results.
The addition of coffee to chocolate cake became particularly popular in the 1960s and 1970s. Bakers noticed that coffee didn’t make the cake taste like coffee; instead, it enhanced and deepened the chocolate flavor in the same way salt enhances other foods. This discovery revolutionized chocolate cake baking.
The ultimate chocolate cake as we know it today represents the culmination of decades of recipe testing and refinement by home bakers, professional pastry chefs, and food scientists. It balances cocoa powder with sugar, uses both baking soda and baking powder for perfect rise, incorporates oil for moisture retention, and uses buttermilk or sour cream for tanginess and tenderness. The result is a cake that’s both incredibly flavorful and texturally perfect – moist without being gummy, tender without being crumbly, and chocolatey without being bitter.
Why You’ll Love This Recipe
This best chocolate cake recipe is absolutely phenomenal, and once you make it, it’ll become your forever chocolate cake!
Here’s why this recipe will win your heart:
- Incredibly moist and tender – Stays soft for days, never dries out
- Deep, intense chocolate flavor – Satisfies every chocolate craving
- Easy one-bowl method – Simple mixing, no complicated techniques
- Uses pantry staples – No unusual ingredients required
- Foolproof results – Works perfectly every single time
- Versatile base – Perfect for layer cakes, sheet cakes, or cupcakes
- Coffee enhances chocolate – Deepens flavor without tasting like coffee
- Perfect texture – Light and fluffy yet rich and decadent
- Holds up beautifully – Great for frosting and decorating
- Crowd-pleasing favorite – Appeals to kids and adults alike
- Budget-friendly – Makes an impressive cake without expensive ingredients
- Freezer-friendly – Bakes and freezes perfectly for make-ahead needs
Whether you’re a beginner baker or a seasoned pro, this recipe delivers consistent, spectacular results that’ll have everyone asking for seconds!
Ingredient Notes
Let’s break down the ingredients that make this ultimate chocolate layer cake so incredible:
All-Purpose Flour – Creates the cake’s structure. Measure carefully using the spoon-and-level method. Substitution: For gluten-free, use 1:1 gluten-free baking flour blend (results may be slightly denser).
Granulated Sugar – Sweetens and helps create tender texture. Essential for proper moisture. Substitution: Can’t be significantly reduced without affecting texture.
Unsweetened Cocoa Powder – The chocolate star! Use high-quality cocoa for best flavor. Dutch-process creates deeper, darker chocolate flavor; natural cocoa is slightly more acidic. Either works beautifully. Substitution: Cannot substitute with hot chocolate mix.
Baking Powder & Baking Soda – Work together to create perfect rise and tender crumb. Both are essential! Make sure they’re fresh. Substitution: Cannot substitute one for the other.
Salt – Enhances all flavors and balances sweetness. Don’t skip it!
Eggs (Large) – Provide structure and richness. Use room temperature for best results. Substitution: For egg-free, try commercial egg replacer (results will differ).
Whole Milk – Adds moisture and richness. Whole milk is preferred over low-fat. Substitution: Buttermilk creates even more tender crumb; plant-based milk works for dairy-free.
Vegetable Oil – Key to the incredibly moist texture! Oil cakes stay moist longer than butter cakes. Substitution: Canola oil, melted coconut oil, or even melted butter work.
Vanilla Extract – Enhances chocolate flavor. Use pure extract, not imitation. Substitution: Vanilla bean paste adds lovely specks.
Hot Coffee or Hot Water – The secret ingredient! Hot liquid “blooms” the cocoa powder, intensifying chocolate flavor. Coffee enhances chocolate without making it taste like coffee. Substitution: Hot water works if you prefer to avoid coffee.
Equipment Needed
You’ll need these basic tools for perfect chocolate cake:
Essential:
- Two 9-inch round cake pans (for layer cake) or one 9×13-inch pan (for sheet cake)
- Large mixing bowl (for batter)
- Whisk or electric mixer (mixing by hand works great for this recipe!)
- Measuring cups and spoons (dry and liquid measures)
- Rubber spatula (for scraping and spreading)
- Parchment paper (for lining pans)
- Wire cooling racks (for cooling cakes)
- Toothpick or cake tester (for checking doneness)
Optional but helpful:
- Offset spatula (for frosting)
- Cake turntable (makes frosting easier)
- Kitchen scale (for most accurate measuring)
- Sifter (for cocoa powder, though not essential)
- Cake leveler (for even layers)
Ultimate Chocolate Cake Recipe
The ultimate chocolate cake with incredible moist texture and deep chocolate flavor! This easy one-bowl chocolate cake is perfect for birthdays, celebrations, or anytime you need the best homemade chocolate cake. Works beautifully as layer cake, sheet cake, or cupcakes!
- Prep Time: 15 minutes
- Cook Time: 30-35 minutes
- Total Time: 45-50 minutes (plus cooling)
- Yield: 12 servings 1x
- Category: Dessert
- Method: Baking
- Cuisine: American
- Diet: Vegetarian
Ingredients
For the Chocolate Cake:
- 2 cups (240g) all-purpose flour
- 2 cups (400g) granulated sugar
- ¾ cup (75g) unsweetened cocoa powder
- 2 teaspoons baking soda
- 1 teaspoon baking powder
- 1 teaspoon salt
- 2 large eggs, room temperature
- 1 cup (240ml) whole milk, room temperature
- ½ cup (120ml) vegetable oil
- 2 teaspoons vanilla extract
- 1 cup (240ml) hot coffee (or hot water)
For Simple Chocolate Buttercream (Optional):
- 1 cup (2 sticks) unsalted butter, softened
- 3½ cups powdered sugar
- ½ cup unsweetened cocoa powder
- ⅓ cup heavy cream or milk
- 2 teaspoons vanilla extract
- Pinch of salt
Instructions
Step 1: Preheat and Prepare Pans
Preheat oven to 350°F (175°C). Grease two 9-inch round cake pans with butter or cooking spray. Line bottoms with parchment paper rounds, then grease the parchment. Dust lightly with cocoa powder (instead of flour) for chocolate cakes, tapping out excess. Set aside.
Step 2: Mix Dry Ingredients
In a large mixing bowl, whisk together flour, sugar, cocoa powder, baking soda, baking powder, and salt. Whisk thoroughly for at least 30 seconds to ensure everything is well combined and there are no lumps in the cocoa powder. This is important for even distribution of leavening agents.
Step 3: Add Wet Ingredients
Add eggs, milk, oil, and vanilla extract to the dry ingredients. Using a whisk or electric mixer on medium speed, beat until well combined and smooth, about 2 minutes. The batter will be thick at this point. Scrape down the sides of the bowl to ensure everything is incorporated.
Step 4: Add Hot Coffee
Carefully stir in the hot coffee (or hot water). The batter will become very thin – don’t worry, this is correct! The thin batter creates the incredibly moist texture. Mix just until combined. The batter should be smooth and pourable, like thick hot chocolate consistency.
Step 5: Divide and Bake
Divide batter evenly between prepared pans (use a kitchen scale for precision – about 650g per pan). Tap pans gently on counter 2-3 times to release air bubbles.
Bake for 30-35 minutes, or until a toothpick inserted in the center comes out clean or with just a few moist crumbs (not wet batter). The cake should spring back when lightly touched. Don’t overbake or the cake will be dry!
Step 6: Cool Completely
Remove from oven and let cakes cool in pans on wire racks for 10 minutes. Run a knife around the edges, then carefully invert onto wire racks. Peel off parchment paper. Flip cakes right-side up and cool completely before frosting – at least 1-2 hours. This is crucial!
Step 7: Make Chocolate Buttercream (Optional)
Beat softened butter on medium speed until creamy, about 2 minutes. Add cocoa powder and beat until smooth. Gradually add powdered sugar, one cup at a time, alternating with heavy cream. Add vanilla and salt. Beat on high speed for 3 minutes until light and fluffy. If too thick, add more cream; if too thin, add more powdered sugar.
Step 8: Assemble and Frost
Level cake tops if domed (use serrated knife). Place one layer on serving plate. Spread about 1 cup frosting on top. Place second layer on top. Apply thin “crumb coat” of frosting over entire cake. Refrigerate 15 minutes until firm. Apply final coat of frosting, smoothing with offset spatula or bench scraper.
Step 9: Serve and Enjoy
Let frosted cake sit at room temperature 30 minutes before slicing for easiest cutting and best flavor. Slice with a sharp knife, wiping clean between cuts. Store any leftovers covered at room temperature or refrigerated.
Notes
- Don’t skip the hot coffee: It intensifies chocolate flavor dramatically and creates moisture. Water works, but coffee makes it extraordinary.
- Batter is supposed to be thin: The thin, liquidy batter creates the incredibly moist texture.
- Cool completely before frosting: Warm cake will melt frosting!
- Use room temperature ingredients: Cold ingredients don’t mix as smoothly.
- Measure flour correctly: Spoon into measuring cup and level – don’t pack or scoop.
- For cupcakes: Makes about 24. Fill liners ⅔ full, bake 18-22 minutes.
- For sheet cake: Use 9×13-inch pan, bake 35-40 minutes.
Nutrition
- Serving Size: 1 slice (1/12 of cake, unfrosted)
- Calories: 315
- Sugar: 38g
- Sodium: 420mg
- Fat: 11g
- Saturated Fat: 2g
- Unsaturated Fat: 8g
- Trans Fat: 0g
- Carbohydrates: 52g
- Fiber: 3g
- Protein: 5g
- Cholesterol: 33mg
Tips & Variations
The beauty of this best chocolate cake from scratch is how versatile it is!
Double Chocolate Cake: Fold 1 cup chocolate chips into batter before baking for extra chocolate chunks throughout.
Mocha Chocolate Cake: Increase coffee to 1½ cups and add 2 tablespoons instant espresso powder for intense mocha flavor.
Mexican Chocolate Cake: Add 1 tablespoon cinnamon and ½ teaspoon cayenne pepper for spicy kick.
Mint Chocolate Cake: Add 1 teaspoon peppermint extract and fold in mini chocolate chips or chopped Andes mints.
Chocolate Stout Cake: Replace coffee with dark stout beer for rich, malty flavor (alcohol bakes off).
Chocolate Orange Cake: Add 2 tablespoons orange zest and 1 teaspoon orange extract.
German Chocolate Style: Use the cake base but frost with coconut-pecan frosting instead of chocolate.
Black Forest Style: Fill layers with cherry pie filling and whipped cream, top with chocolate shavings and cherries.
Chocolate Peanut Butter Cake: Add peanut butter frosting between layers, chocolate on outside.
Vegan Chocolate Cake: Replace eggs with flax eggs (2 tablespoons ground flaxseed + 6 tablespoons water, let sit 5 min), use plant milk and vegan butter.
Gluten-Free: Use 1:1 gluten-free flour blend. May be slightly denser but still delicious.
Pro Chef Tips
Want bakery-perfect results? Here are professional secrets:
Use high-quality cocoa powder. Since cocoa is the primary chocolate flavor, quality matters enormously. Dutch-process cocoa (like Droste, Valrhona, or Guittard) creates deeper, richer, darker chocolate flavor. Natural cocoa works beautifully too. Avoid cheap store brands – they can taste chalky or bland.
Brew fresh, hot coffee for maximum impact. The hot liquid “blooms” the cocoa powder, releasing aromatics and deepening flavor. If using instant coffee, dissolve 2 tablespoons instant coffee granules in 1 cup boiling water. The coffee flavor completely disappears, leaving only enhanced chocolate taste.
Bring all ingredients to room temperature. Cold eggs and milk don’t incorporate as smoothly and can create lumpy batter. Set ingredients out 30-60 minutes before baking, or use the warm water trick: place cold eggs (in shells) in bowl of warm water for 5-10 minutes.
Don’t overmix once flour is added. Mix just until ingredients are combined. Overmixing develops gluten, creating tough, dense cake instead of tender, fluffy texture. It’s okay if a few tiny lumps remain.
Use parchment paper in pans. Even with greased pans, parchment ensures perfect release. Trace pan bottom on parchment, cut out circle, place in greased pan.
Rotate pans halfway through baking. Most ovens have hot spots. Rotating at the midpoint ensures even baking and prevents one side from over-browning.
Check doneness early, but not too early. Start checking at 28-30 minutes. A toothpick should come out with just a few moist crumbs – not wet batter, but not completely clean. Chocolate cake continues cooking from residual heat.
Cool completely before frosting. This cannot be rushed! Warm cake will melt frosting and create a goopy mess. Plan for at least 1-2 hours cooling time, or cool 30-45 minutes at room temp then refrigerate 30 minutes.
Apply a crumb coat first. This thin initial layer of frosting seals in crumbs and creates smooth base for final coat. Refrigerate 15 minutes after crumb coat to firm up, then apply final frosting.
Add simple syrup for extra moisture. Brush each layer with simple syrup (equal parts sugar and water, boiled then cooled) before frosting. This bakery secret keeps cake incredibly moist and adds subtle sweetness.
Common Mistakes to Avoid
Even great recipes can go wrong with common errors:
Measuring flour incorrectly: Scooping flour directly from the bag packs it down, and you’ll use too much, creating dry, dense cake. Always spoon flour into measuring cup and level with knife. Better yet, use a kitchen scale (240g for 2 cups).
Using old leavening agents: Baking powder and baking soda lose potency over time. If yours are over 6 months old, test them: baking powder should fizz vigorously in hot water, baking soda should bubble in vinegar. Old leaveners create flat, dense cakes that don’t rise properly.
Substituting hot liquid with cold: The hot coffee or water is essential! It blooms the cocoa powder and creates the signature moisture. Cold liquid will not give you the same results. If you forget to heat your liquid, microwave it until very hot (nearly boiling) before adding.
Overbaking the cake: Chocolate cake should come out when toothpick has a few moist crumbs – not completely clean. If you wait for a clean toothpick, the cake will be dry. Start checking 3-5 minutes before the minimum bake time. Remember, it continues cooking from residual heat after leaving the oven.
Frosting a warm cake: This is recipe for disaster! Frosting will melt, slide off, and mix with crumbs creating a mess. Always cool cake completely – test by touching the bottom of the pan or cake itself. Should feel completely room temperature, not even slightly warm.
Opening oven door repeatedly: Every time you open the door, temperature drops significantly. This can cause cakes to sink in the middle or bake unevenly. Don’t peek until near the expected done time.
Storage & Meal Prep
Ultimate chocolate cake stores wonderfully!
Room Temperature Storage: Store unfrosted cake layers wrapped tightly in plastic wrap at room temperature for 2-3 days. Once frosted with buttercream, cake can stay at room temperature (covered) for 1-2 days if kitchen isn’t too warm. If frosted with cream cheese frosting or whipped cream, must be refrigerated.
Refrigerator Storage: Frosted cake can be refrigerated for up to 5-7 days. Store in cake keeper or cover loosely with plastic wrap (don’t let plastic touch frosting). Before serving, let sit at room temperature 30-60 minutes – cold cake tastes muted and frosting is hard.
Storing Slices: Wrap individual slices in plastic wrap, place in airtight container. Refrigerate up to 5 days or freeze up to 3 months. Perfect for portion control!
Keeping Cake Moist: The oil in this recipe keeps cake moist naturally, but wrap tightly to prevent drying. If storing unfrosted layers, place plastic wrap directly on cut surfaces.
Leftover Frosting: Store in airtight container in refrigerator up to 2 weeks or freeze up to 3 months. Bring to room temperature and re-whip before using.
Make-Ahead & Freezer Notes
Perfect for stress-free entertaining!
Freezing Unfrosted Cake Layers: Cool completely, wrap each layer tightly in plastic wrap (double layer), then aluminum foil. Freeze up to 3 months. Thaw overnight in refrigerator, still wrapped, then bring to room temperature before frosting. Texture remains perfect!
Freezing Frosted Cake: Freeze assembled, frosted cake uncovered 1-2 hours until frosting is firm. Wrap carefully in plastic wrap and foil. Freeze up to 2 months. Thaw overnight in refrigerator. Best results come from freezing layers unfrosted and frosting after thawing.
Freezing Individual Slices: Wrap slices individually in plastic wrap, place in freezer bags or container. Freeze up to 3 months. Thaw at room temperature 30-60 minutes or in refrigerator overnight.
Freezing Cupcakes: Freeze unfrosted cupcakes in freezer bags up to 3 months. Thaw and frost before serving. For frosted cupcakes, freeze on baking sheet until firm, then wrap individually or place in container.
Make-Ahead Baking Schedule:
- 1-3 months ahead: Bake and freeze layers
- 1 week ahead: Make buttercream frosting, refrigerate
- 2 days ahead: Thaw cake layers in fridge
- 1 day ahead: Frost cake, refrigerate
- Day of: Bring to room temperature, add decorations, serve
Best Make-Ahead Strategy: Bake layers weeks ahead and freeze. Make frosting 2-3 days ahead. Assemble day before your event. This spreads out work and reduces stress while ensuring fresh taste!
Serving Suggestions
Chocolate cake is endlessly versatile for serving!
Classic Layer Cake: Frost with chocolate buttercream, decorate with chocolate curls or shavings. Serve on cake stand for dramatic presentation.
Birthday Cake: Frost with colorful buttercream, add sprinkles, pipe borders, and candles. Makes any age feel special!
Elegant Dessert: Dust with powdered sugar, serve with raspberry coulis and fresh berries. Add dollop of whipped cream.
Ice Cream Cake: Use as base for ice cream cake. Split each layer horizontally, fill with softened ice cream, refreeze, then frost.
Trifle: Cube cake and layer in trifle bowl with chocolate pudding, whipped cream, and crushed cookies or candy bars.
Naked Cake Style: Apply minimal frosting on sides, letting cake show through. Decorate with fresh flowers and berries for rustic charm.
Perfect Accompaniments:
- Vanilla ice cream or gelato
- Fresh whipped cream
- Berry compote or sauce
- Caramel or chocolate sauce
- Fresh strawberries or raspberries
- Coffee or espresso
- Cold milk
- Hot fudge sauce
Beverage Pairings:
- Cold milk (classic!)
- Hot coffee or espresso
- Hot chocolate
- Red wine (Cabernet or Port)
- Dessert wine
- Champagne (for celebrations)
Occasion Ideas:
- Birthday celebrations
- Holiday dinners
- Wedding showers
- Graduation parties
- Just because!
- Date night at home
- Potluck contributions
- Bake sales
FAQs Section
Can I make this chocolate cake without coffee?
Yes! Replace coffee with an equal amount of hot water. The cake will still be delicious and moist, though the chocolate flavor won’t be quite as deep and intense. The coffee doesn’t make the cake taste like coffee – it enhances chocolate flavor.
Why is my cake dry instead of moist?
Usually from overbaking or measuring too much flour. Check your oven temperature with thermometer (many run hot), and pull cake when toothpick has moist crumbs, not when completely clean. Measure flour by spooning into cup and leveling, never scooping directly from bag.
Can I make this as cupcakes?
Absolutely! This recipe makes about 24 cupcakes. Line muffin tins with paper liners, fill ⅔ full. Bake at 350°F for 18-22 minutes until toothpick comes out with moist crumbs. Cool completely before frosting.
What’s the best frosting for chocolate cake?
Depends on preference! Chocolate buttercream is classic and rich. Cream cheese frosting adds tangy contrast. Vanilla buttercream lets chocolate shine. Chocolate ganache is elegant. Whipped cream frosting is lighter. All work beautifully!
How do I get flat cake layers without doming?
Use cake strips (wet fabric strips wrapped around pans) or lower oven temp to 325°F and bake slightly longer. You can also level tops with serrated knife or cake leveler after baking.
Can I make this cake dairy-free?
Yes! Use plant-based milk (almond, oat, or soy) and replace butter in frosting with vegan butter. Use dairy-free chocolate chips if adding those. The cake itself already uses oil instead of butter.
Why did my cake sink in the middle?
Usually from opening oven door too early, underbaking, or too much leavening agent. Don’t open oven before 25 minutes. Make sure leavening is fresh and measured correctly. Bake until toothpick comes out with moist crumbs.
Conclusion
And there you have it – everything you need to bake the most incredible ultimate chocolate cake that’ll become your forever recipe! This isn’t just any chocolate cake – it’s THE chocolate cake that ruins you for all others with its perfectly moist texture, intense chocolate flavor, and foolproof reliability.
Whether you’re celebrating a birthday, bringing dessert to a party, treating your family, or just satisfying a serious chocolate craving, this easy moist chocolate cake delivers spectacular results every single time. The one-bowl mixing method keeps it simple, while the secret ingredient (hot coffee!) takes the chocolate flavor from good to absolutely extraordinary.
I’d love to hear about your chocolate cake adventures! Did you try any of the variations? How did you frost and decorate yours? Did everyone beg for the recipe? Drop a comment below and share your experience – I read every one and love seeing how you make this recipe your own! If this became your new favorite chocolate cake, please save it to your Pinterest boards and share it with fellow chocolate lovers. Let’s spread the joy of perfect homemade chocolate cake!
Now grab that cocoa powder and preheat your oven – the best chocolate cake of your life is just 50 minutes away! Happy baking!