Giant Skillet Cookie Recipe – Gooey, Shareable & SO Easy!
Get ready to make the most incredible skillet cookie recipe that’s about to become your new favorite dessert! This giant cookie is baked right in a cast iron skillet, creating crispy edges with a soft, gooey center that’s absolutely irresistible. Whether you’re hosting friends, celebrating a special occasion, or just craving something warm and comforting, this easy skillet cookie delivers all the deliciousness of homemade cookies in one stunning, shareable dessert that comes together in less than an hour.
What makes this cast iron skillet cookie so amazing? It’s the perfect combination of convenience and indulgence – no need to scoop individual cookies, everything bakes in one pan, and you get that coveted crispy-gooey texture contrast in every single slice. This dessert is perfect for game day gatherings, family movie nights, birthday celebrations, or anytime you want to impress without spending hours in the kitchen. Serve it warm from the skillet with a scoop of vanilla ice cream melting on top, and you’ve got a restaurant-quality dessert that’ll have everyone asking for seconds!
History / Background
The skillet cookie, also known as a “pizookie” (pizza + cookie) in some restaurants, represents a delicious evolution in American dessert culture that emerged in the late 20th century as comfort food experienced a renaissance.
While cookies themselves have ancient origins dating back to 7th century Persia, the American chocolate chip cookie was invented in the 1930s by Ruth Graves Wakefield at the Toll House Inn in Massachusetts. Her creation became an instant classic, and for decades, cookies were primarily enjoyed as individual treats – perfectly portioned, portable, and personal.
The concept of baking a giant cookie in a skillet began gaining popularity in the 1990s and early 2000s, coinciding with several cultural shifts. First, there was the rise of casual dining chains like BJ’s Restaurant & Brewhouse (which trademarked “Pizookie” in 2004) and Pizzeria Uno, which began serving warm, shareable desserts as a way to encourage social dining experiences. These restaurants discovered that giant cookies served in individual cast iron skillets created an interactive, memorable dessert experience that encouraged sharing and conversation.
The skillet cookie phenomenon also aligned with the growing appreciation for cast iron cooking in home kitchens. As food blogs and cooking shows proliferated in the 2000s, home cooks rediscovered the versatility of cast iron cookware, which had been somewhat overlooked in favor of modern non-stick pans. Food bloggers began adapting the restaurant-style skillet cookie for home bakers, creating recipes that could be made in a single 8, 10, or 12-inch skillet.
What makes the skillet cookie special from a culinary perspective is the unique texture it creates. The cast iron retains and distributes heat evenly, creating crispy, caramelized edges while the center remains soft and gooey – almost like cookie dough consistency. This textural contrast is nearly impossible to achieve with regular cookies, making skillet cookies a distinct dessert category.
The giant skillet cookie also became Instagram and Pinterest famous in the 2010s, as its rustic, shareable presentation made it inherently photogenic. The visual appeal of a golden-brown cookie studded with melted chocolate chips, served right in the skillet with ice cream on top, perfectly captured the comfort-food aesthetic that dominated food media during that era.
Today, skillet cookies represent the perfect marriage of convenience, nostalgia, and indulgence – honoring the classic American cookie while elevating it into an occasion-worthy centerpiece dessert.
Why You’ll Love This Recipe
This chocolate chip skillet cookie is absolutely phenomenal, and once you make it, you’ll wonder why you ever bothered scooping individual cookies!
Here’s why this recipe will win your heart:
- Impossibly easy – One bowl, one skillet, minimal cleanup
- Ready in under an hour – From ingredients to table in 45 minutes
- Perfect texture contrast – Crispy edges, gooey center every time
- Impressive presentation – Looks like you spent hours making it
- Infinitely customizable – Add any mix-ins you love
- Feeds a crowd – One skillet serves 8-10 people
- No cookie scooping – Skip the tedious portioning step
- Restaurant-quality dessert – Rivals anything you’d pay $12 for
- Warm, shareable experience – Creates a fun, interactive dessert moment
- Kid-friendly – Children love the novelty of a giant cookie
- Budget-friendly – Uses basic pantry ingredients
- Great for parties – Perfect for casual gatherings and celebrations
Whether you’re a busy parent looking for quick desserts, a college student impressing friends, or anyone who loves warm cookies with minimal effort, this recipe delivers pure magic!
Ingredient Notes
Let’s break down the ingredients that create this gooey skillet cookie:
Butter (Unsalted) – The foundation of flavor and texture. Use room temperature butter for proper creaming. Melted butter creates chewier cookies, while softened butter creates fluffier texture. This recipe uses softened. Substitution: For dairy-free, use vegan butter sticks (not spreads).
Brown Sugar – Adds moisture, chewiness, and rich molasses flavor. Dark brown sugar creates deeper flavor; light brown is more subtle. Substitution: Can use all granulated sugar, but cookie will be less chewy and flavorful.
Granulated Sugar – Provides sweetness and helps create those crispy edges. Substitution: Coconut sugar works but creates darker color and different flavor.
Eggs – Bind ingredients and provide structure. Use large eggs at room temperature. Substitution: For egg-free, try 1 flax egg (1 tablespoon ground flaxseed + 3 tablespoons water, let sit 5 min), though texture will differ.
Vanilla Extract – Essential for flavor depth. Use pure vanilla extract, not imitation. Substitution: Vanilla bean paste adds lovely specks.
All-Purpose Flour – Creates structure. Measure correctly using spoon-and-level method. Substitution: For gluten-free, use 1:1 gluten-free baking flour (results may vary slightly).
Baking Soda – Provides rise and spread. Make sure it’s fresh! Substitution: Cannot substitute with baking powder.
Salt – Enhances all flavors and balances sweetness. Don’t skip! Substitution: Flaky sea salt for finishing adds extra dimension.
Chocolate Chips – The star! Semi-sweet is classic, but use your favorite. Substitution: Dark chocolate chunks, milk chocolate, white chocolate, or butterscotch chips all work beautifully.
Optional Add-ins – Nuts, candy pieces, marshmallows, pretzels – your imagination is the limit!
Equipment Needed
You’ll need these basic tools for the perfect skillet cookie:
Essential:
- 10-inch cast iron skillet (or 8-inch for thicker cookie, 12-inch for thinner)
- Large mixing bowl (for creaming butter and sugar)
- Medium bowl (for dry ingredients)
- Electric mixer or wooden spoon (for mixing dough)
- Measuring cups and spoons (for accuracy)
- Rubber spatula (for spreading dough)
- Wire cooling rack (for slight cooling)
- Pot holders or oven mitts (cast iron handle gets HOT!)
Optional but helpful:
- Ice cream scoop (for serving)
- Kitchen scale (for precise measuring)
- Parchment paper (optional pan liner)
Skillet Cookie Recipe

An incredible giant chocolate chip skillet cookie with crispy edges and a gooey, melty center! This easy one-pan dessert is perfect for sharing, ready in under an hour, and tastes amazing served warm with ice cream on top. The ultimate crowd-pleasing dessert!
- Prep Time: 15 minutes
- Cook Time: 25 minutes
- Total Time: 40 minutes
- Yield: 8-10 servings 1x
- Category: Dessert
- Method: Baking
- Cuisine: American
- Diet: Vegetarian
Ingredients
For the Skillet Cookie:
- ½ cup (115g) unsalted butter, softened to room temperature
- ½ cup (100g) packed light brown sugar
- ¼ cup (50g) granulated sugar
- 1 large egg, room temperature
- 1½ teaspoons vanilla extract
- 1½ cups (180g) all-purpose flour
- ½ teaspoon baking soda
- ½ teaspoon salt
- 1 cup (175g) semi-sweet chocolate chips
- ½ cup (85g) additional chocolate chips for topping (optional)
For Serving:
- Vanilla ice cream
- Chocolate sauce or caramel (optional)
- Flaky sea salt (optional)
Instructions
Step 1: Preheat Oven and Prepare Skillet
Preheat oven to 350°F (175°C). Lightly grease a 10-inch cast iron skillet with butter or cooking spray. You can also line with parchment paper if desired, though it’s not necessary. Set aside.
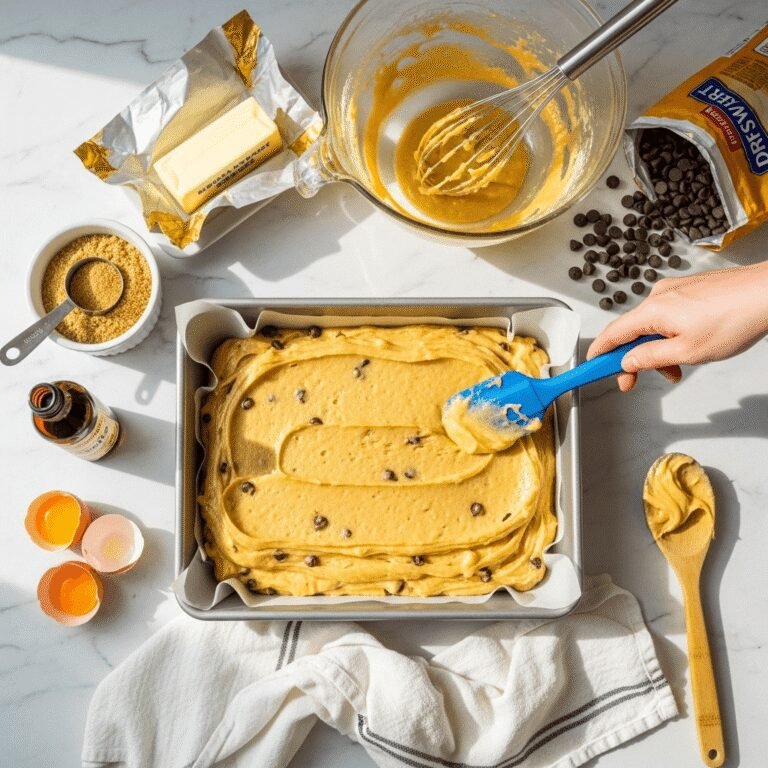
Step 2: Cream Butter and Sugars
In a large mixing bowl, using an electric mixer or wooden spoon, beat the softened butter, brown sugar, and granulated sugar together until light and fluffy, about 2-3 minutes. The mixture should look creamy and slightly paler in color. This step incorporates air and creates better texture.
Step 3: Add Egg and Vanilla
Add the egg and vanilla extract to the butter mixture. Beat until fully incorporated and smooth, about 1 minute. Scrape down the sides of the bowl as needed.
Step 4: Mix Dry Ingredients
In a separate medium bowl, whisk together the flour, baking soda, and salt. This ensures even distribution of leavening and salt throughout the dough.
Step 5: Combine Wet and Dry
Add the flour mixture to the butter mixture. Using a wooden spoon or rubber spatula, mix just until combined and no flour streaks remain. Don’t overmix! The dough should be thick and slightly sticky. Fold in 1 cup of chocolate chips, distributing them evenly throughout the dough.
Step 6: Press into Skillet
Transfer the cookie dough to your prepared skillet. Using your hands or a spatula, press and spread the dough evenly across the bottom of the skillet, reaching almost to the edges. The dough will spread slightly during baking, so it doesn’t need to reach the very edge. Press the dough down firmly to eliminate air pockets. If desired, press additional chocolate chips on top for extra chocolate and beautiful presentation.
Step 7: Bake
Bake in the preheated oven for 25-30 minutes. The cookie is done when the edges are golden brown and set, but the center still looks slightly underdone and soft. It should jiggle just slightly when you gently shake the pan. Don’t overbake! The cookie continues cooking from residual heat after leaving the oven. For a 10-inch skillet, start checking at 23 minutes. For 8-inch (thicker), may need 30-33 minutes. For 12-inch (thinner), check at 20 minutes.
Step 8: Cool Slightly
Remove from oven (remember the handle is extremely hot!). Let the skillet cookie cool on a wire rack for 5-10 minutes. It will firm up as it cools but should still be warm and gooey in the center.
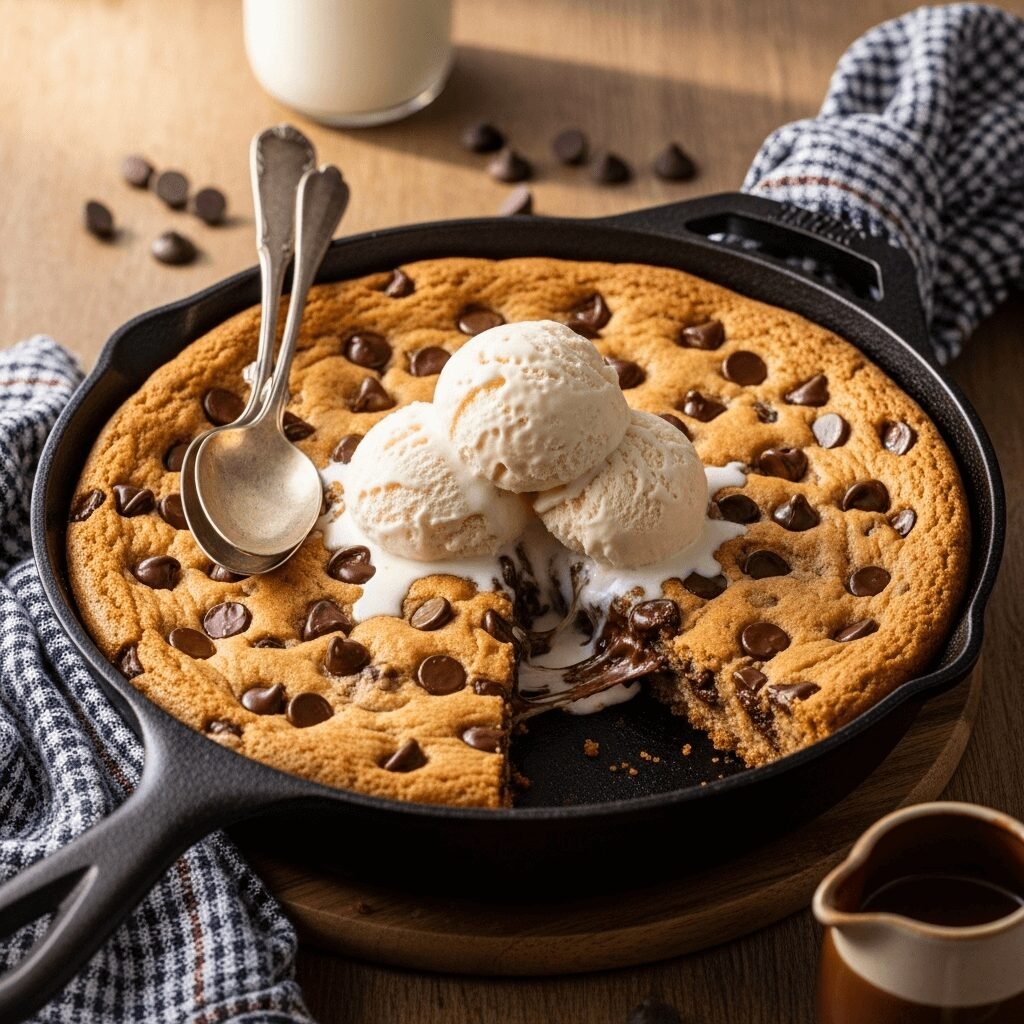
Step 9: Serve Immediately
Serve the skillet cookie warm, right from the skillet! Top with scoops of vanilla ice cream, drizzle with chocolate or caramel sauce if desired, and sprinkle with flaky sea salt. Provide spoons and let everyone dig in together, or cut into wedges and serve on individual plates.
Notes
- Don’t overbake: Cookie should look slightly underdone in center when removed from oven.
- Room temperature ingredients: Ensure butter and egg are room temp for best texture.
- Cast iron retains heat: Cookie continues baking after leaving oven, so pull early!
- Handle is HOT: Always use pot holders when handling cast iron skillet.
- Serving size: 10-inch skillet serves 8-10 people generously.
- Customize mix-ins: Swap chocolate chips for your favorite add-ins.
- No cast iron? Can use oven-safe skillet or 9-inch round cake pan (adjust time).
Nutrition
- Serving Size: 1 slice (1/10 of recipe)
- Calories: 295
- Sugar: 22g
- Sodium: 190mg
- Fat: 14g
- Saturated Fat: 8g
- Unsaturated Fat: 5g
- Trans Fat: 0g
- Carbohydrates: 39g
- Fiber: 1g
- Protein: 3g
- Cholesterol: 40mg
Tips & Variations
The beauty of a skillet cookie is how endlessly customizable it is!
Triple Chocolate Skillet Cookie: Use ¼ cup cocoa powder (reduce flour by ¼ cup), mix in both semi-sweet and white chocolate chips, top with chocolate chunks.
Peanut Butter Chocolate Chip: Replace ½ cup flour with ½ cup peanut butter. Swirl additional peanut butter on top before baking.
S’mores Skillet Cookie: Top with marshmallows and crushed graham crackers during last 5 minutes of baking.
Oatmeal Raisin Style: Replace ½ cup flour with ½ cup rolled oats, swap chocolate chips for raisins, add 1 teaspoon cinnamon.
Nutty Delight: Add ½ cup chopped walnuts, pecans, or almonds to the dough.
Candy Bar Cookie: Chop your favorite candy bars (Snickers, Reese’s, M&Ms) and mix into dough.
Salted Caramel: Drizzle caramel sauce over dough before baking, sprinkle with flaky sea salt after.
Cookie Dough Stuffed: Press half the dough into skillet, add dollops of edible cookie dough, cover with remaining dough.
Birthday Cake Style: Add rainbow sprinkles to dough and top with extra sprinkles and birthday candles.
Brown Butter Version: Brown the butter first, cool slightly, then proceed with recipe for nutty, caramelized flavor.
Vegan Skillet Cookie: Use vegan butter, flax egg, and dairy-free chocolate chips.
Gluten-Free: Use 1:1 gluten-free flour blend. Texture may be slightly different but still delicious.
Pro Chef Tips
Want bakery-quality results? Here are professional secrets:
Use room temperature ingredients religiously. This cannot be overstated! Room temperature butter creams properly with sugar, and room temperature eggs incorporate smoothly without curdling. Set ingredients out 30-60 minutes before baking, or use the warm water trick for eggs.
Don’t skip the creaming step. Beating butter and sugar together for 2-3 minutes incorporates air, creating lighter texture and better rise. The mixture should look fluffy and slightly paler. This step makes a huge difference!
Press dough firmly into skillet. Eliminate air pockets by pressing dough down evenly and firmly. This ensures even baking and prevents the center from puffing up too much.
Underbake for gooey perfection. The single most important tip! The cookie should look slightly underdone in the center when you pull it out. The edges should be golden and set, but the center should jiggle just slightly. It firms up as it cools from residual heat in the cast iron.
Preheat your cast iron in the oven first (optional pro move). Place greased skillet in oven while it preheats for 5 minutes, then carefully add dough. This creates even crispier edges and more caramelization on the bottom.
Use high-quality chocolate chips. Since chocolate is a star ingredient, quality matters! Ghirardelli, Guittard, or even chopped chocolate bars create better melty pockets than cheap chips.
Add extra chocolate chips on top. Press additional chips onto the surface before baking. They melt beautifully and create that professional, loaded-with-chocolate appearance.
Let it cool for 5-10 minutes, no longer. This brief rest allows the cookie to set slightly for easier serving, but keeps it warm and gooey. Waiting longer means the cookie cools too much and loses that magic warm-from-the-oven appeal.
Serve directly from the skillet. Part of the charm is the rustic, communal presentation. Place the hot skillet on a trivet or wooden board (warn guests it’s hot!), add ice cream, and let everyone dig in with spoons.
Finish with flaky sea salt. A sprinkle of Maldon or other flaky sea salt on top (especially if you add caramel or toffee) elevates the flavor dramatically with sweet-salty contrast.
Common Mistakes to Avoid
Even simple recipes can go wrong. Here are pitfalls to watch for:
Overbaking the cookie: This is the #1 mistake! Skillet cookies should be removed when the center still looks soft and slightly underdone. If you wait until the center is completely set, the cookie will be dry and cakey instead of gooey. The cast iron retains heat and continues cooking the cookie after you remove it from the oven. Always err on the side of underdone!
Using cold butter: Cold butter won’t cream properly with sugar, creating dense, flat cookies. Butter should be soft enough to leave a fingerprint when pressed, but not melting or greasy. Microwave in 5-second bursts if you forgot to set it out, checking frequently.
Overmixing the dough after adding flour: Once flour is added, mix just until combined. Overmixing develops gluten, creating tough, dense cookies instead of tender, soft ones. Some flour streaks are fine – they’ll incorporate as you press the dough into the skillet.
Not greasing the skillet properly: Even well-seasoned cast iron can stick, especially with the sugar content in cookies. Always grease with butter or cooking spray. If worried about sticking, line with parchment paper (cut to fit the bottom).
Forgetting the cast iron handle gets extremely hot: This seems obvious but is easy to forget! The entire skillet, including the handle, becomes blazing hot in the oven. Always use pot holders or oven mitts, and warn guests before they touch anything.
Using a skillet that’s too small or too large: Pan size matters! A 10-inch skillet is ideal. Using an 8-inch makes a very thick cookie that may not cook through. A 12-inch creates a thin cookie that may overbake. Adjust baking time accordingly if using different sizes.
Storage & Meal Prep
Skillet cookies are best fresh but can be stored!
Room Temperature Storage: Cover the skillet tightly with aluminum foil or plastic wrap, or transfer cookie to an airtight container. Store at room temperature for up to 3 days. The cookie will firm up as it cools but remains delicious.
Refrigerator Storage: If your kitchen is very warm or you added perishable toppings, refrigerate in airtight container for up to 5 days. Let come to room temperature before serving, or reheat.
Reheating for Warm-Cookie Magic: Reheat in 300°F oven for 8-10 minutes until warmed through and gooey again. Alternatively, microwave individual slices for 15-20 seconds. The cookie won’t be quite as good as fresh, but warming revives much of the magic!
Best Served Fresh: Honestly, skillet cookies are at their absolute best served warm from the oven within 30 minutes of baking. The texture and flavor are incomparable. If possible, time your baking so you serve immediately.
Individual Portions: If you have leftovers (rare!), cut into wedges and wrap individually in plastic wrap for easy grab-and-go treats.
Make-Ahead & Freezer Notes
Perfect for planning ahead!
Freezing Baked Cookie: Cool completely, wrap tightly in plastic wrap then aluminum foil. Freeze up to 3 months. Thaw at room temperature, then reheat in 300°F oven for 10-12 minutes to restore texture.
Freezing Cookie Dough: Press dough into greased skillet, cover tightly with plastic wrap and foil, freeze up to 2 months. Bake directly from frozen, adding 5-10 minutes to baking time. Or freeze dough as a disk wrapped in plastic wrap, thaw overnight in fridge, then press into skillet and bake.
Make-Ahead Dough: Prepare dough up to 2 days ahead, wrap tightly, refrigerate. Press into skillet and bake when ready. Cold dough may need 2-3 extra minutes baking time.
Portion and Freeze Dough Balls: Scoop dough into individual cookie portions, freeze on baking sheet, transfer to freezer bag. Bake as regular cookies whenever you want them (12-14 minutes at 350°F).
Best Strategy for Entertaining: Prepare dough earlier in the day, keep refrigerated in the mixing bowl. 30 minutes before serving dessert, press into skillet and bake. This gives you warm-from-the-oven perfection with minimal last-minute stress!
Serving Suggestions
Skillet cookies shine with the right accompaniments!
Classic Style: Serve warm with scoops of vanilla ice cream melting into the crevices. This is the iconic presentation!
Elevated Dessert: Top with gourmet ice cream (salted caramel, coffee, or dulce de leche), drizzle with hot fudge, add whipped cream and a cherry.
Breakfast Treat: Yes, really! Serve a small wedge with coffee for a special breakfast or brunch treat (no judgment here!).
Party Presentation: Place hot skillet on a wooden board with a trivet underneath, surround with bowls of ice cream, various sauces, whipped cream, and toppings. Let guests build their own creations!
Individual Plating: Cut into wedges, plate individually, add ice cream scoop, drizzle artistically with sauce, garnish with fresh mint.
Perfect Accompaniments:
- Vanilla ice cream (classic!)
- Coffee, salted caramel, or chocolate ice cream
- Hot fudge or chocolate sauce
- Caramel sauce
- Fresh whipped cream
- Fresh berries
- Peanut butter sauce
- Flaky sea salt
- Chopped nuts
Beverage Pairings:
- Cold milk
- Hot coffee or espresso
- Hot chocolate
- Iced coffee
- Dessert wine
Occasion Ideas:
- Birthday celebrations
- Game day parties
- Movie nights
- Dinner parties
- Valentine’s Day
- Holiday gatherings
- Casual get-togethers
- Date night at home
FAQs Section
Do I need a cast iron skillet to make this?
Cast iron is ideal because it conducts heat evenly and creates amazing crispy edges, but you can use any oven-safe 10-inch skillet (stainless steel, oven-safe non-stick) or a 9-inch round cake pan. Results will be slightly different but still delicious!
Why is my skillet cookie raw in the middle?
This usually means the oven temperature was too high, cooking the edges before the center could set. Use an oven thermometer to verify temperature. Also ensure you’re spreading dough evenly and not making it too thick in the center. If edges brown too quickly, tent with foil and continue baking.
Can I make this ahead and reheat?
Yes! Bake completely, cool, cover tightly. Reheat in 300°F oven for 8-10 minutes before serving. However, nothing beats a fresh-baked skillet cookie, so if possible, bake right before serving or make the dough ahead and bake when needed.
How do I prevent my cookie from sticking?
Grease your skillet well with butter or cooking spray. If using older or unseasoned cast iron, line with parchment paper. Make sure to let the cookie cool for 5-10 minutes before trying to remove – it firms up and releases more easily.
Can I halve this recipe for a smaller skillet?
Absolutely! Halve all ingredients and bake in an 8-inch skillet. Check for doneness at 18-20 minutes. This makes about 4-6 servings.
What’s the best chocolate to use?
Semi-sweet chocolate chips are classic, but use whatever you love! Dark chocolate (60-70% cacao) creates more sophisticated flavor. Milk chocolate is sweeter and creamier. Chocolate chunks create bigger pockets of melted chocolate. Mix and match!
Why didn’t my cookie spread properly?
Cookie dough needs to be pressed firmly into the skillet – it doesn’t spread much during baking. Also ensure your baking soda is fresh (test by adding a pinch to vinegar – it should fizz vigorously). Cold dough spreads less, so if dough was refrigerated, let it sit 10 minutes before pressing into skillet.
Conclusion
And there you have it – everything you need to create the most incredible giant skillet cookie that’ll become your signature dessert! This isn’t just another cookie recipe – it’s an experience, a centerpiece, a reason to gather around the table and share something warm, gooey, and absolutely delicious.
Whether you’re hosting a party, celebrating a special occasion, or just treating your family to something special on a random Tuesday, this easy cast iron skillet cookie delivers pure magic with minimal effort. The crispy edges, the gooey center, the melting ice cream on top – it’s comfort food at its finest, and so much fun to share!
I’d love to hear about your skillet cookie adventures! Did you try any of the variations? What toppings did you add? How fast did it disappear? Drop a comment below and share your experience – I read every one and love connecting with fellow cookie enthusiasts! If this recipe made you smile (or made your dessert game infinitely better), please save it to your Pinterest boards and share it with friends who appreciate warm, shareable desserts. Let’s spread the skillet cookie love!
Now grab that skillet and preheat your oven – the most amazing cookie experience of your life is just 45 minutes away! Happy baking!