The Ultimate Buttercream Frosting Recipe: Silky, Sweet, and Perfect Every Time
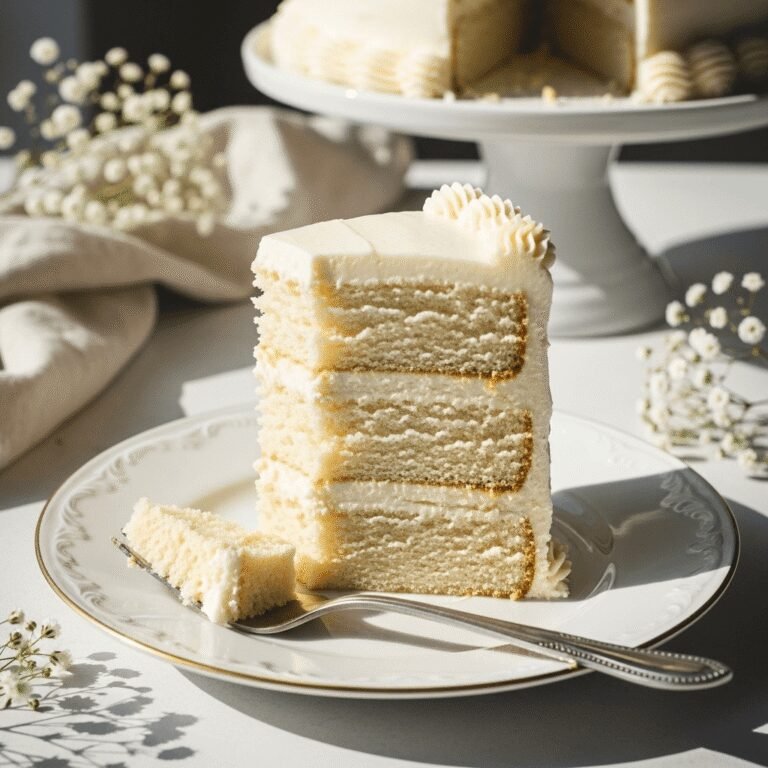
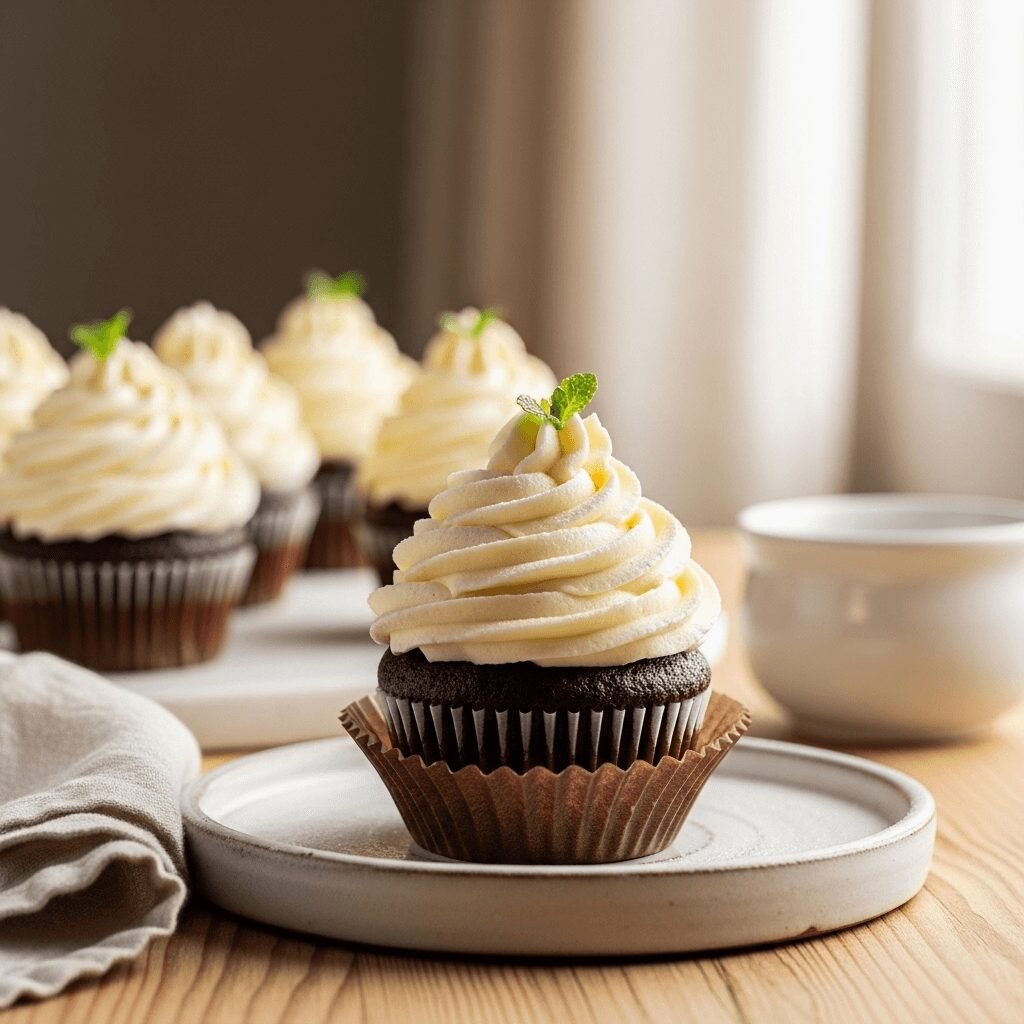
There’s something absolutely magical about a perfectly made buttercream frosting. It’s the crowning glory of birthday cakes, the sweet swirl atop freshly baked cupcakes, and the delicious glue that holds layer cakes together. This classic buttercream frosting recipe is everything you’ve been searching for—smooth, creamy, not too sweet, and incredibly versatile. Whether you’re frosting a simple sheet cake for a weeknight dessert or decorating an elaborate celebration cake, this foolproof recipe delivers bakery-quality results every single time.
What makes this buttercream truly special is its silky texture and perfect balance of sweetness. It pipes beautifully, spreads like a dream, and holds its shape wonderfully for decorating. This is the kind of frosting that makes people ask for your recipe, the kind that turns a simple homemade cake into something extraordinary. Best of all, it comes together in just minutes with ingredients you probably already have in your kitchen. No fancy equipment needed, no complicated techniques—just pure, delicious buttercream perfection.
History / Background
Buttercream frosting has a rich history that spans continents and centuries. The earliest versions of buttercream emerged in Europe during the mid-1800s, when refined sugar became more widely available and affordable for home bakers. Before this time, most cakes were topped with simple glazes or boiled icings that didn’t require the creaming of butter and sugar.
The classic American buttercream—which is what this recipe is based on—became popular in the United States in the early 20th century. It was notably different from its European cousins like French buttercream (made with egg yolks and sugar syrup) or Swiss and Italian meringue buttercreams (made with whipped egg whites). American buttercream won hearts because of its simplicity: just butter, powdered sugar, a splash of cream or milk, and flavoring. No double boilers, no candy thermometers, no fussy egg tempering required.
During the mid-1900s, as home baking became increasingly popular in American culture, buttercream frosting became the go-to choice for decorating cakes at home. It was featured in countless church cookbooks, community recipe collections, and eventually, became the standard frosting taught in home economics classes. The beauty of American buttercream lies in its accessibility—any home baker can master it, and it’s forgiving enough to work with while still producing professional-looking results. Today, it remains the most beloved frosting in American baking, gracing everything from simple birthday cupcakes to elaborate wedding cakes.
Why You’ll Love This Recipe
This buttercream frosting recipe is about to become your absolute favorite for so many reasons. It’s the kind of recipe you’ll keep coming back to again and again, the one you’ll scribble on a recipe card and pass down to your kids. Here’s what makes it so incredibly special:
This recipe is perfect because:
- Incredibly quick and easy – Ready in just 10 minutes with minimal effort and only 5 ingredients
- Foolproof for beginners – Even if you’ve never made frosting before, this recipe practically guarantees success
- Infinitely customizable – Easily adapt it to any flavor profile, from vanilla to chocolate to fruit-flavored variations
- Perfect texture every time – Smooth, creamy, and pipeable without being too stiff or too runny
- No special equipment needed – Just a hand mixer or stand mixer (even a wooden spoon works in a pinch!)
- Budget-friendly – Uses simple, inexpensive ingredients you likely already have at home
- Stable for decorating – Holds its shape beautifully for piping rosettes, borders, and detailed decorations
- Not overly sweet – Unlike some commercial frostings, this has a balanced sweetness that complements cakes without overwhelming them
- Freezer-friendly – Make it ahead and store it for future baking projects
- Kid-approved – Children love helping make this and even pickier eaters enjoy the smooth, classic flavor
Ingredient Notes
Every ingredient in this buttercream plays an important role in creating that perfect texture and flavor. Let’s break down what you’ll need and why each component matters:
Unsalted Butter: The star of the show! Use high-quality unsalted butter for the best flavor. It should be at room temperature—soft enough to leave an indent when pressed but not greasy or melted. Room temperature butter (around 65-68°F) creams beautifully with the sugar. Unsalted butter gives you complete control over the salt level. If you only have salted butter, reduce or omit the added salt in the recipe.
Powdered Sugar (Confectioners’ Sugar): This is what gives buttercream its sweetness and structure. The cornstarch in powdered sugar helps stabilize the frosting. Always sift it before using to avoid lumps in your finished frosting. You cannot substitute granulated sugar—it won’t dissolve properly and will make your frosting grainy.
Heavy Cream or Whole Milk: This thins the frosting to the perfect consistency. Heavy cream creates a richer, more luxurious frosting, while milk makes it slightly lighter. Start with less liquid than you think you need—you can always add more, but you can’t take it out. For a dairy-free version, use full-fat canned coconut cream (not coconut milk).
Pure Vanilla Extract: This adds depth and warmth to the frosting. Use pure vanilla extract, not imitation, for the best flavor. The quality really does make a difference here. You’ll need about 2 teaspoons for a beautiful vanilla flavor.
Salt: Just a pinch balances the sweetness and enhances all the other flavors. Don’t skip it! Salt is what takes buttercream from one-dimensional sweetness to something more complex and delicious.
Equipment Needed
Gathering your equipment before you start makes the frosting process quick and smooth. Here’s what you’ll need:
- Stand mixer or hand mixer – A stand mixer with paddle attachment is ideal, but a hand mixer works perfectly too
- Large mixing bowl – If using a hand mixer, choose a bowl large enough to prevent powdered sugar from flying everywhere
- Measuring cups and spoons – For accurate measurements of butter, sugar, and liquids
- Rubber spatula – Essential for scraping down the bowl and ensuring everything is evenly mixed
- Fine-mesh sieve or sifter – For sifting the powdered sugar to prevent lumps
- Offset spatula or butter knife – For spreading the frosting onto cakes or cupcakes
- Piping bags and tips (optional) – If you want to pipe decorative swirls and designs
Buttercream Frosting Recipe

This classic American buttercream frosting is silky smooth, perfectly sweet, and incredibly easy to make. With just 5 simple ingredients and 10 minutes, you’ll have bakery-quality frosting that’s perfect for decorating cakes, cupcakes, cookies, and more.
- Prep Time: 10 minutes
- Cook Time: 0 minutes
- Total Time: 10 minutes
- Yield: About 3 cups (enough to frost 24 cupcakes or one 9-inch 2-layer cake) 1x
- Category: Dessert
- Method: Mixing
- Cuisine: American
- Diet: Vegetarian
Ingredients
- 1 cup (2 sticks / 226g) unsalted butter, softened to room temperature
- 4 cups (480g) powdered sugar, sifted
- ¼ cup (60ml) heavy cream or whole milk (plus more if needed)
- 2 teaspoons pure vanilla extract
- ⅛ teaspoon salt
Instructions
- Prepare your butter: Make sure your butter is at true room temperature—it should be soft enough to easily press your finger into but not greasy or melted. Cut it into tablespoon-sized pieces for easier beating.
- Beat the butter: Place the softened butter in your mixing bowl. Using a stand mixer fitted with the paddle attachment or a hand mixer, beat the butter on medium speed for 2-3 minutes until it’s light, fluffy, and pale in color. Scrape down the sides of the bowl with a rubber spatula.
- Add the powdered sugar gradually: With the mixer on low speed, add the sifted powdered sugar one cup at a time. Mix on low until each addition is incorporated before adding more. This prevents a powdered sugar cloud from forming in your kitchen. After all the sugar is added, increase speed to medium and beat for 2 minutes.
- Add the liquids: Add the vanilla extract, heavy cream (or milk), and salt to the mixture. Beat on low speed for 30 seconds to incorporate, then increase to medium-high speed and beat for 3-4 minutes. The frosting should become noticeably lighter in color and very fluffy.
- Adjust consistency: Check the consistency of your frosting. It should be smooth, creamy, and spreadable. If it’s too thick, add more cream 1 tablespoon at a time until you reach your desired consistency. If it’s too thin, add more powdered sugar ¼ cup at a time.
- Final whip: Once you’ve achieved the perfect consistency, beat the frosting on high speed for 30 seconds to add extra air and fluffiness. Scrape down the bowl one final time to ensure everything is evenly mixed.
- Use immediately or store: Your buttercream is now ready to use! Spread it on cakes, pipe it onto cupcakes, or use it however you like. If not using immediately, transfer to an airtight container and store according to the storage instructions below.
Notes
- Butter temperature is crucial: If your butter is too cold, the frosting will be lumpy. If it’s too warm, it will be soupy. Aim for 65-68°F room temperature.
- Sift your sugar: This step is non-negotiable if you want smooth, lump-free frosting.
- Scrape the bowl: Stop the mixer several times during beating to scrape down the sides and bottom of the bowl with a rubber spatula. This ensures even mixing.
- Beat long enough: Don’t rush the beating process. The longer you beat the frosting (up to 5 minutes), the lighter and fluffier it becomes.
- Color carefully: If adding food coloring, use gel colors rather than liquid ones to avoid changing the consistency.
Nutrition
- Serving Size: 2 tablespoons (30g)
- Calories: 140
- Sugar: 16g
- Sodium: 15mg
- Fat: 8g
- Saturated Fat: 5g
- Unsaturated Fat: 3g
- Trans Fat: 0g
- Carbohydrates: 18g
- Fiber: 0g
- Protein: 0g
- Cholesterol: 20mg
Note: Nutrition information is calculated based on the ingredients used and is an approximation. Actual nutritional values may vary.
Tips & Variations
The beauty of buttercream frosting is how incredibly versatile it is. Here are some delicious ways to customize this recipe:
Chocolate Buttercream: Add ¾ cup unsweetened cocoa powder along with the powdered sugar. You may need to add an extra 2-3 tablespoons of cream to achieve the right consistency. Sift the cocoa powder with the powdered sugar for best results.
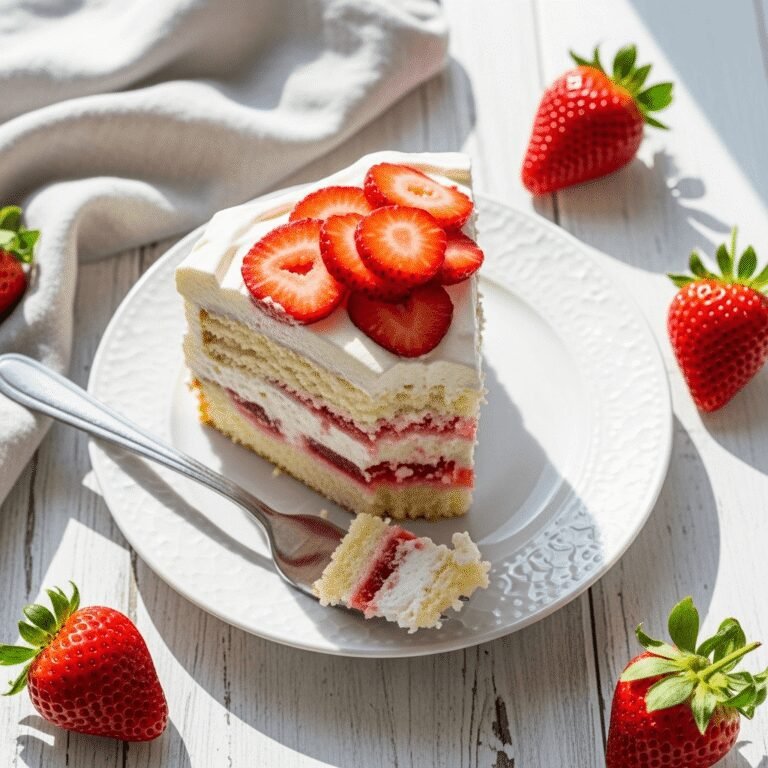
Strawberry Buttercream: Replace the heavy cream with strawberry puree (made from fresh or frozen strawberries, strained to remove seeds). Add 2-3 tablespoons of freeze-dried strawberry powder for intense flavor and beautiful color without extra moisture.
Lemon Buttercream: Replace vanilla extract with lemon extract and add 2 tablespoons fresh lemon juice plus 1 teaspoon lemon zest. Reduce the cream slightly to compensate for the added lemon juice.
Cream Cheese Buttercream: Replace 4 tablespoons (half a stick) of butter with softened cream cheese for a tangy twist. This creates a delicious hybrid between buttercream and cream cheese frosting.
Espresso Buttercream: Dissolve 2 tablespoons instant espresso powder in the cream before adding it to the frosting. Perfect for coffee lovers and pairs beautifully with chocolate cake.
Salted Caramel Buttercream: Replace the vanilla with caramel extract and add 3-4 tablespoons of caramel sauce. Increase the salt to ¼ teaspoon for that perfect salted caramel flavor.
Peppermint Buttercream: Replace vanilla extract with peppermint extract (start with ½ teaspoon and add more to taste, as peppermint is strong). Add crushed candy canes for a festive touch.
Reduced Sugar Version: You can reduce the powdered sugar by up to ¾ cup for a less sweet frosting. The texture will be slightly softer, so it’s better for spreading than piping intricate designs.
Pro Chef Tips
Take your buttercream from good to absolutely extraordinary with these professional secrets:
Temperature control is everything: Professional bakers know that butter temperature makes or breaks buttercream. If your kitchen is warm, place the frosting in the refrigerator for 10-15 minutes to firm up before using. If it’s too cold, let it sit at room temperature and beat it again before using.
The Swiss meringue trick: For an even silkier texture, briefly heat your mixing bowl in a warm water bath before beating the butter. This helps create an incredibly smooth consistency.
Add a secret ingredient: Professional bakers often add a tiny amount (⅛ teaspoon) of almond extract alongside the vanilla. It adds depth without making the frosting taste like almond.
The crumb coat technique: When frosting a cake, always apply a thin “crumb coat” layer first, then refrigerate for 30 minutes before applying the final frosting layer. This keeps crumbs from showing in your final presentation.
Whip for volume: After your buttercream is made, beat it on high speed for an extra minute. This incorporates air bubbles that make the frosting incredibly light and increases the volume by up to 20%.
Use the paddle, not the whisk: Always use a paddle attachment (not a whisk) to make buttercream. The paddle creates a smooth, creamy texture, while a whisk incorporates too much air and can make the frosting look separated or curdled.
Stabilize for hot weather: If you’re frosting a cake for an outdoor event in warm weather, replace 2 tablespoons of butter with 2 tablespoons of vegetable shortening. This helps the frosting hold up better in heat without sacrificing much flavor.
Common Mistakes to Avoid
Even simple recipes can go wrong if you’re not careful. Here’s how to avoid the most common buttercream pitfalls:
Using cold butter: This is the number one mistake home bakers make. Cold butter creates a lumpy, curdled-looking frosting that never fully comes together. Always use room temperature butter that’s been sitting out for at least 2 hours.
Not sifting the powdered sugar: Unsifted powdered sugar contains clumps that will show up as lumps in your finished frosting. Always sift! It takes 30 seconds and makes a huge difference.
Adding liquid too quickly: If you add all your cream or milk at once, the frosting can break and look curdled. Add it gradually while the mixer is running, and give it time to incorporate before adding more.
Over-beating after adding liquid: Once you’ve added the cream and vanilla, don’t beat for more than 4-5 minutes total. Over-beating can incorporate too much air and make the frosting look almost grainy or separated.
Making it in a hot kitchen: If your kitchen is above 75°F, your butter will be too soft and your frosting will be soupy. Work in a cool environment or refrigerate your bowl and frosting periodically during mixing.
Not scraping down the bowl: Unmixed butter or sugar lurking on the sides of the bowl will create an uneven frosting with pockets of sweetness. Stop and scrape regularly throughout the mixing process.
Trying to frost a warm cake: This is a recipe for disaster! Always let cakes cool completely (ideally, refrigerate them) before frosting. Warm cake will melt your buttercream and create a goopy mess.
Storage & Meal Prep
Proper storage ensures your buttercream stays fresh and delicious:
Room Temperature Storage: Buttercream can sit at room temperature for up to 2 days if your kitchen is cool (below 70°F). Keep it covered with plastic wrap pressed directly against the surface to prevent crusting.
Refrigerator Storage: Store buttercream in an airtight container in the refrigerator for up to 2 weeks. Before using, let it come to room temperature (this takes about 2-3 hours), then re-beat it with your mixer for 2-3 minutes to restore the fluffy texture.
Freezer Storage: Buttercream freezes beautifully for up to 3 months! Store it in an airtight container or heavy-duty freezer bag with all air removed. Label with the date and flavor.
Reheating/Reconstituting: When ready to use frozen buttercream, thaw it overnight in the refrigerator, then bring to room temperature. Re-beat it with your mixer on medium-high speed for 3-5 minutes. If it looks separated or curdled during beating, don’t panic—just keep beating and it will come back together. You can also add 1-2 tablespoons of fresh cream to help it along.
Frosted Cake Storage: Cakes frosted with buttercream can be stored at room temperature for 1-2 days if your home is cool and you have AC. Otherwise, refrigerate them. Cover loosely with plastic wrap or place in a cake keeper. Let refrigerated cakes sit at room temperature for 30 minutes before serving for the best flavor and texture.
Make-Ahead & Freezer Notes
Buttercream is one of the most make-ahead friendly frostings, which makes it perfect for busy bakers:
Make-Ahead Instructions: You can make this buttercream up to 2 weeks in advance! Prepare it according to the recipe, then store it in an airtight container in the refrigerator. When you’re ready to use it, bring it to room temperature (this is important—don’t try to use it cold), then re-beat it with your mixer for 2-3 minutes to restore the light, fluffy texture.
Freezing the Frosting: Buttercream freezes exceptionally well for up to 3 months. Transfer it to freezer-safe containers, leaving about ½ inch of space at the top for expansion. For easy portioning, you can freeze it in smaller containers or even in piping bags! To use, thaw overnight in the refrigerator, bring to room temperature, and re-beat.
Freezing Frosted Cakes: You can also freeze cakes or cupcakes that have already been frosted with buttercream. Place them uncovered in the freezer for 1-2 hours to harden the frosting, then wrap well with plastic wrap and aluminum foil. They’ll keep for up to 2 months. Thaw unwrapped in the refrigerator overnight, then bring to room temperature before serving.
Best Reheating Method: There’s no actual heating involved with buttercream, but the “reconstituting” method is key. Always let it come fully to room temperature naturally (don’t microwave!). If you’re in a hurry, you can gently warm the bowl by placing it over a bowl of warm (not hot) water while beating. Beat on medium speed first, then gradually increase to high. The frosting will go through an ugly stage where it looks broken or curdled—keep beating! It will come back together beautifully.
Serving Suggestions
Buttercream frosting is wonderfully versatile. Here’s how to use it and what to pair it with:
Classic Applications: Use this buttercream to frost layer cakes, sheet cakes, cupcakes, sugar cookies, brownies, or even as a filling between graham crackers or sandwich cookies. It’s also perfect for creating decorative borders on pies or as a dip for fresh fruit.
Cake Pairings: This vanilla buttercream pairs beautifully with yellow cake, chocolate cake, red velvet, vanilla cake, marble cake, funfetti cake, carrot cake, or spice cake. Basically, it’s the perfect match for any cake flavor!
Beverage Pairings: Serve cakes or cupcakes frosted with buttercream alongside cold milk, hot coffee, espresso, tea, or hot chocolate. For adult gatherings, it pairs wonderfully with dessert wines, champagne, or Irish coffee.
Seasonal Serving Ideas: In fall, pair buttercream-frosted spice cakes with hot apple cider. In winter, serve alongside peppermint hot chocolate. Spring calls for pairing with fresh strawberry lemonade, while summer is perfect for serving with iced coffee or cold brew.
Party Presentation: For a beautiful dessert table, pipe the buttercream onto cupcakes in tall swirls, dust with edible glitter or sprinkles, and arrange on a tiered stand. Add fresh flowers (make sure they’re food-safe), fresh berries, or decorative toppers for special occasions.
Make It a Dessert Board: Create a “build your own dessert” station with unfrosted cupcakes or cookies, bowls of buttercream in different flavors, and various toppings like sprinkles, crushed cookies, mini chocolate chips, and fresh fruit. Let guests decorate their own treats!
FAQs Section
Can I use salted butter instead of unsalted?
Yes, you can use salted butter if that’s what you have on hand. Just omit the additional salt called for in the recipe. However, unsalted butter is preferred because it gives you better control over the final flavor and saltiness level.
Why is my buttercream grainy or gritty?
This usually happens when the powdered sugar isn’t fully dissolved or wasn’t sifted before adding. To fix it, continue beating the frosting for an additional 3-5 minutes on medium-high speed, which will help dissolve the sugar crystals. If that doesn’t work, you can briefly warm the bottom of the bowl over a pot of simmering water while beating to help dissolve the sugar completely.
Can I make buttercream without a mixer?
Yes, but it requires significant elbow grease! Use a large wooden spoon and really work that butter against the side of the bowl. It will take 15-20 minutes of vigorous stirring and beating to achieve a light, fluffy texture. A hand mixer makes the job much easier if you have one available.
How do I fix buttercream that’s too runny?
If your buttercream is too soft or runny, it’s usually because the butter was too warm or you added too much liquid. To fix it, add more powdered sugar ¼ cup at a time until it thickens up. Alternatively, refrigerate the frosting for 20-30 minutes, then re-beat it. The cold temperature will firm up the butter.
How do I fix buttercream that’s too stiff?
If your frosting is too thick or stiff to spread easily, simply add more heavy cream or milk, 1 tablespoon at a time, beating well after each addition until you reach your desired consistency. Be patient and add liquid gradually to avoid overshooting and making it too thin.
Can I color buttercream with food coloring?
Absolutely! Use gel food coloring rather than liquid food coloring for the best results. Gel colors are more concentrated, so you need less to achieve vibrant colors, and they won’t alter the consistency of your frosting. Add color gradually—you can always add more but you can’t take it away.
Why does my buttercream look curdled or separated?
This typically happens when the butter and liquid are at different temperatures. Don’t panic! Keep beating the frosting on medium-high speed for 2-3 minutes and it should come back together. If it doesn’t, the frosting might be too cold—let it sit at room temperature for 10-15 minutes, then beat again. If it’s too warm, refrigerate for 10 minutes, then beat again.
Conclusion
There you have it—the only buttercream frosting recipe you’ll ever need! This classic American buttercream is the perfect combination of simplicity and deliciousness, delivering bakery-quality results every single time. Whether you’re frosting your first batch of cupcakes or you’re a seasoned baker looking for a reliable go-to recipe, this buttercream will never let you down.
The beauty of this recipe is its versatility. Keep it classic with pure vanilla, or experiment with the countless flavor variations to match any cake, occasion, or craving. From birthday parties to holiday gatherings, from Tuesday night desserts to wedding celebrations, this buttercream rises to every occasion with grace and deliciousness.
Now it’s your turn to whip up a batch of this heavenly frosting! I’d love to hear how it turns out for you. Drop a comment below and let me know what you frosted with this buttercream, share your favorite flavor variation, or ask any questions you might have. And if you love this recipe as much as I do, please pin it to your favorite Pinterest board so you can find it easily the next time you need to frost something spectacular. Don’t forget to snap a photo of your beautiful creation and tag me—I love seeing your baking successes! Happy frosting, friends!