Easy No Flour Cookies Recipe – Naturally Gluten-Free & Irresistibly Delicious!

If you’ve ever found yourself craving freshly baked cookies but realized you’re out of flour—or if you’re simply looking for a naturally gluten-free treat that doesn’t compromise on flavor—these No Flour Cookies are about to become your new obsession! These delightful cookies are soft, chewy, and packed with rich, nutty flavor thanks to their base of wholesome ingredients like oats, nut butter, and natural sweeteners.
What makes these cookies truly special is their incredible simplicity. You don’t need any specialty flours, xanthan gum, or complicated gluten-free blends. Just pantry staples that come together in one bowl for a cookie that’s perfect for after-school snacks, lunchbox treats, holiday cookie exchanges, or those moments when you need something sweet but want to keep things a bit healthier. They’re ideal for anyone following a gluten-free lifestyle, but trust me—even the most devoted flour-lovers won’t miss it one bit!
Serve these at your next family gathering, pack them for picnics, gift them to neighbors during the holidays, or simply enjoy them warm from the oven with a cold glass of milk. They’re versatile enough to customize with chocolate chips, dried fruit, or nuts, making them the perfect canvas for your favorite mix-ins.
History / Background
While traditional cookies have been made with wheat flour for centuries, the concept of flourless baking has fascinating roots that span multiple cultures and culinary traditions. Flourless cookies gained prominence during World War II when flour rationing made bakers creative with alternative ingredients. Home cooks discovered that ground nuts, oats, and other grain alternatives could create delicious baked goods without traditional wheat flour.
The rise of flourless cookies also has strong connections to Jewish Passover traditions, where leavened flour products are forbidden. Macaroons and other flourless confections became holiday staples, proving that amazing cookies could exist without conventional flour. These traditional recipes relied heavily on egg whites, ground almonds, and coconut—ingredients that naturally bind and create structure.
In recent decades, the explosion of dietary awareness—particularly around celiac disease, gluten sensitivity, and clean eating movements—has brought flourless baking into the mainstream spotlight. What was once a necessity or religious observance has transformed into a celebrated baking style embraced by health-conscious home cooks everywhere. Modern no-flour cookies often use oats (which are naturally gluten-free when certified), nut butters, and natural sweeteners, creating treats that are not only safe for gluten-free diets but also align with whole-food, minimally processed eating philosophies.
Today’s no flour cookies represent the perfect marriage of necessity, tradition, and modern nutritional awareness—proving that sometimes the best innovations come from working within creative constraints!
Why You’ll Love This Recipe
These No Flour Cookies are the epitome of simple, wholesome baking that delivers big on taste without any fuss. They’re proof that you don’t need complicated ingredients or techniques to create something truly delicious. Whether you’re an experienced baker or someone who usually sticks to slice-and-bake varieties, these cookies will make you feel like a baking superstar.
Here’s why these cookies will win your heart:
- Naturally Gluten-Free – No specialty flours or gums needed; perfect for celiac friends and family
- One-Bowl Wonder – Minimal cleanup means more time enjoying cookies, less time at the sink
- Ready in 20 Minutes – From mixing bowl to cooling rack faster than you can say “cookie craving”
- Wholesome Ingredients – Made with oats, nut butter, and natural sweeteners you can feel good about
- Incredibly Versatile – Customize with chocolate chips, nuts, dried fruit, or spices to suit any taste
- Budget-Friendly – Uses affordable pantry staples you likely already have on hand
- Kid-Approved – Soft, chewy texture that children absolutely love (and parents appreciate the nutritious ingredients)
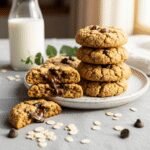
- Great Texture – Perfectly chewy with slightly crisp edges—the ideal cookie consistency
- No Chilling Required – Skip the waiting and bake immediately when the cookie mood strikes
- Meal Prep Friendly – Dough freezes beautifully for fresh-baked cookies anytime
Ingredient Notes
Let’s talk about what makes these cookies so incredibly delicious and why each ingredient plays an important role in creating the perfect texture and flavor.
Rolled Oats – The foundation of these cookies! Use old-fashioned rolled oats for the best texture. Quick oats will work in a pinch but may result in slightly denser cookies. For certified gluten-free cookies, always check that your oats are labeled gluten-free, as oats are often processed in facilities that handle wheat. You can pulse the oats in a food processor for 3-4 seconds if you prefer a smoother texture, but I love the rustic, hearty texture of whole oats.
Natural Peanut Butter (or Almond Butter) – This is your binder and flavor powerhouse! Use creamy, natural nut butter (the kind where oil separates on top). Conventional peanut butter with added sugar and oils can make cookies overly sweet and greasy. Almond butter, cashew butter, or sunflower seed butter are excellent alternatives for nut-free versions. Make sure to stir your nut butter well before measuring for consistent results.
Honey (or Maple Syrup) – Natural liquid sweeteners not only add sweetness but also contribute to that chewy texture we all love. Honey creates slightly chewier cookies with a subtle floral note, while maple syrup offers a more caramel-like flavor. For vegan cookies, stick with maple syrup or agave nectar.
Egg – Provides structure and helps bind everything together. One large egg is perfect for this recipe. For vegan cookies, use a flax egg (1 tablespoon ground flaxseed mixed with 3 tablespoons water, let sit 5 minutes) or a chia egg.
Vanilla Extract – Never skip the vanilla! It enhances all the other flavors and adds that classic cookie aroma. Use pure vanilla extract rather than imitation for the best flavor.
Baking Soda – Just a small amount creates the perfect amount of rise and helps achieve those slightly crispy edges while keeping the centers soft.
Salt – Balances sweetness and enhances flavor. Even if you use salted nut butter, don’t skip this—it makes a noticeable difference!
Chocolate Chips (Optional) – Because what’s better than a cookie? A cookie with chocolate! Use dark chocolate chips, semi-sweet, or even white chocolate chips. Dairy-free chocolate chips work perfectly for keeping these cookies completely free from common allergens.
Equipment Needed
One of the best things about this recipe is how minimal your equipment needs are! Here’s what you’ll need to whip up these delicious cookies:
- Large Mixing Bowl – For combining all your ingredients
- Measuring Cups and Spoons – Accurate measurements ensure consistent results every time
- Wooden Spoon or Sturdy Spatula – The dough is thick, so you’ll want something sturdy for mixing
- Baking Sheet – One or two standard baking sheets (9×13 or larger)
- Parchment Paper or Silicone Baking Mat – Prevents sticking and makes cleanup a breeze
- Small Bowl – For mixing your flax egg if making vegan version
- Cookie Scoop or Tablespoon – Ensures evenly sized cookies that bake uniformly (a 1.5-tablespoon scoop is perfect)
- Wire Cooling Rack – Allows air circulation for even cooling
- Fork (Optional) – For creating that classic crisscross pattern on top
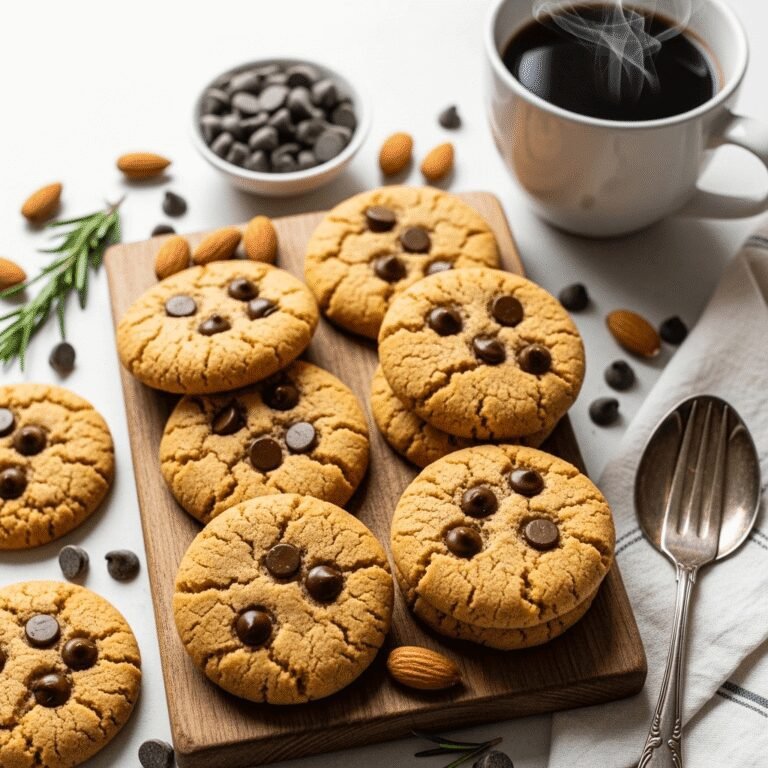
No Flour Cookies Recipe
These easy No Flour Cookies are naturally gluten-free, made with wholesome oats and nut butter for a chewy, delicious treat that comes together in just one bowl! Perfect for satisfying your cookie cravings with simple pantry ingredients.
- Prep Time: 10 minutes
- Cook Time: 10 minutes
- Total Time: 20 minutes
- Yield: 18-20 cookies 1x
- Category: Dessert
- Method: Baking
- Cuisine: American
- Diet: Vegetarian
Ingredients
- 2 cups old-fashioned rolled oats (certified gluten-free if needed)
- 1 cup natural peanut butter or almond butter (creamy, well-stirred)
- ½ cup honey or pure maple syrup
- 1 large egg (or flax egg for vegan version)
- 1 teaspoon pure vanilla extract
- ½ teaspoon baking soda
- ¼ teaspoon fine sea salt
- ¾ cup chocolate chips (optional but highly recommended)
- ¼ cup chopped nuts or dried fruit (optional)
Instructions
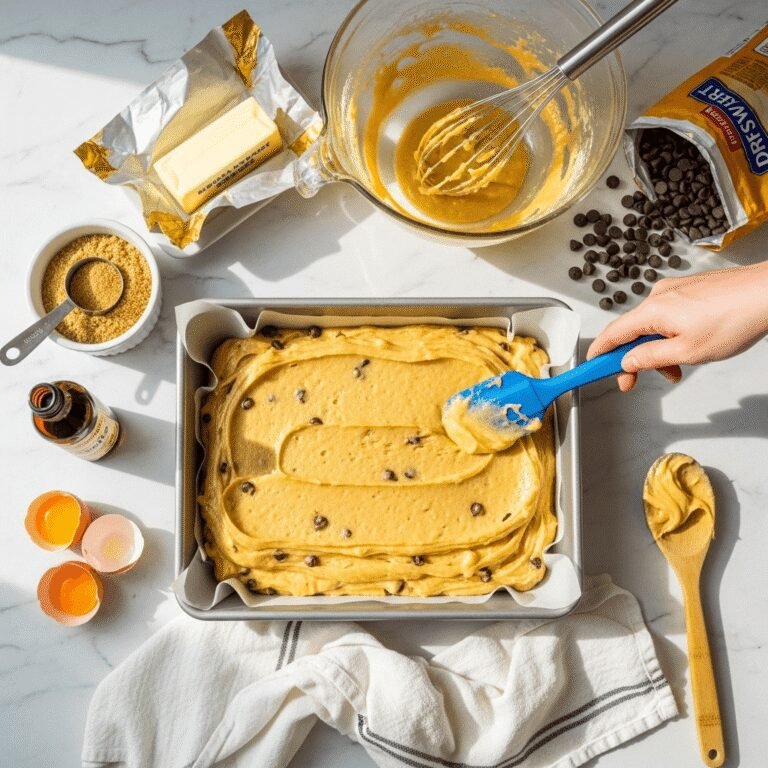
- Preheat and Prepare: Preheat your oven to 350°F (175°C). Line two baking sheets with parchment paper or silicone baking mats. This prevents sticking and ensures easy cleanup.
- Mix Wet Ingredients: In a large mixing bowl, combine the peanut butter, honey, egg, and vanilla extract. Stir vigorously with a wooden spoon or sturdy spatula until the mixture is smooth and well combined. The natural oils in the nut butter should emulsify with the other wet ingredients, creating a creamy base.
- Add Dry Ingredients: Add the rolled oats, baking soda, and salt directly to the wet mixture. Stir everything together until all the oats are fully coated and no dry patches remain. The dough will be thick and slightly sticky—this is exactly what you want!
- Fold in Mix-ins: If using chocolate chips, nuts, or dried fruit, fold them into the dough now. Make sure they’re evenly distributed throughout for chocolate in every bite.
- Shape the Cookies: Using a cookie scoop or tablespoon, portion the dough into balls (about 1.5 tablespoons each) and place them on your prepared baking sheets, spacing them about 2 inches apart. The cookies will spread slightly but maintain their shape nicely.
- Flatten (Optional): For more traditional-looking cookies, gently press each dough ball down with the back of a fork, creating a crisscross pattern. This also helps them bake more evenly. If you prefer thicker, chewier cookies, skip this step.
- Bake: Place the baking sheets in the preheated oven and bake for 9-11 minutes. The cookies are done when the edges are golden brown and the centers look just slightly underdone. They will continue to firm up as they cool.
- Cool: Remove from the oven and let the cookies cool on the baking sheet for 5 minutes—this is crucial! They’ll be very soft when hot but will firm up perfectly as they cool. After 5 minutes, transfer them to a wire cooling rack to cool completely.
- Serve and Enjoy: Enjoy your cookies warm or at room temperature. Store any leftovers in an airtight container at room temperature for up to 5 days, in the refrigerator for up to 2 weeks, or freeze for up to 3 months.
Notes
- Nut Butter Consistency Matters: Make sure your natural nut butter is well-stirred before measuring. If the oils have separated, stir thoroughly to reincorporate them for the best texture.
- Don’t Overbake: These cookies continue to cook on the hot baking sheet after removing from the oven. Slightly underdone centers = perfectly chewy cookies.
- Certified Gluten-Free Oats: If cooking for someone with celiac disease, always use certified gluten-free oats to avoid cross-contamination.
- Dough Too Sticky? Refrigerate for 15-20 minutes to make it easier to handle, or lightly wet your hands when shaping.
- Customize Your Add-ins: Try dried cranberries and white chocolate chips, chopped walnuts and cinnamon, or mini M&Ms for a fun variation!
Nutrition
- Serving Size: 1 cookie
- Calories: 145
- Sugar: 9g
- Sodium: 85mg
- Fat: 8g
- Saturated Fat: 1.5g
- Unsaturated Fat: 6g
- Trans Fat: 0g
- Carbohydrates: 16g
- Fiber: 2g
- Protein: 4g
- Cholesterol: 10mg
Nutrition facts are estimates based on standard ingredients and may vary based on specific brands and modifications.
Tips & Variations
The beauty of these no flour cookies is how adaptable they are to your taste preferences and dietary needs! Here are some delicious ways to customize them:
Chocolate Lover’s Version: Use ½ cup chocolate chips plus 2 tablespoons cocoa powder mixed into the dough for double chocolate cookies. Add a handful of white chocolate chips for a cookies-and-cream effect.
Breakfast Cookie Makeover: Reduce honey to ⅓ cup, add ½ cup unsweetened dried cranberries, ¼ cup chopped walnuts, and 1 teaspoon cinnamon. These make excellent grab-and-go breakfast options!
Peanut Butter Cup Cookies: Press a miniature peanut butter cup into the center of each cookie immediately after removing from the oven. Let cool completely for the best texture.
Tropical Paradise: Substitute almond butter for peanut butter, add ½ cup shredded coconut and ⅓ cup chopped macadamia nuts. Use maple syrup for the sweetener.
Spiced Chai Cookies: Add 1 teaspoon cinnamon, ½ teaspoon ginger, ¼ teaspoon cardamom, and a pinch of cloves to the dough. These are perfect with afternoon tea!
Nut-Free School Safe: Use sunflower seed butter instead of peanut butter (note: dough may turn slightly green due to natural chlorophyll reaction with baking soda—totally safe and tastes great!).
Protein Boost: Add 2-3 tablespoons of your favorite vanilla protein powder to the dough for extra protein. You may need to add 1-2 tablespoons of milk if the dough becomes too thick.
Lower Sugar Option: Reduce honey to ⅓ cup and add a handful of unsweetened chocolate chips or a few drops of liquid stevia to compensate for sweetness if needed.
Pro Chef Tips
These insider tips will take your no flour cookies from good to absolutely phenomenal:
Toast Your Oats First: For an incredible depth of flavor, spread your oats on a baking sheet and toast them at 350°F for 5-7 minutes until fragrant before making the dough. This adds a nutty, almost caramelized flavor that’s restaurant-quality.
Room Temperature Ingredients: Let your egg and nut butter come to room temperature before mixing. This helps everything incorporate more smoothly and creates a better texture. Cold ingredients don’t emulsify as well.
The Press-and-Twist Technique: When pressing cookies with a fork, press down firmly, then give the fork a slight twist before lifting. This creates more defined ridges that catch extra crispiness during baking.
Strategic Chocolate Placement: Instead of mixing all chocolate chips into the dough, reserve a handful and press them onto the tops of your formed cookies. This creates those gorgeous, bakery-style cookies with visible chocolate on top.
The Maillard Magic: For cookies with deeper flavor complexity, let your edges get slightly darker golden brown. This is the Maillard reaction at work—it creates hundreds of new flavor compounds that make cookies taste richer and more complex.
Two-Temperature Baking: For perfectly chewy centers with crispy edges, bake at 375°F for the first 5 minutes, then reduce to 325°F for the remaining 4-6 minutes. This technique creates amazing texture contrast.
The Tap Test: Gently tap the baking sheet on the counter immediately after removing from the oven. This helps settle the cookies and creates a slightly flatter, chewier texture with beautiful crackled tops.
Common Mistakes to Avoid
Even simple recipes have pitfalls! Here’s how to sidestep the most common issues:
Mistake #1: Using Stabilized Peanut Butter – Commercial peanut butters like Jif or Skippy contain added oils and sugars that throw off the recipe’s balance. Always use natural nut butter where the only ingredients are nuts (and maybe salt). The oil separation on top is actually a good sign!
Mistake #2: Overbaking – These cookies look slightly underdone when they’re actually perfect. If you wait until they look fully cooked in the oven, they’ll be dry and crumbly once cooled. Remember, they continue baking on the hot pan after you remove them from the oven.
Mistake #3: Not Measuring Accurately – With flourless recipes, precision matters even more. Use the spoon-and-level method for oats (spoon into measuring cup, level off with a knife) rather than scooping directly from the container, which compacts them and gives you too much.
Mistake #4: Skipping the Cooling Time on the Pan – These cookies are fragile when hot! Moving them too soon will cause them to break apart. Those 5 minutes on the baking sheet allow them to firm up to the perfect consistency.
Mistake #5: Storing While Warm – Putting warm cookies in an airtight container creates condensation, which makes them soggy. Always let them cool completely on a wire rack before storing. Patience pays off with perfect texture!
Storage & Meal Prep
Proper storage keeps your no flour cookies tasting fresh-baked for days!
Room Temperature Storage: Store completely cooled cookies in an airtight container with a piece of parchment paper between layers to prevent sticking. They’ll stay fresh for 4-5 days at room temperature. Add a small piece of bread to the container—it will go stale, but it releases just enough moisture to keep your cookies soft and chewy.
Refrigerator Storage: For longer storage (up to 2 weeks), keep cookies in an airtight container in the refrigerator. Let them come to room temperature before eating, or warm them in the microwave for 8-10 seconds for that fresh-baked taste and texture.
Lunch Box Friendly: These cookies are perfect for school lunches or work snacks. Individually wrap them in plastic wrap or small zip-top bags for easy grab-and-go options. They stay fresh this way for 3-4 days.
Reheating Tips: To recreate that fresh-from-the-oven experience, microwave a cookie for 10-15 seconds, or warm several cookies in a 300°F oven for 3-4 minutes. They’ll soften up and taste like you just baked them!
Make-Ahead & Freezer Notes
These cookies are fantastic for advance preparation, making them perfect for busy schedules and last-minute entertaining!
Freezing Unbaked Dough: Scoop cookie dough into balls, place on a parchment-lined baking sheet, and freeze until solid (about 2 hours). Transfer frozen dough balls to a freezer-safe zip-top bag or container. They’ll keep for up to 3 months. Bake directly from frozen, adding 1-2 extra minutes to the baking time. No thawing required!
Freezing Baked Cookies: Let cookies cool completely, then layer them in a freezer-safe container with parchment paper between layers. Freeze for up to 3 months. Thaw at room temperature for 30 minutes, or microwave frozen cookies for 15-20 seconds for a warm treat.
Make-Ahead Dough (Refrigerator): Prepare the dough up to 2 days in advance and store it covered in the refrigerator. Cold dough is actually easier to handle and creates slightly thicker cookies with less spread. Let it sit at room temperature for 10-15 minutes before scooping if it’s too firm.
Pre-Portioned Convenience: On meal prep day, portion all the dough into balls and store them in the refrigerator in an airtight container. Throughout the week, you can bake just 2-3 cookies at a time for fresh treats without making a full batch. They’ll keep in the fridge for 3-4 days this way.
Gift-Giving Tip: Freeze baked cookies, then wrap them beautifully in cellophane bags with ribbons. They’ll thaw to perfect freshness by the time you gift them, but the freezing actually helps preserve optimal texture!
Serving Suggestions
These versatile cookies pair beautifully with so many things! Here are some delicious ways to serve them:
Classic Combinations:
- Cold glass of milk (dairy or non-dairy)
- Hot coffee or espresso for dunking
- Warm chai tea or spiced tea
- Hot chocolate with marshmallows
- Fresh fruit salad for a balanced snack
Dessert Plating:
- Crumble cookies over vanilla ice cream for an easy sundae
- Serve alongside fresh berries and whipped cream
- Create ice cream sandwiches using softened ice cream
- Pair with chocolate fondue for dipping
- Arrange on a dessert board with fresh fruit, nuts, and dark chocolate squares
Afternoon Tea Service:
- Serve with Greek yogurt and honey
- Pair with herbal tea and lemon slices
- Arrange with fresh sliced apples and almond butter
- Create a cookie plate with variety of homemade treats
Kid-Friendly Options:
- Pack in lunchboxes with string cheese and grapes
- Serve with banana slices and peanut butter
- Offer with smoothies for an after-school snack
- Include on breakfast-for-dinner nights alongside scrambled eggs
FAQs Section
Q: Can I make these cookies without eggs?
A: Absolutely! Use a flax egg (1 tablespoon ground flaxseed mixed with 3 tablespoons water, let sit 5 minutes) or chia egg as a direct substitute. The texture will be slightly more delicate but still delicious. Vegan versions work beautifully!
Q: Why are my cookies falling apart?
A: This usually happens from one of three issues: 1) Using the wrong type of peanut butter (stabilized instead of natural), 2) Not measuring oats accurately (too many oats makes crumbly cookies), or 3) Overbaking. Make sure you’re using natural nut butter and removing cookies when they still look slightly underdone.
Q: Can I use quick oats instead of old-fashioned rolled oats?
A: Yes, but the texture will be different—slightly denser and less chewy. Quick oats are more finely cut, so they absorb liquid differently. If using quick oats, you might need to add 1-2 tablespoons of milk to the dough if it seems too thick.
Q: Are these cookies really gluten-free?
A: Yes! Oats are naturally gluten-free, but they’re often processed in facilities that also process wheat. For truly gluten-free cookies safe for celiac disease, always buy certified gluten-free oats. The label will specifically state this certification.
Q: Can I make these cookies nut-free for school allergies?
A: Definitely! Use sunflower seed butter as a 1:1 substitute for peanut butter. Be aware that sunflower seed butter can sometimes react with baking soda and turn cookies slightly green—this is completely safe and doesn’t affect taste, just appearance. Tahini (sesame seed butter) also works well.
Q: My dough is too sticky to handle. What should I do?
A: Refrigerate the dough for 15-20 minutes to firm it up. Alternatively, lightly wet or oil your hands when portioning the cookies. The dough is naturally sticky due to the honey and nut butter, but chilling makes it much more manageable.
Q: How do I know when the cookies are done baking?
A: Look for golden brown edges while the centers still appear slightly soft and underdone. They should look like they need “just one more minute”—that’s when they’re perfect! They’ll firm up as they cool on the baking sheet. If you wait until they look fully done in the oven, they’ll be overbaked.
Conclusion
There you have it—the easiest, most delicious No Flour Cookies you’ll ever make! These naturally gluten-free treats prove that you don’t need complicated ingredients or fancy techniques to create something absolutely wonderful. Whether you’re baking for dietary restrictions, trying to use up pantry staples, or simply craving a wholesome homemade cookie, this recipe delivers every single time.
The beauty of these cookies lies in their simplicity and versatility. One basic recipe becomes your canvas for endless variations, from breakfast cookies packed with fruit and nuts to decadent double chocolate versions. They’re perfect for beginner bakers building confidence and experienced home cooks looking for a reliable, quick recipe.
I’d absolutely love to hear how your cookies turn out! Did you try any of the variations? What mix-ins did you use? Drop a comment below and share your experience. And if you loved this recipe, please consider pinning it to your favorite Pinterest boards—your saves help other home cooks discover these amazing cookies too!
Happy baking, friends! May your kitchen always smell like fresh cookies and your cookie jar never stay empty for long. 🍪