The Ultimate Easy Oreo Balls Recipe (No-Bake, 3-Ingredient Crowd-Pleaser!)

If you’re looking for a dessert that’s ridiculously easy, insanely delicious, and guaranteed to disappear within minutes at any gathering, these Oreo Balls are your new best friend! Also known as Oreo Truffles, these no-bake treats combine crushed Oreo cookies with cream cheese and chocolate coating to create bite-sized balls of pure heaven.
What makes Oreo Balls so incredibly popular is their simplicity—you only need three basic ingredients and about 30 minutes of hands-on time. There’s no oven required, no complicated techniques, and they look absolutely stunning on any dessert table. They’re perfect for holidays like Christmas and Valentine’s Day, birthday parties, baby showers, potlucks, or even just a weekend treat when you’re craving something sweet. Kids and adults alike go crazy for these rich, creamy, chocolate-covered delights, and the best part? They think you spent hours making them when you actually spent barely any time at all!
These little gems have become a staple at holiday cookie exchanges and family gatherings across America, and once you try them, you’ll understand why they’ve earned such a devoted following in the home baking community.
History / Background
Oreo Balls emerged from the American tradition of transforming beloved store-bought cookies into elevated homemade treats. While the exact origin is debated, these delightful confections gained massive popularity in the early 2000s through online recipe sharing and food blogs. The recipe represents the perfect marriage between convenience cooking and homemade charm—a trend that resonated deeply with busy home cooks who still wanted to serve impressive desserts.
The concept itself draws inspiration from traditional truffle-making techniques, where ganache centers are coated in chocolate. However, the genius of Oreo Balls lies in their accessibility—instead of tempering chocolate and making ganache from scratch, home bakers simply crush up America’s favorite cookie (Oreos have been around since 1912!) and bind them with cream cheese.
The recipe spread like wildfire through Pinterest, mommy blogs, and church cookbook exchanges, becoming a go-to recipe for anyone needing a foolproof dessert. What started as a creative way to use up Oreos has evolved into countless variations—from red velvet to mint to peanut butter versions—but the classic Oreo Ball remains the most beloved.
In Southern states particularly, these treats became a staple at Christmas cookie platters alongside more traditional offerings like fudge and peanut brittle. The no-bake aspect made them especially popular during hot summer months when turning on the oven was unthinkable, and their make-ahead nature meant stressed hosts could prepare them days before a party.
Today, Oreo Balls have earned their place in the pantheon of classic American no-bake desserts, sitting comfortably alongside puppy chow, Rice Krispie treats, and peanut butter balls as a treat that defines modern American home baking culture.
Why You’ll Love This Recipe
These Oreo Balls are the definition of maximum impact with minimum effort. They’re the kind of recipe you’ll make again and again because they never fail to impress while being incredibly forgiving for bakers of all skill levels.
Here’s why this recipe will become your go-to dessert:
- Ridiculously Easy – Only 3 ingredients and no baking required! If you can crush cookies and dip balls in chocolate, you can make these.
- Quick Prep Time – Active work takes just 20-30 minutes, then the freezer does the rest of the work for you.
- Always a Crowd-Pleaser – I’ve never met a person who doesn’t love these. They disappear faster than any other dessert at parties.
- Budget-Friendly – You probably need less than $10 in ingredients to make a huge batch that serves 36 people.
- Make-Ahead Friendly – These actually taste better after sitting for a day, and they can be made up to 2 weeks in advance.
- Endless Customization – Once you master the basic recipe, you can create dozens of variations with different cookies, coatings, and mix-ins.
- No Special Skills Required – Unlike temperamental baked goods, these are forgiving and nearly impossible to mess up.
- Impressive Presentation – They look fancy and professional, like something from a boutique bakery, but they’re secretly super simple.
- Kid-Friendly Activity – Children love helping crush the cookies and roll the balls (just maybe not the chocolate dipping part!).
Ingredient Notes
The beauty of Oreo Balls lies in their simplicity, but understanding your ingredients ensures perfect results every time.
Oreo Cookies (1 package, 14.3 oz): The star of the show! Use regular Oreos for the classic version. You’ll use the entire cookie—cream filling and all—so don’t bother separating them. The cookies provide structure, flavor, and that distinctive Oreo taste everyone loves. While you can experiment with Golden Oreos, Mint Oreos, or other varieties, classic Oreos give you that beautiful speckled appearance and rich chocolate flavor. Make sure your Oreos are fresh and haven’t gone stale, as this affects the final texture.
Cream Cheese (8 oz, full-fat): This is your binding agent that transforms crushed cookies into a moldable truffle mixture. Always use full-fat brick-style cream cheese (like Philadelphia), not the spreadable or whipped kind, as those contain too much moisture. The cream cheese must be softened to room temperature—this is crucial! Cold cream cheese won’t incorporate properly and will leave you with lumps. Set it out for at least 30-60 minutes before starting. The cream cheese adds a subtle tanginess that balances the sweetness and creates that melt-in-your-mouth texture.
Chocolate for Coating (16-24 oz): You have options here! Chocolate almond bark or candy melts are the easiest for beginners because they melt smoothly and set quickly without tempering. Semi-sweet or milk chocolate chips work too, but you may want to add 1 tablespoon of coconut oil or shortening per 2 cups of chips to help with consistency. White chocolate is another popular choice for a different look. The amount you need depends on your dipping technique—efficient dippers might use only 16 oz, while those learning might need closer to 24 oz.
Optional Add-Ins: While not traditional, some bakers add 1 teaspoon of vanilla extract to the mixture for extra depth, or a pinch of salt to enhance the chocolate flavor.
Equipment Needed
You don’t need any fancy equipment to make perfect Oreo Balls, but having the right tools makes the process smoother and more enjoyable:
- Food Processor or Blender: Essential for turning Oreos into fine crumbs quickly. You can use a rolling pin and zip-top bag in a pinch, but a food processor makes this step effortless.
- Large Mixing Bowl: For combining your crushed Oreos with cream cheese.
- Electric Mixer or Sturdy Spoon: An electric hand mixer makes incorporating the cream cheese easier, but a wooden spoon and some elbow grease work too.
- Cookie Scoop or Tablespoon: A 1-tablespoon cookie scoop ensures uniformly sized balls and makes portioning much faster.
- Baking Sheets: You’ll need at least two—one for the rolled balls to chill on, and one lined with parchment paper for the dipped balls.
- Parchment Paper or Wax Paper: Prevents sticking and makes cleanup a breeze.
- Microwave-Safe Bowl or Double Boiler: For melting your chocolate coating smoothly.
- Fork or Dipping Tool: A regular fork works fine for dipping, though a chocolate dipping tool or candy fork with thin prongs is helpful.
- Toothpicks (Optional): Some people prefer using toothpicks to hold the balls while dipping.
- Freezer Space: You’ll need room to chill your baking sheets.
Oreo Balls Recipe

Easy 3-ingredient Oreo Balls are the ultimate no-bake dessert! These chocolate-covered Oreo truffles feature crushed Oreo cookies mixed with cream cheese and dipped in smooth chocolate coating. Perfect for holidays, parties, or any time you need an impressive treat that takes just minutes to prepare.
- Prep Time: Prep Time
- Cook Time: 30 minutes
- Total Time: 1 hour 30 minutes
- Yield: 36 balls 1x
- Category: Dessert
- Method: No Bake
- Cuisine: American
- Diet: Vegetarian
Ingredients
- 1 package (14.3 oz) Oreo cookies (about 36 cookies)
- 8 oz cream cheese, softened to room temperature
- 16-20 oz chocolate coating (almond bark, candy melts, or chocolate chips)
- 1 tablespoon coconut oil or shortening (optional, if using chocolate chips)
Instructions
- Prepare Your Workspace: Line two large baking sheets with parchment paper or wax paper. Set aside. Make sure your cream cheese has been sitting at room temperature for at least 30-60 minutes until it’s soft and spreadable.
- Crush the Oreos: Place the entire package of Oreos (don’t separate the cream from the cookies—use them whole!) into a food processor. Pulse until the cookies are finely ground into crumbs that resemble dirt or sand. You want very fine crumbs with no large chunks remaining. If you don’t have a food processor, place cookies in a large zip-top bag, seal it, and crush them with a rolling pin until fine. This takes more time but works perfectly well.
- Mix with Cream Cheese: Transfer the Oreo crumbs to a large mixing bowl. Add the softened cream cheese. Using an electric hand mixer on low speed (or a sturdy wooden spoon), mix together until completely combined. The mixture should look uniform with no visible cream cheese streaks. It should hold together when pressed but not be overly wet or sticky. If it seems too dry, your cream cheese may not have been soft enough—microwave the mixture for 10 seconds and mix again.
- Portion the Mixture: Using a 1-tablespoon cookie scoop or regular tablespoon, scoop out portions of the Oreo mixture and place them on one of your prepared baking sheets. You should get approximately 36 portions. Don’t roll them into balls yet—just scoop them into mounds for now.
- Roll into Balls: Once all portions are scooped, wash your hands and lightly dampen them with cold water (this prevents sticking). Roll each portion between your palms to form smooth, round balls. Return each ball to the baking sheet. Try to make them as round and smooth as possible—any cracks or rough spots will show through the chocolate coating.
- First Chill: Place the baking sheet in the freezer for at least 30 minutes, or in the refrigerator for at least 1 hour. The balls need to be very firm and cold before dipping, or they’ll fall apart in the warm chocolate. You can leave them in the freezer for up to 24 hours if you want to split up the work.
- Melt the Chocolate: When you’re ready to dip, melt your chocolate coating. If using almond bark or candy melts, place them in a microwave-safe bowl and microwave in 30-second intervals, stirring between each interval, until smooth and completely melted (usually 1.5-2 minutes total). If using chocolate chips, add 1 tablespoon of coconut oil or shortening to help thin the chocolate, then melt the same way. Alternatively, melt chocolate in a double boiler on the stovetop, stirring constantly until smooth. The chocolate should be fluid enough to coat smoothly but not so hot it melts the balls.
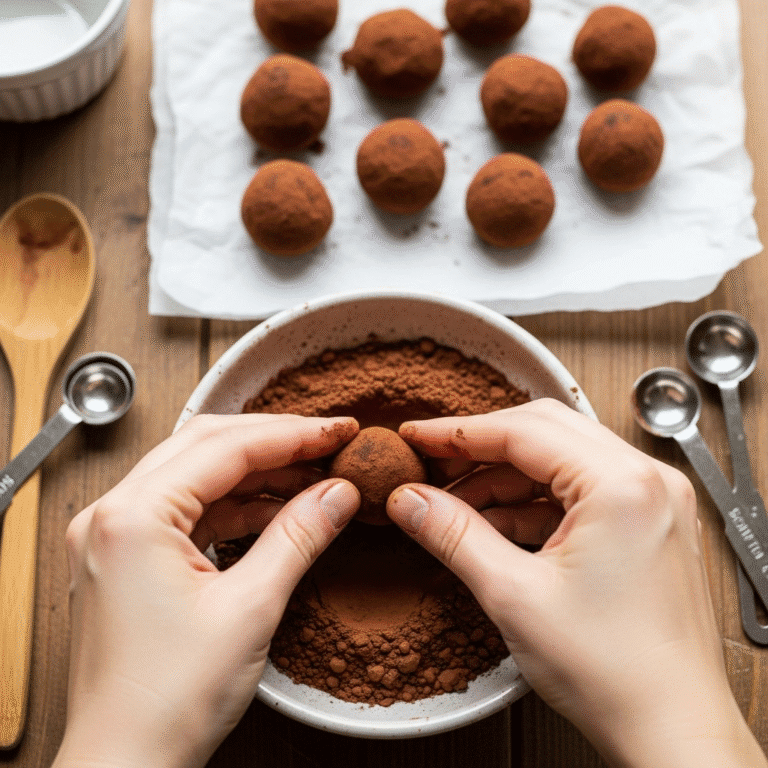
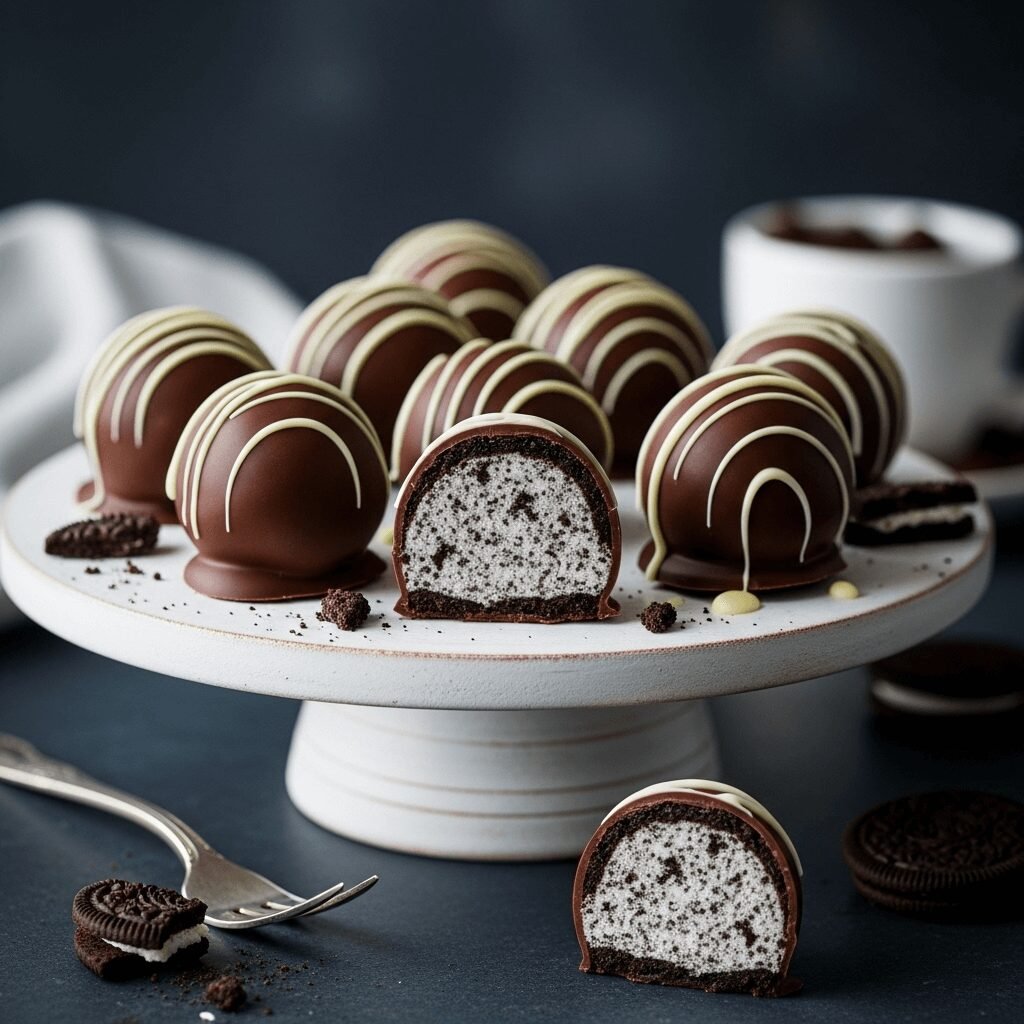
- Dip the Oreo Balls: Remove about 8-10 balls from the freezer at a time (keep the rest cold). Drop one ball into the melted chocolate. Using a fork, roll it around to coat completely, then lift it out, letting excess chocolate drip back into the bowl. Tap the fork gently on the edge of the bowl to remove more excess chocolate. Slide the coated ball onto your second parchment-lined baking sheet. If desired, immediately sprinkle with decorations before the chocolate sets. Repeat with remaining balls, working in small batches so they stay cold.
- Set the Chocolate: Once all balls are dipped, place the baking sheet in the refrigerator for about 15 minutes to allow the chocolate to set completely. The coating should be firm and no longer tacky to the touch.
- Serve or Store: Your Oreo Balls are now ready to serve! Arrange them on a pretty platter for maximum impact. Store any leftovers in an airtight container in the refrigerator.
Notes
- Cream cheese temperature is crucial: If the cream cheese is too cold, it won’t mix properly. Too warm, and your balls will be too soft to roll. Room temperature (about 70°F) is perfect.
- Keep everything cold: Work quickly during dipping and keep uncoated balls in the freezer. Warm balls will fall off the fork during dipping.
- Chocolate too thick? Add coconut oil or shortening 1 teaspoon at a time to thin it out.
- Fork marks on top? Use a toothpick to dip instead, or smooth the top with your finger after placing on the sheet.
- Want them extra fancy? Drizzle with contrasting chocolate, roll in sprinkles, or top with crushed Oreo crumbs before the coating sets.
Nutrition
- Serving Size: 1 ball
- Calories: 110
- Sugar: 9g
- Sodium: 75mg
- Fat: 6g
- Saturated Fat: 3g
- Unsaturated Fat: 2.5g
- Trans Fat: 0g
- Carbohydrates: 13g
- Fiber: 0.5g
- Protein: 1g
- Cholesterol: 7mg
Note: Nutrition information is approximate and will vary based on specific ingredients used and coating thickness.
Tips & Variations
Flavor Variations:
- Mint Oreo Balls: Use Mint Oreos instead of regular, dip in dark chocolate, and crush a few candy canes to sprinkle on top.
- Red Velvet: Use Red Velvet Oreos and dip in white chocolate for gorgeous pink-and-white treats.
- Peanut Butter: Add 1/4 cup creamy peanut butter to the mixture along with the cream cheese for a peanut butter twist.
- Birthday Cake: Use Birthday Cake Oreos, dip in white chocolate, and cover with rainbow sprinkles.
- Double Chocolate: Use Double Stuf Oreos for extra richness and creaminess.
Coating Options:
- Create contrast by dipping regular Oreo Balls in white chocolate.
- Try dark chocolate for a more sophisticated, less sweet option.
- Mix it up by dipping half in milk chocolate and half in white chocolate.
- Roll finished balls in crushed Oreos, sprinkles, chopped nuts, or toasted coconut before the chocolate sets.
Texture Adjustments:
- For firmer balls, reduce cream cheese to 6 oz.
- For creamier balls, increase cream cheese to 10 oz (though they’ll be harder to roll).
- Add 1 teaspoon vanilla extract for deeper flavor.
- Mix in 2 tablespoons of melted peanut butter for a subtle peanut butter undertone.
Presentation Ideas:
- Drizzle with contrasting chocolate in a zig-zag pattern using a piping bag or fork.
- Place in mini cupcake liners for gift-giving or party presentation.
- Insert a lollipop stick before dipping to make Oreo Ball pops.
- Dust with edible gold or silver powder for elegant events.
Pro Chef Tips
Temperature Control is Everything: Professional confectioners know that temperature is the secret to perfect truffle-style treats. Your cream cheese should be exactly 68-70°F—use a food thermometer if you’re unsure. Too cold and it won’t incorporate smoothly; too warm and your balls won’t hold shape. Similarly, your finished balls should be freezer-cold (32-35°F) when dipping, while your chocolate should be melted but not hot (90-95°F for best results).
The Rolling Technique Matters: Pastry chefs roll truffles between their palms with just enough pressure to form a smooth ball without compacting the mixture too much. Use a light touch and slightly damp (not wet) hands. If balls start cracking, your mixture might be too dry—work a bit faster so the warmth of your hands softens it slightly. If they’re too soft to hold shape, pop the whole bowl in the freezer for 10 minutes.
Master the Dipping Motion: The fork technique used in professional chocolate shops is simple but requires practice. Hold the ball on a fork, submerge it completely in chocolate, lift straight up, then tap the fork handle on the bowl’s edge (not the tines on the rim—this leaves marks). This vibration releases excess chocolate. Slide the fork forward slightly as you place the ball on parchment to avoid a “foot” of chocolate pooling at the bottom.
Chocolate Quality and Preparation: While candy melts are easiest for beginners, real chocolate creates a superior snap and flavor. If using real chocolate (chips or chopped chocolate bars), add 1 tablespoon of refined coconut oil per 12 oz of chocolate to achieve the fluid consistency of candy coating. Never let water contact your chocolate—even a drop will cause it to seize into a grainy, unusable mass.
Work in Batches: Professional kitchens never try to dip everything at once. Remove only 6-8 balls from the freezer at a time. This keeps them cold enough to handle while preventing condensation from forming on frozen balls meeting room temperature air, which can cause chocolate coating to separate or “bloom” with white streaks.
The Resting Period Improves Flavor: Like many desserts, Oreo Balls taste better after resting. The flavors meld and the texture becomes more uniform after 24 hours in the refrigerator. Professional bakers know that making these a day ahead isn’t just convenient—it actually improves the final product.
Common Mistakes to Avoid
Mistake #1: Not Crushing Oreos Finely Enough: Large cookie chunks create lumpy, difficult-to-roll balls that crack and don’t hold together well. Your Oreo crumbs should be the texture of damp sand—very fine and uniform. Pulse your food processor until you see no visible chunk larger than a grain of rice. This extra 30 seconds of processing makes a huge difference in the final texture and appearance.
Mistake #2: Using Cold Cream Cheese: This is the most common mistake! Cold cream cheese creates lumps that won’t fully incorporate, leaving you with streaky mixture and balls that have pockets of pure cream cheese. These spots will be too soft and won’t hold their shape during dipping. Always let cream cheese sit at room temperature for at least one hour, or soften it in the microwave for 10-15 seconds (not longer or it will get too warm and oily).
Mistake #3: Skipping the Chilling Step: I know you’re excited to finish them, but trying to dip warm or room-temperature balls is a recipe for disaster. They’ll fall apart on the fork, create a crumbly mess in your chocolate, and you’ll end up frustrated. The proper chill time makes them firm enough to handle easily. If you’re short on time, 30 minutes in the freezer is better than an hour in the fridge.
Mistake #4: Overheating the Chocolate: Chocolate burned in the microwave becomes thick, grainy, and unusable. Always use 30-second intervals and stir thoroughly between each heating. The chocolate will continue melting from residual heat as you stir, so stop microwaving when you still see a few small unmelted pieces—they’ll melt as you stir. Overheated chocolate also causes the balls to crack as the coating sets.
Mistake #5: Adding Too Much or Too Little Cream Cheese: The 8 oz measurement for a standard package of Oreos is carefully calibrated. Too much cream cheese and your mixture will be soup that won’t hold a ball shape. Too little and it’ll be dry, crumbly, and won’t stick together. If you’re doubling or tripling the recipe, measure your cream cheese carefully by weight (8 oz = 226 grams) rather than eyeballing it.
Storage & Meal Prep
Refrigerator Storage: Oreo Balls store beautifully in an airtight container in the refrigerator for up to 2 weeks. Layer them in a container with parchment paper between layers to prevent sticking, and make sure the lid seals tightly to prevent them from absorbing refrigerator odors. They’re actually best when served chilled directly from the fridge, as the texture is firmest and most truffle-like at this temperature. Let them sit at room temperature for just 5 minutes before serving if you prefer a slightly softer bite.
Room Temperature Display: If you’re setting these out on a dessert table or platter for a party, they’ll hold up at room temperature for 3-4 hours without issues. Beyond that, the cream cheese filling can start to soften, especially in warm weather or heated homes. In hot summer months or at outdoor events, keep them refrigerated until 30 minutes before serving, or display them on a platter set over ice.
Shelf Life and Quality: While they’re safe to eat for up to 2 weeks refrigerated, they’re at their prime during the first week. After that, the chocolate coating can start to soften slightly, and the Oreo flavor becomes less pronounced as flavors meld together more. For best taste and texture, try to make them no more than 5-7 days before you plan to serve them.
Reheating: Don’t! These should always be served chilled or at cool room temperature. Heating them would melt the chocolate coating and turn the filling into mush.
Make-Ahead & Freezer Notes
Make-Ahead Timeline: Oreo Balls are perfect for advance preparation, which makes them ideal for holiday baking marathons. You can prepare them completely up to 2 weeks ahead and store them in the refrigerator, or freeze them for up to 3 months for even longer storage. Many bakers make multiple batches in November and freeze them for Christmas entertaining.
Freezing Instructions:
- Undipped balls: You can freeze the rolled balls before dipping for up to 3 months. Place them on a baking sheet in a single layer and freeze until solid (about 1 hour), then transfer to a freezer-safe container or zip-top bag with parchment paper between layers. When ready to dip, thaw in the refrigerator for 2 hours, then proceed with dipping—actually, some people prefer dipping them straight from frozen as they stay cold longer during the dipping process.
- Fully dipped balls: Freeze finished Oreo Balls in an airtight container with parchment between layers for up to 3 months. They stay perfectly intact through freezing and thawing.
Thawing Method: Transfer frozen Oreo Balls from the freezer to the refrigerator and let them thaw overnight or for at least 6 hours. Never thaw them at room temperature or in the microwave, as this can cause condensation to form on the chocolate coating, creating a streaky, unattractive appearance. Thawing in the fridge keeps them at a consistent cool temperature.
Best Practices for Freezing: Use freezer-safe containers or heavy-duty freezer bags, removing as much air as possible to prevent freezer burn. Label your container with the date and flavor (if you’re making multiple varieties). For best quality, keep them away from strong-smelling foods in the freezer, as chocolate can absorb odors.
Strategic Make-Ahead Plan: For big events, make and freeze Oreo Balls 1-2 weeks ahead. This spreads out your work and ensures you’re not stressed the day before the party. Thaw them in the refrigerator 24 hours before serving.
Serving Suggestions
Oreo Balls are incredibly versatile and fit into almost any dessert scenario, but here are some serving ideas that make them shine:
Holiday Cookie Platters: Include Oreo Balls on your Christmas cookie tray alongside sugar cookies, fudge, peanut butter blossoms, and gingerbread. Their dark color provides beautiful contrast against lighter-colored cookies, and their sophisticated truffle appearance elevates the entire presentation.
Party Dessert Tables: Arrange Oreo Balls in decorative bowls, tiered stands, or scattered across a dessert table with other finger foods. They pair wonderfully with brownies, Rice Krispie treats, and mini cheesecakes for variety in texture and flavor.
Coffee and Dessert Service: Serve Oreo Balls with hot coffee, espresso, or cappuccino for an Italian-inspired coffee break. The rich chocolate flavor complements the bitterness of coffee perfectly. They’re also wonderful with hot chocolate during winter months.
Ice Cream Topping: Chop Oreo Balls into chunks and use them as a premium ice cream topping. They’re especially good over vanilla, coffee, or mint chocolate chip ice cream.
Gift Giving: Package Oreo Balls in clear cellophane bags tied with ribbon, arrange them in small gift boxes lined with tissue paper, or place them in decorative tins for thoughtful homemade gifts. They’re perfect for teacher appreciation, neighbor gifts, or hostess presents.
Wine Pairing: For adult gatherings, pair Oreo Balls with dessert wines like Port, late-harvest Riesling, or even a creamy Irish cream liqueur. The chocolate coating and sweet filling complement these after-dinner drinks beautifully.
Kids’ Parties: Serve Oreo Balls alongside other child-friendly treats, or set up a simple “decorate your own” station where kids can roll finished balls in sprinkles or drizzle them with colored melts (though the dipping itself should be done by adults).
With Fresh Fruit: Balance the richness of Oreo Balls by serving them with fresh strawberries, raspberries, or orange segments. The bright, acidic fruit cuts through the sweetness perfectly.
FAQs Section
Can I use reduced-fat or light cream cheese? While you can technically use reduced-fat cream cheese, I don’t recommend it for best results. Reduced-fat versions contain more moisture and less fat, which changes the texture and can make your mixture too soft to roll properly. Full-fat cream cheese creates the perfect consistency and gives you that rich, creamy texture that makes Oreo Balls so irresistible. If you must use reduced-fat, you may need to reduce the amount slightly (try 6-7 oz instead of 8 oz) and chill the mixture longer.
Why are my Oreo Balls falling apart when I dip them? This almost always comes down to temperature. If your balls aren’t cold enough, they’ll soften from the heat of the chocolate and fall apart on the fork. Make sure they’re freezer-cold before dipping—at least 30 minutes in the freezer. Also, work in small batches, removing only 6-8 balls from the freezer at a time so the rest stay cold. If your chocolate is too hot, that can also melt the balls; let melted chocolate cool slightly before dipping. Finally, make sure your cream cheese was well-incorporated—lumps of pure cream cheese will make balls structurally weak.
Can I use different types of Oreos? Absolutely! Any Oreo variety works in this recipe. Golden Oreos create a vanilla-flavored white ball, Mint Oreos add a refreshing mint flavor, Red Velvet Oreos make beautiful pink-speckled balls, and Peanut Butter Oreos give you a chocolate-peanut butter combination. Birthday Cake, Lemon, and Chocolate Peanut Butter are also delicious options. The recipe stays exactly the same regardless of which Oreo flavor you choose—just use a full 14.3 oz package and 8 oz of cream cheese.
Do I have to use Oreos, or can I use other sandwich cookies? While Oreos are traditional and give the best flavor, you can use other sandwich cookies like Hydrox, store-brand chocolate sandwich cookies, or even Newman-Os. Just make sure you use the same weight (14.3 oz) as a standard package of Oreos. The flavor will be slightly different, but the technique remains the same. I’ve even seen bakers use Nutter Butters (for peanut butter balls) or Vanilla Wafers with great success, though you’ll need to adjust expectations for different textures.
My chocolate coating is too thick. How do I fix it? If you’re using chocolate chips or real chocolate and it’s too thick to coat smoothly, add coconut oil or vegetable shortening one teaspoon at a time, stirring thoroughly after each addition, until you reach a thinner, more fluid consistency. For candy melts or almond bark that’s too thick, try microwaving for just 10-15 seconds more and stirring vigorously. Sometimes the chocolate just needs a bit more stirring to become fluid. Avoid adding water or milk, as this will cause the chocolate to seize and become grainy.
Can I make these without a food processor? Yes! Place your Oreos in a large, heavy-duty zip-top freezer bag, seal it with most of the air removed, then crush them with a rolling pin, meat mallet, or the bottom of a heavy pan. This takes more time and effort—expect to spend about 10 minutes crushing—but it works perfectly well. Make sure to get the cookies very finely crushed; large chunks will make rolling difficult. Shake the bag occasionally to redistribute larger pieces to the top.
How far in advance can I make Oreo Balls? You can make them up to 2 weeks ahead if storing in the refrigerator, or up to 3 months ahead if freezing. They actually taste better after sitting for at least 24 hours, as the flavors meld together and the texture becomes more uniform. For holiday entertaining, I usually make mine 3-5 days before serving, which spreads out the work and ensures they’re at peak flavor. If you’re freezing them, make them as far ahead as you’d like, then thaw in the refrigerator for 24 hours before your event.
Conclusion
There you have it—everything you need to know to make perfect Oreo Balls every single time! These little chocolate-covered bites of heaven are proof that you don’t need complicated recipes or professional baking skills to create something truly special. With just three simple ingredients, about 30 minutes of work, and some chilling time, you’ll have a dessert that looks like it came from an expensive bakery but costs just a few dollars to make.
Whether you’re preparing for a holiday cookie exchange, need a last-minute potluck contribution, or just want to treat yourself to something indulgent, Oreo Balls never disappoint. They’re endlessly customizable, practically foolproof, and loved by everyone from picky kids to sophisticated adults.
I’d love to hear how your Oreo Balls turn out! Drop a comment below with your results, any creative variations you tried, or questions you might have. And if you loved this recipe, please give it a five-star rating and share it with your friends and family—or better yet, pin it to your Pinterest boards so you can find it easily next time a dessert craving strikes!
Now stop reading and go make these already—your taste buds will thank you! 🍪🍫