Easy No-Churn Vanilla Bean Ice Cream (Frozen Dessert Recipe)
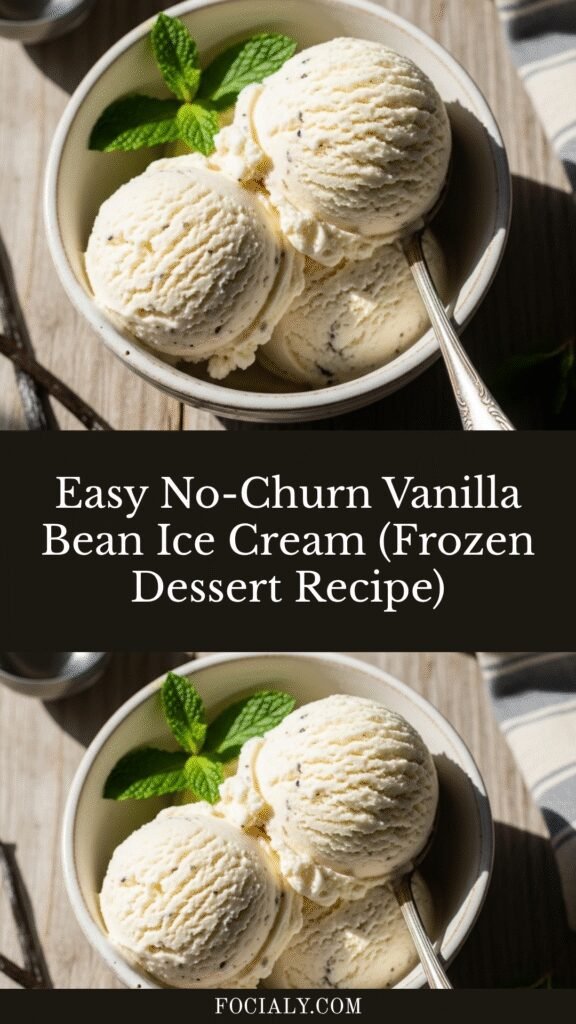
There’s something magical about homemade ice cream that store-bought versions just can’t replicate—the rich, creamy texture, the intense vanilla flavor studded with real vanilla bean specks, and the satisfaction of creating something extraordinary with your own hands. This Easy No-Churn Vanilla Bean Ice Cream is a game-changing frozen dessert that delivers premium ice cream shop quality without requiring any expensive equipment or complicated techniques.
Unlike traditional ice cream recipes that demand constant churning and ice cream makers taking up valuable kitchen space, this no-churn method uses just a handful of simple ingredients and relies on the magic of whipped cream and sweetened condensed milk to create that luxuriously smooth, scoopable texture we all crave. Whether you’re serving it at summer barbecues, topping it on warm brownies, or enjoying it straight from the container on a hot afternoon, this vanilla bean ice cream will quickly become your go-to frozen treat.
The best part? You can make this stunning dessert in less than 15 minutes of active prep time, then simply freeze it overnight. No babysitting an ice cream maker, no worrying about ice crystals forming, and no complicated tempering techniques. Just pure, creamy, dreamy vanilla bean ice cream that tastes like it came from an artisan creamery.
History / Background
Ice cream’s history stretches back thousands of years, with ancient civilizations enjoying frozen treats made from snow and ice mixed with honey and fruit. However, the creamy, churned ice cream we know today evolved in Europe during the 17th and 18th centuries, where it was considered a luxury reserved for the wealthy due to the difficulty of obtaining and storing ice.
Vanilla ice cream specifically became the gold standard of frozen desserts in the 1780s when Thomas Jefferson returned from France with a handwritten recipe for “vanilla cream ice.” The vanilla bean itself comes from orchids native to Mexico, and for centuries, Mexico held a monopoly on vanilla production because the native Melipona bee was the only insect that could pollinate the vanilla orchid naturally. When vanilla cultivation spread to Madagascar and other tropical regions in the 19th century, vanilla became more accessible, and vanilla ice cream grew into America’s most beloved flavor.
The no-churn ice cream method is a relatively modern innovation that gained popularity in home kitchens during the 2010s, particularly as food bloggers and home cooks sought ways to make restaurant-quality desserts without specialized equipment. This technique revolutionized home ice cream making by eliminating the need for expensive ice cream makers while still producing that coveted creamy texture. The secret lies in the combination of whipped heavy cream (which incorporates air) and sweetened condensed milk (which prevents ice crystal formation thanks to its high sugar content and lower water content).
Today, no-churn ice cream represents the perfect marriage of old-world indulgence and modern convenience, allowing anyone with a freezer and a hand mixer to create extraordinary frozen desserts at home.
Why You’ll Love This Recipe
This no-churn vanilla bean ice cream is about to become your most-requested summer dessert, and here’s why: it combines gourmet flavor with foolproof simplicity, making you look like a culinary genius with minimal effort.
Here’s what makes this recipe absolutely irresistible:
- No special equipment required – No ice cream maker, no constant churning, no complicated machinery. Just a mixing bowl and beaters.
- Only 4 ingredients – Heavy cream, sweetened condensed milk, vanilla extract, and vanilla bean. That’s it. Simple, pure, delicious.
- Incredibly creamy texture – The whipped cream and condensed milk combination creates a texture that rivals any churned ice cream, with no icy crystals.
- Customizable base – Once you master this vanilla base, you can add mix-ins, swirls, and flavors to create endless variations.
- Budget-friendly luxury – Costs a fraction of premium ice cream brands but tastes even better.
- Make-ahead friendly – Perfect for entertaining since you make it the day before and it’s ready when you need it.
- Real vanilla bean flavor – Those beautiful vanilla bean specks aren’t just pretty—they deliver an intense, aromatic vanilla flavor that extract alone can’t match.
- Kid-approved and crowd-pleasing – Everyone loves vanilla ice cream, making this a safe bet for any gathering.
- Impressive presentation – The visible vanilla bean specks make this look professionally made, perfect for showing off on social media or at dinner parties.
Ingredient Notes
Understanding your ingredients is the key to ice cream success. Let’s break down what makes this recipe work so beautifully.
Heavy Whipping Cream: This is the foundation of your ice cream’s luxurious texture. The high fat content (at least 36%) whips up into stable peaks that trap air, creating that light yet creamy mouthfeel. Don’t substitute with lighter creams—you need the full-fat version for proper structure. Make sure it’s very cold before whipping for best results.
Sweetened Condensed Milk: This magical ingredient does double duty. First, it provides sweetness without the graininess that granulated sugar can create in frozen desserts. Second, its low water content and high sugar concentration prevent large ice crystals from forming, ensuring your ice cream stays scoopable and smooth. Don’t confuse this with evaporated milk—they’re completely different products.
Vanilla Bean: The star of the show. A whole vanilla bean pod contains thousands of tiny seeds that deliver intense, complex vanilla flavor with floral and slightly woody notes. Look for plump, flexible beans (not dry and brittle). Madagascar Bourbon vanilla beans are most common and have a classic sweet vanilla flavor, while Tahitian vanilla beans offer a more floral, fruity profile. If vanilla beans are unavailable or too expensive, you can use 1 tablespoon of pure vanilla extract or vanilla bean paste, though you’ll miss those gorgeous specks.
Pure Vanilla Extract: Even with a vanilla bean, a splash of extract intensifies the vanilla flavor. Always use pure vanilla extract, not imitation, which can taste artificial and leave a chemical aftertaste, especially in frozen desserts where flavors are somewhat muted.
Optional Salt: Just a tiny pinch (⅛ teaspoon) enhances all the flavors and balances the sweetness without making the ice cream taste salty.
Equipment Needed
One of the beauties of no-churn ice cream is the minimal equipment required. Here’s what you’ll need:
- Large mixing bowl (preferably metal or glass, chilled in the freezer for 15 minutes before use)
- Electric hand mixer or stand mixer (for whipping the cream—you could do this by hand, but it takes serious arm strength and 15+ minutes)
- Rubber spatula (for folding ingredients and scraping down the bowl)
- Sharp paring knife (for splitting the vanilla bean)
- Loaf pan or freezer-safe container (9×5-inch loaf pan works perfectly, or a 1.5-quart freezer-safe container with lid)
- Parchment paper or plastic wrap (to cover the surface and prevent freezer burn)
- Measuring cups and spoons
- Small cutting board (for vanilla bean prep)
Pro tip: Chill your mixing bowl and beaters in the freezer for 15 minutes before whipping cream. Cold equipment helps the cream whip faster and achieve stiffer peaks.
PrintEasy No-Churn Vanilla Bean Ice Cream (Frozen Dessert Recipe)

This luxuriously creamy no-churn vanilla bean ice cream requires no ice cream maker and delivers gourmet ice cream shop quality with just 4 simple ingredients. Studded with real vanilla bean specks and incredibly smooth, it’s the perfect make-ahead frozen dessert for any occasion.
- Prep Time: 15 minutes
- Cook Time: 0 minutes
- Total Time: 6 hours 15 minutes
- Yield: 8 servings (about 1 pint) 1x
- Category: Dessert
- Method: No-Churn
- Cuisine: American
- Diet: Vegetarian
Ingredients
- 2 cups (480ml) cold heavy whipping cream
- 1 can (14 oz/396g) sweetened condensed milk
- 1 whole vanilla bean (or 1 tablespoon vanilla bean paste)
- 2 teaspoons pure vanilla extract
- ⅛ teaspoon fine sea salt (optional, but recommended)
Instructions
- Prepare your vanilla bean: Place the vanilla bean on a cutting board. Using a sharp paring knife, slice the bean lengthwise down the middle. Open the pod and use the back of your knife to scrape out all the tiny seeds. Add both the seeds and the scraped pod to the sweetened condensed milk in a medium bowl. Stir to combine and let sit while you whip the cream—this allows the vanilla to infuse into the milk. (If using vanilla bean paste, simply stir it into the condensed milk with the vanilla extract.)
- Whip the cream: In a large, chilled mixing bowl, pour the cold heavy cream. Using an electric mixer on medium speed, begin whipping the cream. After about 1 minute, increase speed to medium-high. Continue whipping for 3-4 minutes until stiff peaks form. The cream should hold its shape when you lift the beaters, and the peaks should stand straight up without drooping. Be careful not to over-whip, or you’ll end up with butter.
- Remove vanilla pod: Take out the vanilla bean pod from the sweetened condensed milk (you can rinse and dry it to make vanilla sugar later—nothing goes to waste!). Stir in the vanilla extract and salt into the condensed milk mixture.
- Combine carefully: Pour the sweetened condensed milk mixture over the whipped cream. Using a rubber spatula, gently fold the mixture together using a figure-eight motion. Start from the bottom of the bowl, lifting and folding over the top. Rotate the bowl as you fold. Continue for about 1-2 minutes until completely combined and you see vanilla bean specks throughout, but be gentle—you don’t want to deflate all those air bubbles you worked hard to create.
- Transfer to container: Pour the ice cream mixture into a 9×5-inch loaf pan or freezer-safe container. Use your spatula to smooth the top. Press a piece of parchment paper or plastic wrap directly onto the surface of the ice cream to prevent ice crystals and freezer burn.
- Freeze until firm: Cover the pan tightly with foil or a lid. Freeze for at least 6 hours, but preferably overnight (8-12 hours) until completely firm and scoopable.
- Serve and enjoy: When ready to serve, let the ice cream sit at room temperature for 5-10 minutes to soften slightly for easier scooping. Use an ice cream scoop dipped in hot water, wiping it dry between scoops, for perfect rounded servings.
Notes
- For best texture, use full-fat heavy whipping cream—do not substitute with half-and-half or light cream.
- Make sure your cream is very cold before whipping for best volume and stability.
- Don’t over-whip the cream or it will become grainy and separate.
- The ice cream will keep in the freezer for up to 2 months, but is best enjoyed within the first month.
- If your ice cream becomes too hard after extended freezing, simply let it sit out for 10-15 minutes before scooping.
- You can easily double this recipe for a larger batch—use a 9×13-inch pan or larger container.
Nutrition
- Serving Size: ½ cup (approximately 100g)/8
- Calories: 285
- Sugar: 28g
- Sodium: 75mg
- Fat: 18g
- Saturated Fat: 11g
- Unsaturated Fat: 6g
- Trans Fat: 0g
- Carbohydrates: 28g
- Fiber: 0g
- Protein: 4g
- Cholesterol: 65mg
Percent Daily Values are based on a 2,000 calorie diet. Your daily values may be higher or lower depending on your calorie needs.
Tips & Variations
The beauty of this no-churn vanilla bean base is its incredible versatility. Once you’ve mastered the basic recipe, a world of flavors opens up to you.
Flavor Variations:
- Cookies and Cream: Fold in 1 cup of crushed Oreo cookies after combining the cream and condensed milk.
- Chocolate Chip: Add ¾ cup mini chocolate chips in the final folding stage.
- Strawberry Swirl: Mash 1 cup fresh strawberries with 2 tablespoons sugar, then swirl into the ice cream mixture before freezing.
- Salted Caramel: Drizzle ½ cup caramel sauce throughout the mixture and increase salt to ¼ teaspoon.
- Mint Chocolate Chip: Add 1 teaspoon peppermint extract and a few drops of green food coloring, then fold in chocolate chips.
- Coffee: Dissolve 2 tablespoons instant espresso powder into 1 tablespoon hot water, cool, and mix into the condensed milk.
- Peanut Butter: Swirl in ½ cup warmed creamy peanut butter before freezing.
Texture Modifications:
- For an even richer ice cream, substitute ½ cup of the heavy cream with full-fat coconut cream.
- Add 2 tablespoons of vodka or other alcohol to keep the ice cream slightly softer and easier to scoop (alcohol doesn’t freeze).
- For a lighter texture, fold in 2 beaten egg whites after combining the cream and condensed milk (use pasteurized eggs if concerned about raw eggs).
Healthier Alternatives:
While ice cream is inherently indulgent, you can make small modifications: use low-fat sweetened condensed milk (texture will be slightly less creamy), reduce sugar by using half the condensed milk and adding a sugar substitute, or use light cream (though you’ll sacrifice some richness).
Pro Chef Tips
Want to take your no-churn ice cream from great to extraordinary? These professional techniques make all the difference:
Temperature Control is Everything: Professional ice cream makers know that temperature affects both texture and scoopability. Your freezer should be set to 0°F (-18°C) or below. If your ice cream becomes rock-hard, your freezer might be too cold—try storing it in a shallower container for easier scooping.
The Vanilla Bean Infusion Trick: After scraping your vanilla bean, let those seeds sit in the sweetened condensed milk for at least 15 minutes (or up to an hour in the refrigerator). This cold infusion allows the vanilla compounds to fully dissolve into the milk, creating a more intense vanilla flavor that blooms throughout the ice cream.
Master the Fold: The folding technique isn’t just for show—it’s crucial for maintaining the airiness that gives your ice cream its light texture. Use a wide rubber spatula and make broad, sweeping motions from the bottom of the bowl up and over. Turn the bowl a quarter turn with each fold. You want to see streaks of condensed milk disappearing, but stop as soon as everything is combined. Over-mixing deflates the cream and creates a denser final product.
Layer for Better Distribution: If adding mix-ins like chocolate chips or cookie pieces, add half the ice cream mixture to your pan, sprinkle half the mix-ins, add the remaining ice cream, and top with remaining mix-ins. This ensures even distribution throughout instead of everything sinking to the bottom.
The Parchment Paper Secret: Pressing parchment or plastic wrap directly onto the ice cream surface before covering creates a barrier against freezer burn and prevents ice crystals from forming on top. Professional ice cream makers always do this with their artisan products.
Strategic Softening: For the perfect scoopability, remove your ice cream from the freezer and let it sit at room temperature for 5-10 minutes before serving. This softening period makes scooping effortless and brings out the flavors (frozen items taste more muted because cold temperatures dull our taste receptors).
Use Quality Ingredients: Since this recipe has so few ingredients, each one matters enormously. Splurge on real vanilla beans and pure vanilla extract—your taste buds will thank you. The difference between artificial and natural vanilla is night and day in frozen desserts.
Common Mistakes to Avoid
Even with a simple recipe, a few missteps can affect your results. Here’s how to sidestep the most common pitfalls:
Not Whipping Cream to Stiff Peaks: Under-whipped cream won’t hold enough air, resulting in a dense, icy texture. Your peaks should stand straight up when you lift the beaters. However, over-whipping turns cream into butter, so watch carefully. Stop as soon as you see stiff peaks form.
Vigorous Mixing Instead of Gentle Folding: When combining the whipped cream and condensed milk, aggressive stirring deflates all those carefully whipped air bubbles. Think of those bubbles as tiny balloons—you want to keep them intact, not pop them. Use a light touch and broad folding motions.
Using Low-Fat or Light Cream: Full-fat heavy whipping cream (36-40% fat) is non-negotiable for proper texture. Lower-fat creams won’t whip properly, won’t hold their structure during freezing, and will create an icy rather than creamy final product. Don’t try to make this recipe “healthier” with lighter cream—it simply won’t work.
Skipping the Chilling Step for Equipment: Room-temperature bowls and beaters make whipping cream take forever and may prevent it from reaching stiff peaks. Always chill your equipment for at least 15 minutes in the freezer beforehand. This small step makes a huge difference in success rate.
Not Freezing Long Enough: Patience is key. While it’s tempting to dive in after a few hours, no-churn ice cream needs at least 6 hours (preferably overnight) to fully set. Scooping it too early results in a soft-serve consistency rather than proper ice cream texture. Plan ahead and make it the day before you need it.
Storage & Meal Prep
Proper storage ensures your homemade ice cream stays fresh, creamy, and delicious for weeks.
Short-Term Storage (1-2 weeks): Keep your ice cream in an airtight, freezer-safe container. Press plastic wrap or parchment paper directly onto the surface before sealing to prevent ice crystals and freezer burn. Store in the main compartment of your freezer (not the door, where temperature fluctuates).
Long-Term Storage (up to 2 months): For extended storage, use a freezer-safe container with a tight-fitting lid. You can also wrap the entire container in an additional layer of plastic wrap or aluminum foil for extra protection against freezer odors and ice crystal formation. While the ice cream remains safe to eat beyond 2 months, the texture and flavor quality begin to decline.
Preventing Ice Crystals: Ice crystals are the enemy of smooth ice cream. They form when moisture evaporates from the ice cream and refreezes on the surface. Combat this by always covering the ice cream directly (press-and-seal method), keeping your freezer at a consistent temperature, and minimizing how often the container is opened.
Scooping Made Easy: For easier scooping every time, store your ice cream in a shallow, wide container rather than a deep, narrow one. The larger surface area allows the ice cream to soften more quickly when removed from the freezer. You can also run your ice cream scoop under hot water between scoops for clean, round portions.
Reheating? Not Exactly, But…: You can’t reheat ice cream, but if it becomes too hard after extended freezing, simply transfer it from the freezer to the refrigerator for 10-15 minutes before serving. Never use a microwave, as it creates uneven melting and ruins the texture.
Make-Ahead & Freezer Notes
No-churn ice cream is the ultimate make-ahead dessert, perfect for stress-free entertaining.
Advance Preparation: You can make this ice cream up to 1 month ahead of any event. It actually benefits from a full 24-hour freeze, allowing all the flavors to meld and the texture to fully set. For dinner parties, prepare it 2-3 days before so you can cross dessert off your list and focus on other dishes.
Freezer Logistics: If you’re making multiple flavors or preparing for a large gathering, this recipe scales beautifully. Double or triple the batch, using separate containers for each flavor. Label containers with the flavor and date made. Stack containers flat to save freezer space.
Pre-Scooping Strategy: For serving a crowd, you can pre-scoop ice cream into muffin tins lined with cupcake liners, then freeze the individual scoops on a baking sheet. Once frozen solid, transfer the pre-scooped portions to a freezer bag. This makes serving at parties incredibly fast and ensures even portion sizes.
Refreezing Guidelines: Once ice cream has melted, don’t refreeze it. The texture will never recover properly, and you risk bacterial growth. However, if it’s only slightly softened from sitting out for 10-15 minutes, it’s fine to return it to the freezer immediately.
Travel-Friendly Tips: Transporting homemade ice cream requires strategy. Pack it in an insulated cooler with plenty of ice packs or dry ice. Keep the container sealed and surrounded by ice. Transport it last and get it into a freezer immediately upon arrival. For potlucks, consider bringing a cooler with dry ice so the ice cream stays frozen until serving time.
Serving Suggestions
While vanilla bean ice cream is spectacular on its own, these pairings take it to the next level:
Classic Pairings: Serve alongside warm apple pie, peach cobbler, or chocolate lava cake. The contrast between warm and cold, the temperature interplay, creates an unforgettable dessert experience.
Build Your Own Sundae Bar: Set up a toppings station with hot fudge, caramel sauce, crushed nuts, fresh berries, whipped cream, maraschino cherries, sprinkles, and crushed cookies. Let guests customize their perfect sundae.
Beverages: Float a scoop in root beer for a classic root beer float, or in cold brew coffee for an affogato-style treat. It’s also delicious in milkshakes—blend with milk for classic vanilla shakes.
Elegant Plating: For dinner parties, serve a scoop alongside a slice of pound cake, drizzle with berry coulis, and garnish with fresh mint. Add a crisp wafer cookie or biscotti for textural contrast.
Breakfast Treats: Top warm waffles or French toast with a scoop, drizzle with maple syrup, and add fresh berries for an indulgent brunch dish.
Sandwich It: Make ice cream sandwiches using homemade chocolate chip cookies, brownies, or even waffles as the “bread.”
International Flair: Serve with warm churros and chocolate sauce (Spanish-inspired), between two macarons (French-style), or alongside mochi for an Asian fusion treat.
FAQs Section
Q: Can I make this without a vanilla bean? Is vanilla extract enough?
A: Absolutely! While vanilla beans create those beautiful specks and intense flavor, you can use 1 tablespoon of pure vanilla extract or vanilla bean paste instead. The ice cream will still be delicious—you just won’t have the visual appeal of the seeds. Vanilla bean paste is an excellent middle-ground option that provides both flavor and specks.
Q: Why is my ice cream icy instead of creamy?
A: This usually happens when the cream wasn’t whipped to stiff peaks before folding, or when the mixture was stirred too vigorously (deflating the air bubbles). It can also occur if you used low-fat cream instead of heavy whipping cream. Make sure to whip your cream until stiff peaks form and fold gently. Also ensure your freezer is at the proper temperature (0°F/-18°C).
Q: How long can homemade ice cream last in the freezer?
A: Your no-churn ice cream will stay fresh for up to 2 months when stored properly in an airtight container with plastic wrap pressed directly onto the surface. However, for the best texture and flavor, enjoy it within the first month. After that, while it’s still safe to eat, you may notice some ice crystal formation and slight flavor degradation.
Q: Can I make this dairy-free or vegan?
A: Yes, but with modifications. Replace heavy cream with full-fat coconut cream (refrigerate a can overnight, then scoop out only the solid cream). Use dairy-free condensed milk (available at health food stores) or make your own by simmering coconut milk with sugar. The texture will be slightly different but still delicious. Note that coconut cream has a distinct coconut flavor that will come through.
Q: My ice cream is too hard to scoop. What should I do?
A: This is common, especially with deep-freezer temperatures. Let the ice cream sit at room temperature for 10-15 minutes before scooping. You can also add 1-2 tablespoons of vodka or liqueur to the mixture before freezing—alcohol lowers the freezing point and keeps ice cream slightly softer. Store it in a shallow, wide container rather than a deep one for easier scooping.
Q: Can I reduce the sugar in this recipe?
A: The sweetened condensed milk provides both sweetness and the special texture that makes no-churn ice cream work. Reducing it significantly will result in icier texture. If you must reduce sugar, you could try using half the can of sweetened condensed milk and adding a sugar substitute, but expect textural changes. Sugar isn’t just for sweetness—it prevents ice crystal formation.
Q: What’s the difference between no-churn ice cream and traditional churned ice cream?
A: Traditional churned ice cream uses an ice cream maker to constantly agitate the mixture as it freezes, breaking up ice crystals and incorporating air. No-churn ice cream achieves similar results by pre-aerating the mixture through whipped cream. The texture is comparable but slightly denser. No-churn is more accessible and convenient, while churned ice cream allows for more complex custard-based recipes.
Conclusion
Congratulations! You’ve just unlocked the secret to making extraordinary, creamery-quality ice cream in your own kitchen without any special equipment. This no-churn vanilla bean ice cream proves that the best things in life don’t have to be complicated—sometimes simple ingredients, treated with care, create the most memorable results.
The beauty of mastering this recipe extends far beyond just one flavor. You now have a versatile base that you can transform into countless variations, limited only by your imagination. From classic combinations to creative innovations, every batch is an opportunity to customize dessert to your family’s preferences.
Whether you’re cooling down on a sweltering summer afternoon, impressing guests at your next dinner party, or simply treating yourself to a midweek indulgence, this homemade vanilla bean ice cream delivers that perfect combination of luxury and comfort. And let’s be honest—there’s something deeply satisfying about telling people “I made this myself” when they rave about how delicious it is.
So grab your whisk, chill your bowl, and get ready to create some frozen magic. Your freezer is about to become the most popular destination in your house. Don’t forget to snap a photo of your beautiful creation and share it on Pinterest—your fellow home cooks will thank you for spreading the no-churn ice cream love!
Ready to make the creamiest, dreamiest vanilla bean ice cream of your life? Pin this recipe, gather your ingredients, and let’s get churning (well, not actually churning—that’s the point!). Drop a comment below and let me know what mix-ins you’re planning to try first!