Magical Unicorn Cookies Recipe – Colorful, Whimsical & Easy to Make!
If you’ve ever wanted to bring a touch of magic and wonder into your kitchen, these Unicorn Cookies are exactly what you need! These delightfully colorful, whimsical treats feature vibrant swirls of pastel colors, a soft and chewy sugar cookie base, and optional sparkly decorations that make them look like they came straight from a fairy tale. Perfect for birthday parties, baby showers, unicorn-themed celebrations, or just because you want to add some joy to an ordinary Tuesday, these cookies are as fun to make as they are to eat.
What makes Unicorn Cookies so special is their visual appeal combined with their delicious taste. The base is a classic sugar cookie that’s buttery, tender, and not overly sweet, which makes it the perfect canvas for the colorful dough swirls. When you bite into one, you get that satisfying soft cookie texture with a subtle vanilla flavor that both kids and adults absolutely love. These cookies have become a Pinterest sensation, and once you see how easy they are to make at home, you’ll understand why they’ve captured the hearts of home bakers everywhere.
Unicorn Cookies are ideal for so many occasions: children’s birthday parties, unicorn-themed baby showers, school bake sales, Valentine’s Day treats, Easter celebrations, or even as a fun weekend baking project with your kids. They’re also wonderful for anyone who loves to bake Instagram-worthy treats that taste as good as they look. The best part? While they look incredibly fancy and complicated, they’re actually quite simple to make with ingredients you probably already have in your pantry.
History / Background
The phenomenon of Unicorn Cookies is part of a larger “unicorn food” trend that swept across social media platforms, particularly Pinterest and Instagram, starting around 2016-2017. This trend coincided with a broader cultural fascination with all things magical, whimsical, and nostalgic. As adults increasingly sought comfort in childhood memories and fantastical elements, food creators began transforming ordinary treats into colorful, magical versions that captured this sense of wonder.
The unicorn food trend didn’t start with cookies specifically – it began with the viral “Unicorn Frappuccino” from Starbucks and quickly spread to include unicorn cakes, unicorn bark, unicorn hot chocolate, and eventually, unicorn cookies. Food bloggers and home bakers on Pinterest began experimenting with ways to create that signature rainbow swirl effect in cookie dough, and the result was the beautiful, marbled appearance we associate with Unicorn Cookies today.
What’s fascinating about Unicorn Cookies is that they’re essentially a modern twist on a very traditional recipe: the classic American sugar cookie. Sugar cookies have been a staple in American baking since the 1700s, when German and Dutch immigrants brought their butter cookie recipes to Pennsylvania. Over the centuries, sugar cookies evolved into the soft, tender version we know today, often cut into shapes and decorated for holidays.
Unicorn Cookies take this time-honored tradition and give it a contemporary, whimsical makeover by incorporating vibrant colors and sparkly decorations. The technique of creating colorful swirled dough has its roots in other patterned cookies like pinwheel cookies and rainbow cookies, but the unicorn version specifically embraces pastel colors (pink, purple, blue, and yellow) that have become synonymous with unicorn aesthetics.
The popularity of these cookies also speaks to a larger trend in home baking: the desire to create treats that are not only delicious but also highly shareable on social media. Unicorn Cookies photograph beautifully, making them perfect for Pinterest boards, Instagram feeds, and food blogs. They represent the intersection of baking tradition and digital culture, where visual appeal is just as important as taste.
Why You’ll Love This Recipe
These Unicorn Cookies are about to become your new favorite go-to treat for special occasions, and here’s why: they deliver maximum visual impact with minimal effort. While they look like they came from a fancy bakery or require professional cake decorating skills, the truth is that anyone can make these stunning cookies at home. The process is straightforward, the ingredients are simple, and the results are absolutely magical.
The cookie base itself is incredibly delicious – it’s a soft, buttery sugar cookie that’s perfectly tender without being cakey. The texture hits that sweet spot where the edges are just slightly crisp while the center remains wonderfully soft and chewy. The vanilla flavor is prominent but not overwhelming, which makes these cookies appealing to a wide range of palates. Even without the colorful swirls, this would be an excellent sugar cookie recipe on its own.
Here’s why you’ll fall in love with this Unicorn Cookie recipe:
- Visually Stunning – The colorful swirls and sparkly decorations make these cookies absolutely Instagram-worthy and perfect for themed parties
- Easy to Make – Despite their fancy appearance, these cookies use a simple sugar cookie base and straightforward techniques that beginners can master
- Kid-Friendly – Children absolutely love the bright colors and magical theme, and they can help with the decorating process
- Customizable – You can adjust the colors, add different extracts for flavor variations, or customize the decorations to match any party theme
- Perfect Texture – These cookies have that ideal soft and chewy texture that everyone loves, with just enough structure to hold their beautiful shape
- Make-Ahead Friendly – The dough can be prepared in advance and frozen, making party prep much easier
- Budget-Friendly – Made with basic baking ingredients, these impressive cookies won’t break the bank
- Crowd-Pleaser – Both children and adults are drawn to these whimsical treats, making them perfect for mixed-age gatherings
- Versatile for Any Occasion – While perfect for unicorn-themed events, you can adapt the colors for any holiday or celebration
- Fun Baking Project – Making these cookies is an enjoyable, creative activity that’s perfect for spending quality time with family
Ingredient Notes
Understanding your ingredients is key to baking success, so let’s break down what goes into these magical cookies and why each component matters:
All-Purpose Flour – This is the foundation of your cookie structure. All-purpose flour provides the right amount of protein to create cookies that hold their shape but remain tender. Don’t substitute with cake flour (too soft) or bread flour (too tough). If you need a gluten-free option, use a 1:1 gluten-free baking flour blend.
Unsalted Butter – Butter is essential for both flavor and texture. Using unsalted butter allows you to control the salt content in your cookies. Make sure your butter is at room temperature (softened but not melted) so it creams properly with the sugar. This creates those air pockets that give you a tender cookie. In a pinch, you can substitute margarine, but the flavor won’t be quite as rich.
Granulated Sugar – This sweetens your cookies and helps create that slightly crispy edge. Sugar also plays a crucial role in the cookie’s texture and spread during baking.
Eggs – Eggs bind everything together and add moisture. They also contribute to the cookie’s structure. Use large eggs at room temperature for best results. Cold eggs don’t incorporate as smoothly into the batter.
Vanilla Extract – Pure vanilla extract adds warmth and depth to your cookies. Don’t skimp here – quality vanilla makes a noticeable difference. You can also experiment with almond extract for a different flavor profile.
Baking Powder – This leavening agent gives your cookies a slight lift and creates that soft, tender texture. Make sure it’s fresh (check the expiration date) or your cookies won’t rise properly.
Salt – Just a pinch enhances all the other flavors and balances the sweetness. Don’t skip it!
Gel Food Coloring – This is crucial for achieving vibrant colors without making your dough too wet. Gel colors are much more concentrated than liquid food coloring, so you need less and your dough consistency stays perfect. Choose pastel shades of pink, purple, blue, and yellow for that classic unicorn look.
Optional Decorations – Sanding sugar, edible glitter, sprinkles, and pearl dust add that extra magical sparkle. These are completely optional but really elevate the final presentation.
Equipment Needed
Having the right tools makes baking these Unicorn Cookies much easier and more enjoyable. Here’s what you’ll need:
- Stand Mixer or Hand Mixer – For creaming the butter and sugar and mixing the dough
- Large Mixing Bowls – At least 4-5 small bowls for dividing and coloring the dough
- Measuring Cups and Spoons – For accurate ingredient measurements
- Rubber Spatula – For scraping down the bowl and folding ingredients
- Baking Sheets – Two or three half-sheet pans work best
- Parchment Paper or Silicone Baking Mats – To prevent sticking and ensure even baking
- Cookie Scoop – A 1.5-tablespoon cookie scoop ensures uniform size and professional appearance
- Rolling Pin (optional) – If you prefer rolled cookies instead of scooped
- Wire Cooling Rack – For cooling cookies properly after baking
- Toothpicks – For adding and mixing gel food coloring
- Small Bowls or Ramekins – For organizing different colored doughs
- Plastic Wrap – For wrapping dough if you’re chilling it
Unicorn Cookies Recipe

These magical Unicorn Cookies feature vibrant pastel swirls of pink, purple, blue, and yellow in a soft, buttery sugar cookie base. Perfect for parties, celebrations, or any time you want to add a touch of whimsy to your day, these colorful treats are as delicious as they are beautiful!
- Prep Time: 20 minutes
- Cook Time: 10 minutes
- Total Time: 1 hour
- Yield: 24 cookies 1x
- Category: Dessert
- Method: Baking
- Cuisine: American
- Diet: Vegetarian
Ingredients
- 2¾ cups all-purpose flour
- 1 teaspoon baking powder
- ½ teaspoon salt
- 1 cup (2 sticks) unsalted butter, softened
- 1½ cups granulated sugar
- 2 large eggs, room temperature
- 2 teaspoons vanilla extract
- Gel food coloring (pink, purple, blue, yellow)
- Sanding sugar or sprinkles for decoration (optional)
- Edible glitter or pearl dust (optional)
Instructions
- Prepare the dry ingredients: In a medium bowl, whisk together the flour, baking powder, and salt. Set aside.
- Cream the butter and sugar: In a large mixing bowl or stand mixer, beat the softened butter and sugar together on medium speed for 3-4 minutes until light and fluffy. This step is crucial for creating the right cookie texture.
- Add eggs and vanilla: Add the eggs one at a time, beating well after each addition. Mix in the vanilla extract until fully incorporated.
- Combine wet and dry ingredients: With the mixer on low speed, gradually add the flour mixture to the butter mixture. Mix just until combined – don’t overmix or your cookies will be tough.
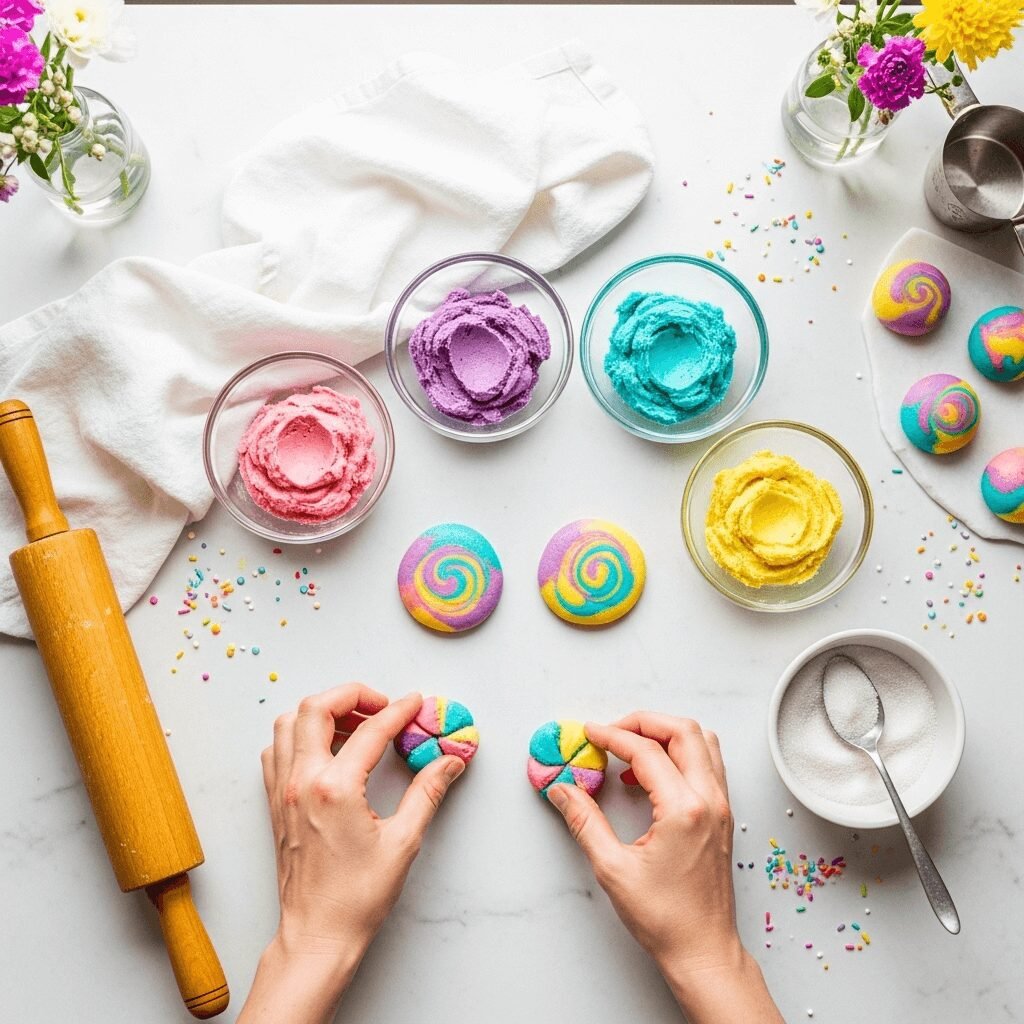
- Divide and color the dough: Divide the dough into 4-5 equal portions. Place each portion in a separate bowl. Add a few drops of gel food coloring to each bowl (one color per bowl), leaving one portion white if desired. Use a toothpick to add color gradually until you reach your desired pastel shade. Knead each portion with your hands until the color is evenly distributed.
- Create the swirl effect: Tear small pieces from each colored dough and press them together randomly. Gently roll and fold the combined pieces a few times to create a marbled effect – don’t over-knead or the colors will blend into a muddy brown. You want distinct swirls of color.
- Shape the cookies: Using a cookie scoop or your hands, form balls of dough about 1.5 tablespoons in size. Place them on parchment-lined baking sheets, spacing them about 2 inches apart. If desired, gently flatten each ball slightly with your palm.
- Add decorations: If using sanding sugar, sprinkles, or edible glitter, gently press them onto the top of each cookie before baking.
- Chill the dough: Refrigerate the shaped cookies on the baking sheets for 20-30 minutes. This prevents excessive spreading during baking.
- Preheat the oven: While cookies chill, preheat your oven to 350°F (175°C).
- Bake: Bake for 9-11 minutes, until the edges are just set but the centers still look slightly underdone. The cookies will continue cooking on the hot pan after you remove them from the oven.
- Cool: Let cookies cool on the baking sheet for 5 minutes, then transfer to a wire cooling rack to cool completely.
Notes
- Don’t overbake: These cookies are best when they’re soft and chewy, so remove them when the centers still look slightly underdone.
- Gel food coloring is essential: Liquid food coloring will make your dough too wet and affect the texture.
- Color intensity: Start with less color than you think you need – you can always add more, but you can’t remove it.
- Marbling technique: The key to beautiful swirls is not over-mixing. Stop when you still see distinct streaks of color.
- Storage: Store in an airtight container at room temperature for up to 5 days.
Nutrition
- Serving Size: 1 cookie
- Calories: 165
- Sugar: 13g
- Sodium: 75mg
- Fat: 8g
- Saturated Fat: 5g
- Unsaturated Fat: 2.5g
- Trans Fat: 0g
- Carbohydrates: 22g
- Fiber: 0.5g
- Protein: 2g
- Cholesterol: 35mg
Tips & Variations
The beauty of Unicorn Cookies is how easily you can customize them to suit your preferences or dietary needs. Here are some creative variations to try:
Flavor Variations: While vanilla is classic, try adding ½ teaspoon of almond extract for a more complex flavor. You can also experiment with lemon extract, peppermint extract, or even a tablespoon of cocoa powder in one of the dough portions for chocolate-swirled unicorn cookies.
Color Customization: Change up the color scheme to match any theme or holiday. Use red and green for Christmas unicorn cookies, orange and purple for Halloween, red and pink for Valentine’s Day, or pastel colors for Easter. You can even create ombre effects by using different shades of the same color.
Add Mix-Ins: Fold in ½ cup of white chocolate chips, mini chocolate chips, or rainbow sprinkles into the base dough before dividing and coloring for added texture and flavor.
Gluten-Free Version: Substitute the all-purpose flour with a 1:1 gluten-free baking flour blend. The texture may be slightly different, but the cookies will still be delicious.
Vegan Adaptation: Use vegan butter and replace eggs with flax eggs (2 tablespoons ground flaxseed mixed with 6 tablespoons water, let sit for 5 minutes). The texture will be slightly different but still tasty.
Make Them Healthier: Substitute half the butter with Greek yogurt or applesauce, though this will change the texture slightly. You can also reduce the sugar by ¼ cup for a less sweet version.
Shape Variations: Use cookie cutters to create unicorn shapes, hearts, stars, or any shape you like. Just roll the marbled dough to about ¼-inch thickness before cutting.
Decorating Options: Instead of (or in addition to) sanding sugar, try royal icing drizzles, cream cheese frosting, or even a simple powdered sugar glaze. Add edible gold stars, unicorn horn candy decorations, or rainbow sprinkles.
Pro Chef Tips
Want to take your Unicorn Cookies from good to absolutely spectacular? Here are some professional baker secrets:
Temperature Matters: The single most important factor in cookie success is ingredient temperature. Butter should be at room temperature (about 65-68°F) – soft enough to leave an indentation when pressed but not so soft it’s greasy. Room temperature butter creams more effectively with sugar, creating more air pockets for a lighter texture.
Don’t Skip the Chill: Chilling the shaped cookies before baking is non-negotiable if you want them to maintain their shape and not spread too thin. The cold butter takes longer to melt in the oven, which gives the flour time to set the structure. Even 15-20 minutes makes a huge difference.
Measure Flour Correctly: Too much flour is the most common reason for dry, tough cookies. Use the spoon-and-level method: spoon flour into your measuring cup and level it off with a knife. Don’t scoop directly from the bag, which packs the flour and gives you more than you need.
The Marble Technique: When creating the swirl effect, less is more. Combine the colored dough pieces gently and only fold or twist 2-3 times. Over-working will muddy the colors. Think of it like mixing paint – you want distinct streaks, not a uniform blend.
Use Quality Food Coloring: Invest in good gel food coloring from brands like Americolor or Wilton. Cheap food coloring can taste bitter and requires more product to achieve vibrant colors. Gel colors are concentrated, so a little goes a long way.
The Undercooked Look: Professional bakers pull cookies from the oven when they look slightly underdone in the center. They continue cooking on the hot pan thanks to carryover heat. Cookies that look fully done in the oven will be overbaked once cooled.
Rotate Your Pans: If you’re baking multiple sheets, rotate them halfway through baking and swap their positions (top to bottom rack). This ensures even baking since most ovens have hot spots.
Parchment vs. Silicone: Parchment paper creates slightly crispier edges, while silicone mats produce softer, more evenly baked cookies. Choose based on your texture preference.
Common Mistakes to Avoid
Even experienced bakers can run into issues with Unicorn Cookies. Here are the most common problems and how to prevent them:
Muddy Colors Instead of Distinct Swirls: This happens when you over-knead or mix the colored dough pieces together. Remember, you want visible streaks of color, not a blended mess. Combine the pieces gently, twist just 2-3 times, then stop. If your colors look muddy, you’ve gone too far. Start with fresh dough portions and be more gentle.
Cookies Spread Too Thin: This frustrating problem has several causes. Most commonly, it’s because the dough wasn’t chilled before baking, the butter was too warm, or there wasn’t enough flour. Always chill your shaped cookies for at least 20 minutes. Make sure you measured your flour correctly using the spoon-and-level method. If your kitchen is very warm, you may need to chill the dough longer.
Dry, Crumbly Cookies: This usually means you added too much flour or overbaked the cookies. Always measure flour carefully and remove cookies from the oven when the centers still look slightly soft. They firm up as they cool. Also, make sure you didn’t add too much food coloring, as this can dry out the dough.
Colors That Are Too Pale or Too Neon: Getting that perfect pastel shade takes practice. Start with tiny amounts of gel food coloring (use a toothpick to add just a dot), then gradually add more if needed. Remember that colors often look more vibrant after baking. For pastels, less is more – you can always add more color, but you can’t take it away.
Tough, Dense Cookies: This is usually caused by overmixing the dough, especially after adding the flour. Mix only until the flour is just incorporated – you should still see a few streaks of flour when you stop the mixer, then finish combining by hand with a spatula. Overmixing develops gluten, which makes cookies tough.
Uneven Baking: If some cookies are done while others are still raw, it’s likely your dough balls weren’t uniform in size. Use a cookie scoop to ensure each cookie is the same size. Also, make sure cookies are spaced evenly on the pan and avoid overcrowding, which creates steam and prevents even browning.
Storage & Meal Prep
Proper storage ensures your Unicorn Cookies stay fresh and delicious for as long as possible:
Room Temperature Storage: Store completely cooled cookies in an airtight container at room temperature for up to 5 days. Place parchment paper or wax paper between layers to prevent sticking if you’re stacking them. Keep them away from direct sunlight or heat sources. For extra freshness, add a slice of white bread to the container – it will release moisture that keeps cookies soft, and the bread will get stale instead of your cookies.
Refrigerator Storage: While not necessary for these cookies, you can refrigerate them in an airtight container for up to 2 weeks. Bring them to room temperature before serving for the best texture and flavor. Refrigeration can sometimes dry out cookies, so only do this if you need extended storage.
Reheating: These cookies are delicious at room temperature, but if you want to recreate that fresh-from-the-oven experience, warm them in a 300°F oven for 3-4 minutes. Don’t microwave, as this can make them tough and rubbery.
Shelf Life: The cookies will stay fresh-tasting for about 5 days at room temperature, though they’re technically safe to eat for longer. After 5 days, they may start to dry out or become stale, though they’re still perfectly safe to eat.
Make-Ahead & Freezer Notes
Unicorn Cookies are excellent candidates for make-ahead baking, which makes party prep so much easier:
Freezing Raw Dough: You can freeze the colored dough portions before shaping for up to 3 months. Wrap each color separately in plastic wrap, then place all portions in a freezer-safe bag or container. Label with the date. When ready to use, thaw overnight in the refrigerator, then proceed with creating the swirl effect and shaping cookies. The dough may be slightly crumbly after freezing, but it will come together as it warms up.
Freezing Shaped Cookies (Unbaked): This is my favorite make-ahead method. Shape the marbled dough into balls and place them on a parchment-lined baking sheet. Freeze until solid (about 2 hours), then transfer to a freezer-safe bag or container. These will keep for up to 3 months. When ready to bake, place frozen dough balls on your baking sheet and add 1-2 minutes to the baking time. No need to thaw!
Freezing Baked Cookies: Baked cookies freeze beautifully for up to 3 months. Make sure they’re completely cooled, then layer them between parchment paper in an airtight container or freezer bag. Thaw at room temperature for about 30 minutes before serving. They’ll taste freshly baked!
Best Make-Ahead Strategy: For parties, I recommend baking the cookies 1-2 days in advance and storing them at room temperature. This actually improves the flavor as the cookies have time to “mature” and the flavors meld together. Just wait to add any fresh decorations until the day of serving.
Tip for Best Results: If you’re freezing raw dough, freeze the colored portions before creating the swirl. This prevents the colors from bleeding into each other during the freezing process.
Serving Suggestions
Unicorn Cookies are stars on their own, but here are some wonderful ways to serve them and what to pair them with:
Beverage Pairings: These sweet cookies are perfect with cold milk (obviously!), but they’re also delicious with hot chocolate, vanilla lattes, fruit smoothies, or even a glass of pink lemonade for a fully themed unicorn experience. For adult gatherings, they pair surprisingly well with champagne or prosecco.
Ice Cream Sandwiches: Use two Unicorn Cookies to sandwich a scoop of vanilla ice cream, strawberry ice cream, or rainbow sherbet. Roll the edges in more sprinkles for an extra magical touch.
Cookie Platters: Include these on a dessert platter alongside brownies, cupcakes, and other treats for birthday parties or showers. Their colorful appearance makes them the focal point of any dessert spread.
Party Favors: Package individual cookies or pairs in clear cellophane bags tied with colorful ribbons. They make perfect take-home gifts for party guests.
Breakfast or Snack: While definitely a treat, these cookies are lovely with morning coffee or as an afternoon pick-me-up with tea.
Unicorn-Themed Party Table: Create a full unicorn dessert spread with these cookies as the centerpiece, surrounded by unicorn cake pops, rainbow fruit kabobs, pastel-colored macarons, and unicorn-themed cupcakes.
With Dips: While unconventional, these cookies are delicious dunked in vanilla frosting, cream cheese frosting, or even Nutella for an indulgent treat.
FAQs Section
Can I use liquid food coloring instead of gel?
While technically possible, liquid food coloring is not recommended. It will make your dough too wet, which affects the texture and can cause excessive spreading during baking. Gel food coloring is concentrated, so you need much less, and it won’t change your dough consistency. If you absolutely must use liquid coloring, reduce the vanilla extract slightly to compensate for the extra liquid, but results won’t be as vibrant or successful.
Why did my colors turn brown instead of staying swirled?
This happens when you over-mix the colored dough pieces. When you combine all the colors of the rainbow, you get brown (remember mixing all the paints together as a kid?). The key is to gently press the colored pieces together and only fold or twist 2-3 times maximum. You want to see distinct streaks of each color, not a blended mixture. Think of it like marble – you want those visible veins of color.
Can I make these cookies without chilling the dough?
You can, but I don’t recommend it. Chilling serves several important purposes: it prevents excessive spreading, helps cookies maintain their shape, and actually improves the flavor as it allows the flour to fully hydrate and the ingredients to meld. If you’re truly in a hurry, you can skip the chill, but your cookies will be thinner and may lose their distinct swirl pattern. At minimum, chill for 15 minutes.
How do I keep the cookies soft and chewy?
The secret to soft cookies is not overbaking them. Remove cookies from the oven when the centers still look slightly underdone – they’ll continue cooking on the hot pan. Also, don’t overmix the dough after adding flour, use room temperature ingredients, and store baked cookies in an airtight container with a slice of bread to maintain moisture.
Can I make these cookies smaller or larger?
Absolutely! Adjust the baking time accordingly. Smaller cookies (about 1 tablespoon of dough) will bake in 7-9 minutes, while larger cookies (3 tablespoons) may need 12-14 minutes. Just watch them carefully and remove when the edges are set but centers still look soft.
My cookies are too crunchy – what went wrong?
Crunchy cookies are almost always the result of overbaking. These cookies should be soft and tender, so they need to come out of the oven looking slightly underdone. They firm up as they cool. Also check that you didn’t add too much flour and that your oven temperature is accurate (use an oven thermometer to check).
Can I make these cookies dairy-free or egg-free?
For dairy-free cookies, substitute vegan butter in equal amounts – Earth Balance or Miyoko’s work well. For egg-free, you can try two flax eggs (2 tablespoons ground flaxseed mixed with 6 tablespoons water, let sit 5 minutes), though the texture will be slightly different. For both dairy-free and egg-free (vegan), use both substitutions. The cookies won’t have quite the same tender texture but will still be delicious.
How far in advance can I make these for a party?
Baked cookies stay fresh for up to 5 days when stored properly, so you can make them up to 3-4 days before your event. For longer advance preparation, freeze the baked cookies (up to 3 months) or freeze the shaped raw dough (up to 3 months). The frozen dough option is great because you can bake fresh cookies the morning of your party.
Conclusion
There’s something truly magical about Unicorn Cookies – they bring joy, wonder, and a touch of whimsy to any occasion. Whether you’re baking them for a special celebration or just want to brighten an ordinary day, these colorful, delicious treats are guaranteed to make everyone smile. The combination of soft, buttery sugar cookie texture with those gorgeous pastel swirls creates something that’s as delightful to eat as it is to look at.
What I love most about this recipe is how it proves that you don’t need professional training or fancy equipment to create something spectacular in your own kitchen. With just basic ingredients, gel food coloring, and a little creativity, you can make bakery-worthy cookies that will have everyone asking for the recipe. The process is fun and forgiving – there’s no “wrong” way to swirl the colors, which means every batch is unique and special.
I hope this recipe inspires you to get creative in the kitchen and maybe even start your own magical baking traditions. These Unicorn Cookies are perfect for creating memories with your kids, impressing party guests, or simply treating yourself to something special. The look on someone’s face when they see these colorful creations is truly priceless.
Now it’s your turn to bring some magic into your kitchen! Try making these Unicorn Cookies and don’t forget to share your beautiful creations on Pinterest. I’d love to see how your cookies turned out – tag me in your photos and let me know what color combinations you tried. Did you add any special decorations? Did your kids help with the coloring? Share your experience in the comments below!
If you loved this recipe, please pin it to your favorite Pinterest board so you can find it again easily. Share it with friends who would enjoy these whimsical treats. And if you try the recipe, come back and leave a comment – I read every single one and love hearing about your baking adventures!
Happy baking, and may your kitchen be filled with magic and unicorns! 🦄✨