The Ultimate Salted Caramel Brownies Recipe: Fudgy, Gooey Perfection
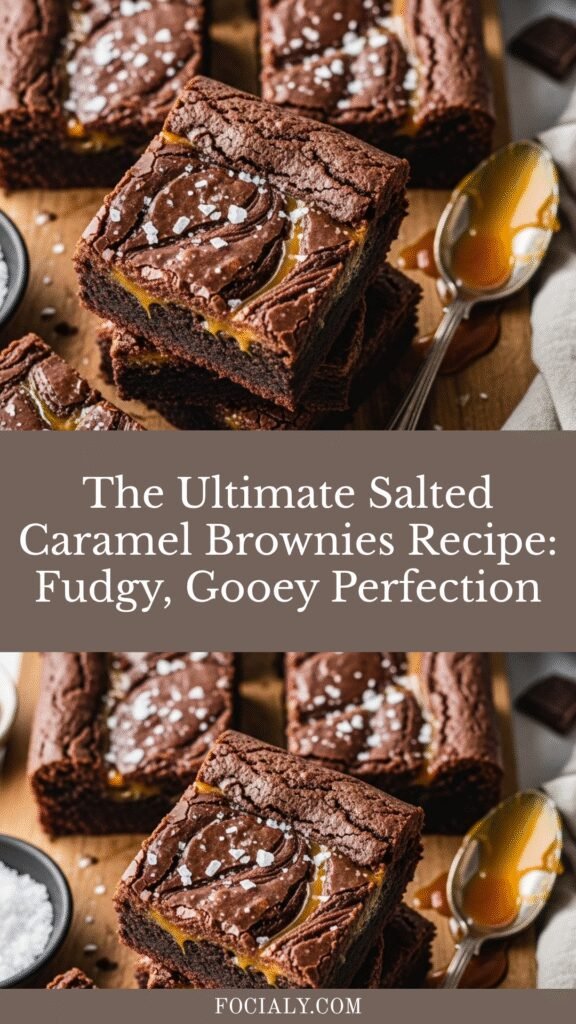
If you’ve ever craved the perfect marriage between rich, fudgy brownies and luxurious salted caramel, you’re in for an absolute treat. These Salted Caramel Brownies are the epitome of dessert indulgence—dense, chocolatey brownies swirled with homemade salted caramel sauce and topped with flaky sea salt that creates the most incredible sweet-and-salty flavor explosion in every bite.
This recipe delivers bakery-quality brownies right from your home kitchen. The brownies themselves are deeply chocolatey with those coveted crackly tops, while the ribbons of golden caramel add pockets of buttery sweetness throughout. They’re perfect for special occasions, holiday gatherings, potlucks, bake sales, or simply when you want to treat yourself to something extraordinary. These brownies are sophisticated enough to impress dinner guests but comforting enough to enjoy with a glass of cold milk on a quiet Tuesday evening.
What makes these brownies truly special is the balance of flavors. The slight bitterness of dark chocolate plays beautifully against the sweet caramel, while the flaky sea salt ties everything together and prevents the dessert from becoming overwhelmingly sweet. Whether you’re a seasoned baker or just starting your baking journey, this recipe will become your new go-to showstopper.
History / Background
The brownie itself has a rich American history dating back to the late 19th century. According to culinary historians, brownies were likely created by accident when a baker forgot to add baking powder to a chocolate cake recipe, resulting in a dense, fudgy square that became an instant hit. The first known published brownie recipe appeared in the 1896 Boston Cooking-School Cook Book, though it didn’t contain chocolate. The chocolate version we know and love today emerged in the early 1900s.
Salted caramel, on the other hand, has French origins. French pastry chef Henri Le Roux is credited with inventing salted butter caramel (caramel au beurre salé) in 1977 in Brittany, a region famous for its salted butter. He combined the traditional caramel with Brittany’s renowned salted butter, creating a flavor sensation that would eventually sweep the culinary world.
The combination of chocolate and salted caramel became a global phenomenon in the early 2000s when pastry chefs and chocolatiers began pairing these two flavors in everything from truffles to tarts. The trend exploded across home baking communities, Pinterest boards, and food blogs as home cooks discovered how accessible and impressive this flavor combination could be.
Salted Caramel Brownies represent the perfect fusion of American comfort baking and French culinary sophistication. They’ve become a staple at bake sales, potlucks, and holiday dessert tables across the United States, proving that sometimes the best recipes come from combining beloved classics in unexpected ways.
Why You’ll Love This Recipe
These Salted Caramel Brownies strike the perfect balance between approachable home baking and impressive dessert presentation. They look and taste like something you’d pay premium prices for at a gourmet bakery, but they’re surprisingly straightforward to make in your own kitchen.
Here’s why this recipe will become your new favorite:
- Deeply fudgy texture – These brownies are intensely chocolatey with that perfect dense, fudgy consistency that melts in your mouth rather than being cakey or dry
- Homemade caramel swirls – The ribbons of salted caramel throughout create pockets of buttery sweetness that contrast beautifully with the rich chocolate
- Perfect sweet-and-salty balance – The flaky sea salt topping elevates these from ordinary brownies to sophisticated dessert perfection
- Makes a crowd – This recipe yields a generous 9×13 pan, perfect for feeding a crowd at gatherings or having plenty of leftovers to enjoy throughout the week
- Bakery-quality results – You’ll achieve those beautiful crackly tops and gorgeous caramel swirls that look magazine-worthy
- Customizable – Easy to adapt with different chocolate types, add-ins like nuts, or variations in the caramel
- Make-ahead friendly – These brownies actually improve after a day, making them perfect for party planning
- No mixer required – Everything comes together with simple hand mixing, making cleanup a breeze
Ingredient Notes
For the Brownies:
Unsalted butter – Using unsalted butter allows you to control the salt level precisely. European-style butter with higher fat content will make these even richer. If using salted butter, reduce the added salt by half.
Granulated sugar – Creates structure and that signature crackly top. Don’t substitute with other sweeteners as it affects texture dramatically.
Dark chocolate – Use quality chocolate (60-70% cacao) for the best flavor. Avoid chocolate chips as they contain stabilizers that prevent proper melting. Ghirardelli, Guittard, or Trader Joe’s chocolate bars work beautifully.
Unsweetened cocoa powder – Dutch-process cocoa gives a deeper, smoother chocolate flavor, but natural cocoa works too. Sift it to avoid lumps.
Eggs – Room temperature eggs incorporate more easily and create a better texture. Let them sit out for 30 minutes before baking.
All-purpose flour – Measure properly by spooning into the measuring cup and leveling off. Too much flour makes dry brownies.
Vanilla extract – Pure vanilla extract is worth the investment here. The flavor shines through.
Salt – Enhances all the flavors. Even though we’re adding salted caramel, the brownies need salt too.
For the Salted Caramel:
Granulated sugar – Pure white sugar is essential for clear, golden caramel. Don’t substitute.
Heavy cream – The fat content is crucial for smooth, creamy caramel. Half-and-half or milk won’t work as well.
Unsalted butter – Adds richness and silky texture to the caramel.
Sea salt – Flaky sea salt like Maldon or fleur de sel is ideal. Table salt is too fine and can make the caramel taste overly salty.
Vanilla extract – Adds depth and rounds out the caramel flavor.
Equipment Needed
- 9×13-inch baking pan – Metal pans conduct heat better than glass. Dark pans may require reducing oven temperature by 25°F.
- Parchment paper – Creates a sling for easy removal and prevents sticking. Leave overhang on two sides for lifting.
- Medium saucepan – For melting chocolate and butter, and making caramel separately.
- Mixing bowls – At least two medium bowls for combining ingredients.
- Whisk and wooden spoon – For mixing batter and stirring caramel.
- Measuring cups and spoons – Accurate measuring is crucial in baking.
- Candy thermometer (optional) – Helpful for caramel but not essential if you watch for color changes.
- Toothpick or cake tester – For checking doneness.
- Cooling rack – Allows air circulation for even cooling.
- Sharp knife – For clean cuts. Wipe between cuts for neat squares.
Salted Caramel Brownies Recipe
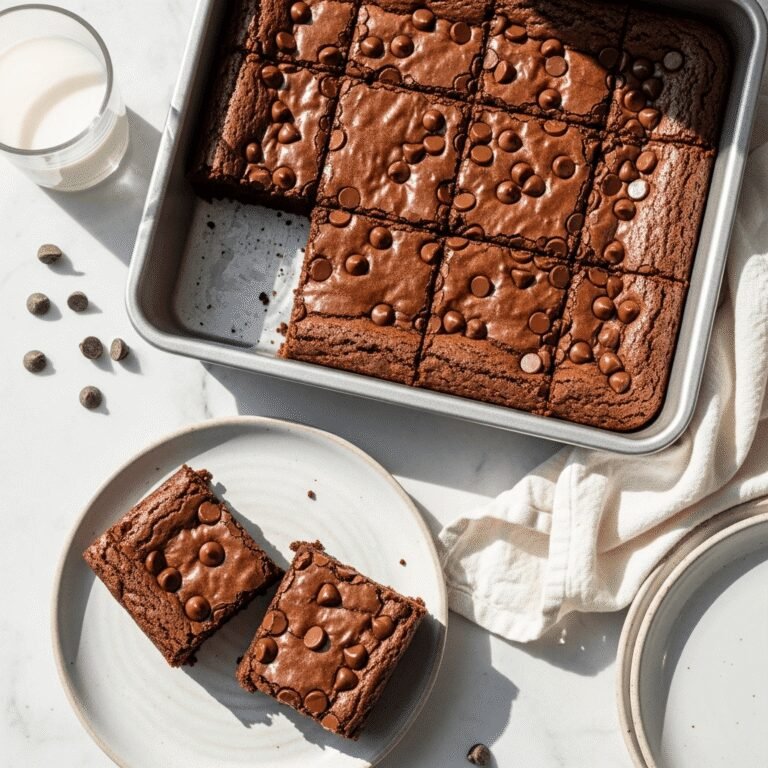
Rich, fudgy chocolate brownies swirled with homemade salted caramel and topped with flaky sea salt. These bakery-style Salted Caramel Brownies are the perfect balance of sweet and salty, with a dense, chocolatey base and ribbons of buttery caramel throughout.
- Prep Time: 25 minutes
- Cook Time: 35 minutes
- Total Time: 1 hour (plus cooling time)
- Yield: 16 large brownies or 24 smaller squares 1x
- Category: Dessert
- Method: Baking
- Cuisine: American
- Diet: Vegetarian
Ingredients
For the Salted Caramel:
- 1 cup granulated sugar
- 6 tablespoons unsalted butter, room temperature, cut into pieces
- ½ cup heavy cream, room temperature
- 1 teaspoon sea salt
- 1 teaspoon vanilla extract
For the Brownies:
- 1 cup (2 sticks) unsalted butter
- 8 ounces dark chocolate (60-70% cacao), chopped
- 1¾ cups granulated sugar
- 4 large eggs, room temperature
- 1 tablespoon vanilla extract
- 1 cup all-purpose flour
- ½ cup unsweetened cocoa powder
- 1 teaspoon salt
- Flaky sea salt for topping
Instructions
Make the Salted Caramel:
- Prepare your mise en place. Have butter, cream, salt, and vanilla measured and ready beside the stove. Caramel moves quickly once it starts, so preparation is key.
- Caramelize the sugar. In a medium heavy-bottomed saucepan, heat granulated sugar over medium heat. Let it sit undisturbed for 3-4 minutes until edges begin to melt. Then stir constantly with a wooden spoon, breaking up any clumps. Continue cooking until all sugar is melted and amber-colored, about 6-8 minutes total. Watch carefully as it can burn quickly.
- Add the butter. Remove from heat and immediately add butter pieces. The mixture will bubble vigorously—this is normal. Whisk until butter is completely melted and incorporated.
- Add the cream. Slowly pour in heavy cream while whisking constantly. The caramel will bubble up dramatically. Continue whisking until smooth and combined.
- Finish the caramel. Stir in sea salt and vanilla extract. Return to medium heat and cook for 1-2 minutes, stirring constantly, until smooth. Remove from heat and let cool for 10 minutes. The caramel will thicken as it cools. Reserve ½ cup for swirling; save the rest for drizzling after baking.
Make the Brownies:
- Prepare the pan. Preheat oven to 350°F. Line a 9×13-inch baking pan with parchment paper, leaving overhang on two sides for easy removal. Lightly grease the parchment.
- Melt chocolate and butter. In a medium saucepan over low heat, melt butter and chopped chocolate together, stirring frequently until smooth. Remove from heat and let cool slightly for 5 minutes.
- Mix in sugar. Pour the chocolate mixture into a large mixing bowl. Whisk in sugar until well combined and slightly glossy.
- Add eggs and vanilla. Add eggs one at a time, whisking well after each addition. The mixture should become thick and glossy. Whisk in vanilla extract.
- Incorporate dry ingredients. In a separate bowl, sift together flour, cocoa powder, and salt. Fold the dry ingredients into the chocolate mixture using a wooden spoon or spatula. Mix just until no flour streaks remain—don’t overmix.
- Layer and swirl. Pour brownie batter into prepared pan, spreading evenly. Drizzle the ½ cup of reserved salted caramel over the top in lines. Use a butter knife or skewer to swirl the caramel into the batter, creating a marbled pattern. Don’t over-swirl or the caramel will disappear into the batter.
- Bake to perfection. Bake for 30-35 minutes, until edges are set and a toothpick inserted in the center comes out with a few moist crumbs (not wet batter). The center should look slightly underdone—it will continue cooking as it cools. Don’t overbake or brownies will be dry.
- Cool completely. Remove from oven and immediately sprinkle with flaky sea salt. Let cool in the pan on a wire rack for at least 1 hour. For cleanest cuts, refrigerate for 2 hours before slicing.
- Cut and serve. Use the parchment overhang to lift brownies from the pan. Cut into squares with a sharp knife, wiping the blade between cuts. Drizzle with remaining salted caramel before serving if desired.
Notes
- Caramel tip: Making caramel can be intimidating, but watching for the amber color is more reliable than using a thermometer. If your caramel seizes or crystallizes, start over—it’s difficult to save once it hardens.
- Fudgy vs. cakey: For ultra-fudgy brownies, pull them when a toothpick has moist crumbs. For slightly cakier texture, bake 3-5 minutes longer.
- Cutting tip: For picture-perfect squares, refrigerate brownies completely, then use a hot knife (run under hot water and dry) to cut. Clean between each cut.
- Caramel storage: Leftover caramel can be stored in the refrigerator for up to 2 weeks. Reheat gently before using.
- Altitude adjustment: At high altitude, reduce sugar by 2 tablespoons and increase flour by 2 tablespoons.
Nutrition
- Serving Size: 1 brownie (based on 16 servings)
- Calories: 385
- Sugar: 38g
- Sodium: 285mg
- Fat: 22g
- Saturated Fat: 13g
- Unsaturated Fat: 7g
- Trans Fat: 0g
- Carbohydrates: 46g
- Fiber: 2g
- Protein: 5g
- Cholesterol: 95mg
Nutrition information is approximate and will vary based on exact ingredients used and portion sizes.
Tips & Variations
Chocolate Variations:
- Use milk chocolate for sweeter, less intense brownies (reduce sugar by ¼ cup)
- Try 70% dark chocolate for deeper, more sophisticated flavor
- Mix in ½ cup chocolate chips or chunks for extra chocolate pockets
- Add white chocolate chips for beautiful color contrast
Caramel Customizations:
- Make bourbon salted caramel by adding 2 tablespoons bourbon with the vanilla
- Try brown butter caramel by browning the butter before making caramel
- Add ½ teaspoon espresso powder to caramel for mocha notes
- Use coconut cream instead of heavy cream for dairy-free caramel (though texture may differ slightly)
Mix-In Ideas:
- Fold in 1 cup chopped pecans or walnuts for nutty crunch
- Add ½ cup toffee bits for extra caramel flavor and texture
- Swirl in ½ cup peanut butter along with caramel for peanut butter lovers
- Mix in 1 teaspoon instant espresso powder to the brownie batter for mocha brownies
Dietary Adaptations:
- Gluten-free: Replace all-purpose flour with 1:1 gluten-free baking flour blend
- Reduced sugar: Reduce sugar in brownies to 1½ cups (they’ll be less sweet but still delicious)
- Mini brownies: Bake in mini muffin tins for 12-15 minutes for bite-sized treats
- Vegan version: Use vegan butter, dairy-free chocolate, flax eggs (1 tablespoon ground flaxseed + 3 tablespoons water per egg), and coconut cream
Pro Chef Tips
Temperature matters for texture. Room temperature eggs and dairy incorporate more smoothly into batters, creating better texture. Cold eggs can cause the melted chocolate to seize and create a grainy texture. Let eggs sit out for 30 minutes, or place them in warm water for 5 minutes to bring to room temperature quickly.
Don’t skip the cooling time. Brownies need at least an hour to set properly. Cutting them too soon results in messy, gooey squares that fall apart. For the cleanest cuts and best texture, refrigerate for 2 hours before cutting. The caramel firms up and the brownies slice like butter.
Master the caramel by watching, not timing. Every stove heats differently, so color is more reliable than time. You want deep amber—the color of an old penny. Too light and the caramel tastes just like sugar; too dark and it becomes bitter. Remove from heat immediately when you reach the right color.
Create professional swirls with technique. After drizzling caramel on top, make one continuous S-pattern through the batter with your knife, then reverse direction. This creates beautiful swirls without over-mixing. Over-swirling makes the caramel disappear into the brownie, so less is more here.
Use the toothpick test correctly. When testing brownies, you want moist crumbs clinging to the toothpick, not wet batter and not completely clean. Clean toothpick means overbaked, dry brownies. A few moist crumbs indicate that perfect fudgy texture.
Invest in quality chocolate. Since chocolate is a primary flavor here, quality matters enormously. Use good baking chocolate bars, not chocolate chips. Chips contain stabilizers that prevent them from melting smoothly. Chop a bar instead for silky, intense chocolate flavor.
Common Mistakes to Avoid
Overbaking is the number one brownie killer. Brownies continue cooking from residual heat after you remove them from the oven, so slightly underdone is perfect. If the center looks completely set and dry, you’ve gone too far. Remember: moist crumbs on the toothpick, not clean.
Don’t stir constantly while making caramel at the start. When the sugar first goes into the pan, let it sit undisturbed for several minutes. Stirring too early causes crystallization. Once edges begin melting, then you can stir to help even melting.
Using cold cream in caramel causes seizing. The dramatic temperature difference between hot caramel and cold cream can cause the mixture to harden and seize. Always use room temperature cream, or warm it slightly in the microwave before adding to ensure smooth caramel.
Overmixing the batter creates tough, cakey brownies. Once you add the flour, mix just until no streaks remain. Every extra stir develops gluten, which makes brownies less fudgy and more cake-like. Use a light hand and fold gently.
Skipping the parchment paper makes removal difficult. Even in a well-greased pan, these brownies can stick. The parchment sling allows you to lift the entire brownie block out cleanly, making cutting so much easier and preventing broken corners.
Storage & Meal Prep
Room temperature storage: Store brownies in an airtight container at room temperature for up to 4 days. Place parchment or wax paper between layers to prevent sticking. They’ll actually taste better on day two as flavors meld together.
Refrigerator storage: For longer storage or in warm weather, refrigerate brownies in an airtight container for up to 1 week. The caramel stays firmer when chilled, which some people prefer. Bring to room temperature before serving for the fudgiest texture, or enjoy them cold for a denser, almost truffle-like consistency.
Freezer storage: These brownies freeze beautifully for up to 3 months. Wrap individual brownies tightly in plastic wrap, then place in a freezer-safe container or bag. This allows you to thaw just what you need. Alternatively, freeze the entire uncut brownie block wrapped in plastic and foil.
Reheating for warm brownies: While delicious at room temperature, warm brownies with molten caramel are next-level. Microwave individual brownies for 10-15 seconds, or warm in a 300°F oven for 5-7 minutes. The caramel becomes gooey and the chocolate gets melty.
Caramel storage: Store leftover salted caramel in a jar in the refrigerator for up to 2 weeks. It will thicken considerably when cold. Reheat gently in the microwave in 15-second intervals, stirring between each, until pourable. It’s perfect for ice cream, coffee, or drizzling over brownies before serving.
Make-Ahead & Freezer Notes
Make-ahead for parties: These brownies are perfect for party planning because they taste better after sitting for 24 hours. Make them the day before your event, store at room temperature, and cut just before serving. The flavors deepen and the texture becomes more cohesive overnight.
Prepare components separately: Make the salted caramel up to a week in advance and store in the refrigerator. When ready to bake, gently reheat until pourable, then proceed with the brownie recipe. This breaks the recipe into manageable steps if you’re short on time.
Bake and freeze for later: These brownies freeze exceptionally well. Bake completely, cool, cut into squares, and freeze individually wrapped. This gives you homemade brownies ready at a moment’s notice for lunchboxes, last-minute guests, or late-night cravings.
Thawing instructions: Remove brownies from freezer and let thaw at room temperature for 1-2 hours. For faster thawing, microwave frozen brownies for 20-30 seconds. They’ll taste freshly baked. You can also thaw overnight in the refrigerator.
Freeze unbaked batter (not recommended): While technically possible, freezing unbaked brownie batter changes the texture and rise. It’s much better to bake them fresh or freeze after baking for best results.
Best reheating method from frozen: For that just-baked experience, warm frozen brownies in a 300°F oven for 10-12 minutes. The edges get slightly crispy while the center becomes warm and gooey. Drizzle with extra caramel sauce for an indulgent treat.
Serving Suggestions
Classic pairings:
- Serve warm with a scoop of vanilla bean ice cream melting over the top
- Pair with freshly whipped cream lightly sweetened with vanilla
- Accompany with hot coffee or espresso to cut through the richness
- Offer with cold whole milk for a nostalgic childhood treat
Elevated presentations:
- Plate with a drizzle of extra salted caramel and a small scoop of salted caramel ice cream
- Dust with cocoa powder and serve with chocolate sauce for chocolate lovers
- Top with chopped candied pecans for added crunch and sophistication
- Serve alongside fresh raspberries or strawberries—the tartness balances the sweetness beautifully
For entertaining:
- Create a brownie sundae bar with various ice cream flavors, toppings, and sauces
- Cut into small squares and arrange on a dessert platter with other treats
- Warm and top with hot fudge for an over-the-top dessert
- Serve with dessert wine like port or a sweet Moscato
Holiday serving ideas:
- Package individually wrapped brownies as holiday gifts or party favors
- Serve on a beautiful platter for Thanksgiving or Christmas dessert tables
- Pair with pumpkin spice lattes in fall or peppermint mochas in winter
- Create a s’mores-inspired version by serving with graham crackers and toasted marshmallows
FAQs Section
Can I use store-bought caramel sauce instead of homemade?
While homemade caramel tastes significantly better, you can use store-bought in a pinch. Look for quality jarred caramel sauce (not ice cream topping, which is too thin). You’ll need about 1 cup total. Warm it slightly so it swirls easily, and add extra flaky sea salt since store-bought is often less salty. The texture and flavor won’t be quite as incredible, but the brownies will still be delicious.
Why did my caramel crystallize or turn grainy?
Caramel crystallization happens when sugar crystals form during cooking, usually from stirring too early or having crystallized sugar on the pan sides. To prevent this, don’t stir until edges begin melting, and brush down pan sides with a wet pastry brush if you see crystals forming. If crystallization occurs, unfortunately you need to start over—it’s difficult to save crystallized caramel.
How do I know when the brownies are done?
The edges should be set and pulling slightly away from the pan, while the center looks slightly underdone and jiggles very slightly when gently shaken. A toothpick inserted in the center should come out with moist crumbs, not wet batter. Remember, they continue cooking after removal, so err on the side of underdone for fudgy brownies.
Can I make these in a different size pan?
Yes, but adjust baking time accordingly. In an 8×8 pan, brownies will be thicker and need 40-45 minutes. In a 9×9 pan, bake for 35-40 minutes. For a half-sheet pan (larger), brownies will be thinner and bake in 20-25 minutes. Always use the toothpick test rather than relying solely on time.
Why are my brownies cakey instead of fudgy?
This usually comes from too much flour, overbaking, or overmixing. Measure flour by spooning into the measuring cup and leveling off—don’t pack it. Mix just until flour disappears, and remove brownies when the toothpick has moist crumbs. Using quality chocolate with higher fat content also contributes to fudgy texture.
Can I make these dairy-free or vegan?
Yes, with modifications. Use vegan butter and dairy-free dark chocolate for the brownies. Replace eggs with flax eggs (1 tablespoon ground flaxseed + 3 tablespoons water per egg, let sit 5 minutes). For caramel, use coconut cream instead of heavy cream and vegan butter. The texture will be slightly different but still delicious.
How far in advance can I make these brownies?
Make them up to 3 days in advance and store at room temperature, or up to a week in the refrigerator. They actually improve after 24 hours as flavors develop. For longer storage, freeze for up to 3 months. They’re perfect for stress-free party planning since they taste better after sitting.
Conclusion
These Salted Caramel Brownies are everything a brownie should be—intensely chocolatey, perfectly fudgy, and impossibly indulgent. The ribbons of homemade salted caramel throughout create pockets of buttery sweetness that complement the rich chocolate base, while the flaky sea salt on top adds that sophisticated sweet-and-salty contrast that keeps you coming back for just one more bite.
Whether you’re baking for a special celebration, bringing dessert to a potluck, or simply treating yourself to something extraordinary on an ordinary day, this recipe delivers bakery-quality results that will have everyone asking for the recipe. The combination of simple techniques and premium flavors proves that impressive desserts don’t have to be complicated.
I’d love to hear how your Salted Caramel Brownies turn out! Leave a comment below with your results, any creative variations you tried, or questions about the recipe. Don’t forget to pin this recipe to your dessert board on Pinterest so you can find it easily next time that brownie craving hits. If you make these, tag me in your photos—I absolutely love seeing your beautiful creations come to life!
Happy baking, and enjoy every fudgy, caramel-swirled bite!