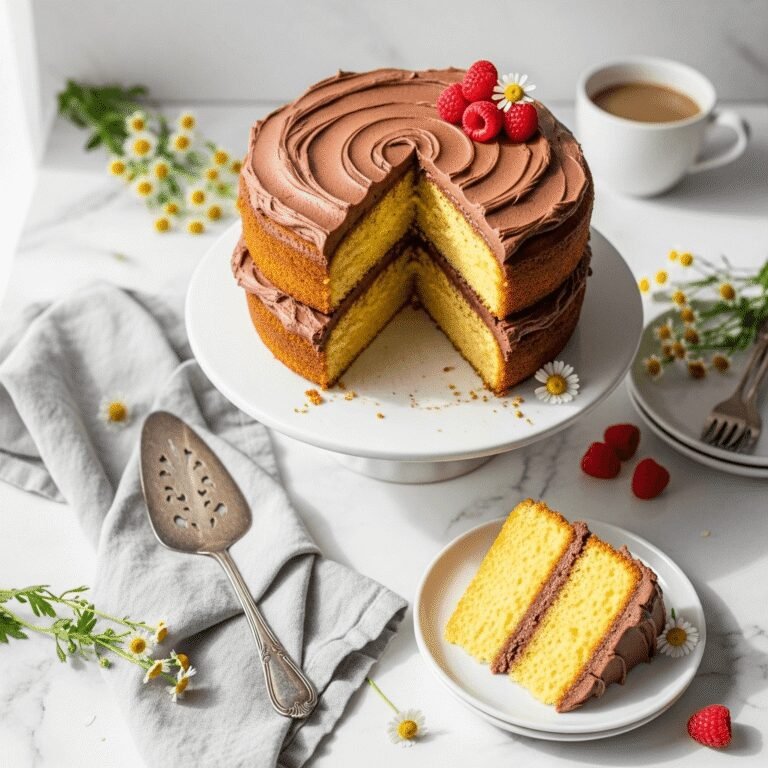
Fluffy Easter Cake with Buttercream Frosting (Easy Spring Celebration Dessert!)
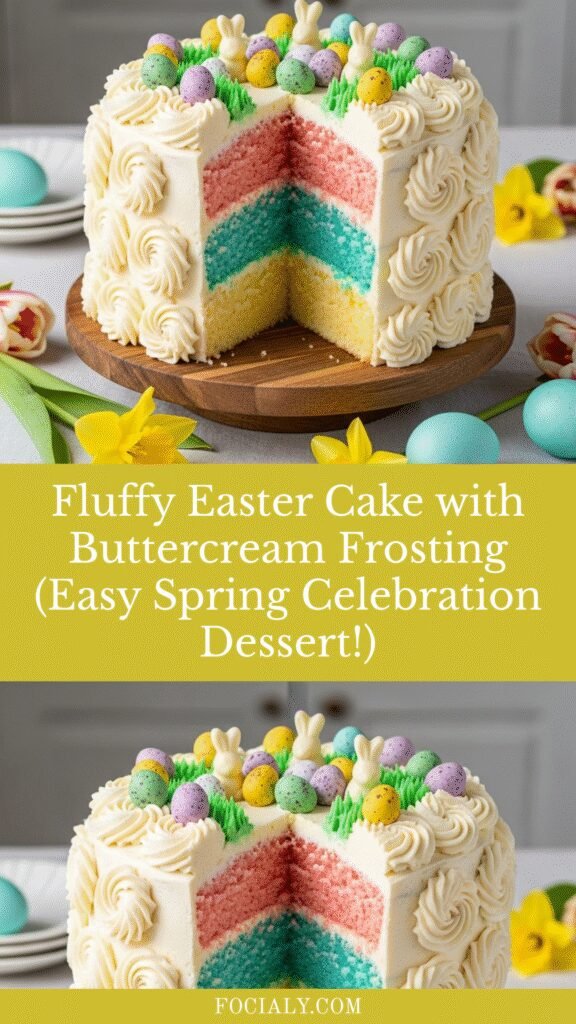
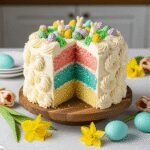
There’s something truly magical about an Easter cake sitting at the center of your holiday table – a towering masterpiece adorned with pastel frosting, perhaps decorated with springtime flowers or adorable bunny motifs. This fluffy Easter cake recipe delivers exactly that: a moist, tender vanilla layer cake wrapped in silky buttercream that practically melts on your tongue.
Whether you’re hosting Easter brunch, attending a potluck, or simply want to bring a touch of springtime sweetness to your table, this Easter cake is your answer. It’s a classic American celebration cake that combines simple pantry ingredients with impressive results. The cake itself is wonderfully light and fluffy – thanks to the perfect ratio of butter, sugar, and eggs – while the buttercream frosting is smooth, sweet, and endlessly customizable with food coloring and decorations.
This recipe serves 12-16 people generously, making it perfect for family gatherings. What I love most is that despite looking like it came from a fancy bakery, this cake is completely achievable for home bakers of all skill levels. You don’t need professional equipment or advanced techniques – just good ingredients, a bit of patience, and the desire to create something beautiful for the people you love.
History / Background
The tradition of Easter cakes dates back centuries across many cultures, each with their own unique spin on springtime celebratory baking. In America, the Easter cake as we know it today evolved from European traditions brought by immigrants in the 18th and 19th centuries. The British had their Simnel cake studded with marzipan, the Italians their Colomba Pasquale shaped like a dove, and the Eastern Europeans their beautiful Paska breads.
The American Easter cake became particularly popular in the mid-20th century when layer cakes became the centerpiece of celebrations. Post-World War II, when ingredients like butter, sugar, and eggs became more readily available again, home bakers embraced elaborate cake decorating as an expression of joy and abundance. Women’s magazines and cooking shows popularized the idea of themed holiday cakes, and Easter – with its associations of renewal, spring, and family gatherings – became the perfect occasion for a festive dessert.
The pastel color palette we associate with Easter cakes today reflects the soft hues of spring flowers: baby pink, lavender, mint green, buttery yellow, and sky blue. These colors became synonymous with Easter celebrations in American culture during the 1950s and 1960s, when food coloring became widely accessible and cake decorating transformed into a beloved home hobby.
Today, the Easter cake remains a cherished tradition in homes across the United States. It’s more than just dessert – it’s a symbol of togetherness, a canvas for creativity, and a delicious way to celebrate the arrival of spring after the long winter months.
Why You’ll Love This Recipe
This Easter cake recipe has become my go-to for spring celebrations, and once you try it, I think it’ll become yours too. The cake has that perfect tender crumb that’s neither too dense nor too airy – it’s substantial enough to hold up layers of frosting but light enough that you’ll happily go back for seconds. The buttercream is smooth and not overly sweet, making it the ideal canvas for whatever decorative vision you have in mind.
Here’s why this recipe is absolutely perfect:
- Beginner-friendly but impressive – The steps are straightforward and clearly explained, but the final result looks like you spent hours at a bakery
- Customizable for any skill level – Keep it simple with basic frosting, or go all out with piped flowers, fondant bunnies, and elaborate decorations
- Made with everyday ingredients – No specialty items needed; everything is likely already in your pantry
- Moist cake that stays fresh – This cake doesn’t dry out quickly and actually tastes even better the next day
- Perfect crowd-pleaser – The classic vanilla flavor appeals to everyone from kids to grandparents
- Budget-friendly – Costs a fraction of what you’d pay for a bakery cake
- Make-ahead friendly – You can bake the layers in advance and assemble closer to your celebration
- Freezer-friendly – Both cake layers and frosted cake freeze beautifully
- Nostalgic and festive – Creates that special holiday feeling that makes memories
Ingredient Notes
All-purpose flour – The foundation of your cake structure. I always measure flour by spooning it into the measuring cup and leveling off – never pack it down or you’ll end up with a dense cake. Cake flour can be substituted for an even more tender crumb (use 1 cup plus 2 tablespoons cake flour for every 1 cup all-purpose).
Granulated sugar – Provides sweetness and helps create the cake’s tender texture through the creaming process. Don’t substitute with other sweeteners as they’ll affect the structure.
Unsalted butter (room temperature) – This is crucial! Room temperature butter (around 65-70°F) creams properly with sugar, creating air pockets that make your cake light and fluffy. Take it out of the fridge 1-2 hours before baking. If you only have salted butter, use it but reduce the added salt by half.
Large eggs (room temperature) – Room temperature eggs incorporate more easily and create better structure. Place cold eggs in warm water for 5 minutes to bring them to temperature quickly.
Whole milk – Adds moisture and richness. Buttermilk can be substituted for a tangier, more tender cake. Avoid skim milk as it lacks the fat needed for proper moisture.
Pure vanilla extract – Use the real stuff, not imitation! It makes a noticeable difference in flavor. Consider using vanilla bean paste for extra vanilla specks.
Baking powder & baking soda – These leavening agents work together to give your cake rise and a tender crumb. Make sure they’re fresh (less than 6 months old) for best results.
Salt – Enhances all the other flavors and balances the sweetness.
Powdered sugar (for frosting) – Creates smooth, pipeable buttercream. Sift it to avoid lumps in your frosting.
Heavy cream – Added to the buttercream for a silky, smooth consistency. Whole milk works in a pinch but won’t be quite as luxurious.
Food coloring (optional) – Gel food coloring gives the most vibrant colors without thinning your frosting. Liquid food coloring works but you’ll need more of it.
Equipment Needed
- Two 9-inch round cake pans
- Parchment paper
- Stand mixer or hand mixer
- Large mixing bowls (2-3)
- Rubber spatula
- Wire cooling racks
- Measuring cups and spoons
- Sifter or fine-mesh strainer
- Offset spatula (for frosting)
- Cake turntable (optional but helpful for decorating)
- Toothpicks (for testing doneness)
- Serrated knife (for leveling layers if needed)
- Piping bags and tips (optional, for decorative frosting)
- Cake board or serving plate
Easter Cake Recipe
This fluffy Easter cake features tender vanilla layers paired with smooth buttercream frosting that’s perfect for springtime celebrations. Easy enough for beginners yet impressive enough for any holiday gathering, this classic cake can be decorated as simply or elaborately as you desire.
- Prep Time: 25 minutes
- Cook Time: 28 minutes
- Total Time: 53 minutes (plus cooling time)
- Yield: 12-16 servings 1x
- Category: Dessert
- Method: Baking
- Cuisine: American
- Diet: Vegetarian
Ingredients
For the Cake:
- 3 cups all-purpose flour
- 2½ teaspoons baking powder
- ½ teaspoon baking soda
- 1 teaspoon salt
- 1 cup (2 sticks) unsalted butter, room temperature
- 2 cups granulated sugar
- 4 large eggs, room temperature
- 1 tablespoon pure vanilla extract
- 1½ cups whole milk, room temperature
For the Buttercream Frosting:
- 1½ cups (3 sticks) unsalted butter, room temperature
- 6 cups powdered sugar, sifted
- ¼ cup heavy cream
- 2 teaspoons pure vanilla extract
- ¼ teaspoon salt
- Gel food coloring in pastel shades (optional)
- Sprinkles, edible flowers, or decorations of choice
Instructions
Step 1: Prep Your Pans and Oven
Preheat your oven to 350°F (175°C). Grease two 9-inch round cake pans generously with butter or baking spray, then line the bottoms with parchment paper circles. Grease the parchment too. This double insurance ensures your cakes will release perfectly. Set aside.
Step 2: Combine Dry Ingredients
In a medium bowl, sift together the flour, baking powder, baking soda, and salt. Sifting isn’t just for show – it removes lumps and aerates the flour, contributing to that light, fluffy texture we’re after. Set this bowl aside.
Step 3: Cream Butter and Sugar
In the bowl of your stand mixer fitted with the paddle attachment (or using a hand mixer with a large bowl), beat the room temperature butter on medium speed for about 2 minutes until smooth and creamy. Gradually add the sugar, about ½ cup at a time, beating well after each addition. Continue beating on medium-high speed for 4-5 minutes until the mixture is very light, fluffy, and pale in color – almost white. This creaming process is crucial for a light cake, so don’t rush it!
Step 4: Add Eggs and Vanilla
Reduce mixer speed to medium-low. Add eggs one at a time, beating well after each addition and scraping down the sides of the bowl as needed. The mixture might look slightly curdled after the eggs – that’s normal and will come together once you add the flour. Beat in the vanilla extract.
Step 5: Alternate Dry and Wet Ingredients
With the mixer on low speed, add the flour mixture in three additions, alternating with the milk in two additions. Start and end with the flour mixture (flour-milk-flour-milk-flour). Mix each addition just until no streaks of flour remain – overmixing at this stage develops gluten and creates a tough cake. Use your rubber spatula to scrape the bottom and sides of the bowl, ensuring everything is evenly incorporated.
Step 6: Divide and Bake
Divide the batter evenly between your prepared pans (I use a kitchen scale for precision – about 680-700g per pan). Smooth the tops with your spatula. Tap each pan firmly on the counter 3-4 times to release any large air bubbles. Bake for 26-30 minutes, or until a toothpick inserted in the center comes out clean or with just a few moist crumbs. The cakes should be golden on top and spring back when gently pressed.
Step 7: Cool the Cakes
Let the cakes cool in the pans on wire racks for 15 minutes. Run a knife around the edges, then invert onto the racks, peel off the parchment, and flip right-side up to cool completely. This takes about 1-2 hours. Cakes MUST be completely cool before frosting or the buttercream will melt.
Step 8: Make the Buttercream
In a clean mixer bowl with the paddle attachment, beat the room temperature butter on medium speed for 3-4 minutes until very smooth and creamy. Reduce speed to low and gradually add the sifted powdered sugar, 1 cup at a time. Once all the sugar is added, increase speed to medium and beat for 2 minutes. Add the heavy cream, vanilla extract, and salt. Beat on medium-high for 4-5 minutes until light, fluffy, and very smooth. If the frosting seems too thick, add more cream 1 tablespoon at a time. If too thin, add more powdered sugar ¼ cup at a time.
Step 9: Divide and Color Frosting (Optional)
If you want multiple colors, divide the buttercream into separate bowls. Add gel food coloring a tiny bit at a time (a toothpick amount) and stir until you reach your desired pastel shade. Remember, colors deepen as they sit, so start lighter than you think you need.
Step 10: Level and Assemble
If your cake layers domed during baking, use a long serrated knife to carefully level off the tops, creating flat surfaces. Place the first layer cut-side down on your cake board or serving plate. Spread about 1 cup of buttercream evenly across the top, going all the way to the edges. Place the second layer on top, cut-side down, and gently press to adhere.
Step 11: Crumb Coat
Apply a thin layer of frosting all over the top and sides of the cake. This “crumb coat” seals in crumbs and creates a smooth base. Don’t worry about it looking perfect – you’ll barely see this layer. Refrigerate for 20-30 minutes until the frosting is firm.
Step 12: Final Frosting and Decoration
Apply a generous, smooth layer of frosting over the entire cake, using an offset spatula for smooth sides and top. If using a turntable, rotate it while holding your spatula still against the cake for ultra-smooth sides. Get creative with your decorations – pipe rosettes around the borders, add Easter candies, create a basket-weave pattern, or keep it simple with smooth frosting and sprinkles. There’s no wrong way to decorate your Easter masterpiece!
Notes
- Temperature matters: All ingredients should be at room temperature (65-70°F) for best results. This ensures proper emulsification and a tender crumb.
- Don’t overmix: Once you add the flour, mix just until combined. Overmixing develops gluten, creating a tough, chewy cake.
- Measure flour correctly: Spoon flour into measuring cups and level off with a knife. Scooping directly from the bag compacts the flour, leading to dry cake.
- Test for doneness: Oven temperatures vary. Start checking at 26 minutes. The cake should spring back when touched and a toothpick should have moist crumbs, not wet batter.
- Make it ahead: Unfrosted cake layers can be wrapped tightly and refrigerated for 2 days or frozen for 3 months. Bring to room temperature before frosting.
- Frosting consistency: If your kitchen is warm, the buttercream may soften. Refrigerate for 10-15 minutes to firm it up. If too stiff, let it sit at room temperature briefly.
Nutrition
- Serving Size: 1 slice (1/14 of cake)
- Calories: 625
- Sugar: 68g
- Sodium: 285mg
- Fat: 32g
- Saturated Fat: 20g
- Unsaturated Fat: 10g
- Trans Fat: 0g
- Carbohydrates: 81g
- Fiber: 1g
- Protein: 5g
- Cholesterol: 135mg
Note: Nutrition information is approximate and will vary based on specific ingredients used and portion size.
Tips & Variations
Flavor Variations:
- Lemon Easter Cake: Add 2 tablespoons lemon zest to the cake batter and 1 tablespoon to the frosting. Replace vanilla extract with lemon extract.
- Almond Version: Use almond extract instead of vanilla (use only 1½ teaspoons as it’s stronger) for a subtle almond flavor that pairs beautifully with spring.
- Chocolate Easter Cake: Replace ½ cup of flour with unsweetened cocoa powder for chocolate layers. Add chocolate chips to the frosting for cookies and cream effect.
- Coconut Cake: Add 1 cup sweetened shredded coconut to the batter and press toasted coconut onto the frosted sides.
- Strawberry Cake: Fold ¾ cup freeze-dried strawberry powder into the batter for natural strawberry flavor and pink color.
Frosting Options:
- Cream Cheese Frosting: Replace half the butter with cream cheese for tangier, less sweet frosting.
- Swiss Meringue Buttercream: For a silkier, less sweet option, use Swiss meringue buttercream instead.
- Whipped Cream Frosting: For a lighter option, use stabilized whipped cream (though this must be kept refrigerated).
Decoration Ideas:
- Arrange mini chocolate eggs or jelly beans on top
- Create a nest design with shredded coconut tinted green
- Pipe buttercream flowers using petal tips
- Add fondant bunnies, chicks, or carrots
- Use edible flowers for an elegant spring look
- Create an ombré effect with graduated pastel colors
- Add Easter-themed sprinkles and nonpareils
Size Adjustments:
- Cupcakes: This recipe makes about 28-30 cupcakes. Bake at 350°F for 18-22 minutes.
- Sheet Cake: Use a 9×13-inch pan. Bake for 35-40 minutes.
- Three Layers: Divide batter among three 8-inch pans. Reduce baking time to 20-24 minutes.
Pro Chef Tips
For the Fluffiest Cake: Don’t skimp on the creaming time. That 4-5 minutes of beating butter and sugar creates thousands of tiny air pockets that expand during baking, giving you that bakery-quality texture. Your arm might get tired with a hand mixer, but it’s worth it!
The Pan Tap Trick: After dividing batter into pans, firmly tap them on the counter several times. This releases hidden air bubbles that would create tunnels or holes in your finished cake. Professional bakers never skip this step.
Toothpick Test Wisdom: Don’t wait for a completely clean toothpick – that means your cake is already overdone. Look for a few moist crumbs clinging to the toothpick. The cake will continue cooking slightly as it cools (carryover cooking), and you’ll end up with perfectly moist cake, not dry cake.
Buttercream Temperature Control: If your buttercream looks curdled or separated, it’s usually a temperature issue. If it’s too cold, the butter has seized – beat it on high speed or briefly warm the bowl with a warm towel. If it’s too warm and soupy, refrigerate for 10-minute intervals, beating in between, until it firms up to the right consistency.
The Offset Spatula Advantage: Invest in a good offset spatula if you plan to make layer cakes regularly. The angled design makes frosting sides so much easier than a regular spatula, and you’ll get professional-looking results with much less frustration.
Leveling Layers Like a Pro: For perfectly level cakes, use dental floss instead of a knife. Wrap it around the cake where you want to cut, cross the ends, and pull tight. It slices through without dragging or tearing.
Rotating While Baking: If your oven has hot spots (most do), rotate your cake pans 180 degrees halfway through baking. This ensures even rising and browning. Just be quick and gentle – you don’t want to slam the door or jostle the pans too much before the structure is set.
Common Mistakes to Avoid
Using Cold Ingredients: This is the #1 cake-baking mistake! Cold eggs won’t emulsify properly with room-temperature butter, leading to a dense, unevenly textured cake. Cold milk can cause the batter to curdle. Everything should feel cool to the touch, not cold from the fridge. Plan ahead and set ingredients out 1-2 hours before baking.
Overmixing After Adding Flour: Once flour meets liquid, gluten starts developing. Overmixing at this stage creates chewy, tough cake with tunnels instead of a tender crumb. Mix on low speed just until you can’t see dry flour anymore – 15-20 seconds after the last addition is usually enough. A few small lumps are fine; they’ll bake out.
Opening the Oven Too Early: Every time you open that oven door, the temperature drops by 25-50°F, and the sudden temperature change can cause cakes to sink in the middle. Don’t peek before the minimum baking time, and when you do check, be quick. Use your oven light to watch progress instead of opening the door.
Frosting Warm Cake: I know you’re excited to finish your masterpiece, but frosting a warm cake is a recipe for disaster. The buttercream will melt right off, mixing with crumbs and creating a sloppy mess. Patience is key – cakes should be completely cool to the touch, preferably even chilled slightly, before frosting.
Skipping the Crumb Coat: Going straight to the final frosting layer means you’ll fight crumbs the entire time, and your beautiful cake will look messy with cake specks throughout the frosting. That thin first layer seals everything in, making the final coat a breeze and giving you that professional bakery look.
Not Sifting Powdered Sugar: Those lumps in your powdered sugar won’t dissolve in buttercream – they’ll just give you grainy, bumpy frosting. Always sift powdered sugar before adding it to butter. It takes 30 seconds and makes a world of difference in the smoothness of your finished frosting.
Rushing the Cooling Process: Setting warm cake pans on the counter instead of wire racks traps steam underneath, making the bottoms soggy. Always use cooling racks so air can circulate around all sides. And resist the urge to speed things up with the freezer – rapid temperature changes can make your cake crack or become dense.
Storage & Meal Prep
Room Temperature Storage:
Once frosted and decorated, this Easter cake can stay at room temperature for up to 2 days if your kitchen is relatively cool (below 70°F). Cover it loosely with a cake dome or large bowl – don’t wrap tightly or the frosting will stick and get damaged. Room temperature storage keeps the cake at its most tender and flavorful.
Refrigerator Storage:
For longer storage or if your kitchen is warm, refrigerate the cake. It will stay fresh for 5-6 days. The buttercream will harden in the fridge, so let the cake sit at room temperature for 30-60 minutes before serving to soften the frosting and improve the texture. Cover loosely with plastic wrap or keep in a cake box to prevent the cake from absorbing refrigerator odors.
Unfrosted Layer Storage:
Unfrosted cake layers can be tightly wrapped in plastic wrap (2-3 layers) and stored at room temperature for 1 day, refrigerated for up to 3 days, or frozen for up to 3 months. This is perfect for make-ahead baking! Bring layers to room temperature before frosting for best results.
Leftover Slices:
Individual slices can be wrapped in plastic wrap and stored in airtight containers in the refrigerator for up to 5 days. This is my favorite way to enjoy cake – grabbing a perfectly portioned slice whenever the craving hits!
Frosting Storage:
Buttercream can be made ahead and stored in an airtight container in the refrigerator for up to 2 weeks or frozen for up to 3 months. Before using, bring it to room temperature, then beat with a mixer for 3-4 minutes until light and fluffy again. This refreshes the texture and incorporates air that was lost during storage.
Make-Ahead & Freezer Notes
Make-Ahead Timeline:
This cake is perfect for advance preparation! Here’s my recommended timeline for stress-free Easter baking:
- 3 months ahead: Bake cake layers, cool completely, wrap tightly in plastic wrap, then aluminum foil, label with date, and freeze.
- 2 weeks ahead: Make buttercream, store in airtight container in fridge.
- 2 days ahead: Bake cake layers if not freezing, wrap well, keep at room temperature.
- 1 day ahead: Assemble and frost cake, refrigerate overnight. Add final decorations.
- Day of: Remove from fridge 1-2 hours before serving, add any last-minute decorations.
Freezing Unfrosted Layers:
This is my go-to method for stress-free holiday baking. Cool cake layers completely on wire racks (this is crucial – any warmth creates ice crystals). Wrap each layer individually in 2-3 layers of plastic wrap, making sure it’s completely sealed with no exposed areas. Then wrap in aluminum foil for extra protection. Label with the date and type of cake. Frozen layers will keep for up to 3 months without any loss of quality. Thaw overnight in the refrigerator (still wrapped), then bring to room temperature before frosting.
Freezing Frosted Cake:
Yes, you can freeze the entire frosted cake! This is perfect if you want to completely finish the project in advance. Freeze the cake uncovered for 30 minutes until the frosting is firm, then wrap carefully in plastic wrap and foil. The initial freezing step prevents the wrap from sticking to your beautiful decorations. Freeze for up to 2 months. Thaw overnight in the refrigerator, then bring to room temperature. Note: Delicate decorations may shift slightly during thawing, so save those for fresh application.
Best Thawing Method:
Always thaw frozen cake in the refrigerator rather than at room temperature. This prevents condensation from forming on the cake’s surface, which can make it soggy. Keep the cake wrapped while thawing to trap any moisture that does form. Once thawed, unwrap and let come to room temperature before serving – this usually takes 1-2 hours depending on room temperature.
Freezing Buttercream:
Buttercream freezes beautifully! Store in an airtight container, pressing plastic wrap directly onto the surface before sealing to prevent ice crystals. Freeze for up to 3 months. Thaw overnight in the refrigerator. Before using, let it come to room temperature (this can take several hours), then rewhip with a mixer on medium-high speed for 4-5 minutes. This restores the fluffy texture and silky consistency. If it looks slightly separated, just keep beating – it will come together!
Serving Suggestions
Beverage Pairings:
This sweet, buttery cake pairs beautifully with a variety of beverages. For brunch, serve alongside freshly brewed coffee, hot tea (Earl Grey or chamomile are lovely choices), or chilled mimosas for the adults. For afternoon celebrations, try iced tea sweetened with honey, lemonade garnished with fresh mint, or even a glass of cold milk for the kids. The vanilla flavor is neutral enough to complement everything from bold coffee to delicate herbal teas.
Complementary Sides:
Since Easter cake is quite rich and sweet, balance your dessert table with lighter options. Fresh fruit salad with berries and melon provides a refreshing contrast. A cheese board with mild cheeses like brie, goat cheese, and cream cheese offers a savory counterpoint. Chocolate-dipped strawberries add elegance without overwhelming the palate. Roasted nuts or candied pecans give textural variety.
Complete Easter Menu Ideas:
For a traditional Easter dinner, serve this cake as the grand finale after a meal of honey-glazed ham, roasted spring vegetables (asparagus, carrots, new potatoes), fresh green salad with vinaigrette, hot cross buns or dinner rolls, and deviled eggs. For Easter brunch, follow dishes like quiche, fresh fruit, breakfast casserole, and pastries with slices of this beautiful cake. The cake is rich enough that a small slice satisfies after a full meal.
Presentation Ideas:
Serve slices on pretty dessert plates with a fork and small dessert napkin. For a special touch, dust each plate with a tiny sprinkle of powdered sugar or place a small edible flower beside the slice. If serving to children, consider adding a small chocolate bunny or colorful Easter candy beside each slice. For outdoor celebrations, keep the cake in a covered cake carrier until just before serving to protect it from sun and wind.
Portion Sizes:
This cake is quite rich, so plan on serving relatively modest slices. For a standard 9-inch two-layer cake, you can realistically get 14-16 slices if cutting into wedges. For events where cake isn’t the only dessert, you can cut smaller slices and serve 18-20 people. Use a long, thin knife dipped in hot water (and wiped clean between cuts) for the cleanest slices.
Make It Extra Special:
Transform each slice into a mini celebration by adding a scoop of vanilla ice cream or a dollop of freshly whipped cream. Drizzle with raspberry or strawberry sauce for added spring flavor and a beautiful color contrast. Garnish with fresh berries, a sprig of mint, or edible flowers. For a truly decadent experience, serve with a side of warm chocolate sauce for dipping.
FAQs Section
Can I make this cake without a stand mixer?
Absolutely! A hand mixer works perfectly fine for this recipe – you’ll just need to use a bit more elbow grease and possibly add an extra minute to your mixing times. The key is to really cream that butter and sugar until light and fluffy. You can even make this cake entirely by hand with a wooden spoon and a good arm workout, though I’d recommend at least using a hand mixer for the buttercream to get it silky smooth.
Why did my cake turn out dense instead of fluffy?
The most common culprits are using cold ingredients (especially butter and eggs), not creaming the butter and sugar long enough (that 4-5 minutes really matters!), overmixing after adding the flour, or measuring flour incorrectly by packing it into the cup. Also check that your baking powder and baking soda are fresh – they lose potency after about 6 months and won’t give you proper rise.
Can I use cake flour instead of all-purpose flour?
Yes! Cake flour will actually give you an even more tender, delicate crumb because it has less protein than all-purpose flour. You’ll need to use 3⅓ cups of cake flour to replace the 3 cups of all-purpose flour in this recipe. The texture will be slightly more delicate, which some people love for special occasion cakes.
How do I get perfectly smooth frosting?
The secret is threefold: First, make sure your buttercream is the right consistency – not too stiff, not too soft. Second, apply that crucial crumb coat and let it firm up in the fridge. Third, use an offset spatula and, if possible, a cake turntable. Hold your spatula at a slight angle against the cake and rotate the turntable (or walk around the cake if on a stationary surface) while keeping the spatula still. For the top, use long, smooth strokes from one edge to the other. Dip your spatula in hot water and wipe clean for an extra-smooth finish.
Can I make this cake dairy-free or vegan?
For dairy-free, you can substitute the butter with vegan butter (Earth Balance or Miyoko’s work well), use non-dairy milk (oat milk or almond milk), and use coconut cream instead of heavy cream in the frosting. For fully vegan, you’ll also need to replace the eggs. Use 4 “flax eggs” (4 tablespoons ground flaxseed mixed with 12 tablespoons water, let sit 5 minutes) or ¾ cup unsweetened applesauce. The texture will be slightly different but still delicious!
My buttercream looks curdled or separated – can I fix it?
Yes! This usually happens when the butter is too cold or too warm. If it’s too cold and looks grainy or curdled, the butter seized up. Fix it by beating on high speed for several minutes until it smooths out, or briefly warm the outside of the bowl with a warm (not hot) towel or your hands, then beat again. If it’s too warm and looks soupy, the butter has gotten too soft. Pop the entire bowl in the fridge for 10-15 minutes, then beat again on medium-high speed until it comes together and thickens.
How far in advance can I decorate the cake?
If using buttercream decorations (rosettes, flowers, borders), you can fully decorate the cake up to 2 days in advance if refrigerated, or 1 day if keeping at room temperature. Just be gentle when covering it. However, if you’re using fresh flowers, chocolate decorations, or candy that might bleed color or melt, add those within a few hours of serving. Fondant decorations can be made well in advance and applied to the cake 1-2 days ahead.
What if I don’t have two 9-inch pans?
You have options! You can bake the layers one at a time using a single 9-inch pan (just keep the remaining batter at room temperature while the first layer bakes). Or use different pan sizes – three 8-inch pans will work beautifully (reduce baking time to 20-24 minutes). You can even make this as a 9×13-inch sheet cake if you prefer simple serving – just increase baking time to 35-40 minutes and frost right in the pan.
Conclusion
There’s something truly special about homemade cake – especially one as beautiful and delicious as this Easter cake. From the moment you cream that butter and sugar, your kitchen fills with the promise of something wonderful. And when you present that gorgeous, pastel-frosted creation to your family and friends, you’re not just serving dessert; you’re creating a memory.
This recipe has become a cornerstone of my spring celebrations, and I hope it becomes one of yours too. Whether you keep the decorating simple or go all out with elaborate designs, whether you make it exactly as written or customize it with your own creative spin, this cake is sure to delight everyone at your Easter table.
I’d love to hear how your Easter cake turns out! Did you try any of the flavor variations? How did you decorate yours? What did your family think? Drop a comment below and share your experience. And if you’re feeling proud of your creation (you should be!), snap a photo and share it on Pinterest or Instagram – tag me so I can see your beautiful work!
Don’t forget to pin this recipe to your Easter board, Spring Desserts collection, or Cake Recipes folder so you can find it easily when celebration time rolls around. There’s nothing worse than remembering that perfect recipe but not being able to track it down when you need it!
Happy baking, and may your Easter be filled with sweetness, springtime joy, and plenty of fluffy cake! 🐰🌸🎂