Buttery Homemade Scones Recipe – Perfectly Flaky & Easy to Make

There’s something absolutely magical about biting into a warm, buttery scone fresh from the oven. These tender, flaky pastries are the perfect companion to your morning coffee or afternoon tea, and once you realize how easy they are to make at home, you’ll never want to buy them from a bakery again. This classic scones recipe delivers bakery-quality results with just a handful of simple ingredients and minimal effort. Whether you’re hosting a brunch, treating yourself to a cozy weekend breakfast, or looking for the perfect addition to your holiday table, these homemade scones are guaranteed to impress.
Introduction of Recipe
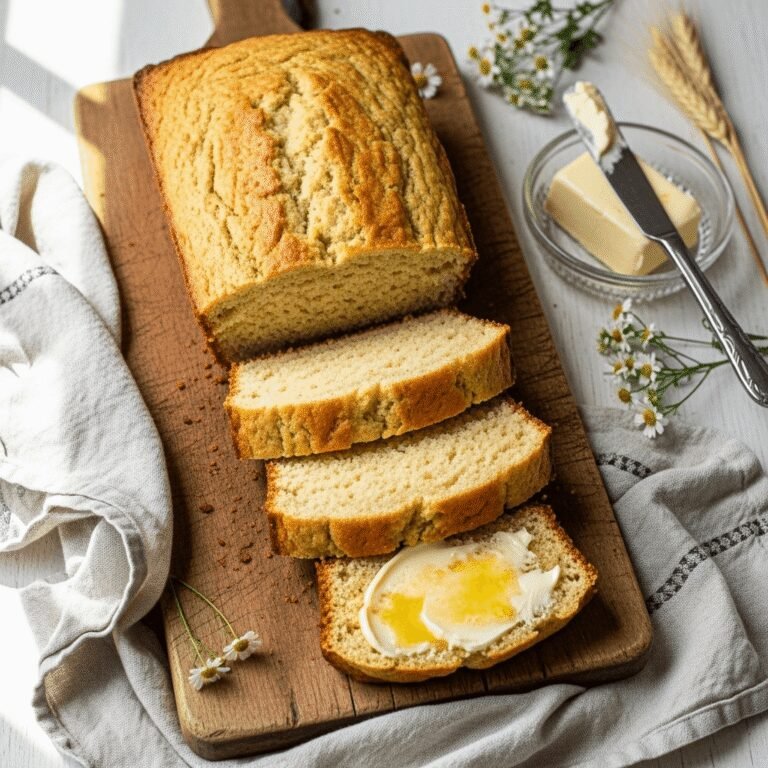
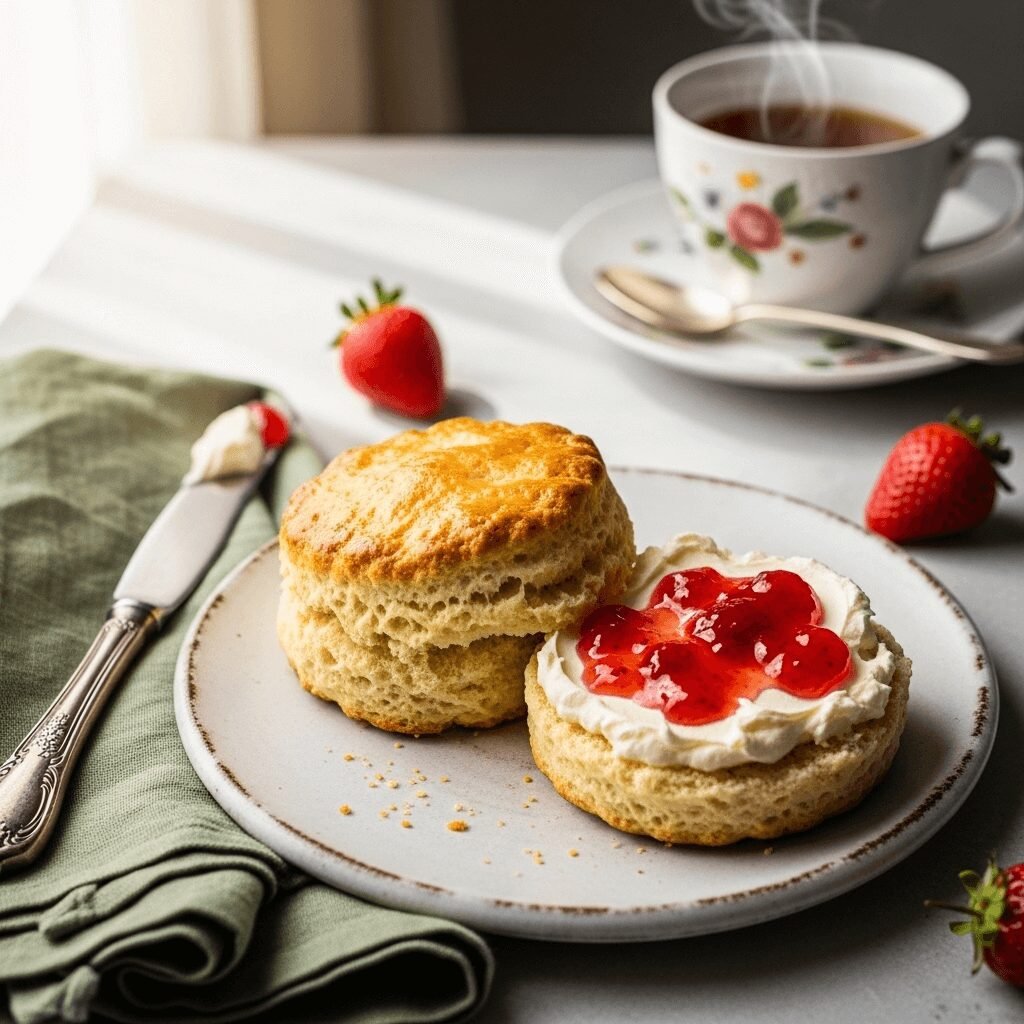
Scones are delightful baked goods that fall somewhere between a biscuit and a cake – tender and crumbly yet slightly sweet and incredibly satisfying. This traditional British teatime treat has become a beloved staple in American homes, especially for breakfast and brunch gatherings. These buttery scones feature a golden-brown exterior with a soft, tender crumb inside that practically melts in your mouth. They’re lightly sweetened, allowing them to pair beautifully with both sweet and savory accompaniments.
What makes this scones recipe particularly special is its versatility. You can enjoy them plain, add dried fruit like cranberries or currants, fold in chocolate chips, or incorporate fresh herbs and cheese for a savory variation. Serve them warm with clotted cream and jam for an authentic British cream tea experience, or simply slather them with butter and your favorite preserves. They’re perfect for holiday breakfasts, Mother’s Day brunch, baby showers, book club meetings, or any occasion that calls for something special yet comfortingly homemade.
History / Background
The scone has a rich and fascinating history that spans centuries and continents. These beloved pastries originated in Scotland in the early 1500s, with the name likely derived from the Dutch word “schoonbrot” (meaning “fine bread”) or the Scots word “skon” (meaning “fine white bread”). The original Scottish scones were made with oats and griddle-baked rather than oven-baked, creating a flatter, denser product quite different from the fluffy scones we know today.
Scones gained immense popularity throughout Britain during the Victorian era when afternoon tea became a fashionable social ritual among the upper classes. Anna, the 7th Duchess of Bedford, is credited with establishing afternoon tea in the 1840s as a way to ward off the “sinking feeling” between lunch and dinner. Scones quickly became a staple of this elegant tradition, served alongside delicate finger sandwiches and petit fours.
The evolution from griddle-baked oat cakes to the light, fluffy, oven-baked scones we enjoy today happened gradually as wheat flour became more affordable and accessible, and as baking powder was invented in the mid-19th century. This leavening agent transformed scones from dense cakes into the tender, risen treats we know today.
British immigrants brought scone recipes to America, where they adapted and evolved. American scones tend to be slightly sweeter and richer than their British counterparts, often incorporating mix-ins like chocolate chips, berries, or nuts. The debate over pronunciation (some say “scone” to rhyme with “cone,” others with “gone”) continues to this day, adding to the charm and cultural significance of these timeless pastries.
Today, scones remain a beloved symbol of hospitality and comfort food culture. Whether enjoyed at a fancy hotel afternoon tea or baked fresh in your own kitchen, scones represent tradition, warmth, and the simple pleasure of good food made with care.
Why You’ll Love This Recipe
This homemade scones recipe is about to become your new favorite baking project, and here’s why: it combines simplicity with impressive results, requiring just basic pantry staples and minimal hands-on time. Unlike many baking projects that demand precise techniques and specialty ingredients, these scones are remarkably forgiving and perfect for both beginners and experienced bakers alike.
Here’s what makes this recipe absolutely irresistible:
- Quick and Easy: From start to finish, you’ll have fresh scones on your table in under 30 minutes – perfect for impromptu guests or lazy weekend mornings
- Minimal Ingredients: Uses simple, everyday ingredients you likely already have in your kitchen – no specialty items required
- Perfectly Flaky Texture: The technique ensures layers of buttery goodness in every bite, with a tender crumb that’s never dry or crumbly
- Versatile Base Recipe: Easily customizable with sweet or savory add-ins to suit any taste preference or occasion
- Freezer-Friendly: Make a double batch and freeze unbaked scones for fresh-baked pastries anytime you want them
- Budget-Friendly: Much more economical than buying bakery scones, and tastes infinitely better
- Impressive Yet Effortless: Looks and tastes like you spent hours in the kitchen, but requires minimal effort
- Family-Friendly: Kids love helping shape the dough, making this a wonderful family baking activity
- Perfect for Meal Prep: Bake ahead for busy weekday breakfasts or pack in lunchboxes for a special treat
- Crowd-Pleaser: Everyone loves a warm, buttery scone – they’re guaranteed to disappear quickly at any gathering
Ingredient Notes
Understanding your ingredients is key to baking perfect scones every time. Here’s what you’ll need and why each component matters:
All-Purpose Flour: Forms the structure of your scones. Make sure to measure correctly by spooning flour into your measuring cup and leveling it off – don’t pack it down. For even flakier scones, you can use a combination of all-purpose and cake flour.
Granulated Sugar: Provides just the right amount of sweetness without making the scones overly sweet. You can adjust the amount based on whether you prefer a sweeter scone or plan to serve them with sweet toppings.
Baking Powder: The leavening agent that gives scones their rise and tender texture. Make sure yours is fresh (test it by adding a teaspoon to hot water – it should bubble vigorously). Substitution: In a pinch, use 1/4 teaspoon baking soda plus 1/2 teaspoon cream of tartar for each teaspoon of baking powder.
Salt: Enhances all the flavors and balances the sweetness. Don’t skip it!
Cold Butter: This is the secret to flaky scones. The cold butter creates steam pockets as it bakes, resulting in those beautiful layers. Always use unsalted butter so you can control the salt content. Substitution: For dairy-free scones, use cold coconut oil or vegan butter.
Heavy Cream: Adds richness and moisture while keeping the dough tender. The fat content is important for texture. Substitution: You can use half-and-half or whole milk in a pinch, though the scones may be slightly less rich. For dairy-free, use full-fat coconut cream.
Egg: Binds the ingredients together and adds richness. It also creates a beautiful golden color when used as a wash on top. Substitution: For egg-free scones, use a flax egg (1 tablespoon ground flaxseed mixed with 3 tablespoons water).
Vanilla Extract: Adds warmth and depth of flavor. Use pure vanilla extract for the best taste.
Optional Add-ins: Whether you choose dried fruit, chocolate chips, fresh berries, or cheese and herbs, add-ins should total about 1 cup and be folded in gently at the end to avoid overworking the dough.
Equipment Needed
Having the right tools makes scone-making even easier. Here’s what you’ll need:
- Large Mixing Bowl: For combining dry ingredients
- Pastry Cutter or Fork: To cut the cold butter into the flour mixture (you can also use your fingertips or a food processor)
- Measuring Cups and Spoons: For accurate measurements
- Small Bowl: For whisking the wet ingredients together
- Wooden Spoon or Rubber Spatula: For mixing the dough
- Baking Sheet: A standard half-sheet pan works perfectly
- Parchment Paper or Silicone Baking Mat: Prevents sticking and makes cleanup easy
- Bench Scraper or Sharp Knife: For cutting the dough into wedges or squares
- Pastry Brush: For brushing the egg wash or cream on top
- Rolling Pin (optional): If you prefer uniform height, though patting by hand works beautifully
- Wire Cooling Rack: Allows air circulation so the bottoms don’t get soggy
- Food Processor (optional): Makes cutting in the butter incredibly quick and easy
Scones Recipe

These classic buttery scones are tender, flaky, and absolutely delicious! Perfect for breakfast, brunch, or afternoon tea, they’re easy to make with simple ingredients and ready in just 30 minutes. Serve them warm with butter, jam, or clotted cream for an authentic British tea experience.
- Prep Time: 15 minutes
- Cook Time: 15 minutes
- Total Time: 30 minutes
- Yield: 8 scones 1x
- Category: Breakfast, Brunch, Dessert
- Method: Baking
- Cuisine: American
- Diet: Vegetarian
Ingredients
- 2 cups (250g) all-purpose flour, plus more for dusting
- 1/3 cup (65g) granulated sugar
- 1 tablespoon baking powder
- 1/2 teaspoon salt
- 1/2 cup (115g) cold unsalted butter, cut into small cubes
- 1/2 cup (120ml) cold heavy cream, plus 2 tablespoons for brushing
- 1 large egg
- 1 teaspoon pure vanilla extract
- Optional: 1 cup mix-ins (chocolate chips, dried cranberries, fresh blueberries, etc.)
Instructions
- Preheat and Prepare: Preheat your oven to 400°F (200°C). Line a baking sheet with parchment paper or a silicone baking mat and set aside.
- Mix Dry Ingredients: In a large mixing bowl, whisk together the flour, sugar, baking powder, and salt until well combined. This ensures the leavening is evenly distributed throughout the flour.
- Cut in the Butter: Add the cold butter cubes to the flour mixture. Using a pastry cutter, two forks, or your fingertips, work the butter into the flour until the mixture resembles coarse crumbs with some pea-sized pieces of butter remaining. These butter pieces are crucial for creating flaky layers. Work quickly to keep the butter cold.
- Combine Wet Ingredients: In a small bowl, whisk together the heavy cream, egg, and vanilla extract until smooth and well combined.
- Form the Dough: Make a well in the center of the flour mixture and pour in the wet ingredients. Using a rubber spatula or wooden spoon, gently stir until the mixture just comes together into a shaggy dough. If using add-ins, fold them in now. Don’t overmix – the dough should look slightly rough and you should still see some streaks of flour. Overmixing will result in tough scones.
- Shape the Scones: Turn the dough out onto a lightly floured surface. Gently knead it 3-4 times just until it comes together (don’t overwork it). Pat the dough into an 8-inch circle about 3/4 to 1 inch thick. Using a sharp knife or bench scraper, cut the circle into 8 equal wedges, like cutting a pizza. Alternatively, you can pat the dough into a rectangle and cut into squares or use a biscuit cutter for round scones.
- Arrange and Brush: Place the scones on your prepared baking sheet, spacing them about 2 inches apart. Brush the tops with the remaining 2 tablespoons of heavy cream (or use a beaten egg for a deeper golden color). This creates that beautiful golden-brown finish.
- Bake: Bake for 15-18 minutes, or until the scones are golden brown on top and a toothpick inserted into the center comes out clean. The bottoms should also be lightly golden.
- Cool and Serve: Transfer the scones to a wire cooling rack. Let them cool for 5-10 minutes before serving. Scones are best enjoyed warm, slathered with butter, jam, honey, or clotted cream.
Notes
- Keep Everything Cold: The key to flaky scones is cold butter and cold cream. If your kitchen is warm, chill your mixing bowl and even the flour in the freezer for 10 minutes before starting.
- Don’t Overmix: Mix just until the dough comes together. Overworking develops gluten and creates tough scones.
- Customize Your Flavor: Add 1 tablespoon lemon zest for lemon scones, 1/2 cup mini chocolate chips for chocolate scones, or 3/4 cup fresh blueberries for berry scones.
- Make Them Ahead: Shape the scones and refrigerate them overnight on the baking sheet. Bake from cold, adding 2-3 extra minutes to the baking time.
- Savory Variation: Reduce sugar to 1 tablespoon, add 1 cup shredded cheddar cheese and 2 tablespoons chopped fresh herbs like chives or rosemary.
Serving Size: 1 scone
Calories: 285
Sugar: 9g
Sodium: 245mg
Fat: 16g
Saturated Fat: 10g
Unsaturated Fat: 5g
Trans Fat: 0g
Nutrition
- Serving Size: 1 scone
- Calories: 285
- Sugar: 9g
- Sodium: 245mg
- Fat: 16g
- Saturated Fat: 10g
- Unsaturated Fat: 5g
- Trans Fat: 0g
- Carbohydrates: 31g
- Fiber: 1g
- Protein: 4g
- Cholesterol: 65mg
Tips & Variations
Sweet Variations:
- Cranberry Orange Scones: Add 3/4 cup dried cranberries and 1 tablespoon orange zest to the dough
- Blueberry Lemon Scones: Fold in 1 cup fresh blueberries and 2 teaspoons lemon zest; drizzle with lemon glaze after baking
- Chocolate Chip Scones: Mix in 3/4 cup mini chocolate chips or chopped dark chocolate
- Cinnamon Chip Scones: Add 1 teaspoon cinnamon to the dry ingredients and fold in 3/4 cup cinnamon chips
- Maple Pecan Scones: Replace vanilla with maple extract, add 1/2 cup chopped toasted pecans
Savory Variations:
- Cheddar Herb Scones: Reduce sugar to 1 tablespoon, add 1 cup shredded sharp cheddar and 2 tablespoons fresh chopped herbs (chives, rosemary, or thyme)
- Bacon Cheddar Scones: Include 1/2 cup crumbled cooked bacon and 3/4 cup shredded cheddar cheese
- Everything Bagel Scones: Reduce sugar to 1 tablespoon, brush tops with butter, and sprinkle with everything bagel seasoning before baking
- Parmesan Black Pepper Scones: Add 1/2 cup grated Parmesan cheese and 1 teaspoon freshly cracked black pepper
Dietary Modifications:
- Whole Wheat Scones: Replace up to half the all-purpose flour with whole wheat flour for added nutrition
- Gluten-Free: Use a 1:1 gluten-free baking flour blend in place of all-purpose flour
- Vegan Scones: Use cold coconut oil or vegan butter, replace heavy cream with full-fat coconut cream, and use a flax egg instead of regular egg
- Lower Sugar: Reduce sugar to 3 tablespoons for a less sweet scone
Glazes and Toppings:
- Vanilla Glaze: Mix 1 cup powdered sugar with 2-3 tablespoons milk and 1/2 teaspoon vanilla
- Lemon Glaze: Combine 1 cup powdered sugar with 2 tablespoons fresh lemon juice
- Cinnamon Sugar: Brush with butter and sprinkle with cinnamon-sugar mixture before baking
- Turbinado Sugar: Sprinkle coarse sugar on top before baking for added crunch and sparkle
Pro Chef Tips
Temperature Control is Everything: Professional bakers know that cold ingredients are the secret to flaky scones. Freeze your butter for 15 minutes before using it, and if your hands run warm, rinse them under cold water before working with the dough. Some chefs even freeze their flour for 10 minutes before starting.
The “Shaggy Dough” Rule: When mixing your dough, stop when it still looks slightly messy with visible streaks of flour. It will come together when you gently knead it on the counter. If your dough looks perfectly smooth in the bowl, you’ve overmixed it, and your scones will be dense.
Layer for Extra Flakiness: After your first pat-down, fold the dough in half, rotate it 90 degrees, and pat it down again. Repeat this 2-3 times. This creates even more buttery layers, similar to how puff pastry is made. Just be gentle and work quickly.
The Chill Before You Bake: If you have time, place your shaped scones in the refrigerator for 15-30 minutes before baking (or even freeze them for 10 minutes). This firms up the butter again, which creates more steam during baking and results in a better rise and flakier texture.
Sharp Tools Make Clean Cuts: Always use a sharp knife or bench scraper when cutting your scones. A dull knife will compress the edges and prevent proper rising. Press straight down without twisting – this ensures the layers can expand upward during baking.
Brush with Heavy Cream, Not Milk: While milk works, heavy cream creates a richer, more golden crust. For an even deeper color, use a beaten egg or egg wash (egg beaten with a tablespoon of water or cream).
Watch Your Oven Hot Spots: Most ovens have hot spots that can cause uneven browning. Rotate your baking sheet halfway through baking for even color. Consider using an oven thermometer to ensure your temperature is accurate.
The Lift Test: Your scones are done when they’re golden brown on top and lift easily from the baking sheet without sticking. The internal temperature should reach 200-205°F if you want to be precise with a thermometer.
Common Mistakes to Avoid
Using Warm Butter: This is the number one mistake home bakers make. Warm butter will blend into the flour instead of creating those essential pockets of fat that create flaky layers. Always use butter straight from the refrigerator, and if your kitchen is warm, work quickly or even freeze the butter cubes for 15 minutes before starting.
Overmixing the Dough: Scones should be mixed just until the ingredients come together. Overworking the dough develops the gluten in the flour, resulting in tough, chewy scones instead of tender, crumbly ones. Your dough should look slightly rough and shaggy, not smooth like bread dough.
Skipping the Rest Time: Many bakers rush straight to baking after shaping. Letting your shaped scones rest in the refrigerator for 15-30 minutes (or even briefly in the freezer) allows the butter to firm back up and the gluten to relax, leading to flakier, taller scones with better texture.
Rolling Too Thin or Too Thick: Scones should be about 3/4 to 1 inch thick when shaped. Too thin and they’ll be dry and crispy instead of tender; too thick and the centers won’t bake through properly. Use a ruler if you’re unsure – consistency leads to even baking.
Overbaking: Scones continue to cook a bit after you remove them from the oven (carryover cooking), so take them out when they’re just golden brown. Overbaking creates dry, crumbly scones. Set a timer and check them at the minimum baking time rather than waiting until the maximum time has passed.
Storage & Meal Prep
Room Temperature Storage: Store completely cooled scones in an airtight container at room temperature for up to 2 days. Place a paper towel in the bottom of the container to absorb any excess moisture and keep the bottoms from getting soggy. For best results, warm them briefly in a 300°F oven for 5 minutes before serving to revive their texture.
Refrigerator Storage: While you can refrigerate scones for up to 5 days, they may become a bit denser in texture. Store them in an airtight container or resealable bag. Let them come to room temperature or warm them in the oven before serving for the best taste and texture.
Freezing Baked Scones: Freeze completely cooled scones in a single layer on a baking sheet for 1 hour, then transfer to a freezer-safe bag or container. They’ll keep for up to 3 months. To reheat, wrap frozen scones in foil and bake at 300°F for 15-20 minutes, or thaw at room temperature and warm for 5-7 minutes.
Reheating Tips: The best way to reheat scones is in a 300°F oven for 5-10 minutes (depending on whether they’re frozen or thawed). This crisps up the exterior while warming the interior. Avoid microwaving if possible, as it can make scones tough and rubbery. If you must use a microwave, heat for just 10-15 seconds.
Freezer-Friendly Dough: Unbaked scones freeze beautifully and are actually the best way to enjoy fresh-baked scones anytime. Shape the scones, place them on a parchment-lined baking sheet, and freeze solid (about 2 hours). Transfer frozen scones to a freezer bag and store for up to 3 months. Bake directly from frozen, adding 3-5 minutes to the baking time.
Make-Ahead & Freezer Notes
Overnight Prep: Shape your scones completely, place them on a parchment-lined baking sheet, cover tightly with plastic wrap, and refrigerate overnight. In the morning, brush with cream or egg wash and bake directly from the refrigerator. This method is perfect for holiday mornings or brunch gatherings when you want fresh-baked scones without the morning prep work.
Freeze Unbaked Scones: This is the ultimate make-ahead method. After shaping your scones, freeze them individually on a baking sheet until solid (about 2 hours), then transfer to a freezer-safe bag or container. They’ll keep for up to 3 months. When you’re ready to bake, place frozen scones on a parchment-lined baking sheet, brush with cream or egg wash, and bake at 400°F for 18-22 minutes (no need to thaw). This gives you fresh-baked scones whenever you want them with minimal effort.
Make the Dough Ahead: You can prepare the dough through step 5 (before shaping), wrap it tightly in plastic wrap, and refrigerate for up to 24 hours. Let it sit at room temperature for 10 minutes before shaping and baking. The cold rest actually improves the texture.
Batch Baking: Since scones freeze so well, consider making a double or triple batch. Bake some immediately and freeze the rest (either baked or unbaked) for later. This way, you’ll always have homemade scones on hand for unexpected guests or weekend treats.
Best Reheating from Frozen: For unbaked frozen scones, bake directly from frozen at 400°F for 18-22 minutes. For baked frozen scones, wrap in foil and heat at 300°F for 15-20 minutes, removing the foil for the last 3 minutes to crisp the exterior. Both methods yield scones that taste freshly baked.
Serving Suggestions
Scones are wonderfully versatile and pair beautifully with both sweet and savory accompaniments. Here are the best ways to serve them:
Classic British Style: Serve warm scones with clotted cream and strawberry jam for an authentic cream tea experience. The traditional method is to split the scone horizontally, spread clotted cream on each half, and top with a dollop of jam. In Cornwall, they put cream first then jam; in Devon, it’s jam first then cream – the great “cream tea controversy”!
Breakfast & Brunch Pairings: Pair scones with scrambled eggs, crispy bacon, and fresh fruit for a complete brunch spread. They also go wonderfully with Greek yogurt topped with honey and berries, or alongside a fruit salad for a lighter option.
Beverages: Scones are traditionally served with hot tea (English Breakfast, Earl Grey, or Darjeeling), but they’re equally delicious with coffee, hot chocolate, or even a glass of cold milk. For adult gatherings, consider serving with mimosas or Prosecco.
Sweet Toppings: Beyond the classic jam and cream, try honey butter, lemon curd, Nutella, apple butter, mascarpone with honey, or whipped cream cheese with berry compote. For chocolate chip scones, serve with chocolate ganache or chocolate hazelnut spread.
Savory Accompaniments: Savory scones pair beautifully with soups (especially tomato bisque or butternut squash soup), alongside salads, or served with eggs Benedict. Try them with smoked salmon and cream cheese for an elegant brunch option, or serve cheese scones with a hearty beef stew.
Complete Afternoon Tea Menu: Build an elegant afternoon tea around your scones by serving them alongside finger sandwiches (cucumber, egg salad, smoked salmon), petit fours or small pastries, fresh berries, and of course, plenty of hot tea in beautiful teacups.
FAQs Section
Can I make scones without heavy cream? Yes! While heavy cream gives the richest, most tender scones, you can substitute with half-and-half, whole milk, or even buttermilk. Keep in mind that lower-fat options will produce slightly less rich scones. For a dairy-free version, use full-fat coconut cream (the thick part from a can of coconut milk), which works beautifully and doesn’t impart much coconut flavor.
Why are my scones dry and crumbly? This usually happens for one of three reasons: overbaking (take them out when just golden), measuring flour incorrectly (spoon and level, don’t pack), or not using enough liquid. Also, make sure you’re not overmixing the dough, which can cause the liquid to distribute unevenly. If your dough feels too dry before baking, add cream one tablespoon at a time until it just comes together.
Can I use salted butter instead of unsalted? You can, but reduce the salt in the recipe to 1/4 teaspoon to compensate. Unsalted butter is preferred because it allows you to control the exact amount of salt, but salted butter won’t ruin your scones – they might just be slightly saltier.
How do I keep my scones from spreading flat during baking? Flat scones are usually caused by butter that’s too warm or dough that’s been overworked. Make sure your butter is very cold, handle the dough as little as possible, and chill the shaped scones for 15-30 minutes before baking. Also, check that your baking powder is fresh and that your oven temperature is accurate.
Can I use frozen berries in my scones? Yes, but don’t thaw them first! Fold frozen berries directly into the dough while they’re still frozen. Thawed berries release too much moisture and can make your dough soggy and turn it an unappetizing color. Frozen berries work best in scones than fresh ones for this reason.
What’s the difference between scones and biscuits? While they’re similar, scones are typically sweeter and richer than biscuits, containing eggs and sometimes sugar. Scones often include mix-ins like dried fruit or chocolate chips, while biscuits are usually plain. The texture is similar but scones tend to be slightly denser and more cake-like, while biscuits are flakier and more bread-like.
Why do my scones taste like baking powder? This usually means you’ve added too much baking powder or it’s old and has a metallic taste. Measure carefully (level off the tablespoon) and make sure your baking powder is fresh. Also, ensure you’re mixing the dry ingredients well so the baking powder distributes evenly – concentrated pockets can create a bitter taste. Fresh baking powder should fizz when added to hot water.
Conclusion
There’s truly nothing quite like the aroma of fresh-baked scones filling your kitchen – it’s pure comfort and happiness wrapped up in one delicious pastry. Now that you have this foolproof recipe and all the tips and tricks for success, you’re ready to create bakery-worthy scones right in your own home. Whether you’re hosting an elegant afternoon tea, treating your family to a special weekend breakfast, or simply indulging in a cozy morning moment with your favorite cup of coffee, these buttery, flaky scones are sure to bring joy to your table.
The beauty of this recipe is its simplicity and versatility. Once you’ve mastered the basic technique, you can customize it endlessly to suit your tastes and the seasons. From classic blueberry to decadent chocolate chip, from savory cheddar herb to elegant cranberry orange, the possibilities are limited only by your imagination.
I’d absolutely love to hear how your scones turn out! Did you add your own creative twist? Did your family devour them before they even had a chance to cool? Share your experience in the comments below – your feedback helps other home bakers and creates our wonderful community of food lovers. And please, don’t forget to pin this recipe to your Pinterest boards so you can find it easily when that scone craving hits. Happy baking, friends! ☕🥐