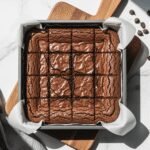
The Ultimate Fudgy Brownies Recipe – Rich, Chewy & Irresistible!
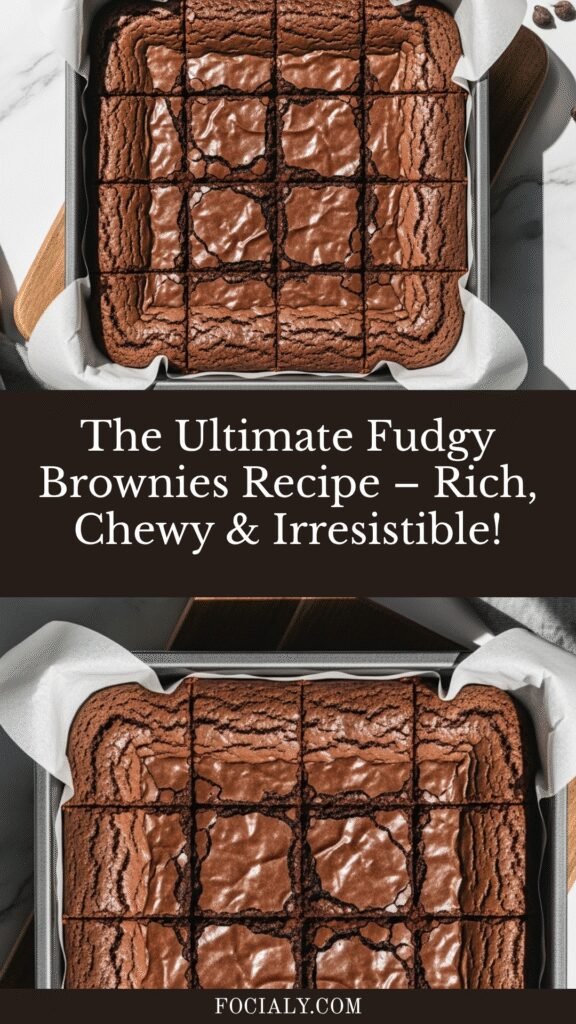
There’s something magical about a perfectly baked brownie—that shiny, crackly top giving way to a fudgy, intensely chocolatey interior that practically melts on your tongue. These homemade brownies are everything you’ve ever dreamed of: rich, decadent, and impossibly easy to make from scratch. Forget the boxed mixes—once you try these fudgy brownies, you’ll never go back!
This recipe is perfect for any occasion, whether you’re baking for a weekend family gathering, bringing treats to a potluck, celebrating a birthday, or simply satisfying that intense chocolate craving on a random Tuesday evening. They’re crowd-pleasers that work beautifully for bake sales, holiday cookie exchanges, or as a thoughtful homemade gift. The best part? You probably already have all the ingredients in your pantry right now, and they come together in just one bowl with minimal cleanup. These brownies strike that perfect balance between cakey and fudgy—with crispy edges and a soft, gooey center that chocolate lovers absolutely adore.
History / Background
The brownie’s origin story is delightfully American and surprisingly recent in culinary history. While chocolate desserts have existed for centuries, the brownie as we know it today was born in the late 19th century in the United States. The most popular origin story credits a socialite named Bertha Palmer, who commissioned a dessert for the 1893 World’s Columbian Exposition in Chicago. She wanted something more elegant than cake but easier to eat than pie—something ladies could enjoy while attending the fair without needing a fork. The Palmer House Hotel’s chef created a chocolate bar cookie topped with walnuts and apricot glaze, which became the precursor to modern brownies.
Another competing story attributes the brownie’s invention to a happy accident in a Bangor, Maine kitchen, where a cook forgot to add baking powder to a chocolate cake, resulting in a dense, flat chocolate treat that was surprisingly delicious. Regardless of which story is true, the brownie quickly became an American favorite, with the first published recipe appearing in the 1906 edition of the “Boston Cooking-School Cook Book” by Fannie Farmer.
Throughout the 20th century, brownies evolved significantly. The 1930s saw the introduction of boxed brownie mixes, making them even more accessible to home bakers. The great “fudgy vs. cakey” debate emerged as bakers tweaked ratios of butter, eggs, and flour to achieve their preferred texture. Today, brownies are a beloved staple of American baking culture, found at bake sales, coffee shops, and dinner tables across the country. They’ve inspired countless variations—from blonde brownies to red velvet brownies—but the classic chocolate version remains the most cherished. This recipe honors that traditional fudgy brownie that started it all, delivering intense chocolate flavor and that coveted chewy texture.
Why You’ll Love This Recipe
These homemade fudgy brownies are about to become your go-to chocolate dessert, and here’s why: they deliver bakery-quality results with minimal effort and simple pantry ingredients. Unlike complicated desserts that require special techniques or hard-to-find ingredients, these brownies are genuinely foolproof—perfect for both beginner bakers and experienced home cooks.
Here’s what makes this recipe special:
- Incredibly easy – Just one bowl, a whisk, and 10 minutes of prep time. No mixer required!
- Seriously fudgy texture – That perfect chewy, dense consistency that true brownie lovers crave, with just the right amount of crackly top
- Intense chocolate flavor – Made with both cocoa powder and optional chocolate chips for maximum chocolate impact
- Budget-friendly – Uses simple, affordable ingredients you likely already have on hand—no fancy chocolate bars required
- Customizable – Easy to adapt with mix-ins like nuts, chocolate chips, peanut butter swirls, or caramel
- Quick baking time – Ready in under 40 minutes from start to finish
- Crowd-pleaser – Loved by kids and adults alike; perfect for parties, potlucks, and gifts
- Foolproof results – Clear instructions ensure perfect brownies every single time, even if you’re not an experienced baker
- Make-ahead friendly – Actually taste better the next day as flavors meld together
- Better than boxed mix – Homemade flavor that’s exponentially better than store-bought, with that distinctive homemade texture
Ingredient Notes
Understanding your ingredients helps you achieve brownie perfection every time. Here’s what you’ll need and why each component matters:
Unsalted Butter – The foundation of rich, fudgy brownies. Butter provides moisture, flavor, and helps create that tender crumb. Use unsalted so you can control the salt level. If you only have salted butter, reduce the added salt in the recipe by half. For extra richness, you can brown the butter first, though regular melted butter works beautifully.
Granulated Sugar – Creates sweetness and contributes to that signature shiny, crackly top. Sugar also helps with moisture retention. Don’t substitute with brown sugar exclusively, as it will change the texture.
Eggs – The binding agent that holds everything together and contributes to the fudgy texture. Use large eggs at room temperature for best incorporation. The eggs also add richness and help create structure.
Vanilla Extract – Enhances the chocolate flavor and adds aromatic depth. Use pure vanilla extract rather than imitation for best flavor. This small amount makes a surprisingly big difference!
Unsweetened Cocoa Powder – The primary source of chocolate flavor. Dutch-processed cocoa creates a darker color and milder flavor, while natural cocoa powder is more acidic and intense. Either works wonderfully. Make sure it’s unsweetened—sweetened cocoa won’t work in this recipe.
All-Purpose Flour – Provides structure without making the brownies too cakey. Don’t overmix once you add the flour, as that develops gluten and creates tougher brownies. For gluten-free brownies, use a 1:1 gluten-free flour blend.
Salt – Essential for balancing sweetness and enhancing chocolate flavor. Don’t skip it!
Baking Powder (optional) – Some recipes include a tiny amount for slightly lifted brownies. For ultra-fudgy brownies, you can omit this entirely.
Chocolate Chips (optional) – Adds pockets of melted chocolate throughout. Use semi-sweet, dark, or milk chocolate chips based on your preference. You can also add chopped chocolate bars for irregular chocolate chunks.
Equipment Needed
Having the right tools makes brownie baking even easier. Here’s what you’ll need:
- 8×8-inch or 9×9-inch square baking pan – The standard size for brownie recipes. Metal or glass both work (glass may require slightly longer baking time).
- Parchment paper or aluminum foil – Line your pan for easy removal and cleanup. Leave overhang on the sides so you can lift the entire brownie slab out.
- Large mixing bowl – For combining all ingredients. Glass, metal, or ceramic all work well.
- Medium saucepan or microwave-safe bowl – For melting butter. Either stovetop or microwave method works.
- Whisk – For mixing ingredients smoothly. A sturdy whisk helps incorporate everything evenly.
- Rubber spatula – For folding in flour and scraping down bowl sides to ensure everything is mixed.
- Measuring cups and spoons – Accurate measurements are important in baking for consistent results.
- Toothpick or cake tester – For checking doneness. Brownies should have a few moist crumbs attached when you insert it in the center.
- Wire cooling rack – Allows air circulation under the pan for even cooling.
- Sharp knife – For cutting clean brownie squares. Wipe the blade between cuts for neat edges.
PrintThe Ultimate Fudgy Brownies Recipe – Rich, Chewy & Irresistible!

The ultimate fudgy brownies with a crackly top and intensely chocolatey center. Made from scratch in one bowl with simple ingredients, these homemade brownies are rich, chewy, and absolutely irresistible. Perfect for chocolate lovers.
- Prep Time: 10 minutes
- Cook Time: 25-30 minutes
- Total Time: 35-40 minutes
- Yield: 16 brownies (from 8x8-inch pan) or 20 brownies (from 9x9-inch pan) 1x
- Category: Dessert
- Method: Baking
- Cuisine: American
- Diet: Vegetarian
Ingredients
Scale- ½ cup (115g) unsalted butter
- 1 cup (200g) granulated sugar
- 2 large eggs, room temperature
- 1 teaspoon pure vanilla extract
- ⅓ cup (40g) unsweetened cocoa powder
- ½ cup (65g) all-purpose flour
- ¼ teaspoon salt
- ¼ teaspoon baking powder (optional, for slightly lifted texture)
- ½ cup (90g) chocolate chips (optional, for extra chocolatey brownies)
Instructions
- Preheat and prepare pan: Preheat your oven to 350°F (175°C). Line an 8×8-inch baking pan with parchment paper, leaving overhang on the sides for easy removal. Lightly grease the parchment paper with butter or cooking spray.
- Melt the butter: In a medium saucepan over low heat (or in a microwave-safe bowl in 30-second intervals), melt the butter completely. Remove from heat and let it cool slightly for about 2-3 minutes so it won’t cook the eggs when combined.
- Add sugar: Add the granulated sugar to the melted butter and whisk vigorously for about 1 minute until well combined and slightly lighter in color. This helps create that signature shiny top on your brownies.
- Add eggs and vanilla: Add the eggs one at a time, whisking well after each addition until the mixture is smooth and glossy. Stir in the vanilla extract. The mixture should look thick and emulsified at this point.
- Add cocoa powder: Sift the cocoa powder into the bowl (or just add it carefully to avoid lumps), then whisk until fully incorporated and no streaks remain. The batter will be thick and deeply chocolatey in color.
- Add dry ingredients: Add the flour, salt, and baking powder (if using) to the chocolate mixture. Gently fold with a rubber spatula just until no flour streaks remain. Do not overmix—this is crucial for fudgy brownies! A few lumps are okay.
- Add chocolate chips: If using chocolate chips, gently fold them into the batter with your spatula, reserving a small handful to sprinkle on top if desired.
- Transfer to pan: Pour the brownie batter into your prepared pan and spread it evenly with the spatula, smoothing the top. If you reserved chocolate chips, sprinkle them over the top now.
- Bake: Bake for 25-30 minutes, until the edges are set and the top has a shiny, crackly appearance. A toothpick inserted in the center should come out with a few moist crumbs attached (not wet batter, but not completely clean either). Don’t overbake or the brownies will be dry!
- Cool completely: Remove the pan from the oven and place it on a wire rack. Let the brownies cool completely in the pan, at least 1-2 hours. This cooling time is essential for the fudgy texture to set properly.
- Cut and serve: Once completely cooled, use the parchment paper overhang to lift the brownies out of the pan. Place on a cutting board and cut into 16 squares using a sharp knife. Wipe the knife clean between cuts for neat edges. Serve and enjoy!
Notes
- For extra fudgy brownies: Reduce flour to ⅓ cup (45g) and bake for only 23-25 minutes.
- For cake-like brownies: Increase flour to ¾ cup (95g) and add an extra egg.
- Doneness test: The toothpick test is crucial—you want moist crumbs, not wet batter or completely clean toothpick.
- Pan size matters: Using a larger pan (9×9) will make thinner brownies that bake faster; using a smaller pan makes thicker brownies that need longer baking time.
- Don’t skip cooling: Brownies continue to set as they cool and are much easier to cut when completely cooled.
- Cutting tip: For super clean cuts, refrigerate the brownies for 30 minutes before cutting, and use a hot knife (dipped in hot water and wiped dry).
Nutrition
- Serving Size: 1 brownie (based on 16 servings)
- Calories: 145
- Sugar: 15g
- Sodium: 55mg
- Fat: 7g
- Saturated Fat: 4g
- Unsaturated Fat: 2.5g
- Trans Fat: 0g
- Carbohydrates: 20g
- Fiber: 1g
- Protein: 2g
- Cholesterol: 35mg
Note: Nutrition information is approximate and will vary based on exact ingredients used and modifications made.
Tips & Variations
The beauty of brownies is how easily they adapt to your preferences! Here are some delicious ways to customize this recipe:
Nut Lover’s Brownies: Fold in ½ cup of chopped walnuts, pecans, or hazelnuts into the batter before baking. Toast the nuts first for deeper flavor. You can also press whole nuts into the top before baking for a decorative touch.
Peanut Butter Swirl: Drop spoonfuls of creamy peanut butter on top of the batter, then use a knife to swirl it through. The marbled effect looks beautiful and tastes incredible!
Mint Chocolate Brownies: Add ½ teaspoon peppermint extract along with the vanilla, or press an Andes mint into each brownie square immediately after removing from the oven.
Salted Caramel Brownies: Drizzle caramel sauce over the warm brownies and sprinkle with flaky sea salt for a sophisticated sweet-salty combination.
Espresso Brownies: Add 1 tablespoon of instant espresso powder to intensify the chocolate flavor without making them taste like coffee.
White Chocolate Raspberry: Swirl in 2 tablespoons of raspberry jam and fold in white chocolate chips instead of regular chocolate chips.
S’mores Brownies: Press mini marshmallows and graham cracker pieces into the batter before baking, or add them during the last 5 minutes of baking for a gooey topping.
Cream Cheese Swirl: Beat together 4 oz softened cream cheese with 2 tablespoons sugar and 1 egg. Drop spoonfuls on the brownie batter and swirl with a knife.
Healthier Version: Substitute half the butter with unsweetened applesauce, reduce sugar by ¼ cup, and use whole wheat flour. They’ll be slightly less fudgy but still delicious!
Pro Chef Tips
Take your brownies from good to absolutely extraordinary with these professional baking secrets:
Don’t Overmix the Batter: Once you add flour, mix just until combined. Overmixing develops gluten, which makes brownies tough and cakey instead of fudgy and tender. Fold gently with a spatula rather than beating vigorously.
Use Room Temperature Eggs: Cold eggs can cause the butter to seize up and create a grainy texture. Let eggs sit at room temperature for 30 minutes before using, or place them in warm water for 5 minutes.
Let Melted Butter Cool Slightly: If butter is too hot when you add eggs, it will cook them and create scrambled egg bits in your brownies. Wait until it’s warm but not hot to the touch.
Line Your Pan Properly: Use parchment paper with overhang on two opposite sides. This creates “handles” to lift the entire brownie slab out for easy cutting and serving. Grease the parchment lightly to prevent sticking.
The Shiny Top Secret: Vigorous whisking of sugar and butter, followed by whisking eggs until glossy, creates that coveted shiny, crackly top. Don’t skip the whisking step!
Master the Doneness Test: Brownies continue cooking from residual heat after removal from oven. Pull them when a toothpick has moist crumbs attached—this ensures fudgy centers. If the toothpick comes out clean, they’re already overdone.
Cool Completely Before Cutting: This is the hardest tip to follow but the most important! Warm brownies are gooey and will tear when cut. Fully cooled brownies cut into perfect squares. For ultra-clean cuts, refrigerate for 30 minutes first.
Use Quality Cocoa: Premium cocoa powder makes a noticeable difference in flavor. Dutch-processed cocoa creates a darker, more sophisticated brownie, while natural cocoa gives a more intense chocolate punch.
Common Mistakes to Avoid
Even experienced bakers can run into brownie problems. Here’s how to avoid the most common issues:
1. Overbaking = Dry, Cakey Brownies
The number one mistake! Brownies should be slightly underdone in the center when you remove them from the oven. They firm up as they cool. Set a timer for the minimum baking time and check early. Remember: you can always bake longer, but you can’t un-bake an overdone brownie.2. Skipping the Cooling Time
I know it’s tempting to dive in while they’re still warm, but cutting hot brownies results in a crumbly mess. The fudgy texture needs time to set. Plan ahead and bake brownies at least 2 hours before you need them, or even the night before—they taste better the next day anyway!3. Using the Wrong Pan Size
Pan size dramatically affects baking time and texture. A larger pan means thinner brownies that bake faster and may dry out. A smaller pan means thicker brownies that need more baking time. Stick to the recommended 8×8 or 9×9 size, or adjust baking time accordingly if using a different size.4. Not Greasing the Parchment Paper
Even parchment paper needs a light coating of butter or cooking spray, especially on the bottom. This prevents sticking and ensures your brownies release cleanly. It only takes an extra 10 seconds but saves you from frustration later.5. Measuring Flour Incorrectly
Too much flour is the fastest route to dry, cakey brownies. Always spoon flour into your measuring cup and level it off with a knife—never scoop directly from the bag, which packs in too much flour. Better yet, use a kitchen scale and measure by weight for perfect results every time.6. Opening the Oven Door Too Often
Every time you open the oven, the temperature drops significantly. This causes uneven baking and can prevent that beautiful crackly top from forming. Resist peeking until the minimum baking time is up.Storage & Meal Prep
Room Temperature Storage:
Store completely cooled brownies in an airtight container at room temperature for up to 4 days. Layer parchment paper between stacked brownies to prevent sticking. They actually improve in flavor and texture after a day as the chocolate flavor deepens and the texture becomes even more fudgy.Refrigerator Storage:
For longer storage, refrigerate brownies in an airtight container for up to 1 week. Let them come to room temperature before serving for best texture, or enjoy them cold for a fudgier, denser experience (some people prefer them this way!). Refrigerated brownies cut more cleanly if you prefer neat edges.Reheating Tips:
To recreate that fresh-from-the-oven experience, microwave individual brownies for 10-15 seconds until slightly warm. You can also wrap them in foil and warm in a 300°F oven for 5-7 minutes. Serve with vanilla ice cream for an amazing warm brownie sundae!Shelf Life:
Brownies stay fresh longer than most baked goods due to their high butter and sugar content, which are natural preservatives. However, if they develop an off smell or show any signs of mold, discard them immediately.Make-Ahead & Freezer Notes
Make-Ahead Instructions:
Brownies are perfect for advance preparation! In fact, they often taste even better the next day as the flavors meld and develop. You can bake them up to 3 days ahead, let them cool completely, then store covered at room temperature. This makes them ideal for parties, potlucks, or any situation where you need to prep desserts in advance.Freezing Baked Brownies:
Brownies freeze beautifully for up to 3 months! Let them cool completely, then cut into squares. Wrap each brownie individually in plastic wrap, then place them all in a freezer-safe container or zip-top bag. This way you can grab individual portions as needed. To thaw, leave at room temperature for 1-2 hours, or microwave for 20-30 seconds for a warm treat.Freezing the Whole Pan:
Alternatively, you can freeze the entire uncut brownie slab. Once completely cooled, wrap the whole thing tightly in plastic wrap, then in aluminum foil. Freeze for up to 3 months. Thaw in the refrigerator overnight, then bring to room temperature before cutting and serving.Freezing Unbaked Batter:
You can also freeze the batter! Prepare the batter as directed, pour into your lined pan, cover tightly with plastic wrap and foil, and freeze for up to 2 months. When ready to bake, do not thaw—bake directly from frozen, adding an extra 10-15 minutes to the baking time. This is perfect for those “emergency dessert needed NOW” moments!Best Reheating Method:
For frozen brownies, thaw at room temperature, then warm individual pieces in the microwave for 10-15 seconds. For a special treat, warm them in a 300°F oven for 5-7 minutes and serve with vanilla ice cream for an irresistible brownie à la mode.Serving Suggestions
Brownies are delicious on their own, but here are some wonderful ways to serve them for different occasions:
Classic Pairings:
Serve warm brownies with a scoop of vanilla ice cream for the ultimate brownie sundae. The contrast between cold ice cream and warm brownie is absolutely heavenly. Add hot fudge sauce and whipped cream for an extra decadent dessert.Coffee & Tea:
Brownies pair beautifully with hot beverages! Serve them alongside freshly brewed coffee, cappuccino, or espresso for an afternoon pick-me-up. They’re also lovely with hot chocolate for a double-chocolate treat, or with chai tea for a spiced complement to the rich chocolate.Dessert Platter:
Cut brownies into small bite-sized pieces and arrange them on a dessert platter with fresh berries, chocolate-covered strawberries, and other bite-sized treats for parties or gatherings. Add some fresh mint leaves for a pop of color.Fancy Presentation:
Warm a brownie and place it in a shallow bowl. Top with a scoop of ice cream, drizzle with chocolate or caramel sauce, add a dollop of whipped cream, and garnish with fresh berries or a mint sprig. This restaurant-style presentation elevates brownies from casual to elegant.Beverage Pairings:
Serve with cold milk (the classic choice!), chocolate milk for kids, or try pairing with red wine like Port or Zinfandel for adult gatherings. The rich chocolate also pairs surprisingly well with stout beer for adventurous palates.Make It a Trifle:
Layer crumbled brownies with whipped cream, chocolate pudding, and berries in parfait glasses for an impressive trifle dessert that’s perfect for dinner parties.FAQs Section
Q: Why are my brownies cakey instead of fudgy?
A: This usually happens from using too much flour, overmixing the batter, or overbaking. Make sure to measure flour correctly (spoon and level, don’t scoop), mix just until combined after adding flour, and pull brownies from the oven when a toothpick has moist crumbs attached. Also check that you’re using the correct pan size—a pan that’s too large will result in thinner, cakier brownies.Q: Can I make these brownies without eggs?
A: Yes! For egg-free brownies, substitute each egg with one of the following: ¼ cup unsweetened applesauce, 1 tablespoon ground flaxseed mixed with 3 tablespoons water (let sit 5 minutes), or a commercial egg replacer. The texture will be slightly different but still delicious. The flax egg option tends to give the fudgiest result.Q: How do I know when brownies are done?
A: Insert a toothpick or cake tester into the center of the brownies. For fudgy brownies, it should come out with a few moist crumbs attached—not wet batter, but not completely clean either. The edges should be set and pulling slightly away from the pan. Remember that brownies continue to cook from residual heat after you remove them from the oven, so slightly underdone is perfect.Q: Can I use melted chocolate instead of cocoa powder?
A: Absolutely! Replace the cocoa powder with 2-3 ounces of melted unsweetened chocolate or semi-sweet chocolate. Melt it with the butter, then proceed with the recipe. Using real chocolate creates an even richer, more intense chocolate flavor. Just note that using sweetened chocolate will make the brownies sweeter, so you may want to reduce the sugar by 2 tablespoons.Q: Why didn’t my brownies get that shiny, crackly top?
A: The shiny top comes from properly dissolving the sugar and vigorously whisking the eggs. Make sure to whisk the sugar and butter mixture well, then whisk each egg thoroughly until the mixture is glossy and emulsified before adding cocoa powder. Also, using the right oven temperature is important—too low and they won’t develop that characteristic sheen.Q: Can I double this recipe?
A: Yes! Double all ingredients and bake in a 9×13-inch pan. The baking time will increase to about 35-40 minutes. Check for doneness with the toothpick test. This is perfect for feeding a crowd or making brownies for bake sales.Q: My brownies stuck to the pan. How do I prevent this?
A: Always line your pan with parchment paper and lightly grease the parchment. The grease on the parchment is crucial—don’t skip it! Also, make sure the brownies are completely cooled before attempting to remove them from the pan. If they do stick, try placing the pan bottom in warm water for a few seconds to loosen them, then carefully remove with a knife around the edges.Q: Can I make these gluten-free?
A: Yes! Simply substitute the all-purpose flour with a 1:1 gluten-free flour blend (like Bob’s Red Mill or King Arthur). Make sure it contains xanthan gum for best texture. The brownies will be just as fudgy and delicious. Some people also have success using almond flour, though the texture will be denser and more fragile.Conclusion
There you have it—the ultimate fudgy brownies recipe that’s about to become your most-requested dessert! These rich, chocolatey squares are proof that the best things in life don’t have to be complicated. With just one bowl, simple ingredients, and about 40 minutes, you can create bakery-quality brownies that’ll have everyone asking for your secret.
Whether you’re baking for a special celebration, treating yourself after a long day, or creating something sweet to share with loved ones, these brownies deliver pure chocolate bliss in every bite. That perfect combination of crispy edges, crackly top, and impossibly fudgy center is simply irresistible.
Now it’s your turn to experience brownie magic! Preheat that oven, pull out your mixing bowl, and get ready to bake the best brownies of your life. Don’t forget to let them cool completely before cutting (I know it’s hard, but I promise it’s worth the wait!).
I’d love to hear how your brownies turned out! Drop a comment below with your results, share any creative variations you tried, or let me know what you served them with. And if you love this recipe as much as I do, please save it to your Pinterest boards so you can find it easily next time that chocolate craving hits. Tag me in your brownie photos on social media—I absolutely love seeing your kitchen creations!
Happy baking, friends! May your brownies be forever fudgy and your chocolate cravings eternally satisfied! 🍫✨