The Ultimate Chocolate Cake Recipe – Rich, Moist & Perfectly Decadent

There’s something truly magical about a slice of homemade chocolate cake. This isn’t just any chocolate cake—it’s the kind that makes birthdays feel extra special, turns ordinary Tuesdays into celebrations, and has your family asking for seconds before they’ve finished their first slice. With its incredibly moist crumb, deep chocolate flavor, and silky smooth frosting, this chocolate cake recipe delivers bakery-quality results right in your own kitchen.
Whether you’re celebrating a milestone birthday, hosting a dinner party, or simply treating yourself because you deserve it, this chocolate cake is your answer. It’s the recipe I turn to time and time again because it never fails to impress. The best part? It’s surprisingly straightforward to make, even if you’re not an experienced baker. You don’t need fancy equipment or hard-to-find ingredients—just a few pantry staples, some quality cocoa powder, and about an hour of your time.
This cake works beautifully for any occasion: birthday parties, anniversaries, potlucks, bake sales, or even as a “just because” treat for your loved ones. It’s equally at home on an elegant dessert table as it is being enjoyed straight from the pan with a glass of cold milk at the kitchen counter.
History / Background
Chocolate cake has a fascinating history that spans continents and centuries. While chocolate itself has been consumed for thousands of years by ancient Mesoamerican civilizations, chocolate cake as we know it didn’t emerge until the 18th and 19th centuries when chocolate became more widely available in Europe and America.
The first chocolate cakes were actually more like chocolate bread—dense, not particularly sweet, and quite different from the fluffy, moist cakes we enjoy today. The real transformation happened in the 1800s when baking powder and baking soda were invented, allowing cakes to rise and develop that tender crumb we associate with modern cake recipes.
The classic American chocolate cake truly came into its own during the early 20th century. The invention of Dutch-processed cocoa by Coenraad Johannes van Houten made chocolate more affordable and easier to work with in baking. By the 1930s and 1940s, chocolate cake recipes began appearing in cookbooks across America, often featuring innovative techniques like adding hot coffee to intensify the chocolate flavor—a trick that’s still used today.
The “devil’s food cake” variation became particularly popular in the United States, named for its sinfully rich, dark chocolate flavor. Throughout the decades, chocolate cake has evolved from a special-occasion luxury to an American classic that appears at celebrations nationwide. Today, it’s one of the most searched-for recipes online, and variations exist in virtually every culture that has embraced chocolate.
This particular recipe draws inspiration from traditional American chocolate cake but incorporates modern baking techniques that guarantee consistent, foolproof results every single time.
Why You’ll Love This Recipe
This chocolate cake recipe has become a staple in my kitchen, and once you try it, I promise it’ll become one of yours too. What makes it so special is the perfect balance of simplicity and show-stopping results.
The texture is what really sets this cake apart—it’s incredibly moist without being dense, with a tender crumb that practically melts on your tongue. The chocolate flavor is deep and rich without being overwhelming, making it appealing to both serious chocolate lovers and those who prefer a more balanced sweetness. And let’s talk about that frosting—smooth, creamy, and chocolatey enough to complement the cake without stealing the show.
Here’s why this recipe is a winner:
- Foolproof for beginners: The instructions are clear and detailed, with tips to help you avoid common baking mistakes
- Uses everyday ingredients: No specialty items required—just basic pantry staples you probably already have
- Consistently moist: The addition of hot coffee (don’t worry, you won’t taste it) keeps the cake incredibly tender for days
- Perfect chocolate flavor: Not too sweet, not too bitter—just rich, balanced chocolate goodness
- Versatile for any occasion: Works beautifully as a layer cake, sheet cake, or even cupcakes
- Make-ahead friendly: Can be baked in advance and actually tastes better the next day
- Budget-friendly: Costs a fraction of what you’d pay at a bakery for similar quality
- Crowd-pleaser: I’ve never met anyone who doesn’t love this cake—it appeals to all ages
- Customizable: Easy to adapt with different frostings, fillings, or flavor variations
Ingredient Notes
Understanding your ingredients is the key to baking success. Let me walk you through what makes each component essential to this chocolate cake recipe.
All-Purpose Flour: The foundation of our cake’s structure. I recommend measuring by weight if possible, or using the spoon-and-level method to avoid packing too much flour into your measuring cup. You can substitute cake flour for an even more tender crumb—use 2 cups plus 2 tablespoons of cake flour in place of 1¾ cups all-purpose flour.
Granulated Sugar: Provides sweetness, yes, but also helps create that tender texture and keeps the cake moist. Don’t reduce the sugar significantly or you’ll affect the cake’s structure. You can substitute up to half with brown sugar for a deeper, more caramel-like flavor.
Dutch-Processed Cocoa Powder: This is crucial for deep chocolate flavor. Dutch-processed cocoa has been treated to neutralize its acidity, resulting in a darker color and mellower flavor. If you only have natural cocoa powder, the cake will still work, but the color will be lighter and the flavor slightly more acidic.
Eggs: These provide structure, moisture, and richness. Use large eggs at room temperature for the best results—they incorporate more easily into the batter. If your eggs are cold, place them in warm water for 5-10 minutes before using.
Buttermilk: The secret ingredient for moisture and tang. The acidity reacts with the baking soda to create lift and tenderness. No buttermilk? Make your own by adding 1 tablespoon of white vinegar or lemon juice to 1 cup of regular milk and letting it sit for 5 minutes.
Vegetable Oil: Keeps the cake incredibly moist and tender. Unlike butter, oil stays liquid at room temperature, which means your cake won’t dry out as quickly. You can use canola oil, melted coconut oil, or even melted butter if you prefer.
Hot Coffee: This is the magic ingredient that intensifies the chocolate flavor without making the cake taste like coffee. The hot liquid also helps bloom the cocoa powder, bringing out its full flavor potential. You can substitute hot water, but I strongly encourage trying it with coffee at least once—the difference is remarkable.
Baking Soda & Baking Powder: These leavening agents work together to create the perfect rise and tender crumb. Make sure yours are fresh (less than 6 months old) for optimal results.
Salt & Vanilla Extract: These enhance all the other flavors and add depth to the chocolate. Don’t skip the salt—it’s essential for balancing the sweetness.
Equipment Needed
Having the right tools makes baking so much easier and more enjoyable. Here’s what you’ll need for this chocolate cake:
- Two 9-inch round cake pans (or one 9×13-inch pan for a sheet cake)
- Parchment paper for lining the pans
- Large mixing bowl for dry ingredients
- Medium mixing bowl for wet ingredients
- Whisk for combining ingredients
- Rubber spatula or wooden spoon for stirring
- Measuring cups and spoons (or kitchen scale for more accuracy)
- Electric mixer (hand mixer or stand mixer) for the frosting
- Cooling rack to prevent soggy bottoms
- Offset spatula for frosting (optional but helpful)
- Toothpick or cake tester to check doneness
- Sifter or fine-mesh strainer for the cocoa powder (optional but recommended)
The Ultimate Chocolate Cake Recipe – Rich, Moist & Perfectly Decadent
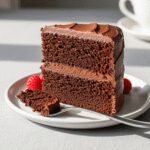
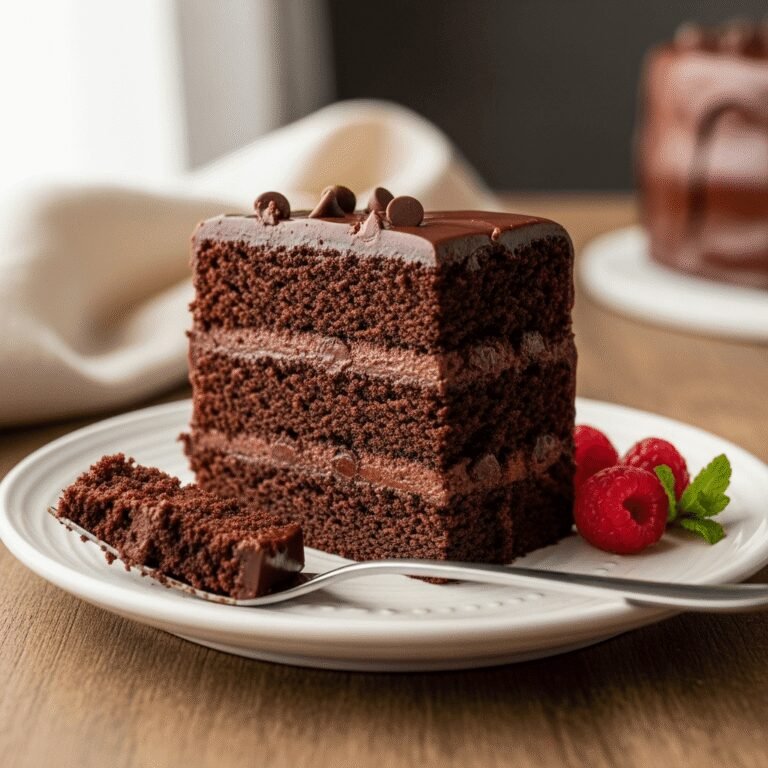
This is the ultimate homemade chocolate cake recipe—incredibly moist, rich, and deeply chocolatey with a tender crumb that melts in your mouth. Topped with silky chocolate buttercream frosting, this classic American dessert is perfect for birthdays, celebrations, or any time you need a show-stopping sweet treat. Simple enough for beginners yet impressive enough for special occasions.
- Prep Time: 20 minutes
- Cook Time: 30-35 minutes
- Total Time: 50-55 minutes (plus cooling time)
- Yield: 12 servings 1x
- Category: Dessert
- Method: Baking
- Cuisine: American
- Diet: Vegetarian
Ingredients
For the Chocolate Cake:
- 1¾ cups (220g) all-purpose flour
- 2 cups (400g) granulated sugar
- ¾ cup (75g) Dutch-processed cocoa powder
- 2 teaspoons baking soda
- 1 teaspoon baking powder
- 1 teaspoon salt
- 2 large eggs, at room temperature
- 1 cup (240ml) buttermilk, at room temperature
- 1 cup (240ml) vegetable oil
- 2 teaspoons vanilla extract
- 1 cup (240ml) freshly brewed hot coffee (or hot water)
For the Chocolate Buttercream Frosting:
- 1 cup (2 sticks/226g) unsalted butter, softened
- 3½ cups (440g) powdered sugar
- ½ cup (50g) Dutch-processed cocoa powder
- ½ teaspoon salt
- 2 teaspoons vanilla extract
- 3-4 tablespoons heavy cream or whole milk
Instructions
For the Cake:
- Preheat and prep: Preheat your oven to 350°F (175°C). Grease two 9-inch round cake pans with butter or non-stick spray, then line the bottoms with parchment paper circles. Grease the parchment paper as well. This ensures your cakes will release perfectly.
- Mix dry ingredients: In a large bowl, whisk together the flour, sugar, cocoa powder, baking soda, baking powder, and salt until well combined and no lumps remain. Sifting the cocoa powder first helps prevent lumps in your batter.
- Combine wet ingredients: In a medium bowl, whisk together the eggs, buttermilk, oil, and vanilla extract until smooth and well combined.
- Combine wet and dry: Pour the wet ingredients into the dry ingredients and stir with a rubber spatula or wooden spoon until just combined. Don’t overmix—some small lumps are okay.
- Add coffee: Carefully stir in the hot coffee. The batter will be very thin—this is exactly what you want! The thin batter creates an incredibly moist cake.
- Bake: Divide the batter evenly between the two prepared pans. Bake for 30-35 minutes, or until a toothpick inserted into the center comes out with just a few moist crumbs (not wet batter). The tops should spring back when lightly touched.
- Cool: Remove from the oven and let the cakes cool in the pans for 10 minutes. Then carefully turn them out onto a wire cooling rack, remove the parchment paper, and let them cool completely before frosting (at least 1 hour).
For the Frosting:
- Beat butter: In a large bowl using an electric mixer, beat the softened butter on medium speed for 2-3 minutes until light and fluffy.
- Add dry ingredients: Sift in the powdered sugar and cocoa powder. Add the salt. Start mixing on low speed to avoid a powdered sugar cloud, then increase to medium speed.
- Add vanilla and cream: Add the vanilla extract and 3 tablespoons of cream. Beat on medium-high speed for 3-4 minutes until light and fluffy. If the frosting seems too thick, add the remaining tablespoon of cream.
- Assemble: Place one cake layer on your serving plate. Spread about 1 cup of frosting evenly over the top. Place the second layer on top and use the remaining frosting to cover the top and sides of the cake. Use an offset spatula for smooth, professional-looking results.
Notes
- Room temperature ingredients: Make sure your eggs and buttermilk are at room temperature for the smoothest batter and best rise.
- Don’t skip the coffee: It intensifies the chocolate flavor without making the cake taste like coffee. Hot water works, but coffee is better.
- Thin batter is normal: The batter will seem very thin and liquid—this is correct and creates the moist texture.
- Cupcake option: This recipe makes about 24 cupcakes. Bake at 350°F for 18-22 minutes.
- Sheet cake option: Bake in a greased 9×13-inch pan for 35-40 minutes.
- Cooling is crucial: Make absolutely sure the cakes are completely cool before frosting, or the frosting will melt.
Nutrition
- Serving Size: 1 slice (1/12 of cake)
- Calories: 562
- Sugar: 58g
- Sodium: 385g
- Fat: 30g
- Saturated Fat: 11g
- Unsaturated Fat: 17g
- Trans Fat: 0g
- Carbohydrates: 71g
- Fiber: 3g
- Protein: 5g
- Cholesterol: 67mg
Nutrition information is approximate and calculated per serving including frosting.
Tips & Variations
One of the best things about this chocolate cake recipe is how adaptable it is. Here are some ways to customize it to your preferences:
Flavor Variations:
- Mocha Cake: Add 2 tablespoons of instant espresso powder to the batter for a sophisticated coffee-chocolate flavor
- Mint Chocolate: Add ½ teaspoon peppermint extract to the batter and frosting, and top with crushed Andes mints
- Mexican Chocolate: Add 1 teaspoon cinnamon and ¼ teaspoon cayenne pepper to the batter for a spicy kick
- Orange Chocolate: Add 2 tablespoons orange zest to the batter and 1 teaspoon orange extract to the frosting
Frosting Options:
- Cream cheese frosting for a tangy contrast
- White chocolate buttercream for visual appeal
- Chocolate ganache for an ultra-rich finish
- Whipped cream frosting for a lighter option
Dietary Modifications:
- Gluten-Free: Substitute with a 1:1 gluten-free baking flour blend
- Dairy-Free: Use non-dairy milk with vinegar instead of buttermilk, and coconut oil instead of butter
- Lower Sugar: You can reduce the sugar in the cake by up to ¼ cup, though the texture will be slightly different
Pro Chef Tips
These professional techniques will take your chocolate cake from good to absolutely phenomenal:
Bloom your cocoa powder: When you add the hot coffee to the batter, you’re actually “blooming” the cocoa powder, which unlocks deeper, more complex chocolate flavors that wouldn’t develop with cold liquid.
Weigh your flour: For the most consistent results, weigh your flour on a kitchen scale (220g for this recipe). Too much flour is one of the most common reasons cakes turn out dry.
Use cake strips: For perfectly level cake layers, wrap your pans with wet cake strips or damp kitchen towels before baking. This prevents the edges from baking faster than the center, which causes doming.
Don’t overmix: Once you add the wet ingredients to the dry, mix just until combined. Overmixing develops gluten, which makes cakes tough and chewy instead of tender.
Test for doneness early: Start checking your cake at 28 minutes. Ovenbaking is the enemy of moisture, and every oven is slightly different.
Crumb coat first: For a beautifully frosted cake, apply a thin layer of frosting all over the cake first (the crumb coat), refrigerate for 20 minutes, then apply the final layer. This traps any loose crumbs and gives you a clean, professional finish.
Room temperature frosting: If your frosting is too firm to spread smoothly, microwave it for just 5-10 seconds and stir—it’ll become much more spreadable.
Common Mistakes to Avoid
Even simple recipes can go wrong if you’re not careful. Here are the pitfalls to watch out for:
Using cold ingredients: Cold eggs and buttermilk don’t incorporate as smoothly into the batter, which can result in an uneven texture. Always let your refrigerated ingredients sit at room temperature for 30-60 minutes before baking.
Overmixing the batter: Stirring too vigorously or for too long after adding the flour develops gluten strands, resulting in a tough, chewy cake instead of a tender one. Mix just until you can’t see any more dry flour streaks.
Mismeasuring flour: Scooping your measuring cup directly into the flour bag compacts it, giving you far more flour than the recipe intends. This makes cakes dry and dense. Always spoon flour into your measuring cup and level it off, or better yet, use a kitchen scale.
Skipping the parchment paper: Even in a well-greased pan, chocolate cakes can stick stubbornly. That circle of parchment paper is your insurance policy for cakes that release cleanly every time.
Frosting a warm cake: This is tempting when you’re excited to dig in, but warm cake will make your frosting melt and slide right off. Patience pays off—wait until the cakes are completely cool to the touch.
Opening the oven door too early: Resist the urge to peek! Opening the oven before the cake is set (before the 25-minute mark) can cause it to sink in the middle as the temperature drops suddenly.
Not leveling your layers: If your cakes dome in the middle, use a serrated knife or cake leveler to trim them flat before stacking. This prevents a lopsided cake and makes frosting much easier.
Storage & Meal Prep
Proper storage keeps your chocolate cake tasting fresh and delicious for days.
Room Temperature Storage: Unfrosted cake layers can be wrapped tightly in plastic wrap and stored at room temperature for up to 2 days. A fully frosted cake should be kept under a cake dome or covered with plastic wrap (carefully, so it doesn’t disturb the frosting) and will stay fresh at room temperature for 3-4 days.
Refrigerator Storage: If your kitchen is very warm or humid, you can refrigerate the frosted cake. Cover it well to prevent it from absorbing other food odors. Buttercream frosting can firm up in the fridge, so let the cake sit at room temperature for 30-60 minutes before serving for the best texture.
Reheating: Individual slices can be microwaved for 10-15 seconds to warm slightly, which makes them extra tender and brings out the chocolate flavor even more. Don’t overheat, or the frosting will melt.
Shelf Life: Thanks to the oil and buttermilk, this cake stays moist for several days. Properly stored, it’s at its absolute best on day 2 and remains delicious through day 4 or 5.
Make-Ahead & Freezer Notes
This cake is fantastic for preparing in advance, making your party planning so much easier.
Baking Ahead: You can bake the cake layers up to 2 days in advance. Let them cool completely, wrap them tightly in plastic wrap (two layers is best), and store at room temperature. They’ll actually be easier to frost when they’ve had time to settle.
Freezing Unfrosted Cake Layers: For longer storage, wrap cooled cake layers in plastic wrap, then aluminum foil, and freeze for up to 3 months. Thaw completely at room temperature (still wrapped) for several hours or overnight before frosting. The texture will be just as perfect as freshly baked.
Freezing Frosted Cake: Yes, you can freeze a fully frosted cake! Place it in the freezer unwrapped for 1 hour to firm up the frosting, then wrap carefully in plastic wrap and foil. Freeze for up to 2 months. Thaw in the refrigerator overnight, then bring to room temperature before serving.
Make-Ahead Frosting: Buttercream frosting can be made up to 1 week ahead and refrigerated in an airtight container, or frozen for up to 3 months. Before using, bring it to room temperature and beat it with an electric mixer for a minute or two to restore its fluffy texture.
Best Reheating Method: For frozen cake, always thaw in the refrigerator first (6-8 hours), then let it come to room temperature. Individual frozen slices can be thawed at room temperature in about 1 hour.
Serving Suggestions
This chocolate cake is spectacular on its own, but here are some wonderful ways to serve it:
Classic Pairings:
- A tall glass of cold whole milk (classic for a reason!)
- Fresh brewed coffee or espresso
- A scoop of vanilla ice cream
- Sweetened whipped cream
- Fresh raspberries or strawberries
Fancy Presentations:
- Drizzle individual slices with warm chocolate or caramel sauce
- Dust with powdered sugar just before serving
- Top with chocolate shavings or curls
- Add fresh mint leaves for a pop of color
- Serve with a berry compote on the side
For Parties:
- Vanilla bean ice cream alongside each slice
- Coffee or dessert wine
- Fresh fruit salad for a lighter accompaniment
- Chocolate-dipped strawberries as a garnish
Kid-Friendly Additions:
- Colorful sprinkles on top
- Mini chocolate chips
- Crushed Oreos
- Gummy bears or candy
FAQs Section
Can I make this as cupcakes instead of a layer cake?
Absolutely! This recipe makes about 24 cupcakes. Fill cupcake liners two-thirds full and bake at 350°F for 18-22 minutes. Start checking at 18 minutes with a toothpick—they’re done when it comes out with just a few moist crumbs.
Why is coffee in a chocolate cake recipe?
The coffee enhances and deepens the chocolate flavor without making the cake taste like coffee. The hot liquid also “blooms” the cocoa powder, bringing out more complex flavors. If you’re very sensitive to caffeine, you can use hot water instead, but the chocolate flavor won’t be quite as rich.
Can I use natural cocoa powder instead of Dutch-processed?
You can, but the results will be different. Natural cocoa powder is more acidic, so your cake will be lighter in color and have a slightly more acidic, fruitier chocolate flavor. The Dutch-processed version gives you that deep, dark, mellow chocolate taste that makes this cake special.
My cake turned out dry. What happened?
The most common cause is too much flour (from scooping directly from the bag) or overbaking. Make sure to measure flour correctly using the spoon-and-level method, and start checking for doneness at 30 minutes. Every oven is different, so your cake might be done before the recipe time.
How do I get my cake layers perfectly flat?
You have two options: use cake strips (wet fabric strips that wrap around the pans) to ensure even baking, or simply level the cooled cakes with a long serrated knife or cake leveler. I usually just trim mine—it’s quick and easy.
Can I halve this recipe?
Yes! Halve all the ingredients and bake in one 9-inch round pan or an 8×8-inch square pan for 30-35 minutes. You’ll have enough for a small single-layer cake, perfect for a small family.
The frosting is too thick/thin. How do I fix it?
If it’s too thick, add more cream one tablespoon at a time until you reach the desired consistency. If it’s too thin, add more powdered sugar (¼ cup at a time) or refrigerate for 10-15 minutes to firm up. Room temperature also affects frosting consistency—warmer rooms mean softer frosting.
Conclusion
There you have it—the ultimate chocolate cake recipe that’ll become your go-to for every celebration, big or small. I hope you can feel how much I love this recipe and how confident I am that it’ll become a favorite in your kitchen too. There’s something truly special about pulling a homemade cake from the oven, watching it cool, and then frosting it with your own two hands. It’s a labor of love that fills your home with the most incredible aroma and your heart with pride.
This isn’t just a recipe—it’s the cake you’ll make for your child’s first birthday, the one you’ll bring to neighborhood potlucks, the dessert that’ll make your coworkers ask for the recipe, and the treat that’ll comfort you on tough days. It’s reliable, delicious, and always impressive.
I’d love to hear how your chocolate cake turns out! Drop a comment below with your results, any fun variations you tried, or questions you might have. And if you love this recipe as much as I do, please share it on Pinterest so other home bakers can discover it too. There’s nothing better than spreading the joy of homemade cake!
Happy baking, my friend! 🎂