Perfect Rice Krispie Treats Recipe – Classic, Chewy & Irresistible
Is there anything more nostalgic and universally loved than a perfect Rice Krispie Treat? These iconic no-bake bars have been delighting kids and adults alike for generations with their irresistible combination of crispy cereal, gooey marshmallow, and buttery sweetness. This isn’t just any Rice Krispie Treats recipe—it’s the ultimate version that delivers perfectly chewy, not-too-hard, not-too-soft treats every single time.
What makes Rice Krispie Treats so special is their simplicity and versatility. With just three basic ingredients and about 10 minutes of active time, you can create a treat that’s perfect for absolutely any occasion. They’re the dessert that saves the day when you forgot about the bake sale, the snack that turns an ordinary afternoon into something special, and the treat that makes everyone smile, regardless of age.
These treats work beautifully for school parties, potlucks, birthday celebrations, holiday gatherings, movie nights, road trip snacks, care packages, or simply as an after-school treat. They’re easy enough for kids to help make (with supervision), impressive enough to bring to a party, and delicious enough that they disappear within minutes. Whether you’re cutting them into classic squares or using cookie cutters for fun shapes, Rice Krispie Treats are always a hit.
History / Background
Rice Krispie Treats have a fascinating origin story that’s deeply rooted in American culinary history. The recipe was created in 1939 by Mildred Day and Malitta Jensen, two home economists who worked in the Home Economics Department of the Kellogg Company in Battle Creek, Michigan. The treats were originally developed as a fundraising idea for a Camp Fire Girls group, and they were an instant sensation.
The beauty of the original recipe was its simplicity and accessibility during a challenging time in American history. Created just as the country was emerging from the Great Depression and heading toward World War II, Rice Krispie Treats required only three inexpensive, readily available ingredients: Rice Krispies cereal (which had been introduced by Kellogg’s in 1928), marshmallows, and butter. No baking was required, which saved on fuel costs and made them accessible to everyone.
The treats gained popularity rapidly through the 1940s and 1950s, appearing on cereal boxes and in magazines across America. Kellogg’s trademarked the recipe as “Rice Krispies Treats” (with an “ie” spelling), and it became one of the most recognized and beloved recipes in American home cooking. The recipe has remained virtually unchanged since its creation, a testament to its perfect simplicity.
What’s particularly interesting about Rice Krispie Treats is how they’ve become a cultural touchstone in America. They represent home baking at its most accessible—no special skills, equipment, or expensive ingredients required. Over the decades, countless variations have emerged, from chocolate-dipped versions to treats with added peanut butter, candy mix-ins, and elaborate decorations. Yet the classic version remains the most popular, proving that sometimes the simplest recipes are the best.
Today, Rice Krispie Treats are as popular as ever, with home bakers continuing to make them using the same basic method created over 80 years ago. They’ve appeared at millions of birthday parties, school events, and family gatherings, creating sweet memories for generation after generation.
Why You’ll Love This Recipe
This Rice Krispie Treats recipe has been my go-to for years, and it never fails to impress. What makes it truly special is achieving that perfect texture—chewy and gooey without being rock-hard or overly sticky. These treats are soft enough to bite through easily but sturdy enough to hold their shape beautifully.
The secret to perfect Rice Krispie Treats lies in the ratios and technique, which I’ve perfected through countless batches. This recipe creates treats that taste exactly like you remember from childhood (or maybe even better!), with that satisfying crispy-chewy texture and sweet, buttery marshmallow flavor that makes them absolutely irresistible.
Here’s why this recipe is a winner:
- Incredibly quick: Ready in just 15 minutes from start to finish—perfect for last-minute needs
- Only 3 ingredients: Butter, marshmallows, and Rice Krispies cereal—that’s it!
- No baking required: Great for hot summer days when you don’t want to turn on the oven
- Kid-friendly: Children love helping to make these (and eating them!)
- Foolproof technique: Clear instructions that guarantee perfect results every time
- Budget-friendly: Costs just a few dollars to make a whole pan
- Crowd-pleaser: Everyone from toddlers to grandparents loves these treats
- Endlessly customizable: Easy to adapt with different mix-ins, colors, and flavors
- Stays fresh: Keeps well for days, making them perfect for meal prep or gifting
- Allergen-aware options: Can be made gluten-free or dairy-free with simple substitutions
- Perfect texture: Chewy, gooey, and never rock-hard like store-bought versions
Ingredient Notes
With only three main ingredients, each one plays a crucial role in creating perfect Rice Krispie Treats. Let me break down what you need and why it matters.
Butter: Use real, unsalted butter for the best flavor and texture. Butter adds richness and helps prevent the treats from being overly sticky. Unsalted butter is preferred so you can control the sweetness, but salted butter works fine too—just know they’ll have a slightly savory edge. I don’t recommend using margarine, as it doesn’t provide the same rich flavor or proper texture. You’ll need 3 tablespoons (that’s about ⅓ of a stick).
Marshmallows: This is where the magic happens! You’ll need a 10-ounce bag of regular-sized marshmallows (about 40 marshmallows). Regular marshmallows work better than mini marshmallows because they melt more evenly and create a smoother consistency. Fresh marshmallows are important—old, hardened marshmallows won’t melt properly and will create tough, chewy treats. Stick with white marshmallows for the classic version, though colored or flavored marshmallows can add fun variations.
Rice Krispies Cereal: You’ll need 6 cups of Rice Krispies cereal, measured loosely (don’t pack them down). The original Kellogg’s Rice Krispies work best, but store brands work too. Make sure your cereal is fresh and crispy—stale cereal will result in treats that lack that signature crispy texture. If you need a gluten-free option, look for certified gluten-free crispy rice cereal.
Optional Add-Ins:
- Vanilla extract (½ teaspoon) adds wonderful depth to the flavor
- Salt (⅛ teaspoon) enhances all the other flavors
- These aren’t traditional, but they make a noticeable difference!
Substitution Options:
- Dairy-Free: Use vegan butter (like Earth Balance) and vegan marshmallows (Dandies brand works great)
- Gluten-Free: Use certified gluten-free crispy rice cereal
- Different Cereals: You can substitute other cereals like Cocoa Krispies, Fruity Pebbles, or Cheerios for fun variations
Equipment Needed
The simplicity of this recipe extends to the equipment—you probably have everything you need already!
- Large pot or Dutch oven (at least 4-quart capacity) for melting marshmallows
- 9×13-inch baking pan for pressing the treats (you can also use a 9×9-inch pan for thicker treats)
- Wooden spoon or heat-resistant spatula for stirring
- Measuring cups for accurately measuring cereal
- Butter or cooking spray for greasing the pan and spatula
- Parchment paper (optional but recommended) for easy removal and cleanup
- Sharp knife for cutting into squares
- Wax paper or plastic wrap for storing
Pro tip: Having a second pair of hands (especially small helping hands!) can make pressing the mixture into the pan easier and more fun!
PrintPerfect Rice Krispie Treats Recipe – Classic, Chewy & Irresistible
The ultimate Rice Krispie Treats recipe that delivers perfectly chewy, gooey, and delicious treats every single time. Made with just three simple ingredients in about 10 minutes, these classic no-bake treats are perfectly sweet, crispy, and nostalgic. They’re ideal for parties, snacks, or any time you need a quick and easy dessert that everyone will love. This foolproof recipe creates treats that stay soft and chewy, never hard or rock-like!
- Prep Time: 5 minutes
- Cook Time: 5 minutes
- Total Time: 10 minutes (plus 30 minutes cooling time)
- Yield: 12-16 servings 1x
- Category: Dessert, Snack
- Method: Stovetop (No-Bake)
- Cuisine: American
- Diet: Vegetarian
Ingredients
- 3 tablespoons unsalted butter
- 10 ounces (about 40) regular marshmallows, or 4 cups mini marshmallows
- 6 cups Rice Krispies cereal
- ½ teaspoon vanilla extract (optional, but recommended)
- ⅛ teaspoon salt (optional, but enhances flavor)
- Butter or cooking spray for greasing
Instructions
- Prep your pan: Line a 9×13-inch baking pan with parchment paper, leaving some overhang on the sides for easy removal. Alternatively, grease the pan generously with butter or cooking spray. Also grease a rubber spatula or wooden spoon—you’ll thank me later when the mixture doesn’t stick!
- Melt the butter: In a large pot or Dutch oven over low heat, melt the 3 tablespoons of butter. Swirl the pan to ensure the butter melts evenly and coats the bottom.
- Add marshmallows: Add the marshmallows to the melted butter. Stir constantly with a wooden spoon or greased spatula over low heat. This should take about 3-5 minutes. The marshmallows will gradually melt and become smooth and creamy. Don’t rush this step by turning up the heat—low and slow prevents burning and ensures even melting.
- Add optional flavorings: Once the marshmallows are completely melted and smooth (no lumps remaining), remove from heat immediately. If using, stir in the vanilla extract and salt quickly.
- Add cereal: Working quickly, add all 6 cups of Rice Krispies cereal to the pot. Use your greased spatula to fold the cereal into the marshmallow mixture, stirring gently but thoroughly until every piece of cereal is evenly coated. Work quickly—the mixture starts to set as it cools.
- Transfer to pan: Immediately pour the mixture into your prepared pan. Using your greased spatula (or greased hands!), press the mixture evenly into the pan. Don’t press too hard—you want to compress it just enough to hold together without making the treats dense. A light, even pressure is perfect.
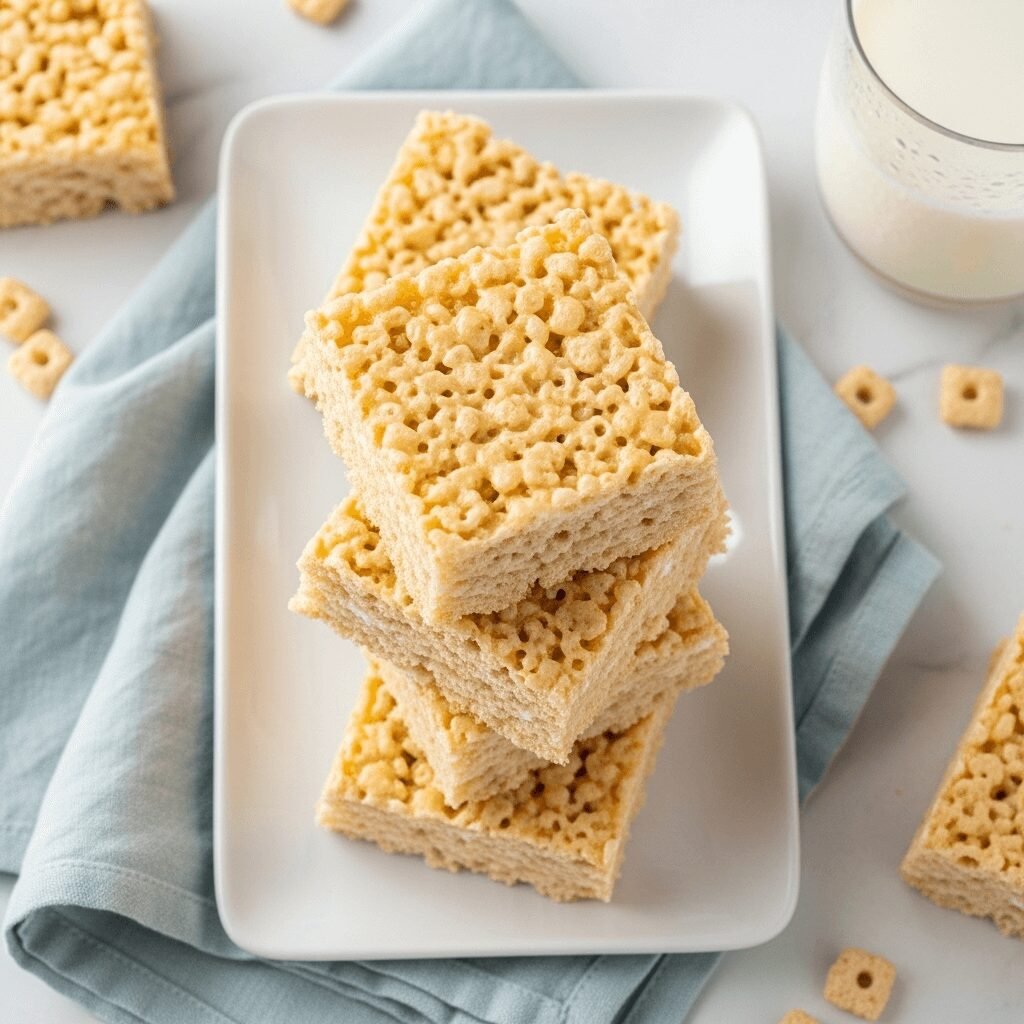
- Cool and cut: Let the treats cool at room temperature for at least 30 minutes until completely set. Using the parchment paper overhang, lift the treats out of the pan onto a cutting board. Use a sharp knife (lightly greased or wiped with butter) to cut into 12-16 squares, depending on your preferred size.
- Serve and enjoy: Serve immediately, or store in an airtight container at room temperature.
Notes
- Low heat is crucial: High heat can scorch the marshmallows and create hard, tough treats. Always use low heat and patience.
- Fresh marshmallows: Old or stale marshmallows don’t melt smoothly and create tough treats. Always use fresh, soft marshmallows.
- Work quickly: Once you add the cereal, work fast because the mixture sets up as it cools.
- Don’t over-press: Pressing too firmly creates dense, hard treats. Use gentle, even pressure.
- Grease everything: Greasing your spatula, hands, and knife makes handling the sticky mixture so much easier.
- Thickness options: Use a 9×9-inch pan for thicker treats or a 9×13-inch pan for classic thickness.
Nutrition
- Serving Size: 1 square (based on 16 servings)
- Calories: 96
- Sugar: 10g
- Sodium: 68mg
- Fat: 2g
- Saturated Fat: 1.2g
- Unsaturated Fat: 0.7g
- Trans Fat: 0g
- Carbohydrates: 19g
- Fiber: 0.1g
- Protein: 1g
- Cholesterol: 6mg
Nutrition information is approximate and calculated per serving based on 16 squares.
Tips & Variations
One of the best things about Rice Krispie Treats is how easily you can customize them! Here are some delicious ways to make this recipe your own:
Flavor Variations:
- Chocolate Rice Krispie Treats: Use Cocoa Krispies cereal instead of regular, or add ½ cup mini chocolate chips to the mixture
- Peanut Butter Rice Krispie Treats: Add ½ cup creamy peanut butter along with the marshmallows for rich, nutty flavor
- Funfetti Treats: Stir in ½ cup rainbow sprinkles after adding the cereal for a party-perfect version
- S’mores Treats: Use Golden Grahams cereal, add chocolate chips, and top with extra mini marshmallows
- Fruity Treats: Use Fruity Pebbles cereal for colorful, fruit-flavored treats
- Birthday Cake: Add 2 tablespoons of dry cake mix and sprinkles to the melted marshmallow mixture
Mix-In Ideas:
- Mini M&Ms or chocolate chips (½-1 cup)
- Chopped nuts like pecans or almonds
- Mini Oreos, crushed (about 10 cookies)
- Dried fruit like cranberries or cherries
- Butterscotch or peanut butter chips
- Mini Reese’s Pieces
Topping Options:
- Drizzle with melted chocolate
- Spread a layer of frosting on top
- Dip in melted white or dark chocolate
- Sprinkle with sea salt for salted treats
- Add a layer of Nutella before the mixture sets
Fun Shapes:
- Use cookie cutters to cut into hearts, stars, or seasonal shapes
- Press into muffin tins for individual portions
- Roll into balls for “truffles”
- Use mini muffin tins for bite-sized treats
Pro Chef Tips
These professional techniques will take your Rice Krispie Treats from good to absolutely phenomenal:
Use fresh ingredients: This seems obvious, but it’s critical. Fresh marshmallows melt smoothly and evenly, while old ones create tough, chewy treats. Check the date on your marshmallow bag and give them a squeeze—they should be soft and pillowy.
Low and slow melting: This is the single most important tip. Melting marshmallows over low heat prevents them from getting too hot, which causes the proteins in the marshmallows to tighten and create tough, hard treats. Patient melting over low heat creates smooth, silky marshmallow mixture that stays soft when cooled.
Grease everything generously: Before you start, grease your spatula, your hands, and have extra butter ready. The mixture is incredibly sticky, and having pre-greased tools makes the process so much easier. I even lightly grease my knife before cutting!
Don’t over-stir after adding cereal: Once you add the cereal, fold it in just until coated. Over-mixing breaks down the cereal and creates mushy treats instead of crispy ones. About 20-30 gentle folds should do it.
Press lightly: This is where many people go wrong. Pressing too firmly compacts the mixture and squeezes out air pockets, creating dense, hard treats. Use gentle, even pressure—just enough to hold the treats together. Think of it as patting, not pressing.
Let them cool completely: Cutting warm treats results in a sticky mess. Patience pays off here—wait the full 30 minutes for clean, perfect cuts.
The butter trick: When cutting, wipe your knife with butter between cuts. This prevents sticking and gives you clean, professional-looking squares every time.
Common Mistakes to Avoid
Even simple recipes can go wrong if you’re not careful. Here are the pitfalls to watch out for:
Using too much heat: This is the number one mistake that creates hard, tough Rice Krispie Treats. High heat causes the marshmallows to get too hot, which makes the sugar molecules bind tightly, resulting in rock-hard treats once they cool. Always use low heat and be patient during the melting process.
Over-pressing the mixture: Many people press way too hard when transferring the mixture to the pan, thinking they need to pack it down firmly. This compacts the mixture and removes the air pockets that give Rice Krispie Treats their signature light, crispy texture. Use gentle pressure—you want to flatten it just enough to create an even layer.
Using old or stale marshmallows: Stale marshmallows have lost moisture and won’t melt smoothly, no matter how long you stir. They create lumpy, uneven mixture that results in tough treats. Always check that your marshmallows are fresh, soft, and pliable before starting.
Adding cereal before marshmallows are fully melted: If you add the cereal while there are still marshmallow lumps, you’ll never get them evenly coated. Make sure the marshmallow mixture is completely smooth and creamy before adding any cereal.
Letting the mixture sit too long: The marshmallow mixture starts to set up as soon as it begins cooling. If you wait too long between adding the cereal and pressing it into the pan, it becomes difficult to work with and won’t press evenly. Work quickly once the cereal is added!
Cutting too soon: Warm Rice Krispie Treats are a sticky disaster. Wait the full 30 minutes (or longer) for them to cool completely before attempting to cut. Your patience will be rewarded with clean, beautiful squares.
Storage & Meal Prep
Proper storage keeps your Rice Krispie Treats fresh and delicious for days.
Room Temperature Storage: Rice Krispie Treats store beautifully at room temperature, which is actually ideal for maintaining their texture. Place them in an airtight container or zip-top bag, separating layers with wax paper or parchment paper to prevent sticking. They’ll stay fresh and chewy for 5-7 days at room temperature.
Avoid Refrigeration: Don’t refrigerate Rice Krispie Treats! The cold temperature makes them hard and tough. Room temperature storage keeps them at the perfect chewy texture.
Preventing Stickiness: If your treats feel sticky, it usually means they weren’t cooled completely before storing, or there’s humidity in the air. Try wrapping them individually in plastic wrap, which creates a barrier and prevents them from sticking together.
Individual Wrapping: For lunches, gift-giving, or bake sales, wrap individual treats in plastic wrap or cellophane bags tied with ribbon. This keeps them fresh and makes them portable.
Shelf Life: When properly stored in an airtight container at room temperature, Rice Krispie Treats stay fresh for about a week. However, they’re usually eaten long before then!
Make-Ahead & Freezer Notes
Rice Krispie Treats are fantastic for advance preparation, making party planning stress-free.
Making Ahead: You can make Rice Krispie Treats up to 3 days in advance. In fact, some people prefer them after they’ve had a day to settle—the flavors meld slightly and the texture becomes even more cohesive. Store in an airtight container at room temperature until ready to serve.
Freezing Uncut Treats: For longer storage, Rice Krispie Treats freeze beautifully! Once cooled completely, wrap the entire uncut pan tightly with plastic wrap, then cover with aluminum foil. Freeze for up to 6 weeks. Thaw at room temperature for 1-2 hours before cutting and serving.
Freezing Individual Squares: Cut the treats into squares, then wrap each one individually in plastic wrap. Place wrapped squares in a freezer-safe container or zip-top bag and freeze for up to 6 weeks. This is perfect for packing in lunches—just grab a frozen square in the morning and it’ll thaw by lunch time!
Best Thawing Method: Always thaw Rice Krispie Treats at room temperature, never in the microwave. Microwaving can make them too soft or cause uneven warming. Frozen individual squares thaw in about 30-60 minutes at room temperature.
Freezer to Lunchbox: One of my favorite tricks is to freeze individual treats and pack them frozen in lunch boxes. They act as ice packs to keep other foods cold and thaw perfectly by lunch time!
Serving Suggestions
While Rice Krispie Treats are perfect on their own, here are some creative ways to serve and enjoy them:
Classic Pairings:
- Cold glass of whole milk (the ultimate combination!)
- Hot chocolate or coffee for adults
- Fresh fruit like strawberries or apple slices for balance
- Ice cream sandwiches—put ice cream between two treats!
- Yogurt parfaits with treats crumbled on top
Party Presentations:
- Stack on a tiered serving platter for visual impact
- Cut into small squares and arrange on a platter with fresh berries
- Use cookie cutters for themed shapes (hearts for Valentine’s, stars for patriotic holidays)
- Wrap individually in clear cellophane bags with ribbons as party favors
- Create a “Rice Krispie Treat bar” with various mix-ins and toppings for guests to customize
Beverage Pairings:
- Chocolate milk for kids
- Coffee or cappuccino for adults
- Strawberry milk for something different
- Lemonade for a sweet-tart contrast
- Hot tea for a cozy afternoon snack
Creative Serving Ideas:
- Crumble over ice cream sundaes
- Cut into sticks for dunking in chocolate
- Create layered desserts in clear cups with treats, pudding, and whipped cream
- Use as a topping for birthday cupcakes
- Serve alongside other nostalgic treats like chocolate chip cookies
FAQs Section
Why are my Rice Krispie Treats hard and crunchy instead of soft and chewy?
This usually happens when the marshmallows get too hot during melting (from using high heat) or when the mixture is pressed too firmly into the pan. Always melt marshmallows over low heat and use gentle pressure when pressing the mixture. If you’ve already made hard treats, you can try warming them in the microwave for 5-10 seconds to soften slightly.
Can I use mini marshmallows instead of regular-sized marshmallows?
Yes! If using mini marshmallows, you’ll need 4 cups instead of the 10-ounce bag of regular marshmallows. Mini marshmallows can sometimes create a slightly different texture because they melt faster and more unevenly, so watch them carefully and stir constantly.
My Rice Krispie Treats are falling apart. What did I do wrong?
Crumbly treats usually indicate too much cereal for the amount of marshmallow mixture, or the mixture cooled too much before you pressed it into the pan. Make sure you’re measuring the cereal correctly (6 cups, measured loosely), and work quickly once you add the cereal. The mixture should still be warm and pliable when you press it into the pan.
Can I make these without butter?
While butter adds wonderful flavor, you can substitute coconut oil or even additional marshmallows (about 10 extra regular marshmallows) if necessary. The texture might be slightly different, but they’ll still work. For vegan treats, use vegan butter and vegan marshmallows.
How do I prevent Rice Krispie Treats from sticking to my hands and utensils?
Generously grease your hands, spatula, and any surface that will touch the mixture with butter or cooking spray before you start. You can also dampen your hands slightly with water, though butter works better. Having everything greased before you begin makes the process much easier.
Can I double this recipe?
Absolutely! Double all ingredients and use a large pot (at least 6-quart capacity) to accommodate the larger volume. You can press the doubled batch into a large sheet pan (11×17 inches) or two 9×13-inch pans. The cooking time remains the same—just make sure your pot is large enough for easy stirring.
Why do my Rice Krispie Treats taste bland?
This could be from using stale cereal or marshmallows, or simply needing more flavor enhancement. Try adding the optional vanilla extract and pinch of salt to the recipe—these make a surprisingly big difference! You can also try using salted butter instead of unsalted for a sweet-salty contrast.
Conclusion
There you have it—the ultimate guide to making perfect Rice Krispie Treats every single time! This simple, nostalgic recipe has brought joy to countless families for over 80 years, and now you have all the secrets to making them absolutely flawless. Whether you’re making them for a school event, a birthday party, an afternoon snack, or just because, these treats are guaranteed to bring smiles to everyone who tries them.
The beauty of Rice Krispie Treats lies in their simplicity and reliability. In just 10 minutes with three basic ingredients, you can create a dessert that tastes like childhood, celebration, and home all at once. And now that you know all the tips and tricks—from melting over low heat to pressing gently to working quickly—you’ll never end up with hard, tough treats again.
I hope you’ll make these Rice Krispie Treats soon and create some sweet memories in your own kitchen! I’d love to hear how they turn out for you. Drop a comment below with your favorite variation, share photos of your beautiful treats, or let me know what occasion you’re making them for. And if this recipe becomes a staple in your home like it has in mine, please share it on Pinterest so other home bakers can discover it too. Happy treating, friend! 💙