Classic Panna Cotta Recipe – Silky, Elegant & Easy Italian Dessert

Panna cotta is the epitome of effortless elegance—a luxurious Italian dessert that looks and tastes like it belongs in a fine dining restaurant, yet it’s surprisingly simple to make at home. This creamy, silky-smooth dessert literally translates to “cooked cream” in Italian, and it delivers exactly that: a delicate, wobbly custard with a melt-in-your-mouth texture that’s absolutely irresistible.
What makes this classic panna cotta recipe so special is its versatility and make-ahead convenience. Unlike many desserts that require precise baking temperatures and careful timing, panna cotta is forgiving and foolproof. It’s perfect for dinner parties, romantic date nights, holiday celebrations, or whenever you want to impress guests with minimal effort. Serve it plain to appreciate its pure, creamy flavor, or top it with fresh berries, fruit coulis, caramel, or chocolate sauce for a stunning presentation. This elegant Italian panna cotta is naturally gluten-free and can be customized with endless flavor variations to suit any occasion.
History / Background
Panna cotta has a rich history rooted in the northern regions of Italy, particularly Piedmont, where it’s considered a traditional dessert that has been enjoyed for centuries. The exact origins of panna cotta are somewhat mysterious, with food historians debating whether it dates back to ancient Roman times or emerged more recently in the early 1900s. What we do know is that this silky dessert was born from the Italian tradition of using simple, high-quality ingredients to create something truly extraordinary.
The Piedmont region, famous for its dairy production and culinary excellence, claims panna cotta as one of its signature contributions to Italian cuisine. In this picturesque area of northwestern Italy, nestled against the Alps, cream has always been abundant and of exceptional quality. Local cooks discovered that by gently warming cream with sugar and setting it with gelatin, they could create a dessert that was both luxurious and practical—one that could be made ahead and stored until needed.
Traditionally, panna cotta was flavored simply with vanilla, allowing the pure taste of fresh cream to shine through. Some historical recipes mention using fish bones or animal collagen as natural setting agents before commercial gelatin became widely available. The dessert was often served at special occasions and celebrations, molded in decorative copper or ceramic molds that created beautiful shapes when unmolded onto serving plates.
Panna cotta remained relatively unknown outside of Italy until the late 20th century when it began appearing on menus in upscale restaurants around the world. The 1990s and early 2000s saw panna cotta become a darling of the fine dining scene, with chefs appreciating its elegant simplicity and blank canvas potential for creative toppings and flavor infusions. Today, while it’s enjoyed globally, authentic Italian panna cotta maintains its reputation as a dessert that celebrates quality over complexity—a philosophy that defines much of Italian cooking.
The beauty of panna cotta lies in its simplicity. Unlike crème brûlée, which requires a water bath and blowtorch, or custards that need careful tempering, panna cotta comes together in minutes on the stovetop and sets beautifully in the refrigerator. This ease of preparation, combined with its sophisticated appearance and heavenly taste, has secured panna cotta’s place as a beloved dessert in both home kitchens and professional restaurants worldwide.
Why You’ll Love This Recipe
This homemade panna cotta recipe is about to become your secret weapon for impressive entertaining and satisfying your sweet tooth with minimal effort. The combination of restaurant-quality results and beginner-friendly preparation makes this dessert absolutely unbeatable for home cooks who want to serve something special without spending hours in the kitchen.
Here’s why this panna cotta will quickly become your go-to dessert:
- Incredibly Easy: No baking required! Just heat, whisk, pour, and chill—it’s truly one of the simplest elegant desserts you can make
- Make-Ahead Friendly: Perfect for entertaining since it must be made at least 4 hours ahead, freeing up your time on party day
- Restaurant-Quality Results: Serves impressively with that signature wobble and silky texture that looks professionally made
- Only 5 Ingredients: Uses basic pantry staples you likely already have—cream, sugar, vanilla, gelatin, and milk
- Naturally Gluten-Free: Perfect for guests with gluten sensitivities without requiring any special substitutions
- Endlessly Customizable: Serves as a blank canvas for countless flavor variations and topping combinations
- Foolproof Technique: Nearly impossible to mess up—no tempering eggs, no water baths, no precise oven temperatures
- Quick Prep Time: Active cooking time is only 10 minutes; the fridge does all the work
- Impressive Presentation: Looks elegant and sophisticated whether served in glasses or unmolded onto plates
- Light Yet Indulgent: Rich and creamy without being overly heavy, making it the perfect ending to any meal
- Budget-Friendly: Creates 6 elegant servings using inexpensive, readily available ingredients
- No Special Equipment: Requires only basic kitchen tools—no stand mixer, thermometer, or specialty molds needed
Ingredient Notes
Understanding your ingredients ensures perfect panna cotta every time. Here’s everything you need to know:
Heavy Cream: This is the star ingredient that gives panna cotta its luxurious, silky texture and rich flavor. Use heavy whipping cream with at least 36% fat content for the best results. Avoid ultra-pasteurized cream if possible, as it can affect the setting process, though it will still work. Don’t substitute with half-and-half or light cream, as they don’t have enough fat content to create the proper texture.
Whole Milk: Balances the richness of the heavy cream and helps create the perfect consistency—creamy but not too heavy. Whole milk (3.25% fat) is ideal, though you can use 2% milk if needed. The milk lightens the texture slightly while maintaining that signature wobble. Avoid skim milk as it lacks the body needed for proper texture.
Granulated Sugar: Sweetens the panna cotta and enhances all the other flavors. The amount can be adjusted based on your preference—this recipe creates a moderately sweet dessert that lets the cream flavor shine. Superfine sugar dissolves most easily, but regular granulated sugar works perfectly. You can substitute with honey or maple syrup, but this will change the flavor profile.
Unflavored Gelatin Powder: The magic ingredient that transforms liquid cream into that signature jiggly, spoonable texture. Use standard unflavored gelatin (like Knox brand). The amount of gelatin is crucial—too little and it won’t set, too much and it becomes rubbery. This recipe uses the perfect ratio for that delicate wobble. Gelatin must be bloomed (softened) in cold liquid before being dissolved in hot liquid.
Pure Vanilla Extract: Provides that classic, sweet flavor that complements the cream beautifully. Always use pure vanilla extract rather than imitation for the best taste. You can also use vanilla bean paste or scrape the seeds from one vanilla bean for even more intense vanilla flavor with beautiful specks throughout.
Salt (Optional): Just a tiny pinch enhances all the flavors and balances the sweetness, though it’s not essential. Many traditional recipes omit it entirely.
Equipment Needed
Gather these simple tools before starting—panna cotta requires minimal equipment:
- Medium Saucepan: For heating the cream mixture (2-3 quart capacity is perfect)
- Whisk: Essential for stirring and ensuring smooth, lump-free panna cotta
- Measuring Cups and Spoons: For accurate ingredient measurements
- Small Bowl: For blooming the gelatin in cold milk
- 6 Serving Glasses or Ramekins: Individual serving vessels (4-6 ounce capacity each)
- Fine-Mesh Strainer: Optional but recommended for straining the mixture to ensure silky smoothness
- Ladle or Measuring Cup with Pour Spout: For easy, mess-free pouring into serving glasses
- Plastic Wrap or Small Plates: For covering the panna cotta while it chills
- Refrigerator with Space: You’ll need room for 6 glasses to chill undisturbed for at least 4 hours
- Offset Spatula or Butter Knife: If unmolding, to help release the panna cotta from ramekins
- Serving Plates: If unmolding for a more elegant presentation
Panna Cotta Recipe

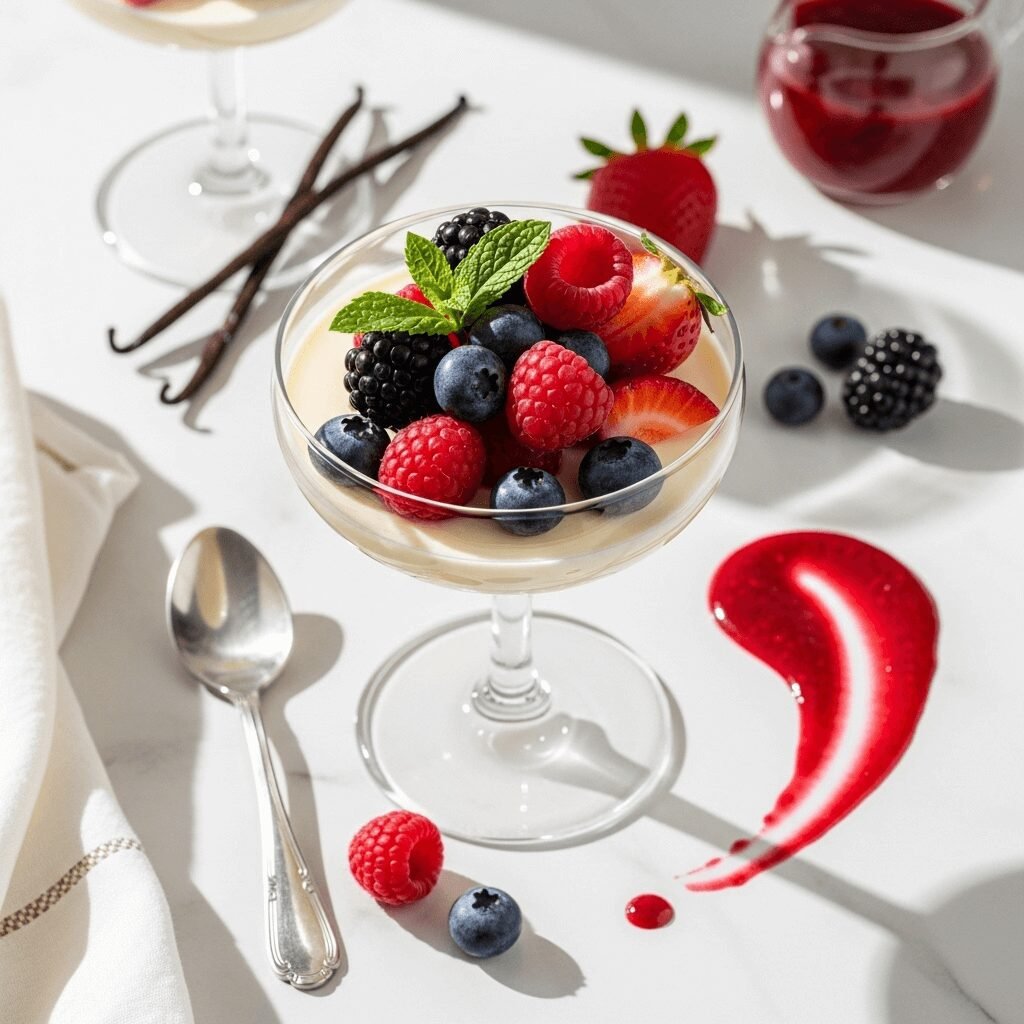
This classic Italian panna cotta recipe creates a silky-smooth, elegant dessert with a delicate wobble and melt-in-your-mouth texture. Made with just 5 simple ingredients, this creamy vanilla panna cotta is naturally gluten-free and incredibly easy to prepare. Perfect for entertaining, it must be made ahead, freeing you up to enjoy time with guests. Serve plain or topped with fresh berries, fruit coulis, or caramel for a restaurant-quality dessert that impresses every time.
- Prep Time: 10 minutes
- Cook Time: 4 hours
- Total Time: 4 hours 10 minutes
- Yield: 6 servings 1x
- Category: Dessert
- Method: Stovetop
- Cuisine: Italian
- Diet: Vegetarian
Ingredients
- 1 tablespoon (1 packet) unflavored gelatin powder
- 3 tablespoons whole milk (cold)
- 2 cups heavy whipping cream
- ⅓ cup granulated sugar
- 1 tablespoon pure vanilla extract
- Pinch of salt (optional)
- Additional ¾ cup whole milk (for the cream mixture)
For Optional Berry Topping:
- 1 cup fresh mixed berries (strawberries, raspberries, blueberries)
- 2 tablespoons sugar
- 1 tablespoon lemon juice
Instructions
- Bloom the Gelatin: Pour 3 tablespoons of cold milk into a small bowl. Sprinkle the gelatin powder evenly over the milk surface. Let it sit undisturbed for 5 minutes to bloom—the gelatin will absorb the liquid and become thick and spongy. This step is crucial for proper setting. Don’t skip it or rush it.
- Heat the Cream Mixture: In a medium saucepan, combine the heavy cream, ¾ cup whole milk, and sugar. Place over medium heat, whisking occasionally to dissolve the sugar. Heat until the mixture is very warm and steaming (about 165-170°F), but do not let it boil. Small bubbles may form around the edges, but you should be able to comfortably hold your finger in the liquid for 2 seconds. This takes about 4-5 minutes.
- Dissolve the Gelatin: Remove the saucepan from heat. Add the bloomed gelatin mixture to the warm cream, whisking constantly for 1-2 minutes until the gelatin is completely dissolved and no lumps remain. The mixture should look smooth and homogeneous. You can check by dipping a spoon into the mixture—it should coat the back evenly without any visible gelatin particles.
- Add Vanilla: Stir in the vanilla extract and optional pinch of salt, mixing until fully incorporated. The vanilla adds beautiful flavor and aroma.
- Strain the Mixture: For the silkiest texture, pour the mixture through a fine-mesh strainer into a large measuring cup with a pour spout or a bowl. This removes any possible lumps, bits of undissolved gelatin, or skin that may have formed. This step is optional but highly recommended for professional results.
- Pour into Serving Vessels: Carefully pour or ladle the panna cotta mixture into 6 individual serving glasses, ramekins, or small bowls, dividing equally. If you plan to unmold the panna cotta later, lightly oil your ramekins with a flavorless oil (like vegetable oil) before pouring in the mixture—this helps with easy release.
- Chill Until Set: Cover each glass loosely with plastic wrap or place small plates on top to prevent the panna cotta from absorbing refrigerator odors. Transfer to the refrigerator and chill for at least 4 hours, or preferably overnight, until completely set. The panna cotta should have a gentle wobble when lightly shaken but hold its shape and not be liquid.
- Serve: Serve the panna cotta directly in the glasses, or unmold onto dessert plates if you used oiled ramekins. To unmold, run a butter knife around the edge, dip the bottom of the ramekin briefly in warm water (5-10 seconds), place a plate on top, and quickly invert. The panna cotta should slip right out.
- Add Toppings (Optional): Top with fresh berries, berry coulis, caramel sauce, chocolate ganache, or a dusting of cocoa powder. For a simple berry compote, gently heat berries with sugar and lemon juice until syrupy, then cool before spooning over the panna cotta.
- Enjoy: Serve immediately and enjoy this silky, elegant dessert!
Notes
- Gelatin Amount: The ratio of gelatin to liquid is precise. Too much creates a rubbery texture; too little won’t set properly. Stick to the measurements for best results.
- Don’t Boil: Boiling the cream can affect the gelatin’s setting ability and create a skin on top. Keep it to a gentle heat—steaming but not bubbling vigorously.
- Chilling Time: While 4 hours is the minimum, overnight chilling yields the best texture and ensures the panna cotta is completely set.
- Testing Doneness: Gently shake a glass—the panna cotta should wobble as one cohesive mass, not ripple like liquid.
- Flavor Variations: Replace vanilla with almond extract, coffee, lemon zest, or 2 tablespoons of liqueur like amaretto or Grand Marnier.
- Serving Size: This recipe makes 6 generous servings. You can stretch it to 8 smaller portions if desired.
Nutrition
- Serving Size: 1 panna cotta (without toppings)
- Calories: 285
- Sugar: 12g
- Sodium: 35mg
- Fat: 26g
- Saturated Fat: 16g
- Unsaturated Fat: 8g
- Trans Fat: 0g
- Carbohydrates: 13g
- Fiber: 0g
- Protein: 3g
- Cholesterol: 85mg
Tips & Variations
Panna cotta’s simplicity makes it the perfect canvas for creative flavors and toppings. Here are delicious ways to customize this elegant dessert:
Coffee Panna Cotta: Add 2 tablespoons instant espresso powder or 3 tablespoons strong brewed espresso to the warm cream mixture. Perfect for coffee lovers and pairs beautifully with chocolate sauce or a dusting of cocoa powder.
Chocolate Panna Cotta: Whisk in 4 ounces of finely chopped dark or milk chocolate (or ½ cup chocolate chips) after removing the cream from heat. Stir until completely melted and smooth before adding gelatin. Top with whipped cream and chocolate shavings.
Citrus Panna Cotta: Add the zest of 1 lemon, lime, or orange to the cream while heating, then strain it out before pouring. Or add 1 tablespoon of lemon or orange extract along with the vanilla. Serve with citrus segments or lemon curd.
Coconut Panna Cotta: Replace 1 cup of the heavy cream with full-fat coconut milk for a tropical twist. Top with toasted coconut flakes, mango, or passion fruit puree.
Berry Swirl: Layer the panna cotta with fresh berry puree. Pour half the panna cotta mixture into glasses, add a spoonful of pureed raspberries or strawberries, then top with remaining panna cotta for a beautiful marbled effect.
Honey Lavender: Replace granulated sugar with honey and steep 1 tablespoon culinary lavender in the warming cream for 5 minutes, then strain. Elegant and fragrant.
Maple Panna Cotta: Substitute pure maple syrup for half the sugar and reduce vanilla to 1 teaspoon. Serve with candied pecans or walnut brittle.
Buttermilk Panna Cotta: Replace 1 cup of the cream with buttermilk for a tangy, lighter version. The slight acidity pairs perfectly with sweet berries.
Liqueur Infused: Add 2-3 tablespoons of your favorite liqueur—Kahlúa, amaretto, Grand Marnier, or Irish cream—after removing from heat.
Lighter Version: Use 1½ cups heavy cream and 1½ cups whole milk instead of the standard ratio for a less rich (but still delicious) panna cotta.
Pro Chef Tips
Elevate your panna cotta from homemade to restaurant-quality with these professional techniques:
Temperature Control is Key: The ideal temperature for dissolving gelatin is between 165-170°F. Too hot (boiling) can damage the gelatin’s setting properties, while too cool won’t fully dissolve it. If you don’t have a thermometer, heat until the mixture is steaming and too hot to comfortably touch, but not bubbling vigorously.
Bloom Properly: Always bloom gelatin in cold liquid—never hot. The cold allows the gelatin granules to hydrate evenly. If you add gelatin directly to hot liquid, it can clump and create an unpleasant texture. The blooming process takes exactly 5 minutes; less time means incomplete hydration.
Strain for Perfection: Professional pastry chefs always strain their panna cotta mixture. Even the most careful whisking can leave tiny particles or create a thin skin on the cream’s surface. Straining ensures a perfectly silky, smooth texture that’s restaurant-quality.
The Wobble Test: Perfect panna cotta should have a gentle wobble when shaken, moving as one cohesive unit rather than sloshing like liquid or sitting firm like Jello. This delicate texture is what makes panna cotta so special. If it’s too firm, use slightly less gelatin next time (2 teaspoons instead of 1 tablespoon).
Prevent Skin Formation: Always cover your panna cotta while chilling to prevent a skin from forming on top. If a skin does form, simply scrape it off gently before serving. You can also lightly press plastic wrap directly onto the surface of each panna cotta.
Unmolding Like a Pro: For clean unmolding, use metal ramekins rather than glass or ceramic—they release heat faster and unmold easier. Lightly oil with a neutral oil (not cooking spray, which can leave a taste). When unmolding, the warm water dip should be brief—3-5 seconds maximum. Any longer and you risk melting the edges.
Flavor Infusion Technique: When infusing flavors like vanilla bean, coffee, or lavender, add them to the cold cream and heat together slowly. This allows maximum flavor extraction. Strain before adding gelatin to remove solids.
Chill Strategically: Place your filled glasses on a flat tray or baking sheet before refrigerating. This makes transport easier and ensures they chill level, creating an even surface. Don’t open the refrigerator frequently during the first 2 hours of setting.
Quality Ingredients Matter: Since panna cotta has so few ingredients, each one’s quality significantly impacts the final result. Use the best cream and real vanilla extract you can afford. The difference is noticeable.
Common Mistakes to Avoid
Even this simple recipe can go wrong. Here’s how to avoid the most common panna cotta pitfalls:
Using Too Much or Too Little Gelatin: This is the most critical measurement in the entire recipe. Too much gelatin creates a rubbery, bouncy texture that’s more like Jello than silky panna cotta. Too little and your dessert won’t set at all, remaining liquidy even after hours in the fridge. Use exactly 1 tablespoon (or one standard packet) of unflavored gelatin for this recipe. Level it off precisely—don’t pack or heap the measuring spoon.
Boiling the Cream Mixture: Boiling can damage gelatin’s molecular structure, preventing it from setting properly. It can also cause the cream to develop a skin or slightly cooked flavor. Keep the heat at medium and remove from heat as soon as the mixture is steaming and the sugar has dissolved. You should be able to see small bubbles forming around the edges, but not a rolling boil.
Not Blooming Gelatin Properly: Adding gelatin powder directly to hot liquid causes it to clump into sticky, rubbery balls that won’t dissolve. Always bloom gelatin in cold liquid first, letting it sit undisturbed for the full 5 minutes until it’s thick and spongy. This hydrates the gelatin granules evenly, ensuring smooth incorporation.
Moving Panna Cotta Before It’s Set: Jostling or moving your panna cotta during the first 2-3 hours of chilling can disrupt the setting process and create uneven texture or air bubbles. Once you’ve placed the glasses in the refrigerator, leave them completely undisturbed until they’re fully set. Don’t keep opening the fridge door to check on them.
Incorrect Serving Temperature: Panna cotta should be served cold—straight from the refrigerator. Leaving it at room temperature for more than 15-20 minutes can cause it to soften and lose its shape, especially in warm weather. If unmolding, do it right before serving, not in advance.
Using Low-Fat Dairy: Substituting with skim milk, light cream, or half-and-half significantly affects texture and richness. The fat content in heavy cream and whole milk is essential for creating that signature silky mouthfeel. Low-fat versions result in a thin, watery texture that lacks the luxurious quality that makes panna cotta special.
Skipping the Straining Step: While optional, skipping this step can leave small bits of undissolved gelatin, spices, or milk skin in your finished dessert. These tiny lumps detract from the perfectly smooth texture panna cotta should have. Taking 30 seconds to strain pays off enormously.
Storage & Meal Prep
Panna cotta is one of the most make-ahead-friendly desserts, perfect for stress-free entertaining:
Refrigerator Storage: Covered panna cotta stores beautifully in the refrigerator for up to 4 days. Keep them covered with plastic wrap or in a sealed container to prevent them from absorbing refrigerator odors or drying out on top. The texture remains perfect throughout this time—in fact, the flavors often meld and improve after a day.
Covering Properly: Use plastic wrap pressed directly onto the surface, or cover the glasses loosely with plastic wrap or small plates. Airtight containers work well if you’re stacking multiple servings, but place parchment paper between layers to prevent sticking.
No Reheating Needed: Panna cotta should always be served cold, straight from the refrigerator. There’s no reheating involved, which makes it incredibly convenient. Simply remove from the fridge, add your desired toppings, and serve immediately.
Texture Changes: The texture of panna cotta remains remarkably consistent during refrigeration. It won’t become rubbery or watery if stored properly. However, if toppings like fruit are added too far in advance, they may release juice and make the panna cotta watery around the edges. Add wet toppings right before serving.
Unmolding Timing: If you plan to unmold your panna cotta, do so just before serving rather than hours in advance. Once unmolded, the dessert can lose its shape if left too long, especially in warm environments. Unmolded panna cotta can sit at room temperature for about 15-20 minutes maximum.
Meal Prep for Parties: Make panna cotta 1-3 days before your event and store covered in the refrigerator. This frees up your party day for other preparations. Simply add toppings and garnishes right before serving for a fresh, beautiful presentation.
Make-Ahead & Freezer Notes
Panna cotta is the ultimate make-ahead dessert, making it perfect for entertaining and busy schedules:
Ideal Make-Ahead Timeline: Panna cotta is actually better when made 24 hours in advance rather than the minimum 4 hours. The extra time allows the gelatin to set fully and the flavors to develop completely. Make it 1-3 days ahead for optimal results and maximum convenience.
Best Day-Before Strategy: Prepare the panna cotta completely the evening before your dinner party. Cover and refrigerate overnight. The next day, your dessert is ready—just add toppings right before serving. This strategy eliminates last-minute stress and ensures perfect texture.
Freezing Panna Cotta: While technically possible, freezing panna cotta is not recommended. The gelatin-based texture doesn’t freeze well—thawing causes the mixture to become grainy and the texture to separate or become watery. The smooth, silky quality that makes panna cotta special is lost in freezing. If you absolutely must freeze, expect significant texture changes.
Topping Storage: If making berry compote or sauce to accompany your panna cotta, prepare it up to 3 days ahead and store separately in the refrigerator. Fresh fruit toppings should be prepared the day of serving for the best appearance and flavor.
Transporting Panna Cotta: If bringing panna cotta to a potluck or event, keep them upright in a shallow box or carrier. They’re surprisingly stable once fully set, but avoid excessive jostling. Transport in a cooler if it’s warm outside, and keep refrigerated until serving time.
Assembly Timeline: For the prettiest presentation, add toppings like fresh berries, sauce drizzles, or whipped cream within 30 minutes of serving. This prevents the toppings from making the panna cotta watery or colors from bleeding.
Serving Suggestions
Panna cotta is incredibly versatile and pairs beautifully with many accompaniments. Here are delicious ways to serve this elegant dessert:
Classic Toppings:
- Fresh berry compote—macerate strawberries, raspberries, and blueberries with sugar and lemon juice until syrupy
- Raspberry or strawberry coulis—a smooth, poured fruit sauce that creates stunning color contrast
- Caramel sauce drizzled artistically over the top or pooled around unmolded panna cotta
- Dark chocolate ganache or shaved chocolate curls for decadent chocolate lovers
- Fresh seasonal fruit—sliced peaches in summer, poached pears in fall, citrus segments in winter
Elegant Garnishes:
- Fresh mint leaves or edible flowers for a pop of color and restaurant-style plating
- Crushed amaretti cookies or biscotti for delightful texture contrast
- Toasted sliced almonds, pistachios, or hazelnuts adding crunch
- A light dusting of powdered sugar or cocoa powder through a fine sieve
- Candied citrus peel for sophisticated flavor and visual appeal
- Microgreens or herb sprigs (basil pairs surprisingly well with berries)
Beverage Pairings:
- Espresso or strong coffee—the slight bitterness balances the sweet cream perfectly
- Dessert wines like Moscato d’Asti, Vin Santo, or late-harvest Riesling
- Italian digestifs such as limoncello, grappa, or amaretto served alongside
- Champagne or Prosecco for celebratory occasions
- Dessert cocktails like White Russians or Brandy Alexander
Complete Dessert Course: Serve panna cotta as the finale to an Italian dinner following pasta, risotto, or osso buco. It’s the perfect light ending after a rich meal. Pair with espresso and perhaps a small plate of biscotti for an authentic Italian experience.
Brunch or Tea Time: Panna cotta isn’t just for dinner! Serve at brunch alongside croissants and fresh fruit, or as an elegant dessert for afternoon tea with delicate cookies and tea sandwiches.
Plating Ideas: For unmolded panna cotta, pool sauce artistically around the base, garnish the top with fresh berries, and add a small mint sprig. For glasses, layer the panna cotta with fruit or create a tri-color effect with different flavored layers. The visual presentation is just as important as taste.
FAQs Section
Can I make panna cotta without gelatin? Traditional panna cotta requires gelatin for its signature wobble and smooth texture. However, you can create a similar dessert using agar-agar (a plant-based alternative) at a ratio of about 1 teaspoon agar powder per 1 cup of liquid. Keep in mind that agar sets more firmly than gelatin, creating a slightly different texture. It also sets at room temperature rather than requiring refrigeration. Cornstarch cannot be substituted as it creates a pudding-like consistency rather than the jiggly, set texture of panna cotta.
Why didn’t my panna cotta set properly? Several factors can prevent setting: using too little gelatin, not fully dissolving the gelatin, boiling the mixture (which damages gelatin’s molecular structure), or not chilling long enough. Ensure you bloom gelatin for the full 5 minutes, dissolve it completely in warm (not boiling) liquid, and chill for at least 4 hours (preferably overnight). If your panna cotta is still liquid after 6 hours, the gelatin likely wasn’t activated properly and you’ll need to start over.
Can I use gelatin sheets instead of powder? Absolutely! Gelatin sheets (also called leaf gelatin) are actually preferred by professional pastry chefs for their neutral flavor and consistent results. Use 4 sheets of gelatin to replace 1 tablespoon of powdered gelatin. Soak the sheets in cold water for 5-10 minutes until softened, squeeze out excess water, then stir into the warm cream mixture until dissolved. The process is slightly different but yields beautiful results.
How do I fix lumpy panna cotta? Prevention is best—always bloom gelatin in cold liquid and strain the mixture before pouring. If you notice lumps after pouring but before chilling, you can gently rewarm the mixture, whisk vigorously, strain, and re-pour into clean glasses. Once the panna cotta has set, there’s no way to fix lumps, unfortunately. The texture will be affected but it’s still edible.
Can I make panna cotta dairy-free? Yes! Replace heavy cream and milk with full-fat coconut cream and coconut milk (from a can, not the carton). Use the same measurements and method. The result will have a subtle coconut flavor and slightly different texture, but it’s delicious. Almond milk and oat milk alternatives don’t work well as they lack the fat content needed for proper texture. Always use the full-fat versions of non-dairy milk.
Why is my panna cotta rubbery? A rubbery texture means too much gelatin was used. The ratio in this recipe (1 tablespoon gelatin to 3 cups total liquid) creates the perfect delicate wobble. If you accidentally used more gelatin, there’s no fix once it’s set. Next time, measure carefully and level off the measuring spoon. Also, some brands of gelatin have slightly different strengths—Knox is the most consistent and reliable.
Can I double this recipe? Yes, this recipe doubles beautifully. Use all the same proportions and follow the exact same method. You’ll need 12 serving glasses or ramekins. The setting time remains the same—at least 4 hours. Large-batch panna cotta is perfect for parties, and since it stores well for several days, you can make it well ahead of your event.
Conclusion
There you have it—a foolproof classic panna cotta recipe that delivers elegant, restaurant-quality results every single time! This silky Italian dessert proves that sophisticated doesn’t have to mean complicated. With just five simple ingredients and a few minutes of active time, you can create a stunning dessert that will have your guests thinking you’re a professional pastry chef.
The beauty of panna cotta lies in its versatility and make-ahead convenience. Whether you’re serving it plain to appreciate its pure, creamy perfection or topping it with seasonal berries, decadent chocolate, or caramel sauce, this dessert adapts to any occasion—from casual family dinners to elegant dinner parties. Plus, it’s naturally gluten-free and endlessly customizable with your favorite flavors.
I absolutely love hearing how your panna cotta turns out! Did you try any of the flavor variations? What toppings did you choose? Leave a comment below sharing your experience and any creative twists you discovered. If you loved this recipe, please give it a 5-star rating and share it with friends who appreciate easy, elegant desserts. Don’t forget to Pin it to your favorite Pinterest boards so you can find it again whenever you need an impressive dessert. Happy cooking, friends!