The Ultimate Crème Brûlée Recipe: Perfectly Creamy Custard with a Caramelized Sugar Top
There’s something utterly magical about cracking through the glassy, caramelized sugar shell of a crème brûlée to reveal the silky, vanilla-scented custard beneath. This classic French dessert has captivated dessert lovers for centuries, and honestly, it’s not hard to see why. The contrast between the crisp, slightly bitter burnt sugar top and the luxuriously smooth custard is pure heaven in every spoonful.
Crème brûlée, which translates to “burnt cream” in French, is the ultimate show-stopping dessert that’s surprisingly simple to make at home. It’s perfect for romantic dinner parties, special celebrations, or whenever you want to impress your guests with restaurant-quality elegance. Despite its fancy reputation, this dessert requires just a handful of ingredients and some patience. The best part? You can make these beauties ahead of time, leaving just the dramatic torch moment for right before serving.
Whether you’re celebrating an anniversary, hosting a dinner party, or simply treating yourself to something special, this crème brûlée recipe will transport you straight to a charming Parisian bistro. And trust me, once you master this technique, you’ll find yourself making excuses to whip up these elegant custards all the time!
History / Background
Crème brûlée has a fascinating and somewhat disputed history that adds to its mystique. While most food historians attribute this beloved dessert to France, its true origins are delightfully controversial. The French claim it as their own, naturally, but the English argue that their “burnt cream” from Cambridge’s Trinity College predates the French version by several decades.
The earliest known reference to a dessert similar to crème brûlée appears in François Massialot’s 1691 cookbook, where it was called “crème brûlée.” However, Trinity College in Cambridge insists their burnt cream recipe dates back to the 1630s. The Spanish also throw their hat in the ring with “crema catalana,” a similar custard dessert that’s been around since medieval times.
Regardless of who invented it first, the French perfected and popularized crème brûlée, making it a staple in haute cuisine. The dessert experienced a massive resurgence in the 1980s when it became a trendy item in upscale American restaurants. Suddenly, everyone wanted to experience the satisfying crack of that caramelized sugar crust.
What makes crème brûlée special is its simplicity and elegance. In classic French cooking tradition, it showcases how a few quality ingredients—cream, eggs, sugar, and vanilla—can be transformed into something transcendent through proper technique. The dessert represents the French culinary philosophy of letting superior ingredients shine without unnecessary complications.
Today, crème brûlée remains one of the most requested desserts in fine dining establishments worldwide, and home cooks have embraced it as an achievable luxury. The ritual of torching the sugar tableside has become almost as important as the dessert itself, creating a memorable dining experience.
Why You’ll Love This Recipe
This crème brûlée recipe strikes the perfect balance between impressive presentation and achievable technique. I’ve tested and refined this recipe countless times to ensure you get that restaurant-quality result every single time. The custard is impossibly silky, infused with real vanilla bean, and the sugar top caramelizes to absolute perfection.
Here’s why this recipe will become your go-to elegant dessert:
- Surprisingly Simple: Despite its fancy reputation, crème brûlée uses just five basic ingredients you probably already have
- Make-Ahead Friendly: Prepare the custards up to three days in advance, then torch just before serving
- Consistently Perfect Results: The water bath method ensures even, gentle cooking with no curdling or overcooked edges
- Impressive Presentation: Your guests will be absolutely wowed—they’ll think you spent hours in the kitchen
- Customizable Flavors: Once you master the basic technique, you can experiment with endless flavor variations
- Perfectly Portioned: Individual servings mean no messy cutting or plating—each person gets their own special dessert
- Interactive Dining Experience: Torching the sugar tableside creates a memorable moment that guests love
- Rich but Not Heavy: The custard is creamy and indulgent without being overly filling
Ingredient Notes
Let’s talk about what goes into these heavenly custards. Quality matters tremendously here since we’re working with so few ingredients—each one plays a starring role.
Heavy Cream: This is the foundation of your custard’s luxurious texture. Don’t substitute with half-and-half or milk, as you need the high fat content for that signature richness and proper setting. The cream should be fresh and preferably not ultra-pasteurized, as it provides better flavor.
Egg Yolks: We’re using only the yolks (no whites) because they create that silky, rich custard without any eggy flavor. The yolks also provide the lecithin needed to emulsify the mixture. Use large eggs at room temperature for best results.
Granulated Sugar: Used both in the custard base and for the caramelized top. Regular white sugar works perfectly—no need for anything fancy for the custard itself. Reserve superfine or granulated sugar for the topping to ensure even caramelization.
Vanilla Bean: This is where the magic happens! A real vanilla bean pod provides those gorgeous flecks and incomparable flavor that vanilla extract simply can’t match. Split the pod lengthwise and scrape out those precious seeds. If vanilla beans are unavailable or too expensive, use 2 teaspoons of high-quality pure vanilla extract as a substitute.
Salt: Just a tiny pinch enhances all the other flavors and balances the sweetness. Don’t skip it!
Optional – Brown Sugar: Some people prefer using brown sugar for the caramelized top as it melts more evenly and provides a deeper, more complex flavor. Try both and see which you prefer!
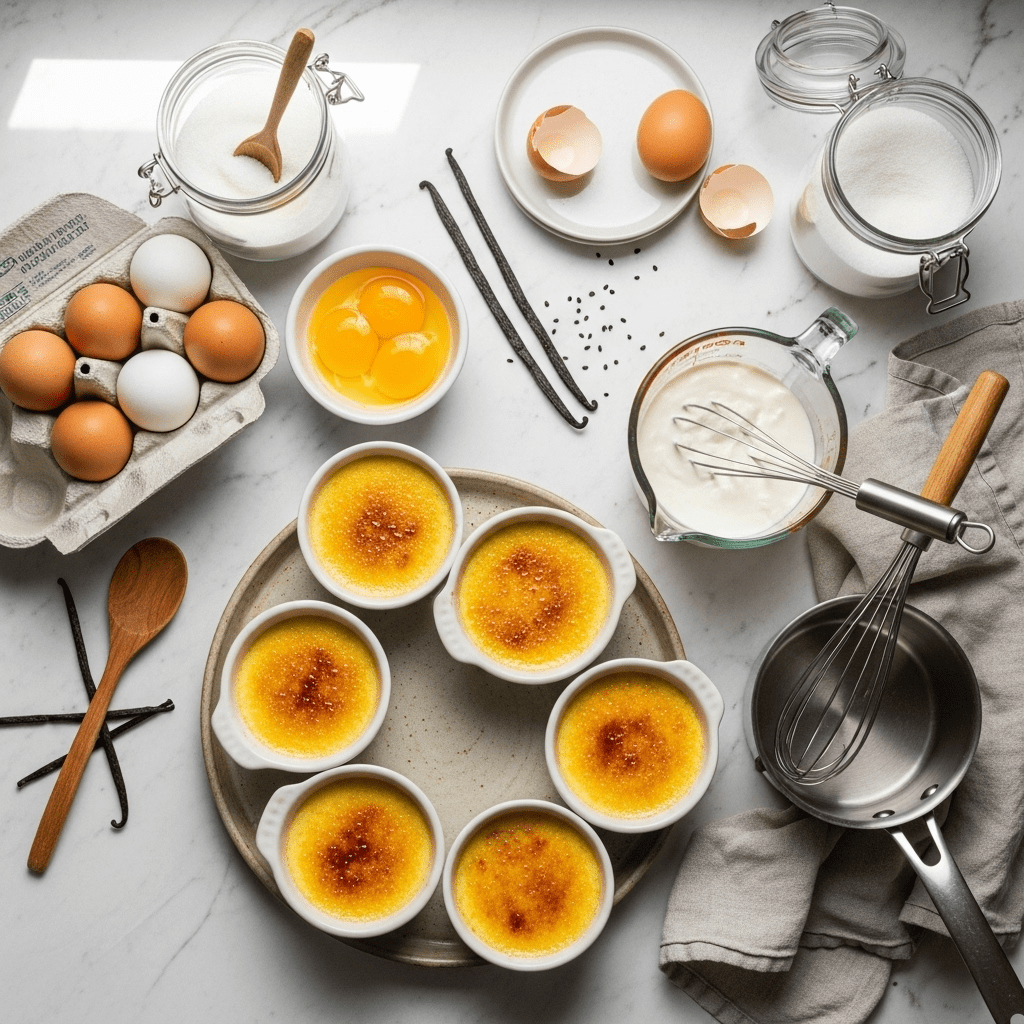
Equipment Needed
Having the right tools makes all the difference in achieving perfect crème brûlée. Here’s what you’ll need:
- Ramekins: Six 6-ounce ceramic ramekins or shallow crème brûlée dishes (wider ramekins provide more surface area for that satisfying sugar crust)
- Kitchen Torch: Essential for caramelizing the sugar top—this is one tool you really can’t skip (an inexpensive culinary torch works perfectly)
- Large Baking Dish or Roasting Pan: Must be deep enough to hold water that comes halfway up the sides of your ramekins
- Medium Saucepan: For heating the cream mixture
- Mixing Bowl: Medium to large size for tempering the eggs
- Fine-Mesh Strainer: Critical for removing any cooked egg bits and ensuring silky-smooth custard
- Whisk: For combining ingredients gently without incorporating too much air
- Measuring Cups and Spoons: Precision matters in custard-making
- Kitchen Towel: Place in the bottom of your water bath to prevent ramekins from sliding
- Kettle or Pot: For boiling water for the water bath
The Ultimate Crème Brûlée Recipe: Perfectly Creamy Custard with a Caramelized Sugar Top

Indulgent French crème brûlée with silky vanilla custard and a perfectly caramelized sugar crust. This classic restaurant dessert is surprisingly easy to make at home and guaranteed to impress!
- Prep Time: 20 minutes
- Cook Time: 40 minutes
- Total Time: 5 hours
- Yield: 6 servings 1x
- Category: Dessert
- Method: Baking
- Cuisine: French
- Diet: Vegetarian
Ingredients
- 2 cups heavy cream
- 1 vanilla bean pod (or 2 teaspoons pure vanilla extract)
- 5 large egg yolks, at room temperature
- ½ cup granulated sugar, divided (⅓ cup for custard, remaining for topping)
- Pinch of salt
- 6 tablespoons superfine sugar (for caramelizing the top)
- Boiling water (for water bath)
Instructions
- Preheat and Prepare: Preheat your oven to 325°F (160°C). Place six 6-ounce ramekins in a large baking dish or roasting pan. Place a folded kitchen towel in the bottom of the pan to keep ramekins stable.
- Infuse the Cream: Split the vanilla bean lengthwise and scrape out the seeds with the back of a knife. Pour the heavy cream into a medium saucepan and add both the vanilla seeds and the scraped pod. Heat over medium heat until the cream just begins to simmer around the edges (small bubbles will form). Remove from heat, cover, and let steep for 15 minutes to infuse the vanilla flavor. Remove the vanilla pod.
- Prepare the Egg Mixture: In a medium mixing bowl, whisk together the egg yolks, ⅓ cup granulated sugar, and a pinch of salt until well combined and slightly pale, about 2 minutes. Don’t overwhisk or create too many bubbles.
- Temper the Eggs: This step is crucial! Slowly pour about ½ cup of the warm cream into the egg mixture while whisking constantly. This gradually raises the temperature of the eggs without scrambling them. Continue adding the cream slowly, whisking constantly, until all the cream is incorporated.
- Strain the Custard: Pour the entire mixture through a fine-mesh strainer into a large measuring cup or bowl with a pour spout. This removes any cooked egg bits and ensures silky-smooth custard. Discard any solids in the strainer.
- Fill the Ramekins: Divide the custard evenly among the six ramekins, filling each about ¾ full. Use a spoon to remove any bubbles from the surface.
- Create Water Bath: Carefully place the baking dish with ramekins in the preheated oven. Pour boiling water into the pan until it reaches halfway up the sides of the ramekins. Be careful not to splash water into the custards.
- Bake: Bake for 38-42 minutes, until the custards are set around the edges but still have a slight jiggle in the center (about the size of a quarter). The centers should register 170-175°F on an instant-read thermometer. Don’t overbake or the custards will be grainy.
- Cool: Carefully remove the ramekins from the water bath using tongs or a spatula. Let cool to room temperature on a wire rack, about 30 minutes.
- Chill: Cover each ramekin with plastic wrap and refrigerate for at least 4 hours or up to 3 days. The custards must be completely cold before caramelizing the top.
- Caramelize: Just before serving, remove custards from refrigerator and blot any moisture from the surface with a paper towel. Sprinkle 1 tablespoon of superfine sugar evenly over each custard. Using a kitchen torch held 3-4 inches away, move the flame constantly in a circular motion until the sugar melts, bubbles, and turns deep golden amber. Let the sugar harden for 1-2 minutes before serving.
- Serve: Serve immediately while the caramelized top is crisp and the custard is cold. Garnish with fresh berries if desired.
Notes
- The custards are done when they jiggle slightly in the center but are set around the edges. They’ll continue cooking from residual heat after removal from the oven.
- If you don’t have a kitchen torch, you can use the oven broiler, but it’s much harder to control and may warm the custard too much. Place ramekins on a baking sheet 4 inches from the broiler and watch constantly.
- For the smoothest texture, let the cream mixture steep with vanilla for the full 15 minutes.
- Room temperature egg yolks temper more easily and reduce the risk of scrambling.
- Superfine sugar caramelizes more evenly than regular granulated sugar.
Nutrition
- Serving Size: 1 crème brûlée
- Calories: 385
- Sugar: 24g
- Sodium: 45mg
- Fat: 30g
- Saturated Fat: 18g
- Unsaturated Fat: 10g
- Trans Fat: 0g
- Carbohydrates: 26g
- Fiber: 0g
- Protein: 5g
- Cholesterol: 265mg
Tips & Variations
The beauty of mastering basic crème brûlée is that you can customize it endlessly once you’ve got the technique down. Here are my favorite ways to make this recipe your own:
Flavor Variations:
- Chocolate Crème Brûlée: Add 4 ounces of finely chopped dark chocolate to the hot cream and whisk until melted
- Coffee Crème Brûlée: Steep 2 tablespoons of espresso beans with the cream, or add 2 teaspoons of instant espresso powder
- Lavender Crème Brûlée: Add 1 tablespoon of culinary lavender buds to steep with the vanilla
- Citrus Crème Brûlée: Add the zest of one lemon, orange, or lime to the cream mixture
- Coconut Crème Brûlée: Replace ½ cup of heavy cream with full-fat coconut milk and add ½ teaspoon coconut extract
Texture Modifications:
- For an even richer custard, use 6 egg yolks instead of 5
- Want it lighter? Replace ½ cup of heavy cream with whole milk (though it won’t be quite as luxurious)
- Add 1 tablespoon of liqueur like Grand Marnier, Amaretto, or Kahlúa for adult-only versions
Topping Alternatives:
- Try turbinado sugar or raw sugar for a different texture and deeper flavor
- Mix white and brown sugar for complexity
- Sprinkle a tiny amount of flaky sea salt on the caramelized sugar for salted caramel brûlée
Pro Chef Tips
After making hundreds of crème brûlées, I’ve learned these professional secrets that make all the difference:
Temperature Control is Everything: The 325°F oven temperature is crucial. Too hot and your custards will curdle or develop a grainy texture. Use an oven thermometer to ensure accuracy—most home ovens run hot or cold.
The Jiggle Test: Gently shake the pan at the minimum baking time. The custards should wobble like set Jell-O, not slosh like liquid. That slight jiggle in the center is perfect—it will set fully as it cools. Overbaked custards lose their silky texture and become grainy or chalky.
Ice Bath Trick: After removing custards from the oven, some chefs immediately transfer them to an ice bath to stop the cooking process. This prevents carryover cooking and ensures the custards don’t overcook.
Torch Technique: Keep the torch moving constantly in small circular motions. Holding it still in one spot will burn the sugar before it caramelizes evenly. Start from the edges and work toward the center. Hold the torch at a 45-degree angle for best results.
Sugar Application: Pat the custard surface completely dry before adding sugar, or the sugar won’t caramelize properly. Sprinkle the sugar in an even, thin layer—too much creates an overly thick crust that’s hard to crack.
Serving Temperature: The contrast between the warm caramelized top and ice-cold custard is what makes crème brûlée special. Time your torching so you serve within 2-3 minutes for maximum impact.
Room Temperature Eggs: This simple step makes tempering so much easier and reduces the risk of scrambling. Set your eggs out 30 minutes before starting.
Common Mistakes to Avoid
Learn from others’ mistakes so you don’t have to make them yourself:
- Rushing the Tempering: Adding hot cream too quickly to the eggs will scramble them instantly. Always add warm cream gradually while whisking constantly. Take your time—this step can’t be rushed.
- Skipping the Strainer: You might think you mixed everything perfectly, but there are almost always tiny cooked egg bits or air bubbles. Straining ensures perfectly smooth custard every time.
- Forgetting the Water Bath: Never bake custards without a water bath. Direct oven heat will cause curdling and uneven cooking. The gentle, moist heat from the water bath is essential for silky results.
- Overbaking: This is the #1 mistake! Custards continue cooking after leaving the oven. Remove them when they still have that slight jiggle—they’ll firm up as they cool. Overcooked custards are grainy and develop a skin.
- Wet Custard Surface: Any condensation on the custard surface will prevent proper caramelization. Always blot dry with a paper towel before adding sugar, and make sure custards are completely chilled.
Storage & Meal Prep
One of the best things about crème brûlée is how well it keeps, making it perfect for entertaining:
Refrigerator Storage: Uncaramelized custards can be stored covered in the refrigerator for up to 3 days. In fact, they actually improve slightly after a day or two as the flavors meld. Cover each ramekin tightly with plastic wrap, pressing it directly onto the surface to prevent a skin from forming.
After Caramelizing: Once you’ve torched the sugar top, crème brûlée is best enjoyed immediately while the caramelized sugar is crisp. The sugar will begin to soften and dissolve into the custard after about 30 minutes, losing that satisfying crack. If you must wait, refrigerate for no more than 2 hours.
Reheating: You don’t reheat crème brûlée—it’s meant to be served cold with only the sugar top caramelized. If your custards have been refrigerated for several days, let them sit at room temperature for 10 minutes before torching to take the chill off slightly.
Container Type: Keep the custards in their baking ramekins for storage. The ceramic holds temperature well and protects the delicate texture.
Make-Ahead & Freezer Notes
Crème brûlée is an excellent make-ahead dessert, which is why restaurants love it so much!
Make-Ahead Timeline:
- 3 Days Before: Make and bake the custards, then refrigerate covered. This is actually ideal because the flavors have time to develop.
- Day Of: Torch the sugar tops just before serving—literally right before you bring them to the table for maximum wow factor.
Freezing Custards: While I don’t generally recommend freezing crème brûlée, it can be done if necessary. Freeze uncaramelized custards wrapped tightly in plastic wrap then aluminum foil for up to 1 month. Thaw overnight in the refrigerator, then let come to cool room temperature before proceeding with caramelizing. The texture may be slightly affected, becoming a bit more grainy.
Best Reheating Method: Remember, crème brûlée is not reheated! The custard stays cold, and only the sugar top is torched immediately before serving. This contrast between hot and cold, crispy and creamy, is what makes the dessert magical.
Timing for Parties: Make your custards 1-2 days ahead, then recruit a helper to torch them in batches while you serve dinner. Alternatively, torch all six at once and serve immediately. Some hosts even torch tableside as entertainment!
Serving Suggestions
While crème brûlée is stunning on its own, the right accompaniments can elevate the experience:
Fresh Fruit: A small handful of fresh raspberries, blackberries, or sliced strawberries provides a tart contrast to the rich custard. Berries also add beautiful color to the plate.
Shortbread Cookies: A delicate buttery cookie alongside your crème brûlée adds textural variety and a vehicle for scraping up every last bit of custard.
After-Dinner Coffee: Serve with espresso, cappuccino, or a French press coffee. The slight bitterness of good coffee balances the sweetness perfectly.
Dessert Wine Pairings: Try a late-harvest Riesling, Sauternes, or tawny port. The wine’s sweetness should match or slightly exceed the dessert’s sweetness.
Champagne: A glass of brut Champagne or sparkling wine makes the occasion feel extra celebratory and the bubbles cut through the richness.
Garnish Ideas: A small mint leaf, a dusting of cocoa powder, or a tiny edible flower makes for Instagram-worthy presentation without overwhelming the dessert.
Plating Style: Serve each ramekin on a small dessert plate with a linen napkin underneath for stability. Add a long dessert spoon—the narrow shape helps crack through the sugar crust.
FAQs Section
Q: Can I make crème brûlée without a kitchen torch?
A: While a torch is strongly recommended, you can use your oven’s broiler as a last resort. Place the ramekins on a baking sheet about 4 inches from the broiler and watch them like a hawk. The sugar can go from perfect to burnt in seconds, and this method often warms the custard too much. A small kitchen torch costs $15-25 and is worth the investment if you plan to make crème brûlée more than once.
Q: Why did my custard curdle or turn grainy?
A: This happens when custards are baked at too high a temperature or overbaked. The proteins in the eggs coagulate too quickly and squeeze out moisture, creating a grainy texture. Always use a water bath for gentle, even heat, and remove custards when they still have a slight jiggle. An oven thermometer helps ensure your oven isn’t running too hot.
Q: How do I know when crème brûlée is done baking?
A: The custards should be set around the edges but still jiggle slightly in the center (about the size of a quarter). Insert an instant-read thermometer into the center—it should read 170-175°F. Remember, they’ll continue cooking from residual heat after removal from the oven. When in doubt, slightly underbake rather than overbake.
Q: Can I use vanilla extract instead of vanilla beans?
A: Absolutely! Use 2 teaspoons of pure vanilla extract added after you remove the cream from heat. While you won’t get those gorgeous vanilla bean specks, the flavor will still be wonderful. Just make sure to use real vanilla extract, not imitation.
Q: Why won’t my sugar caramelize evenly?
A: Several factors affect caramelization: the sugar must be in a thin, even layer; the custard surface must be completely dry; and you need to keep the torch moving constantly. Superfine or caster sugar caramelizes more evenly than regular granulated sugar. Also, make sure your custards are thoroughly chilled—warm custards cause the sugar to melt rather than caramelize.
Q: How far in advance can I make crème brûlée?
A: Make the custards up to 3 days ahead and store covered in the refrigerator. However, torch the sugar top no more than 30 minutes before serving, ideally just before bringing to the table. The caramelized sugar will begin to soften and weep if it sits too long.
Q: Can I make crème brûlée in different size ramekins?
A: Yes, but adjust your baking time accordingly. Larger, deeper ramekins (8 ounces) need 45-50 minutes, while smaller ones (4 ounces) may only need 30-35 minutes. Always use the jiggle test and temperature check rather than relying solely on time.
Conclusion
There you have it—everything you need to create absolutely perfect crème brûlée in your own kitchen! I know it might seem intimidating at first, but trust me, once you make it a few times, you’ll wonder why you ever thought it was difficult. The combination of silky vanilla custard and that satisfying crack of caramelized sugar is pure dessert magic, and there’s something incredibly satisfying about creating such an elegant restaurant-quality dessert at home.
The beauty of this recipe is that it looks and tastes like you spent hours in the kitchen, but the actual hands-on time is minimal. Plus, since you make them ahead, you’re not rushing around during dinner trying to throw together dessert. Just grab your torch, caramelize those sugar tops, and watch your guests’ faces light up when you bring these beauties to the table.
I’d love to hear how your crème brûlée turns out! Did you try any flavor variations? Did you torch tableside for dramatic effect? Leave a comment below and let me know. And if you loved this recipe, please pin it to your favorite Pinterest board so you can find it easily next time you’re planning a special dinner. Don’t forget to snap a photo of your gorgeous crème brûlée and tag me—I love seeing your culinary creations!
Happy baking, and enjoy every silky, caramelized spoonful! 🍮✨