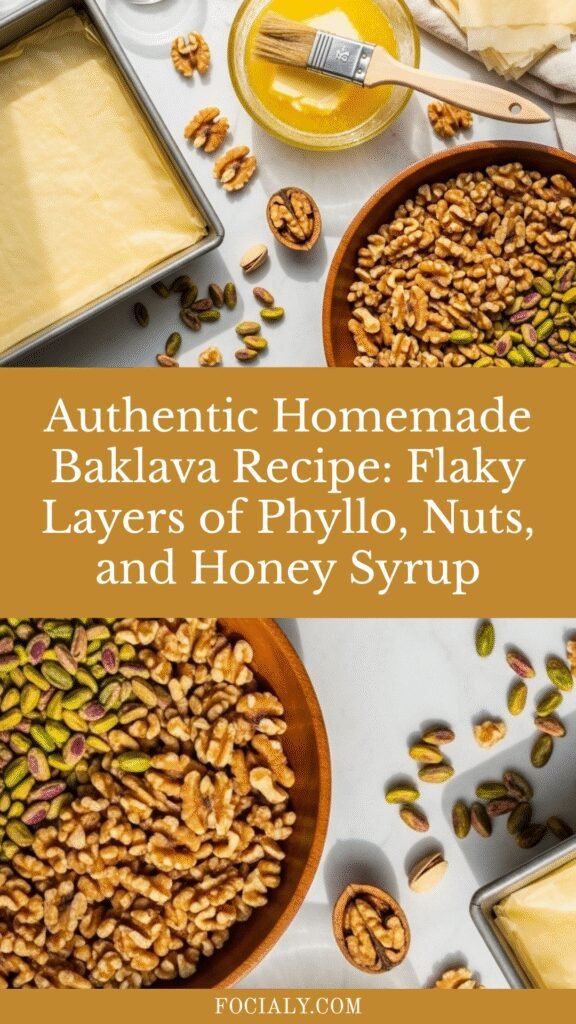
Authentic Homemade Baklava Recipe: Flaky Layers of Phyllo, Nuts, and Honey Syrup
If you’ve ever bitten into a piece of baklava and experienced that incredible moment when crispy, buttery phyllo layers give way to a sweet, nutty filling drenched in fragrant honey syrup, you know exactly why this ancient dessert has captivated people for centuries. Baklava is more than just a dessert—it’s an experience, a celebration, and honestly, one of the most rewarding things you can make in your home kitchen.
This flaky, golden pastry is a staple at Middle Eastern celebrations, Greek holidays, Turkish tea houses, and family gatherings across the Mediterranean. The combination of paper-thin phyllo dough, crunchy spiced nuts, melted butter, and aromatic honey syrup creates layers of texture and flavor that are simply unforgettable. Each bite delivers that satisfying crunch followed by the perfect balance of sweetness and nuttiness.
While baklava might look intimidating with all those delicate layers, I promise you it’s much easier than it appears. Yes, it requires some patience and a gentle touch, but the process is actually quite straightforward and even meditative. This homemade baklava recipe is perfect for special occasions like holidays, weddings, Eid celebrations, Christmas, or anytime you want to create something truly spectacular. Your guests will be absolutely amazed when you tell them you made it from scratch, and you’ll feel like a culinary superstar!
History / Background
Baklava’s history is as layered and complex as the dessert itself, with multiple countries claiming it as their own creation. The truth is, baklava’s origins stretch back centuries, and its evolution reflects the rich culinary交流 of the Ottoman Empire and the Mediterranean region.
Most food historians trace baklava’s roots to the Assyrian Empire around the 8th century BCE, where layers of bread dough were filled with nuts and sweetened with honey. However, the baklava we know today—made with delicate phyllo dough—really came into its own during the Ottoman Empire in the imperial kitchens of the Topkapı Palace in Istanbul during the 15th century. The palace chefs perfected the art of stretching dough into impossibly thin sheets, creating the flaky, multi-layered pastry that defines modern baklava.
The dessert spread throughout the Ottoman territories, which included modern-day Turkey, Greece, the Balkans, and much of the Middle East and North Africa. Each region adopted baklava and made it their own, creating distinctive variations that reflect local tastes and available ingredients. Turkish baklava often uses pistachios and is cut into diamond shapes, Greek baklava frequently features walnuts and is drenched in honey syrup flavored with cinnamon, while Lebanese baklava might include orange blossom water and cashews.
Baklava holds special significance in many cultures. In Turkey, it’s traditionally served at celebrations and is so revered that specific regions like Gaziantep are famous for their baklava-making expertise. In Greece, baklava is a staple at weddings, Easter, and Christmas celebrations. Throughout the Middle East, offering baklava to guests is a sign of hospitality and celebration.
The debate over baklava’s “true” origin continues to be a source of friendly rivalry between Turkey, Greece, and various Middle Eastern countries. But perhaps that’s the beauty of baklava—it belongs to all the cultures that have lovingly crafted and perfected it over generations. Today, baklava is enjoyed worldwide, and making it at home connects you to centuries of culinary tradition and craftsmanship.
Why You’ll Love This Recipe
This authentic baklava recipe delivers that perfect combination of crispy, flaky layers and sweet, nutty goodness that makes this dessert so addictive. I’ve tested and refined every step to ensure your homemade baklava turns out just as good—if not better—than what you’d find in the best Mediterranean bakeries.
Here’s why you’ll want to make this baklava recipe again and again:
- Easier Than It Looks: Despite the impressive appearance, baklava is actually quite forgiving—the butter hides any imperfections in the phyllo layers
- Incredibly Rewarding: The process is meditative and fun, and the results are absolutely stunning
- Crowd-Pleasing Perfection: Everyone loves baklava—it’s the dessert that disappears first at every gathering
- Customizable Flavors: Choose your favorite nuts and adjust the spices and sweetness to your preference
- Makes a Huge Batch: One pan yields 24-40 pieces, perfect for parties, potlucks, or gifting
- Stores Beautifully: Baklava actually tastes better after a day or two and keeps for weeks at room temperature
- Budget-Friendly Elegance: Despite its fancy reputation, the ingredients are surprisingly affordable
- No Special Equipment Needed: Just a baking pan, pastry brush, and sharp knife—that’s it!
- Cultural Connection: You’re participating in a centuries-old culinary tradition that spans continents
Ingredient Notes
Let’s break down what makes baklava so special. Each ingredient plays a crucial role in creating those iconic crispy, sweet, nutty layers.
Phyllo Dough (Filo Pastry): This paper-thin pastry dough is the foundation of baklava. You’ll find it in the freezer section of most grocery stores, usually near the frozen desserts or in the international foods aisle. A 1-pound package typically contains about 20 sheets. Thaw it overnight in the refrigerator, never at room temperature, to prevent it from becoming sticky. While you could theoretically make phyllo from scratch, I strongly recommend buying it—even professional bakers use store-bought phyllo.
Nuts: Traditional baklava uses walnuts, pistachios, or a combination of both. You’ll need about 3-4 cups of chopped nuts. Walnuts provide a classic, slightly bitter flavor that balances the sweetness perfectly. Pistachios create a gorgeous green color and offer a more delicate, buttery taste. Some recipes use almonds, hazelnuts, or cashews. Toast your nuts lightly before chopping to enhance their flavor. Chop them medium-fine—not powdery, but not chunky—so they distribute evenly between the layers.
Butter: You’ll need a full pound (4 sticks) of unsalted butter, melted and clarified if possible. The butter is what makes each phyllo layer crispy and golden. Use real butter, never margarine—the flavor difference is enormous. Clarified butter (ghee) is traditional and prevents the phyllo from becoming too brown, but regular melted butter works beautifully too.
Sugar: Used both in the nut filling (about ½ cup) and in the syrup (1½-2 cups). Granulated white sugar is standard, creating that classic sweet flavor. The sugar in the filling helps the nuts stick together, while the syrup sugar dissolves completely to create that glossy, sweet coating.
Honey: About ¾ to 1 cup goes into the syrup, providing baklava’s signature floral sweetness. Use a good-quality honey—the flavor really shines through. Light-colored honey like clover or wildflower works beautifully. For a more distinctive taste, try Greek honey, orange blossom honey, or even pine honey if you can find it.
Spices: Ground cinnamon (1-2 teaspoons) is essential for warmth and depth. Some recipes also include cardamom, cloves, or nutmeg for additional complexity. The spices should complement, not overpower, the nuts.
Flavorings for Syrup: Lemon juice (2-3 tablespoons) balances the sweetness and prevents the syrup from crystallizing. Optional additions include vanilla extract, rose water, or orange blossom water for an authentic Middle Eastern touch. Just a teaspoon or two adds lovely aromatic complexity.
Water: About 1 cup goes into the syrup, helping to achieve the right consistency—thick enough to coat the baklava but thin enough to soak into all those layers.
Equipment Needed
Baklava doesn’t require any fancy equipment, but having the right tools makes the process much smoother:
- 9×13-inch Baking Pan: This standard size is perfect for baklava. Metal pans work best for even browning and heat distribution. Make sure it’s at least 2 inches deep.
- Pastry Brush: Essential for brushing butter between the phyllo layers. A natural bristle brush or silicone brush both work well—choose one that’s about 1-2 inches wide.
- Sharp Knife or Pizza Cutter: For cutting the baklava before baking. A very sharp knife prevents tearing the delicate phyllo layers.
- Medium Saucepan: For making the honey syrup. A 2-3 quart saucepan is ideal.
- Small Pot or Microwave-Safe Bowl: For melting the butter. I like to keep the butter warm throughout the process.
- Kitchen Towel or Plastic Wrap: To cover the phyllo dough while working—phyllo dries out incredibly quickly when exposed to air.
- Measuring Cups and Spoons: Precision helps, especially for the syrup ingredients.
- Mixing Bowl: For combining the nuts, sugar, and spices.
- Food Processor (Optional): Makes chopping nuts quick and uniform, but a sharp knife works fine too.
- Cooling Rack: For cooling the syrup before pouring over hot baklava.
Authentic Homemade Baklava Recipe: Flaky Layers of Phyllo, Nuts, and Honey Syrup
Authentic homemade baklava with layers of crispy phyllo dough, spiced nuts, and sweet honey syrup. This impressive Mediterranean dessert is easier to make than you think and perfect for celebrations!
- Prep Time: 30 minutes
- Cook Time: 50 minutes
- Total Time: 1 hour 35 minutes
- Yield: 30-36 pieces 1x
- Category: Dessert
- Method: Baking
- Cuisine: Middle Eastern, Greek, Turkish
- Diet: Vegetarian
Ingredients
For the Baklava:
- 1 pound phyllo dough (filo pastry), thawed according to package directions
- 1 pound (4 sticks) unsalted butter, melted
- 4 cups walnuts, pistachios, or a combination, finely chopped
- ½ cup granulated sugar
- 2 teaspoons ground cinnamon
- ¼ teaspoon ground cloves (optional)
- ¼ teaspoon salt
For the Honey Syrup:
- 1½ cups granulated sugar
- 1 cup water
- ¾ cup honey
- 3 tablespoons fresh lemon juice
- 1 cinnamon stick
- 3-4 whole cloves (optional)
- 1 teaspoon vanilla extract or 1 tablespoon rose water (optional)
Instructions
- Prepare Ingredients: Remove phyllo dough from the freezer and thaw in the refrigerator overnight. Let it sit at room temperature for 1 hour before using. Preheat your oven to 350°F (175°C). Melt the butter and keep it warm. If desired, clarify it by skimming off the foam.
- Make Nut Filling: In a food processor or by hand with a knife, chop the nuts to a medium-fine consistency—you want texture, not nut butter. Transfer to a bowl and mix with ½ cup sugar, cinnamon, cloves (if using), and salt. Set aside.
- Prepare Phyllo: Carefully unroll the phyllo dough and lay it flat. Using your 9×13-inch pan as a guide, trim the phyllo sheets to fit if necessary (a little overhang is fine—you can fold it in). Immediately cover the stack with a slightly damp kitchen towel or plastic wrap to prevent drying.
- Butter the Pan: Generously brush the bottom and sides of your 9×13-inch baking pan with melted butter.
- Layer Bottom Phyllo: Place one sheet of phyllo in the pan and brush it completely with melted butter. Repeat this process, layering phyllo and buttering each sheet, until you’ve used about 8-10 sheets. Each sheet should be completely buttered before adding the next.
- Add First Nut Layer: Sprinkle about one-third of the nut mixture evenly over the phyllo base. Spread it gently to cover the entire surface.
- Create Middle Layers: Layer 4-5 more buttered phyllo sheets on top of the nuts. Add another third of the nut mixture. Layer 4-5 more buttered phyllo sheets, then add the final third of the nut mixture.
- Top Phyllo Layers: Finish with the remaining phyllo sheets (about 8-10 sheets), buttering each layer generously. Make sure the top layer is very well buttered—this ensures beautiful golden browning.
- Cut the Baklava: Using a very sharp knife, cut the baklava into diamonds or squares. Cut lengthwise into 4-5 strips, then diagonally to create diamond shapes. Cut all the way through to the bottom—this is crucial for allowing the syrup to penetrate. You can also cut straight lines to create squares if you prefer.
- Bake: Place the pan in the preheated oven and bake for 45-50 minutes, until the top is golden brown and crispy. If the top browns too quickly, tent loosely with aluminum foil for the last 15 minutes.
- Make the Syrup: While the baklava bakes, combine sugar, water, honey, lemon juice, cinnamon stick, and cloves in a medium saucepan. Bring to a boil over medium-high heat, stirring to dissolve the sugar. Reduce heat and simmer for 10-12 minutes until slightly thickened—it should coat the back of a spoon. Remove from heat, discard the cinnamon stick and cloves, and stir in vanilla or rose water if using. Let cool to room temperature.
- Add Syrup: This is the secret: one component must be hot, one must be cool. As soon as the baklava comes out of the oven (while it’s hot), immediately pour the cooled syrup evenly over the entire surface. You’ll hear it sizzle—that’s perfect! Use a spoon to distribute syrup into the cut lines. Let it soak in completely.
- Rest: Let the baklava sit uncovered at room temperature for at least 4 hours, preferably overnight. This allows the syrup to fully absorb and the layers to set properly. Resist cutting into it early—patience is rewarded!
- Serve: Re-cut along the original lines if needed, and serve at room temperature. Baklava is traditionally enjoyed with Turkish coffee, Arabic coffee, or hot tea.
Notes
- Keep phyllo covered at all times while working—it dries out in minutes when exposed to air.
- The hot/cold rule is essential: hot baklava + cold syrup OR cold baklava + hot syrup. Never both hot or both cold, or the phyllo will become soggy.
- Don’t skimp on butter—generously buttering each layer is what creates that incredible flaky texture.
- Cut all the way through before baking, not after. This ensures clean cuts and allows the syrup to penetrate every layer.
- If your phyllo tears (it happens!), don’t worry. Just patch it with another piece and butter over it. The layers hide imperfections beautifully.
Nutrition
- Serving Size: 1 piece (based on 36 pieces)
- Calories: 195
- Sugar: 16g
- Sodium: 95mg
- Fat: 12g
- Saturated Fat: 5g
- Unsaturated Fat: 6g
- Trans Fat: 0g
- Carbohydrates: 21g
- Fiber: 1g
- Protein: 3g
- Cholesterol: 20mg
Tips & Variations
Once you master the basic technique, baklava becomes your canvas for creativity! Here are some delicious ways to customize this recipe:
Nut Variations:
- All Walnut: Classic and traditional with a slightly bitter note that balances the sweetness perfectly
- All Pistachio: Premium and gorgeous with bright green color throughout
- Mixed Nuts: Combine walnuts, pistachios, and almonds for complex flavor and texture
- Hazelnut Baklava: Toast hazelnuts until fragrant for a Nutella-like flavor profile
- Cashew Baklava: Creates a buttery, mild sweetness—popular in Lebanese versions
Spice Combinations:
- Add ½ teaspoon cardamom to the nut mixture for authentic Middle Eastern flavor
- Include a pinch of ground nutmeg or allspice for warmth
- Try orange zest mixed into the nuts for citrus brightness
- Use whole star anise in the syrup for an exotic touch
Syrup Flavor Twists:
- Rose Water Baklava: Add 1-2 tablespoons rose water to the syrup for Persian-style baklava
- Orange Blossom: Use orange blossom water instead of vanilla for Lebanese flavor
- Maple Baklava: Replace half the honey with pure maple syrup
- Chocolate Drizzle: Melt dark chocolate and drizzle over cooled baklava for extra decadence
Healthier Options:
- Use half butter and half coconut oil or olive oil (traditional in some regions)
- Reduce sugar in both filling and syrup by 25% if you prefer less sweet
- Make mini baklava bites in a muffin tin for portion control
Shape Variations:
- Roll phyllo and nuts into cigars (fingers) instead of layering
- Create baklava roses by rolling strips around nut filling
- Make baklava cups in muffin tins for individual servings
Pro Chef Tips
After making countless batches of baklava, I’ve learned these professional secrets that guarantee success every time:
Phyllo Handling Mastery: Phyllo dough is delicate but forgiving. If a sheet tears, simply overlap another piece and butter over it—once baked, you’ll never know. Work quickly but calmly, and always keep unused sheets covered with a slightly damp (not wet) towel. Remove only one sheet at a time.
Butter Temperature Matters: Keep your melted butter warm throughout the entire process. If it starts to solidify, it won’t brush on smoothly and might tear the phyllo. Some bakers keep it in a small pot over the lowest heat setting or in a bowl over warm water.
The Hot/Cold Rule is Sacred: This is the single most important tip for perfect texture. You must have a temperature contrast when adding syrup: pour cold syrup over hot baklava OR hot syrup over cold baklava. Never both hot or both cold. The temperature shock helps the syrup absorb properly without making the phyllo soggy.
Cut Before Baking: Always cut your baklava all the way through to the bottom before baking, not after. This serves two purposes: it creates clean cuts (phyllo shatters if you try to cut it when crispy), and it allows the syrup to flow down into every layer.
Don’t Rush the Resting Time: Baklava needs at least 4 hours to absorb the syrup and set properly, but overnight is even better. In fact, many bakers insist baklava tastes best on day two or three when the flavors have fully melded. Plan accordingly and resist the urge to dig in immediately!
Generous Buttering: Don’t be stingy with the butter between layers. Each sheet should glisten with butter. This is what creates those impossibly crispy, flaky layers and prevents the phyllo from becoming tough or papery.
Syrup Consistency: Your syrup should coat the back of a spoon but still be pourable—like a thin maple syrup. If it’s too thick, it won’t penetrate the layers; too thin and your baklava will be soggy. Simmer for 10-12 minutes to achieve perfect consistency.
Sharp Knife is Essential: Use your sharpest knife or a pizza cutter to score the baklava. Dull knives drag and tear the phyllo. Wipe the knife clean between cuts for the neatest results.
Common Mistakes to Avoid
Learn from these common pitfalls so your first batch turns out perfectly:
- Letting Phyllo Dry Out: This is mistake #1! Phyllo becomes brittle and unusable within minutes of air exposure. Always keep it covered with a damp towel or plastic wrap, removing only one sheet at a time. If sheets do dry out and crack, sprinkle them lightly with water or brush with extra butter—this sometimes rescues them.
- Adding Hot Syrup to Hot Baklava: This creates a soggy, greasy mess instead of crispy layers. You MUST have one element cold and one hot. Most traditional recipes pour room-temperature or cool syrup over hot baklava straight from the oven. The sizzle is music to a baker’s ears!
- Under-Buttering the Layers: Skimping on butter to save calories ruins the texture. Baklava is meant to be indulgent—embrace it! Each phyllo layer needs a complete coating of butter. If you’re worried about richness, just eat smaller portions.
- Cutting After Baking: Trying to cut through baked phyllo creates a mess of shattered pieces. Always score your baklava all the way through before it goes in the oven. Use a very sharp knife and confident, clean cuts.
- Using Frozen Phyllo Without Proper Thawing: Phyllo must thaw slowly in the refrigerator overnight, then come to room temperature for about an hour before use. Quick-thawing at room temperature or in the microwave creates condensation that makes the sheets stick together in a unusable clump. Plan ahead for proper thawing!
Storage & Meal Prep
One of baklava’s best qualities is its impressive shelf life—it actually improves with age!
Room Temperature Storage: Store baklava uncovered or loosely covered with a clean kitchen towel at room temperature for up to 2 weeks. Don’t use an airtight container or plastic wrap for the first few days—baklava needs air circulation to maintain its crispy texture. After 3-4 days, you can cover more tightly, though it may lose some crispness. Keep it away from humidity and direct sunlight.
Refrigerator Storage: You can refrigerate baklava in an airtight container for up to 3-4 weeks, but it will lose its signature crispness and the butter may solidify. Bring to room temperature before serving—cold baklava has a chewy rather than crispy texture. Most traditionalists recommend room temperature storage only.
Serving Temperature: Baklava is always served at room temperature, never cold or warm. This allows you to taste all the complex flavors and enjoy that perfect textural contrast between crispy phyllo and tender nuts.
Reheating: Baklava doesn’t need reheating since it’s served at room temperature. However, if you want to restore crispness to baklava that’s become slightly soft, place pieces on a baking sheet in a 300°F oven for 5-7 minutes. Let cool completely before serving—never serve warm baklava.
Gifting: Baklava makes an incredible homemade gift! Arrange pieces in a decorative tin or box lined with parchment paper, layering with parchment between layers. It travels beautifully and the recipient can enjoy it for weeks.
Make-Ahead & Freezer Notes
Baklava is an excellent make-ahead dessert, perfect for entertaining when you want to spread out the work.
Make-Ahead Timeline:
- Up to 2 Weeks Before: Make the entire baklava, let it absorb syrup, and store at room temperature. The flavor actually improves over time as everything melds together.
- Day Before: This is ideal timing—baklava on day two is absolute perfection with fully absorbed syrup and set layers.
- Same Day: Make it in the morning for an evening event. Just ensure it has at least 4 hours to rest before serving.
Freezing Unbaked Baklava: You can assemble baklava completely, cut it, but freeze it before baking. Wrap the entire pan tightly in plastic wrap, then aluminum foil. Freeze for up to 3 months. When ready to bake, don’t thaw—put it directly in the preheated oven and add 10-15 minutes to the baking time. Prepare syrup while it bakes and pour over as usual.
Freezing Baked Baklava: Freeze fully baked and syrup-soaked baklava pieces individually wrapped in plastic wrap, then stored in a freezer-safe container for up to 3 months. Thaw at room temperature for 2-3 hours before serving. The texture changes slightly but it’s still delicious. Don’t refreeze once thawed.
Best Make-Ahead Method: I recommend making baklava completely, letting it rest overnight, and storing at room temperature. This provides the absolute best texture and flavor with zero extra work on serving day.
Serving Suggestions
Baklava is traditionally enjoyed as a sweet accompaniment to coffee or tea, but here are creative ways to serve this stunning dessert:
Traditional Pairings:
- Turkish or Arabic Coffee: The strong, slightly bitter coffee cuts through the sweetness perfectly
- Hot Tea: Try Earl Grey, chamomile, or traditional mint tea
- Espresso: A small cup of espresso is ideal for balancing the rich sweetness
Beverage Pairings:
- Sweet Dessert Wine: Moscato, late-harvest Riesling, or Sauternes complement the honey beautifully
- Arak or Ouzo: Traditional anise-flavored spirits served diluted with water
- Port Wine: Ruby port’s rich sweetness matches baklava’s intensity
Serving Presentation:
- Arrange diamond-shaped pieces on a decorative platter with fresh mint leaves
- Dust very lightly with powdered sugar for extra elegance
- Garnish with a few whole pistachios or walnut halves
- Serve each piece on a small dessert plate with a demitasse of coffee
Accompaniments:
- A small scoop of vanilla ice cream or whipped cream (though not traditional, it’s delicious)
- Fresh berries like raspberries or strawberries for tart contrast
- Thick Greek yogurt for breakfast—yes, baklava makes an incredible breakfast pastry!
Occasion Ideas:
- Wedding dessert tables
- Holiday celebrations (Christmas, Eid, Easter, Nowruz)
- Dinner party finale
- Afternoon tea party centerpiece
- Potluck contribution that will make you legendary
FAQs Section
Q: Can I use melted butter instead of clarified butter?
A: Absolutely! While clarified butter (ghee) is traditional and prevents over-browning, regular melted unsalted butter works beautifully. Just skim off any foam from the top if you want, but it’s not necessary. The difference is minimal, especially for home bakers.
Q: Why is my baklava soggy instead of crispy?
A: The most common cause is breaking the hot/cold rule—you added hot syrup to hot baklava, creating steam that makes everything soggy. Always ensure one component is cool and one is hot. Other causes include using too much syrup, not baking long enough, or storing in an airtight container while still warm.
Q: How do I prevent phyllo dough from tearing?
A: First, ensure it’s properly thawed (slowly in the refrigerator, then to room temperature). Keep it covered with a damp towel at all times. Work gently but confidently—hesitation causes more tears than quick, decisive movements. If tears happen, simply patch with another piece and butter over it. The layers hide imperfections completely.
Q: Can I make baklava without honey?
A: Yes! You can make an all-sugar syrup using 2½ cups sugar and 1½ cups water with lemon juice. It won’t have honey’s floral notes, but it will still be delicious. Alternatively, use maple syrup or agave nectar for different flavor profiles.
Q: How do I cut baklava into perfect diamonds?
A: Use a very sharp knife or pizza cutter and a ruler for straight lines. First, cut lengthwise down the pan into 4-5 equal strips. Then, starting at one corner, cut diagonal lines at the same spacing—these will intersect with your straight cuts to create diamonds. Cut slowly and deliberately, applying even pressure, and wipe your knife clean between cuts.
Q: Why did my phyllo burn on top?
A: Your oven was likely too hot, or you didn’t use enough butter on the top layers. Always verify oven temperature with an oven thermometer—many ovens run hot. The top layer should be very generously buttered to protect it from burning. If your baklava is browning too quickly, tent it loosely with aluminum foil for the last 15-20 minutes of baking.
Q: How long does homemade baklava last?
A: Properly stored at room temperature, baklava stays fresh for 2 weeks, sometimes longer. In the refrigerator, it keeps for 3-4 weeks but loses crispness. Frozen, it lasts up to 3 months. Honestly, most batches disappear within days—it’s that good!
Conclusion
There you have it—everything you need to create authentic, bakery-quality baklava right in your own kitchen! I know those layers of phyllo might seem daunting at first, but trust me, once you make your first batch, you’ll realize it’s more about patience and process than any special skill. The methodical layering, buttering, and assembling is actually quite therapeutic, and the incredible aroma that fills your kitchen while it bakes makes every minute worthwhile.
The best part about baklava is that it’s genuinely a labor of love that people can taste. When you serve these golden, flaky, sweet-soaked pastries to family and friends, you’re sharing not just a dessert, but a piece of culinary history that spans centuries and cultures. Every crispy, nutty, honey-drenched bite connects you to generations of bakers who’ve perfected this art.
Whether you’re making baklava for a special celebration, experimenting with different nut combinations, or simply wanting to challenge yourself with something new, this recipe will guide you to success. Remember: keep that phyllo covered, be generous with butter, respect the hot/cold syrup rule, and have patience while it absorbs and sets. Follow these guidelines, and you’ll be rewarded with absolutely spectacular results.
I’d absolutely love to hear about your baklava adventures! Did you use walnuts, pistachios, or a mix? Did you add rose water to your syrup? How long did your batch last before everyone devoured it? Leave a comment below and share your experience. And please, if you loved this recipe, pin it to your favorite Pinterest board so you can find it easily next time a special occasion calls for an impressive homemade dessert!
Now grab that phyllo dough and get baking—your kitchen is about to smell absolutely amazing! Happy baking! 🥮✨