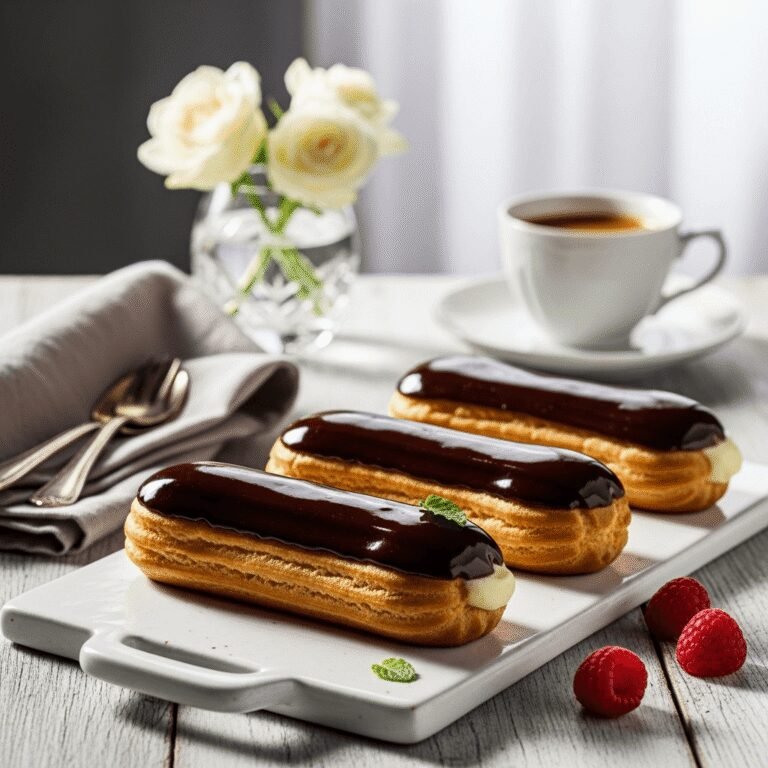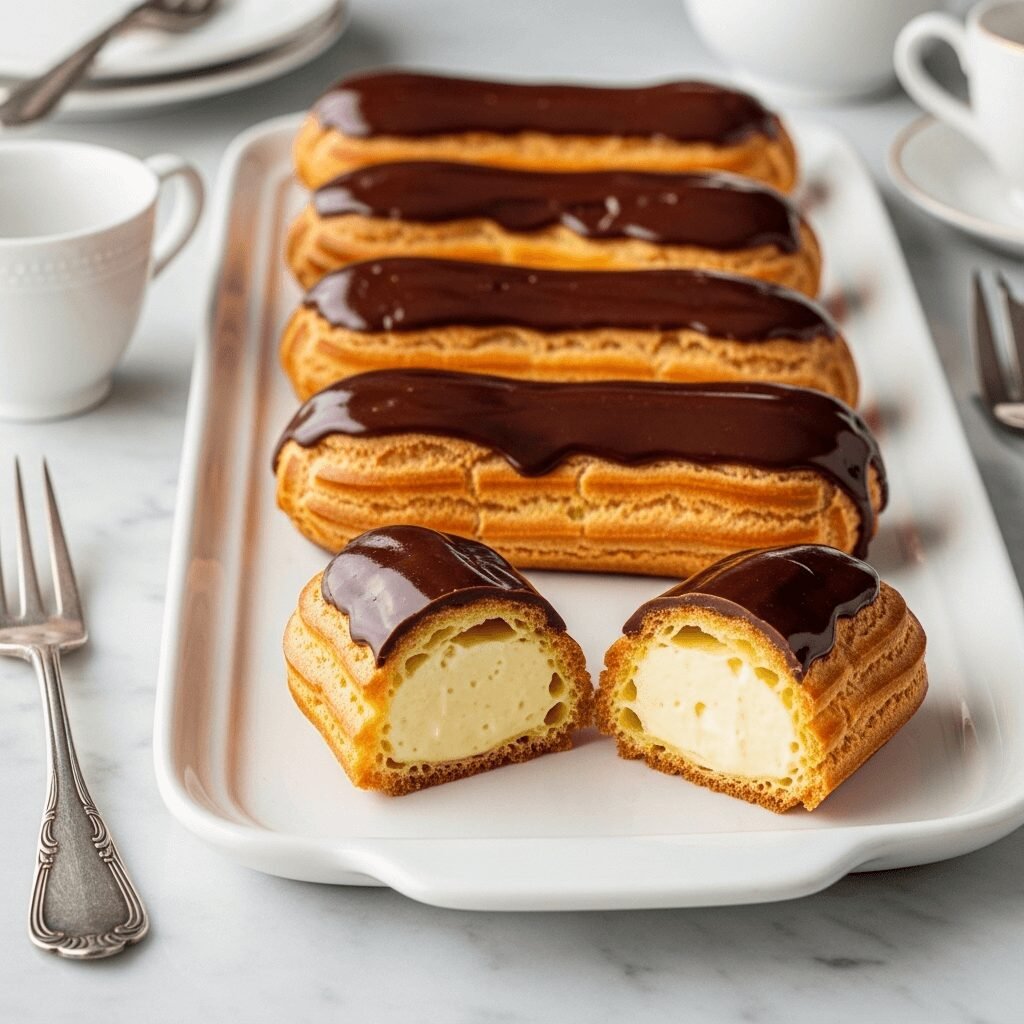
Homemade Chocolate Eclairs – Classic French Pastry Made Easy

Chocolate eclairs are the epitome of French pastry elegance – delicate oblong pastries made from crispy choux dough, filled with silky vanilla pastry cream, and topped with glossy chocolate glaze. These gorgeous treats look like they came straight from a Parisian patisserie, but here’s the secret: you can make authentic chocolate eclairs right in your own kitchen! Despite their impressive appearance, eclairs follow a straightforward process that home bakers can absolutely master. They’re perfect for special occasions like birthday parties, bridal showers, holiday dessert tables, or elegant afternoon tea. There’s something magical about biting through the crispy shell into that smooth, creamy filling, finished with rich chocolate – it’s a texture and flavor combination that never fails to delight. This homemade chocolate eclair recipe will guide you through each step to create bakery-quality results!
History / Background
The chocolate eclair has a rich history rooted in French culinary tradition. The name “éclair” literally means “lightning” in French, and there are two popular theories about how these pastries got their name. The first suggests that the name refers to how quickly they’re eaten – they’re so delicious they disappear in a flash, like lightning! The second theory is that the glaze on top glistens and reflects light, resembling a flash of lightning.
Eclairs were first created in France during the nineteenth century, with credit often given to the legendary French chef Marie-Antoine Carême, who is considered the founder of French haute cuisine. Carême served as chef to European royalty and aristocracy in the early 1800s and is credited with elevating French cooking to an art form. While the exact date of the eclair’s invention is debated, recipes began appearing in French cookbooks in the 1850s.
The foundation of an eclair is choux pastry (pâte à choux), a light pastry dough that dates back even further to the Renaissance. This unique dough is cooked twice – first on the stovetop and then in the oven – which creates its characteristic hollow interior and crispy exterior. The technique was perfected in France and became the basis for many classic French pastries including eclairs, cream puffs, profiteroles, and Paris-Brest.
Traditional French eclairs were originally filled with coffee or chocolate-flavored cream and topped with fondant icing. Over time, vanilla pastry cream became the most popular filling, paired with chocolate glaze on top – the classic combination we know and love today. This pairing creates perfect balance: the neutral vanilla filling allows the chocolate to shine while the crisp pastry shell provides textural contrast.
Eclairs gained international fame in the late 19th and early 20th centuries as French cuisine spread across Europe and America. They became symbols of sophistication and French culinary expertise. Today, creative bakers have expanded on the classic with countless variations – pistachio, raspberry, caramel, and even savory versions – but the traditional chocolate eclair remains the most beloved.
In France, eclairs are commonly found in every patisserie and are enjoyed as an afternoon treat with coffee or tea. They’re considered special occasion pastries rather than everyday desserts, which adds to their allure. Making eclairs at home connects you to centuries of French baking tradition and brings that Parisian elegance to your own kitchen.
Why You’ll Love This Recipe
This homemade chocolate eclair recipe demystifies French pastry-making and proves that you don’t need professional training to create stunning, delicious results. The process is more approachable than you might think!
- Easier than you think – clear steps break down the seemingly complex process
- Impressive presentation – looks like you spent hours at a French bakery
- Light and airy texture – choux pastry creates a delicate, crispy shell
- Rich but not heavy – perfectly balanced flavors and textures
- Customizable filling – endless flavor possibilities once you master the base
- Make-ahead friendly – components can be prepared separately
- Perfect for entertaining – elegant individual servings need no plating
- Fun baking project – satisfying to watch the pastry puff up in the oven
- Classic French technique – master choux pastry for many other recipes
- Budget-friendly elegance – uses simple, inexpensive ingredients
- Crowd-pleaser – universally loved by kids and adults
- Special occasion worthy – ideal for celebrations and gatherings
Ingredient Notes
For the Choux Pastry:
Water and Milk: The liquid base for choux pastry. Using a combination of water and milk creates a richer dough with better color than water alone, though you can use all water if needed.
Butter: Adds richness, flavor, and helps create the flaky texture. Unsalted butter is preferred so you can control the salt level. Don’t substitute with oil or margarine – butter is essential for authentic flavor.
Salt: Enhances all the flavors in the pastry. Even sweet pastries need salt to taste balanced and prevent flatness.
All-Purpose Flour: Creates the structure of the pastry. Bread flour can be used for a crispier shell, but all-purpose provides the best balance of crispy outside and tender inside.
Eggs: The leavening agent in choux pastry! As the eggs heat in the oven, the water in them turns to steam, creating the hollow interior. Eggs also provide structure and richness. Room temperature eggs incorporate more easily.
For the Vanilla Pastry Cream:
Whole Milk: The base of the custard filling. Whole milk creates the richest, creamiest texture. Low-fat milk can be used but will be less luxurious.
Granulated Sugar: Sweetens the pastry cream. The sugar also helps stabilize the eggs during cooking.
Egg Yolks: Create the thick, custard-like texture and golden color. The more yolks, the richer the cream. Save the whites for another recipe!
Cornstarch: The thickening agent that transforms liquid milk into pudding-like cream. It creates a stable filling that won’t make the pastry soggy.
Vanilla Extract: The signature flavoring. Use pure vanilla extract, not imitation, for the best taste. You can also use vanilla bean paste or scrape a vanilla bean for even more intense flavor.
For the Chocolate Glaze:
Semi-Sweet Chocolate: The star of the topping! Use good quality chocolate for the best flavor – chocolate chips work, but chopped bar chocolate melts more smoothly. Semi-sweet provides perfect balance, but dark chocolate works beautifully too.
Heavy Cream: Creates a smooth, glossy glaze. The fat in cream helps the chocolate stay shiny and prevents it from becoming dull or chalky.
Butter: Adds extra shine and makes the glaze even more luscious. This small addition makes a noticeable difference.
Corn Syrup: Optional but recommended – it adds incredible shine to the glaze and keeps it from hardening too much. Light corn syrup works best.
Equipment Needed
- Medium saucepan (for cooking choux pastry)
- Large saucepan (for making pastry cream)
- Wooden spoon or sturdy spatula
- Electric mixer (optional but helpful)
- Baking sheet
- Parchment paper or silicone baking mat
- Piping bag with large round tip (or gallon freezer bag)
- Small piping tip (for filling, or use a zip-top bag)
- Whisk
- Fine-mesh strainer
- Rubber spatula
- Measuring cups and spoons
- Mixing bowls (various sizes)
- Plastic wrap
- Wire cooling rack
Homemade Chocolate Eclairs – Classic French Pastry Made Easy

These classic homemade chocolate eclairs feature crispy choux pastry shells filled with silky vanilla pastry cream and topped with glossy chocolate glaze. They look and taste like they came from a French bakery but are surprisingly achievable at home. Perfect for special occasions or any time you want an elegant, impressive dessert!
- Prep Time: 30 minutes
- Cook Time: 40 minutes
- Total Time: 1 hour 10 minutes (plus cooling and chilling time)
- Yield: 12 eclairs 1x
- Category: Dessert
- Method: Baking
- Cuisine: French
- Diet: Vegetarian
Ingredients
For the Choux Pastry:
- ½ cup water
- ½ cup whole milk
- ½ cup (1 stick) unsalted butter, cut into pieces
- 1 tablespoon granulated sugar
- ½ teaspoon salt
- 1 cup all-purpose flour
- 4 large eggs, room temperature
For the Vanilla Pastry Cream:
- 2 cups whole milk
- ½ cup granulated sugar, divided
- 4 large egg yolks
- 3 tablespoons cornstarch
- 2 tablespoons unsalted butter
- 2 teaspoons pure vanilla extract
For the Chocolate Glaze:
- 4 ounces semi-sweet chocolate, finely chopped
- ⅓ cup heavy cream
- 1 tablespoon unsalted butter
- 1 tablespoon light corn syrup (optional, for extra shine)
Instructions
Make the Pastry Cream:
- In a medium saucepan, heat the milk and ¼ cup sugar over medium heat until steaming and sugar dissolves. Don’t let it boil.
- In a bowl, whisk together egg yolks, remaining ¼ cup sugar, and cornstarch until smooth and pale yellow.
- Slowly pour about half the hot milk into the egg mixture while whisking constantly (this tempers the eggs). Then pour the egg mixture back into the saucepan with remaining milk.
- Cook over medium heat, whisking constantly, until the mixture thickens and comes to a boil. Let it boil for 1 minute while whisking continuously – this cooks out the starchy taste.
- Remove from heat and whisk in butter and vanilla until smooth. Pour through a fine-mesh strainer into a clean bowl.
- Press plastic wrap directly onto the surface to prevent skin from forming. Refrigerate until completely cold, at least 2 hours or overnight.
Make the Choux Pastry:
- Preheat oven to 425°F (220°C). Line a baking sheet with parchment paper or a silicone mat.
- In a medium saucepan, combine water, milk, butter, sugar, and salt. Bring to a rolling boil over medium-high heat, stirring occasionally to ensure butter melts.
- Remove from heat and add all the flour at once. Stir vigorously with a wooden spoon until the mixture forms a smooth ball and pulls away from the sides of the pan, about 1-2 minutes. A thin film will form on the bottom of the pan – this is good!
- Transfer the dough to a mixing bowl (or continue in the pan if you prefer). Let cool for 5 minutes – the dough should be warm but not hot, or it will cook the eggs.
- Add eggs one at a time, mixing vigorously after each addition. The dough will look separated and broken at first but will come together with continued mixing. After the last egg, the dough should be smooth, glossy, and slowly fall from the spoon in a thick ribbon. If it’s too stiff, beat another egg in a small bowl and add it gradually until you reach the right consistency.
- Transfer dough to a piping bag fitted with a large round tip (or a gallon freezer bag with the corner cut off to create a ¾-inch opening).
- Pipe 4-5 inch long strips of dough onto the prepared baking sheet, spacing them about 2 inches apart. You should get about 12 eclairs. Use a wet finger to smooth any peaks or points.
- Bake at 425°F for 15 minutes, then reduce temperature to 375°F (190°C) without opening the oven door and bake for an additional 20-25 minutes until golden brown, puffed, and dry-looking. Don’t open the oven during baking or they may collapse!
- Turn off oven, crack the door open slightly, and let eclairs sit in the cooling oven for 10 minutes. This dries them out and prevents collapse.
- Remove from oven and transfer to a wire rack. Use a skewer or small knife to poke a few small holes in each eclair to release steam. Cool completely.
Make the Chocolate Glaze:
- Place chopped chocolate in a heat-proof bowl. Heat the cream and butter in a small saucepan until just simmering.
- Pour hot cream mixture over chocolate and let sit undisturbed for 1 minute. Then whisk until completely smooth and glossy. Stir in corn syrup if using. Let cool for 5-10 minutes until slightly thickened but still fluid.
Assemble the Eclairs:
- Transfer cold pastry cream to a piping bag fitted with a small round tip (or use a zip-top bag with a small corner cut off).
- Use the tip to poke 3 small holes along the bottom of each eclair shell. Pipe cream into each hole until the eclair feels full and heavy. You can also slice eclairs in half horizontally and pipe cream onto the bottom half, then replace the top.
- Dip the top of each filled eclair into the chocolate glaze, letting excess drip back into the bowl. Place on a serving platter.
- Refrigerate for at least 30 minutes to set the glaze before serving. Serve chilled or at cool room temperature.
Notes
- Don’t open the oven: Opening the oven door while eclairs are baking causes them to collapse. Wait until they’re golden and dry.
- Eggs at room temperature: They incorporate more easily into the warm dough.
- Dry out the dough: Cooking the flour-butter-liquid mixture until a film forms on the pan bottom is crucial – it removes excess moisture.
- Proper consistency: The finished choux dough should slowly fall from a spoon in a thick ribbon, not be too stiff or too runny.
- Cool completely: Never fill warm eclairs – they must be completely cool or the pastry cream will melt.
- Refrigerate: Eclairs keep best in the refrigerator and should be served cold or cool.
Nutrition
- Serving Size: 1 eclair
- Calories: 285
- Sugar: 18g
- Sodium: 185mg
- Fat: 16g
- Saturated Fat: 9g
- Unsaturated Fat: 6g
- Trans Fat: 0g
- Carbohydrates: 29g
- Fiber: 1g
- Protein: 6g
- Cholesterol: 155mg
Tips & Variations
Coffee Eclairs: Add 2 tablespoons instant espresso powder to the pastry cream for café-flavored eclairs. The coffee and chocolate combination is heavenly!
Chocolate Pastry Cream: Add ¼ cup cocoa powder to the pastry cream along with the cornstarch for double chocolate eclairs.
Caramel Eclairs: Top with salted caramel instead of chocolate glaze, or do half chocolate and half caramel for variety.
Raspberry Eclairs: Fill with raspberry pastry cream (add ½ cup raspberry puree to the basic cream) and top with white chocolate glaze.
Pistachio Eclairs: Add pistachio paste to the pastry cream and top with green-tinted white chocolate glaze and crushed pistachios.
Mini Eclairs: Pipe 2-inch eclairs for bite-sized treats perfect for parties. Reduce baking time by 5-7 minutes.
Profiteroles: Pipe round cream puffs instead of oblong eclairs using the same dough. Fill and top the same way.
Lighter Filling: Fold whipped cream into the cooled pastry cream for an airier, less rich filling.
Different Glazes: Try white chocolate, dark chocolate, peanut butter, or Nutella-based glazes.
Savory Eclairs: Omit sugar from the dough and fill with herbed cream cheese, smoked salmon mousse, or chicken salad for appetizers.
Pro Chef Tips
Cook the flour mixture thoroughly: After adding flour to the boiling liquid, cook it over medium heat while stirring constantly until a thin film forms on the bottom of the pan. This usually takes 1-2 minutes. This step is crucial – it removes excess moisture and cooks the flour, creating the structure needed for the pastry to puff properly.
Achieve the perfect dough consistency: The finished choux dough should slowly drop from a spoon in a thick, glossy ribbon. If you lift the spoon, the dough should cling for a moment before slowly sliding off. Too stiff and eclairs won’t puff; too loose and they’ll spread. The fourth egg usually gets you there, but you may need to add a fifth egg or just part of a fifth egg depending on moisture content and egg size.
Pipe confidently and consistently: Hold the piping bag at a 45-degree angle and apply steady, even pressure as you pipe each eclair, moving the bag in a straight line. Keep them uniform in size for even baking. Wet your finger with water and gently smooth any peaks or pointed ends – these burn in the oven.
Temperature matters: The initial high temperature (425°F) creates steam quickly, causing rapid puffing. The lower temperature (375°F) allows the structure to set and dry out without burning. Never open the oven door during baking – the temperature drop can cause collapse.
Test for doneness: Eclairs are done when they’re deeply golden brown (not pale), feel light when picked up, and sound hollow when tapped on the bottom. Underbaked eclairs will collapse when removed from the oven. When in doubt, bake a little longer.
Poke holes immediately: As soon as eclairs come out of the oven and while they’re still hot, poke small holes to release steam. This prevents the interior from becoming soggy as they cool. The shells should feel crispy and light, not heavy or damp.
Strain the pastry cream: Always pour hot pastry cream through a fine-mesh strainer even if you don’t see lumps. This guarantees silky-smooth cream. Any bits of cooked egg or undissolved cornstarch will be removed.
Glaze temperature: The chocolate glaze should be fluid but not hot. If it’s too hot, it will be too thin and run right off the eclairs. If it’s too cool, it won’t coat smoothly. The ideal consistency coats the back of a spoon and slowly drips off.
Fill right before serving: For maximum crispiness, fill and glaze eclairs the day you’ll serve them, ideally within a few hours. The moisture from the filling will eventually soften the crispy shells.
Common Mistakes to Avoid
Not cooking the flour mixture long enough: If you don’t cook the dough on the stovetop until a film forms on the pan bottom, excess moisture remains and prevents proper puffing. The dough needs to be quite dry before you add the eggs. Cook and stir vigorously for 1-2 minutes after adding flour.
Adding eggs to hot dough: If the cooked flour mixture is too hot when you add eggs, they’ll start to cook and scramble, creating a lumpy mess. Let the dough cool for about 5 minutes after cooking – it should be warm but comfortable to touch the outside of the pan.
Opening the oven door during baking: This is the most common reason for collapsed eclairs! The sudden temperature drop causes the delicate structure to collapse before it’s set. Keep that oven door closed until the eclairs are deeply golden and the full baking time has passed.
Underbaking: Pale, soft eclairs will collapse as they cool. They need to bake until deeply golden brown and dry-looking. The shells should feel crispy and light, not soft or heavy. When in doubt, bake longer – overbaking is better than underbaking with choux pastry.
Filling while still warm: Never fill warm eclairs! The heat will cause the pastry cream to melt and become runny, and it may even start to leak out. Eclairs must be completely cool to room temperature, and the pastry cream must be thoroughly chilled before assembly.
Too-thick pastry cream: If your pastry cream is overly thick and difficult to pipe, whisk it vigorously to loosen it, or thin it with a tablespoon of milk. It should be thick enough to hold its shape but fluid enough to pipe easily through a small tip.
Not using parchment or silicone mat: Baking eclairs directly on a metal pan can cause uneven browning and sticking. Always line your pan with parchment paper or a silicone baking mat for even heat distribution and easy removal.
Storage & Meal Prep
Storing Filled Eclairs: Filled and glazed eclairs should be stored in the refrigerator in an airtight container or loosely covered with plastic wrap. They’re best eaten within 24 hours while the shells are still somewhat crispy. After that, the pastry cream moisture will soften the shells significantly, though they’ll still taste delicious.
Storing Unfilled Shells: Baked, unfilled eclair shells can be stored in an airtight container at room temperature for 1-2 days. They’ll lose some crispiness but can be refreshed in a 300°F oven for 3-5 minutes before cooling and filling. This re-crisps the shells beautifully!
Storing Pastry Cream: Prepared pastry cream keeps in an airtight container in the refrigerator for up to 3 days. Always store with plastic wrap pressed directly on the surface to prevent skin formation. Whisk before using to restore smooth consistency.
Storing Chocolate Glaze: Leftover glaze can be refrigerated in an airtight container for up to 1 week. Reheat gently in the microwave in 15-second intervals or over a double boiler, stirring until smooth before using.
Best Storage Practice: For the crispiest results, store components separately and assemble within 2-4 hours of serving. Store baked shells at room temperature, pastry cream in the fridge, and glaze in the fridge (rewarmed before use).
Bringing to Room Temperature: While eclairs can be served cold from the refrigerator, they taste best when allowed to sit at room temperature for 15-20 minutes before serving. This takes the chill off the pastry cream and makes the chocolate glaze glossier.
Make-Ahead & Freezer Notes
Freeze Unfilled Shells: This is the best make-ahead strategy! Baked, completely cooled eclair shells freeze beautifully for up to 2 months. Place them in a single layer in a freezer container or bag. To use, thaw at room temperature for 30 minutes, then crisp in a 300°F oven for 5 minutes. Cool completely before filling.
Make Pastry Cream Ahead: Prepare pastry cream up to 3 days before assembly and store refrigerated with plastic wrap pressed onto the surface. This actually allows flavors to develop, making it taste even better!
Cannot Freeze Filled Eclairs: Do not freeze assembled eclairs. The pastry cream doesn’t freeze well and becomes watery when thawed. The chocolate glaze may also develop an unappealing appearance. Only freeze the unfilled shells.
Day-Before Assembly: You can assemble filled and glazed eclairs up to 6-8 hours before serving if needed, though they’re best assembled closer to serving time. Store refrigerated and loosely covered. The shells will soften but still taste wonderful.
Make Glaze Fresh: Chocolate glaze is so quick to make (5 minutes!) that it’s best made fresh when you’re ready to assemble. However, you can make it several hours ahead and reheat gently before using.
Ideal Make-Ahead Timeline:
- 1-2 months ahead: Bake and freeze shells
- 2-3 days ahead: Make pastry cream and refrigerate
- Day of serving: Thaw and crisp shells, make glaze, fill and glaze eclairs 2-4 hours before serving
Freezing Choux Dough: You can pipe unbaked choux onto a baking sheet, freeze until solid, then store in freezer bags for up to 1 month. Bake directly from frozen, adding 5 minutes to baking time.
Serving Suggestions
Chocolate eclairs are elegant individual desserts that need no additional plating, but here are ways to enhance the experience:
Perfect Occasions:
- Birthday parties (both kids and adults love them!)
- Bridal or baby showers
- Afternoon tea parties
- French-themed dinners
- Holiday dessert tables
- Graduation celebrations
- Valentine’s Day treats
- Mother’s Day brunch
Beverage Pairings:
- French press coffee or espresso (the classic pairing!)
- Hot tea (especially Earl Grey or English Breakfast)
- Champagne or sparkling wine for celebrations
- Dessert wine like Sauternes or late-harvest Riesling
- Hot chocolate for a double chocolate experience
- Cold milk (especially for kids)
Presentation Ideas:
- Arrange on a tiered serving stand for elegant display
- Dust serving platter with cocoa powder before placing eclairs
- Garnish platter with fresh berries and mint leaves
- Drizzle extra chocolate over eclairs for artistic flair
- Serve on individual small plates with dessert forks
- Package in boxes tied with ribbon for gifts
Create a French Pastry Platter: Serve eclairs alongside other French pastries like macarons, madeleines, and fruit tarts for an impressive dessert spread.
Add Fresh Fruit: While eclairs are complete on their own, fresh raspberries or strawberries on the side provide a nice tart contrast to the rich sweetness.
Coffee Service: Create a café experience by serving eclairs with a pot of French press coffee, small cups, sugar cubes, and cream.
FAQs Section
Q: Why didn’t my eclairs puff up?
A: Several reasons: the flour mixture wasn’t cooked long enough (should have a film on pan bottom), the dough was too thick (add more egg until it reaches the right consistency), the oven wasn’t hot enough initially, or you opened the oven door during baking. Make sure you follow the temperature instructions precisely and don’t open the door until baking is complete.
Q: Can I make eclairs without a piping bag?
A: While a piping bag gives the most professional results, you can use a gallon-size freezer bag with one corner cut off to create a ¾-inch opening. For filling, you can carefully slice eclairs in half horizontally and spread the cream with a knife, though piping is neater and easier.
Q: Why did my eclairs collapse after baking?
A: The most common reasons are: underbaking (they need to be deeply golden and feel light/crispy), opening the oven door during baking, or not poking holes to release steam immediately after baking. Eclairs need to be thoroughly dried out in the oven. When in doubt, bake longer rather than shorter.
Q: Can I make eclairs gluten-free?
A: Choux pastry is very difficult to make gluten-free successfully because it relies heavily on gluten development for structure and puffing. Some specialty gluten-free flour blends designed for pastry exist, but results vary significantly and often don’t puff as dramatically. Traditional eclairs really require regular flour for best results.
Q: How far ahead can I make eclairs?
A: Unfilled shells can be baked up to 2 days ahead (stored at room temperature) or frozen for up to 2 months. Pastry cream can be made 2-3 days ahead. However, once assembled, eclairs are best eaten within 24 hours. For maximum crispiness, fill and glaze within 2-4 hours of serving.
Q: My pastry cream is lumpy – can I fix it?
A: Yes! Pour the hot pastry cream through a fine-mesh strainer into a clean bowl, pressing it through with a rubber spatula. This removes lumps. For stubborn lumps, you can also use an immersion blender to smooth it out before straining. Always strain pastry cream even if it looks smooth – it guarantees silky texture.
Q: Can I use instant pudding mix instead of making pastry cream?
A: While you can use prepared vanilla pudding in a pinch, the texture and flavor won’t be as good as homemade pastry cream. Instant pudding tends to be grainier and less rich. If you do use it, prepare according to package directions with whole milk and let it set completely before filling.
Q: Why is my chocolate glaze too thick/thin?
A: If too thick: Gently reheat and whisk in a teaspoon of cream at a time until you reach dipping consistency. If too thin: Let it cool at room temperature for 5-10 minutes, stirring occasionally. You can also refrigerate it briefly, stirring every minute until it thickens to the right consistency.
Conclusion
Making homemade chocolate eclairs is one of those baking achievements that feels incredibly rewarding – and trust me, the impressed reactions from friends and family make it even better! Yes, there are a few steps involved, but each one is straightforward when you break it down. The magic of watching choux pastry puff up in your oven, the satisfaction of piping smooth pastry cream into crispy shells, and that final glossy chocolate glaze coming together – it’s pure baking joy.
The beautiful thing about this chocolate eclair recipe is that once you’ve mastered the basic technique, you’ve unlocked the door to countless variations. Choux pastry is the foundation for so many classic French desserts, from cream puffs to profiteroles to croquembouche. You’re not just learning to make eclairs – you’re learning a fundamental pastry technique that will serve you for years to come.
Ready to create your own French patisserie at home? I’d love to hear about your eclair-making adventure! Did you try any flavor variations? How did your family react when you served these elegant treats? Leave a comment below and share your experience. And if you loved this homemade chocolate eclair recipe, please pin it to your Pinterest dessert board so you can find it again and share it with other bakers who want to try their hand at French pastry!
Now let’s get baking – those crispy, creamy, chocolate-topped eclairs are calling your name! 🥐