Easy Dirt Cake Recipe – Fun No-Bake Dessert Perfect for Kids & Parties!

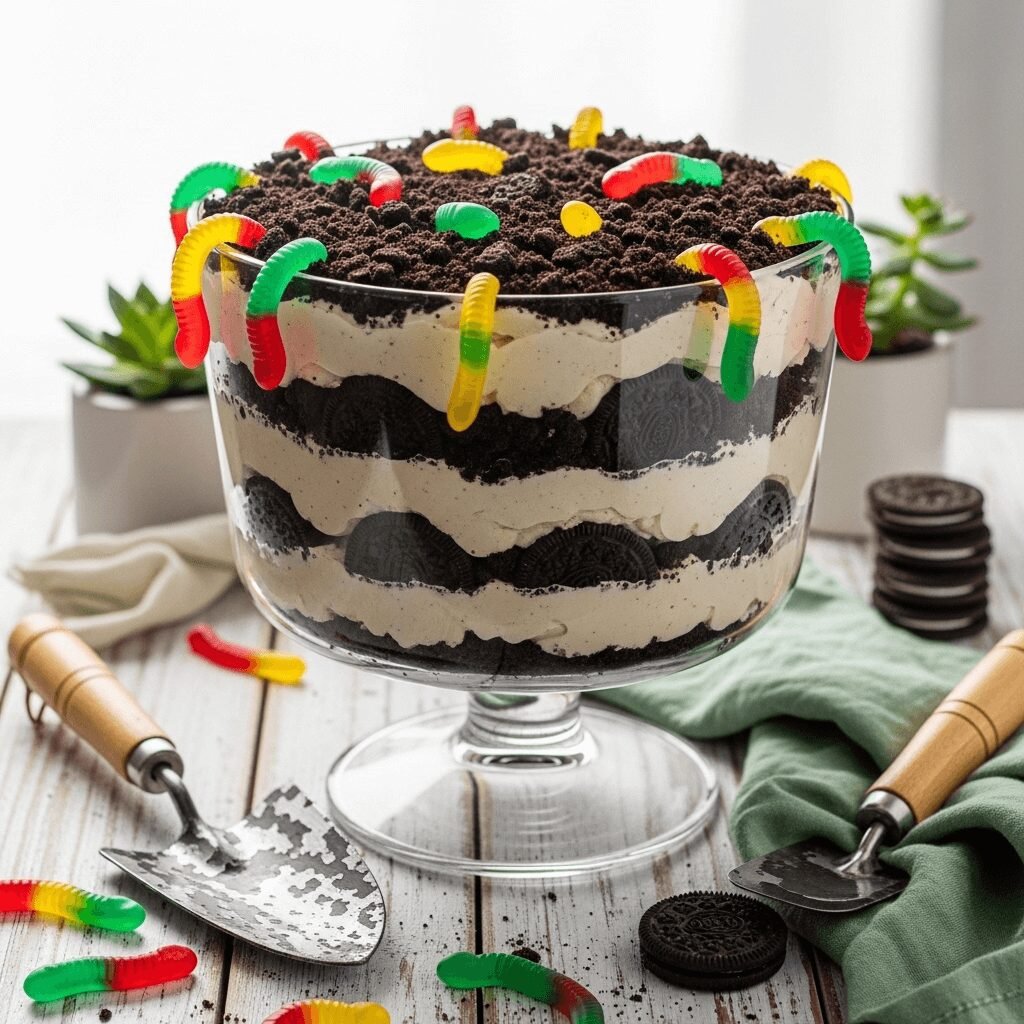
Dirt cake is one of those wonderfully whimsical desserts that never fails to bring smiles and laughter to any gathering. This playful no-bake treat features layers of creamy pudding mixture, crushed Oreo cookies that look just like dirt, and adorable gummy worms peeking out for that authentic “garden” effect. It’s the ultimate crowd-pleaser that looks like you raided someone’s flower bed but tastes like absolute heaven!
This classic American dessert has been delighting kids and adults alike since the 1980s, and it’s incredibly easy to make with just a handful of ingredients. Perfect for birthday parties, spring gatherings, Easter celebrations, Halloween events, or anytime you want to serve something fun and unexpected, dirt cake always steals the show. Serve it in individual cups for easy portion control, layer it in a clear trifle bowl for dramatic presentation, or go all-out and present it in a brand-new flower pot complete with a garden trowel for serving. No matter how you serve it, this nostalgic dessert brings pure joy to everyone who digs in!
History / Background
Dirt cake emerged during the 1980s as part of America’s love affair with creative, conversation-starting desserts. This was the era that gave us dump cakes, poke cakes, and other playfully-named treats that prioritized fun presentation and ease of preparation over elaborate techniques. The exact origin of dirt cake remains somewhat mysterious, but it quickly became a staple at children’s birthday parties, church potlucks, and family reunions across the country.
The genius of dirt cake lies in its visual trickery—it looks completely unappetizing at first glance, which makes the reveal that much more delightful when guests realize it’s actually a decadent dessert. The “dirt” made from crushed Oreo cookies provides the perfect chocolatey crunch, while the creamy pudding filling creates a luscious contrast in both texture and flavor.
The tradition of serving dirt cake in new terracotta flower pots became especially popular in the 1990s and early 2000s, adding to the garden theme. Some creative bakers even added silk flowers stuck into the “dirt” or served it with a clean garden spade for extra whimsy. The dessert became particularly associated with spring celebrations, garden parties, and children’s events featuring themes like bugs, gardens, or outdoor adventures.
What makes dirt cake so enduring is its versatility and accessibility. It requires no baking, no special skills, and uses readily available ingredients that most people already have in their pantries. It’s also incredibly forgiving—there’s really no wrong way to make it! Over the decades, countless variations have emerged, from peanut butter versions to cookies and cream adaptations, but the classic recipe remains beloved for its simplicity and nostalgic charm. Today, dirt cake continues to be a go-to recipe for parents, party planners, and anyone who wants to create something memorable without spending hours in the kitchen.
Why You’ll Love This Recipe
This dirt cake recipe delivers maximum impact with minimal effort, making it absolutely perfect for busy home cooks who still want to wow their guests. The combination of creamy, dreamy pudding mixture with crunchy chocolate cookies creates an irresistible texture that keeps everyone coming back for more.
Here’s why this recipe will become your favorite party dessert:
- No baking required – Perfect for hot summer days or when your oven is already occupied with other dishes
- Ready in 20 minutes – One of the fastest impressive desserts you can make from start to finish
- Kid-approved and kid-friendly – Children absolutely love the playful presentation and can even help assemble it
- Budget-friendly – Uses affordable, everyday ingredients that won’t break the bank
- Easily scaled – Make individual portions in cups or a large batch in a trifle bowl for crowds
- Prepare ahead – Actually tastes better after chilling overnight, making it ideal for party planning
- Impressive presentation – Looks elaborate and creative but requires zero decorating skills
- Crowd-pleaser – Appeals to all ages, from toddlers to grandparents
- Customizable – Easy to adapt with different cookie flavors, pudding varieties, or fun add-ins
- No special equipment needed – Just bowls, a mixer, and your serving dish of choice
- Perfect conversation starter – The quirky appearance always gets people talking and laughing
Ingredient Notes
Understanding what goes into your dirt cake helps you make the best possible version and adapt it to your preferences. Here’s what you’ll need:
Oreo Cookies – The foundation of your “dirt,” regular Oreos provide the perfect chocolate flavor and dark color that genuinely looks like soil. You’ll need about one full package (or 36 cookies) for proper coverage. Crush them finely for authentic dirt texture—some people prefer using a food processor, while others enjoy the therapeutic process of smashing them in a sealed bag with a rolling pin. Don’t substitute with chocolate graham crackers or other cookies; Oreos provide the signature taste and appearance that makes dirt cake special.
Cream Cheese – Use full-fat brick cream cheese (not spreadable), softened completely to room temperature. This creates the rich, tangy base that balances the sweetness of the pudding. Low-fat cream cheese can be used in a pinch, but it won’t be as creamy or flavorful.
Butter – Softened unsalted butter adds richness and helps create that silky, mousse-like texture. Make sure it’s truly softened (not melted) for proper incorporation.
Powdered Sugar – Also called confectioners’ sugar, this sweetens the cream cheese mixture without adding grittiness. Granulated sugar won’t dissolve as smoothly, so don’t substitute.
Instant Vanilla Pudding Mix – The two small boxes (3.4 oz each) create the classic dirt cake flavor. Instant pudding is crucial here—cook-and-serve pudding won’t set properly for this recipe. Vanilla is traditional, but chocolate, cheesecake, or French vanilla flavors work beautifully too.
Cold Milk – Whole milk creates the richest pudding, but 2% works perfectly fine. The milk needs to be cold for the instant pudding to set properly.
Cool Whip (Whipped Topping) – The frozen whipped topping adds lightness and volume to the pudding mixture, creating that signature fluffy texture. Use a 12 oz container, thawed completely. You can substitute with homemade stabilized whipped cream (2 cups heavy cream whipped with ¼ cup powdered sugar and 1 teaspoon gelatin), but Cool Whip is traditional and more stable for make-ahead desserts.
Gummy Worms – These are essential for the full dirt cake experience! They add a fun, playful element that kids especially love. Buy a variety of colors for visual interest. Some people also add candy rocks or chocolate chips to enhance the “garden” theme.
Equipment Needed
Dirt cake requires minimal equipment, which is part of its beauty! Here’s what you’ll need:
- Electric mixer (hand mixer or stand mixer) – For beating the cream cheese mixture until fluffy
- Large mixing bowl – For preparing the cream cheese base
- Medium mixing bowl – For mixing the pudding
- Spatula or large spoon – For folding and layering
- Food processor or rolling pin and plastic bag – For crushing Oreos into “dirt”
- Serving dish – Options include:
- Clear trifle bowl or glass bowl (for beautiful layered presentation)
- Individual clear cups or mason jars (for portion control)
- New, clean flower pot (for traditional whimsical presentation)
- 9×13 inch baking dish (for easy transport and serving)
- Measuring cups and spoons – For accurate measurements
- Plastic wrap or aluminum foil – For covering while chilling
Easy Dirt Cake Recipe – Fun No-Bake Dessert Perfect for Kids & Parties!

This classic dirt cake recipe features layers of creamy pudding mixture and crushed Oreo “dirt” topped with gummy worms for a fun, whimsical presentation. No baking required—just mix, layer, and chill for an easy dessert that kids and adults absolutely love!
- Prep Time: 20 minutes
- Cook Time: Chill Time: 2-4 hours (or overnight)
- Total Time: 2 hours 20 minutes
- Yield: 12-16 servings 1x
- Category: Dessert
- Method: No Bake
- Cuisine: American
- Diet: Vegetarian
Ingredients
- 1 package (14.3 oz) Oreo cookies (about 36 cookies)
- 8 oz cream cheese, softened to room temperature
- ¼ cup unsalted butter, softened to room temperature
- 1 cup powdered sugar
- 2 packages (3.4 oz each) instant vanilla pudding mix
- 3 cups cold whole milk
- 12 oz Cool Whip (whipped topping), thawed
- Gummy worms for decoration
Instructions
- Crush the Oreos: Place Oreo cookies in a food processor and pulse until they resemble fine dirt-like crumbs. Alternatively, place cookies in a large zip-top plastic bag, seal tightly, and crush with a rolling pin until finely ground. Set aside about ¼ of the crumbs for topping; you’ll use the rest for layering.
- Make the cream cheese mixture: In a large mixing bowl, beat the softened cream cheese and butter together with an electric mixer on medium-high speed for 2-3 minutes until light and fluffy with no lumps remaining. Add the powdered sugar and beat for another 1-2 minutes until completely smooth and creamy.
- Prepare the pudding: In a separate medium bowl, whisk together the instant pudding mix and cold milk for about 2 minutes until the pudding begins to thicken. Let it sit for 5 minutes to set completely.
- Combine mixtures: Add the thickened pudding to the cream cheese mixture and beat on medium speed until well combined and smooth, about 1 minute.
- Fold in Cool Whip: Gently fold the thawed Cool Whip into the pudding mixture using a spatula until fully incorporated and no white streaks remain. The mixture should be light, fluffy, and uniform in color.
- Layer the dirt cake: In your chosen serving dish (trifle bowl, flower pot, or individual cups), spread a thin layer of crushed Oreos on the bottom. Add half of the pudding mixture, spreading evenly. Sprinkle with another layer of crushed Oreos. Add the remaining pudding mixture and spread to the edges. Top with the remaining crushed Oreos to completely cover the pudding layer.
- Add gummy worms: Arrange gummy worms on top and poking some partially into the “dirt” for a realistic garden effect. You can also add a few between layers if desired.
- Chill thoroughly: Cover the dish with plastic wrap or aluminum foil and refrigerate for at least 2-4 hours, or preferably overnight. This allows the cookies to soften slightly and all the flavors to meld together beautifully.
- Serve and enjoy: When ready to serve, use a large spoon or serve with a clean garden trowel for fun presentation. Scoop portions that show off the beautiful layers.
Notes
- Cookie texture: The longer the dessert chills, the softer the cookie layers become as they absorb moisture from the pudding. Some people prefer it after just 2 hours for crunchier cookies, while others love it after overnight chilling when the texture is more cake-like.
- Serving dish matters: If using a flower pot, line it with aluminum foil first for food safety, or purchase a new pot designated for food use only.
- Leftovers: This dessert actually improves after a day in the refrigerator as flavors develop and textures meld.
- Make it boozy: For adults-only versions, add 2 tablespoons of Irish cream liqueur or vanilla vodka to the pudding mixture.
- Allergy-friendly: For nut allergies, check that your cookie brand is produced in a nut-free facility.
Nutrition
- Serving Size: 1 cup (approximately 1/12 of recipe
- Calories: 385
- Sugar: 34g
- Sodium: 340mg
- Fat: 18g
- Saturated Fat: 11g
- Unsaturated Fat: 6g
- Trans Fat: 0.5g
- Carbohydrates: 52g
- Fiber: 1g
- Protein: 4g
- Cholesterol: 35mg
Nutrition information is approximate and will vary based on specific ingredients and portion sizes. Gummy worms are not included in calculations.
Tips & Variations
The basic dirt cake recipe is incredibly versatile! Here are creative ways to customize it:
Flavor Variations:
- Chocolate Lovers Dirt Cake: Use chocolate pudding instead of vanilla and add mini chocolate chips to the layers
- Peanut Butter Dirt Cake: Mix ½ cup creamy peanut butter into the cream cheese mixture and use Nutter Butter cookies for some of the “dirt”
- Mint Chocolate: Use mint Oreos and add a few drops of peppermint extract to the pudding mixture
- Cookies and Cream: Use white chocolate or cheesecake pudding with traditional Oreos for a lighter colored filling
- Birthday Cake: Use birthday cake Oreos and funfetti pudding mix, then add rainbow sprinkles between layers
Presentation Ideas:
- Individual “Flower Pots”: Layer in small terracotta pots (lined with foil) and add a silk flower for each serving
- Beach Theme: Use vanilla wafers crushed for “sand,” vanilla pudding, and Swedish Fish instead of gummy worms
- Halloween Version: Add candy pumpkins, candy corn, and chocolate spiders to the top
- Garden Party: Add edible flowers, fresh mint leaves, and serve with a small garden trowel
- Construction Site: Top with crushed graham crackers mixed with the Oreos for “dirt and gravel,” add small toy construction vehicles
Dietary Modifications:
- Gluten-Free: Use gluten-free chocolate sandwich cookies and ensure pudding mix is gluten-free
- Sugar-Free: Use sugar-free pudding mix, sugar-free cookies, and sugar substitute in the cream cheese mixture
- Dairy-Free: Use dairy-free cream cheese, non-dairy milk, and coconut whipped topping with dairy-free Oreo alternatives
Texture Adjustments:
- For more cake-like texture: Let it chill overnight so cookies fully soften
- For extra crunch: Add chopped nuts between layers or serve within a few hours of assembly
- For lighter version: Use sugar-free pudding, light Cool Whip, and reduced-fat cream cheese
Pro Chef Tips
Take your dirt cake from good to absolutely spectacular with these professional techniques:
Soften Cream Cheese Properly – Rock-hard cream cheese creates lumpy filling no matter how long you beat it. Set it out for at least 1 hour before starting, or microwave in 10-second intervals, checking frequently. It should be soft enough to leave an indent when pressed but not melty or oily.
Beat Cream Cheese Longer Than You Think – Spend a full 3-4 minutes beating the cream cheese and butter together before adding other ingredients. This incorporates air and creates an impossibly fluffy, mousse-like texture instead of a dense filling.
Use Cold Milk for Pudding – Instant pudding needs cold milk to set properly. If your milk is room temperature, it won’t thicken correctly and your dessert will be runny. Keep it in the fridge until the moment you need it.
Don’t Skip the Chilling Time – While it might be tempting to serve immediately, chilling is essential. It allows the cookies to soften just enough to create that perfect cake-like texture while the flavors meld together beautifully. Overnight is truly ideal.
Crush Cookies in Varying Sizes – For the most authentic “dirt” look, leave some larger cookie pieces mixed in with the fine crumbs. This creates visual interest and varied texture that more closely resembles real garden soil.
Layer Strategically – Always start and end with cookie crumbs for the best presentation. If using a clear container, be intentional about creating even, attractive layers that showcase the beautiful contrast between dark cookies and creamy filling.
Fold Cool Whip Gently – Overmixing after adding Cool Whip deflates all those lovely air bubbles that make the filling light and fluffy. Use a spatula and fold gently just until combined with no white streaks remaining.
Enhance the Pudding – For deeper vanilla flavor, add ½ teaspoon of vanilla bean paste or an extra teaspoon of vanilla extract to the pudding mixture before folding in the Cool Whip.
Common Mistakes to Avoid
Even simple recipes can go wrong! Here’s how to avoid the most common dirt cake pitfalls:
Using Cook-and-Serve Pudding Instead of Instant – This is a critical error that will ruin your dessert. Cook-and-serve pudding requires heating and has different setting properties. It won’t firm up properly in this no-bake recipe, leaving you with a soupy mess. Always use instant pudding mix and follow the 2-minute whisking instruction for proper thickening.
Not Softening Cream Cheese Completely – Cold, firm cream cheese won’t mix smoothly no matter how long you beat it, resulting in lumpy filling with chunks throughout. Those lumps are impossible to eliminate once other ingredients are added. Always soften cream cheese to room temperature—it should be soft enough to easily spread but not melty.
Crushing Oreos Too Coarse – If your cookie chunks are too large, they won’t look like authentic dirt and won’t absorb enough moisture from the pudding to soften properly. While you don’t need powder-fine consistency, aim for crumbs that resemble actual garden soil—mostly fine with a few slightly larger pieces for texture.
Making It Too Far in Advance – While this dessert benefits from chilling, making it more than 2 days ahead can make it overly soggy. The cookies continue absorbing moisture from the pudding, eventually becoming mushy rather than pleasantly cake-like. For best texture, make it 6-24 hours before serving.
Skimping on the Cookie Layers – If you don’t use enough crushed Oreos, the dessert loses its “dirt cake” identity and looks more like regular pudding dessert. Be generous with those cookie crumbs, especially on top—you want to completely hide the pudding beneath for that surprise element.
Serving at Room Temperature – Dirt cake should be served cold! The cream cheese and Cool Whip need to stay chilled to maintain their structure. If left at room temperature too long, the dessert becomes loose and the components separate, losing that perfect creamy texture.
Storage & Meal Prep
Proper storage keeps your dirt cake fresh, safe, and delicious:
Refrigerator Storage: Dirt cake must be kept refrigerated at all times due to the dairy ingredients. Cover tightly with plastic wrap or aluminum foil to prevent the dessert from absorbing refrigerator odors and to keep the cookies from drying out. Properly stored, dirt cake will last 3-4 days in the refrigerator.
Texture Changes: Keep in mind that the cookie layers continue to soften as the dessert sits, absorbing moisture from the pudding mixture. Day 1 will have crunchier cookie layers, while day 3 will be completely soft and cake-like. Both textures are delicious—it’s just a matter of personal preference!
Individual Portions: If you’ve made individual servings in cups, keep them covered in the refrigerator. The advantage of individual portions is you can take out only what you need without disturbing the entire dessert.
Preventing Sogginess on Top: If you’re concerned about the top layer of cookies becoming too soft, reserve the final cookie topping and add it just 1-2 hours before serving. This keeps the top layer crunchier while still allowing the inner layers to meld together.
Serving from Refrigerator: Dirt cake is best served cold, straight from the refrigerator. There’s no need to bring it to room temperature. The cold temperature helps the dessert hold its shape when scooped and keeps all the components at their best texture.
Make-Ahead & Freezer Notes
Dirt cake is one of the best make-ahead desserts, which makes it perfect for party planning and busy schedules!
Make-Ahead Instructions: Dirt cake actually benefits from being made in advance—it’s one of those rare desserts that genuinely tastes better the next day! The ideal timeline is to prepare it 12-24 hours before serving. This gives the cookies time to soften slightly while absorbing the creamy pudding mixture, creating that signature cake-like texture everyone loves. You can make it up to 2 days ahead, but the texture will be very soft by day 3.
Freezer Storage: Yes, dirt cake freezes surprisingly well! Cover the assembled dessert tightly with plastic wrap, then add a layer of aluminum foil to prevent freezer burn. Freeze for up to 1 month. Individual portions in sealed containers work especially well for freezing.
Thawing Instructions: Transfer the frozen dirt cake to the refrigerator and let it thaw overnight (at least 8-12 hours). Never thaw at room temperature, as this can cause the cream cheese mixture to become watery and separate. The texture after freezing will be slightly softer than fresh but still delicious.
Components Separately: For maximum freshness, you can prepare the pudding mixture up to 24 hours ahead and store it separately in the refrigerator. Crush the Oreos and store in an airtight container at room temperature. Assemble the dessert 2-12 hours before serving for the freshest taste and best texture control.
Party Planning Timeline: If serving at a party, make the dessert the night before and keep it refrigerated. Transport it in a cooler with ice packs if traveling. Just before serving, you can add fresh gummy worms on top for the prettiest presentation if the originals have started to look a bit wilted from moisture.
Serving Suggestions
Dirt cake is fun and versatile! Here are creative ways to serve and complement this playful dessert:
Presentation Styles:
- Trifle Bowl: Layer in a clear glass trifle bowl to show off the beautiful layers—perfect for buffets where guests can admire it before digging in
- Individual Cups: Serve in clear plastic cups, mason jars, or small flower pots for easy portion control at parties
- Traditional Flower Pot: Present in a new terracotta pot with a garden trowel for scooping—kids especially love this whimsical presentation
- Sheet Pan Style: Layer in a 9×13 baking dish for easy transport to potlucks and picnics
Beverage Pairings:
- Ice-cold whole milk (classic and perfect for kids)
- Hot coffee or cold brew for adults
- Chocolate milk for double chocolate indulgence
- Lemonade or fruit punch at children’s parties
- Sweet iced tea for Southern-style gatherings
Complementary Desserts:
- Fresh fruit platter for lighter contrast
- Sugar cookies decorated to match your party theme
- Brownies or chocolate chip cookies for chocolate lovers
- Ice cream sundae bar for a full dessert spread
- Popcorn or pretzels for salty-sweet balance
Party Theme Ideas:
- Garden Party: Serve with herb-infused lemonade and cucumber sandwiches
- Kids’ Birthday: Pair with pizza, fruit kabobs, and juice boxes
- Spring Celebration: Accompany with petit fours and sparkling punch
- Pool Party: Serve alongside fresh watermelon and summer berries
- Halloween: Present with candy corn, caramel apples, and hot cider
Garnish Ideas:
- Fresh mint sprigs stuck into the “dirt” like plants
- Edible flowers for elegant garden party presentation
- Crushed graham crackers mixed into top layer for varied texture
- Chocolate shavings or cocoa powder dusted on top
- Small candy pumpkins or themed candies for holiday versions
FAQs Section
Can I make dirt cake without cream cheese?
While cream cheese is traditional and provides the signature tangy richness, you can make a simplified version without it. Simply fold the thawed Cool Whip directly into the prepared pudding mixture, though the result will be lighter, less rich, and slightly less stable. The cream cheese adds body, tang, and helps the dessert hold its shape better when serving. For best results, I strongly recommend including it.
Why is my dirt cake runny or too soft?
The most common culprit is using cook-and-serve pudding instead of instant pudding mix. Instant pudding is formulated to set without heat, while cook-and-serve won’t set properly in this no-bake recipe. Other causes include not letting the pudding sit long enough to fully thicken (give it the full 5 minutes), using warm milk instead of cold, or not chilling the assembled dessert long enough. Make sure to refrigerate for at least 2-4 hours before serving.
How far in advance can I make dirt cake?
The sweet spot is 12-24 hours ahead—this gives the cookies time to soften perfectly while keeping the dessert fresh. You can make it up to 2 days ahead if needed, though the texture will be quite soft. Don’t make it more than 3 days ahead, as it becomes overly soggy and the cookies lose their pleasant texture entirely. For the absolute best taste and texture, overnight is ideal.
Can I use a different type of cookie?
Oreos are traditional because their dark color convincingly mimics dirt, but you can experiment! Chocolate graham crackers, chocolate teddy grahams, or chocolate wafer cookies all work. For a “sandy” beach-themed version, vanilla wafers are perfect. However, avoid cookies that are too sweet or have strong competing flavors (like flavored sandwich cookies) as they’ll clash with the vanilla pudding mixture.
Do I have to use Cool Whip, or can I use real whipped cream?
Cool Whip is traditional because it’s stable and doesn’t weep or deflate over time. You can substitute homemade stabilized whipped cream (2 cups heavy cream whipped with ¼ cup powdered sugar and 1 teaspoon unflavored gelatin that’s been dissolved in 2 tablespoons warm water). Regular whipped cream without stabilizer will deflate and create a watery texture within a few hours, ruining your dessert.
Is dirt cake safe for kids to eat?
Absolutely! There are no raw eggs or alcohol (unless you choose to add liqueur to an adults-only version), and all ingredients are fully safe for children. The gummy worms and playful presentation make it especially kid-friendly. Just be mindful of potential allergens—check cookie ingredients for nuts if serving to children with allergies, and ensure the pudding mix is gluten-free if needed.
Can I make this dairy-free or vegan?
Yes, with substitutions! Use dairy-free cream cheese (like Kite Hill or Tofutti), non-dairy milk (almond, oat, or soy), coconut-based whipped topping (like CocoWhip), and dairy-free chocolate sandwich cookies (several brands make Oreo alternatives). Check that your pudding mix is vegan-friendly, or use a plant-based pudding mix. The texture will be slightly different but still delicious.
Conclusion
There you have it—the ultimate dirt cake recipe that brings joy, laughter, and deliciousness to any gathering! This playful no-bake dessert proves that sometimes the simplest recipes create the most memorable moments. Whether you’re serving it at a child’s birthday party, bringing it to a potluck, or just treating your family to something fun and different, dirt cake never disappoints.
The best part? You now have a foolproof recipe that takes just 20 minutes of hands-on time and uses ingredients you can grab at any grocery store. No special skills required, no temperamental techniques to master—just layer, chill, and watch everyone’s faces light up when they realize this “dirt” is actually a decadent dessert!
I’d love to hear how your dirt cake turns out! Did you serve it in a flower pot or individual cups? Did you try any fun variations or creative presentations? Drop a comment below and share your experience. And if this recipe brought smiles to your table, please share it with your friends and save it to your Pinterest boards so you can find it whenever you need an easy, crowd-pleasing dessert!
Now grab those Oreos and get ready to make some delicious “dirt”—your guests are going to love this playful treat! Happy layering! 🪱🌱✨