The Ultimate Dump Cake Recipe: Easy, Delicious, and Foolproof!
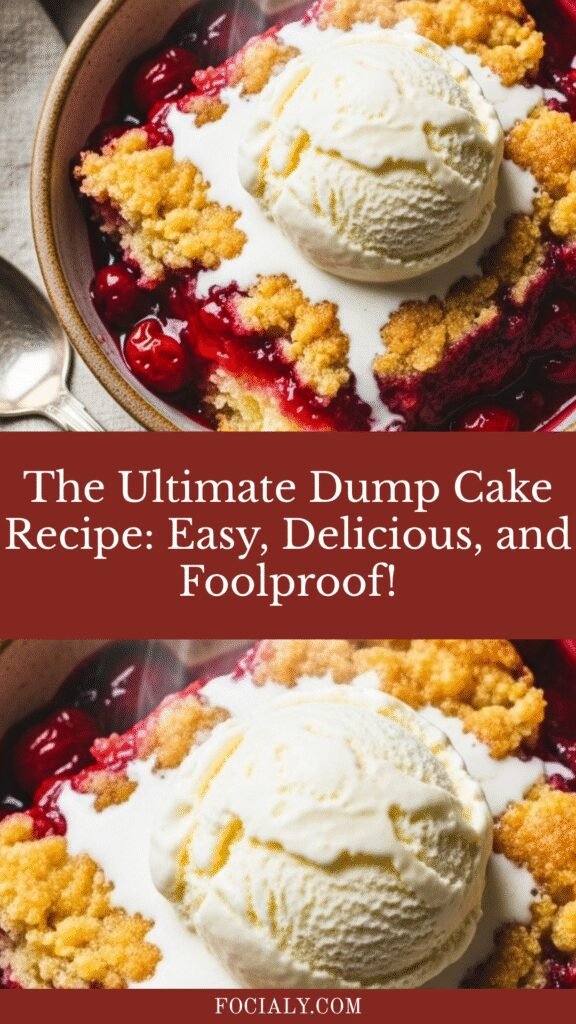
If you’ve never heard of dump cake, you’re in for a treat—literally! A dump cake is one of those magical desserts that sounds too good to be true: you literally dump ingredients into a baking dish, pop it in the oven, and emerge with a warm, gooey, fruit-filled dessert with a buttery, cake-like topping that’s absolutely irresistible.
This isn’t your typical from-scratch cake that requires creaming butter, separating eggs, or carefully measuring flour. Instead, dump cake is the ultimate shortcut dessert that delivers maximum flavor with minimal effort. It’s perfect for busy weeknights when you need a quick dessert, potlucks where you want to impress without stressing, holiday gatherings when your oven is already packed, or lazy Sunday afternoons when you’re craving something sweet but don’t want to dirty every bowl in your kitchen.
The beauty of dump cake lies in its simplicity and versatility. You can make it with virtually any fruit filling—cherry, apple, peach, blueberry, pineapple—and the results are always crowd-pleasing. Kids love helping make it (because who doesn’t love dumping ingredients?), and adults love eating it, especially when served warm with a scoop of vanilla ice cream melting into all those delicious crevices.
History / Background
The dump cake has a fascinating history rooted in American home cooking ingenuity, particularly from the 1970s and 1980s when convenience cooking was at its peak. During this era, home cooks were looking for ways to create delicious homemade desserts without spending hours in the kitchen, and the dump cake answered that call perfectly.
The exact origin is somewhat debated, but most food historians trace dump cake back to the rise of cake mixes in American households. When companies like Duncan Hines, Betty Crocker, and Pillsbury began mass-producing boxed cake mixes in the 1950s, creative home cooks started experimenting with them in unconventional ways. The dump cake was born from this spirit of experimentation.
The recipe gained massive popularity through community cookbooks, church potluck gatherings, and word-of-mouth sharing among neighbors. Before the internet, these recipes were passed down on handwritten index cards and photocopied recipe sheets. The cherry dump cake variation, in particular, became a staple at Southern church socials and Midwestern family reunions.
What made dump cake truly special was its democratic nature—anyone could make it successfully, regardless of baking skill level. There was no risk of overmixing, no worry about proper creaming technique, and no fear of a sunken middle. It was virtually foolproof, which made it a favorite among novice bakers and busy parents alike.
The name “dump cake” itself is charmingly straightforward and honest, reflecting the no-fuss attitude of the recipe. While some cookbooks have tried to rebrand it with fancier names like “magic cobbler” or “impossible cake,” the original name has stuck because it perfectly captures the essence of this delightfully simple dessert.
Today, dump cake has experienced a renaissance thanks to food blogs, Pinterest, and social media. New generations are discovering this retro dessert and falling in love with its simplicity, while also creating modern variations with different fruits, flavor combinations, and even savory versions. It’s a testament to the enduring appeal of easy, delicious comfort food.
Why You’ll Love This Recipe
This dump cake recipe is about to become your new secret weapon for stress-free entertaining and last-minute desserts. It combines everything you want in a dessert—incredible taste, minimal effort, and maximum wow factor—all in one simple recipe.
Here’s why this recipe is absolutely perfect:
- Zero mixing required – Seriously, you don’t need a mixer, wooden spoon, or even a whisk. Everything gets layered directly in the pan.
- Only 5 ingredients – You probably have most of them in your pantry right now, making this perfect for spontaneous baking sessions.
- Ready in under an hour – From start to finish, you’ll have a hot, bubbly dessert on your table in about 50 minutes.
- Beginner-friendly – If you can open a can and sprinkle dry ingredients, you can make this cake. No baking experience needed!
- Budget-friendly – With simple, affordable ingredients, this dessert costs a fraction of what you’d pay at a bakery.
- Crowd-pleaser guaranteed – I’ve never served this to anyone who didn’t ask for the recipe. It’s universally loved by kids and adults alike.
- Minimal cleanup – You’ll only dirty one baking dish and maybe a knife. That’s it!
- Impressive presentation – Despite the simple method, this dessert looks and tastes like you spent hours making it.
- Easily customizable – Switch up the fruit filling or add mix-ins to create endless flavor variations.
- Perfect for sharing – This is potluck gold—easy to transport, serves a crowd, and always disappears first.
Ingredient Notes
Let’s break down each ingredient and why it matters to your dump cake success:
Fruit Pie Filling: This is the star of your dessert and provides all the fruity goodness. Cherry pie filling is the classic choice that creates that iconic sweet-tart flavor, but apple, peach, blueberry, or pineapple work beautifully too. A 21-ounce can is standard, but you can use two smaller cans if needed. Store-brand works just as well as name-brand here, so save your money. If you want to use fresh fruit, you’ll need to add sugar and cornstarch to create that thick, syrupy consistency—about 3 cups fruit mixed with ½ cup sugar and 2 tablespoons cornstarch.
Yellow Cake Mix: This creates the cake-like topping that bakes into a golden, slightly crispy crust with tender pockets underneath. Yellow cake mix is traditional, but white cake mix, chocolate (for a chocolate cherry combination), or even spice cake mix (perfect with apple filling) can be substituted. You need a standard 15.25-ounce box. Don’t use mixes that say “pudding in the mix” as they can affect the texture slightly, though they’ll still work in a pinch.
Butter: The magical ingredient that transforms dry cake mix into something spectacular. You’ll need one full stick (½ cup or 8 tablespoons) of real butter, sliced thin. The butter melts during baking and seeps through the cake mix, creating pockets of rich, buttery goodness. Please don’t use margarine—real butter makes a noticeable difference in flavor. Make sure it’s cold when you slice it; this helps it distribute evenly over the cake mix.
Optional Add-ins: While not required, these take your dump cake to the next level. Chopped pecans or walnuts (about ½ cup) add delightful crunch and nutty flavor. A teaspoon of cinnamon or vanilla extract mixed into the fruit filling adds warmth and depth. Shredded coconut (½ cup) creates a tropical twist, especially good with pineapple filling.
Serving Accompaniments: While not ingredients in the cake itself, vanilla ice cream, whipped cream, or even a drizzle of caramel sauce make this dessert absolutely heavenly. The contrast of cold ice cream melting into warm, gooey cake is pure magic.
Equipment Needed
The beautiful thing about dump cake is that you need very minimal equipment. Here’s what to gather before you start:
- 9×13-inch baking dish – Glass or metal both work perfectly. Glass is nice because you can see the bubbling fruit around the edges, but metal conducts heat slightly better. Either way, your cake will be delicious.
- Sharp knife and cutting board – For slicing the butter into thin pats.
- Can opener – Unless your pie filling has a pull-tab lid.
- Oven mitts – Because your pan will be very hot and the fruit filling bubbles up quite dramatically.
- Cooling rack – Optional but helpful for letting your cake cool slightly before serving.
- Serving spatula – A sturdy metal spatula works best for scooping out those gooey portions.
- Measuring cups – Only if you’re adding optional mix-ins like nuts or coconut.
That’s truly it! No stand mixer, no hand mixer, no whisks, no multiple bowls. This is what makes dump cake so appealingly simple.
PrintDump Cake Recipe

This classic dump cake recipe is the easiest dessert you’ll ever make! With just 5 simple ingredients and zero mixing required, you’ll have a warm, gooey, fruit-filled dessert with a buttery, golden topping that tastes like it took hours to make. Perfect for potlucks, family dinners, or anytime you need a crowd-pleasing dessert without the fuss.
- Prep Time: 5 minutes
- Cook Time: 45 minutes
- Total Time: 50 minutes
- Yield: 12 servings 1x
- Category: Dessert
- Method: Baking
- Cuisine: American
- Diet: Vegetarian
Ingredients
- 1 can (21 oz) cherry pie filling (or fruit filling of choice)
- 1 box (15.25 oz) yellow cake mix
- ½ cup (1 stick) unsalted butter, cold and sliced thin
- ½ cup chopped pecans (optional)
- Vanilla ice cream or whipped cream for serving (optional)
Instructions
- Preheat your oven to 350°F (175°C). Position the rack in the center of your oven for even baking.
- Prepare your baking dish by lightly greasing a 9×13-inch baking dish with butter or non-stick spray. This helps with cleanup later, though it’s not absolutely necessary since the fruit creates natural lubrication.
- Spread the fruit filling evenly across the bottom of your prepared baking dish. Use a spoon to distribute it into an even layer, reaching all corners of the pan. The fruit layer should be relatively level.
- Sprinkle the dry cake mix directly over the fruit filling. This is the “dump” part! Pour it right from the box, then use your hands or the back of a spoon to spread it into an even layer covering all the fruit. Don’t leave any fruit peeking through—every bit should be covered with cake mix.
- Arrange the butter slices evenly over the top of the dry cake mix. Try to distribute the butter pieces as evenly as possible across the entire surface. The butter will melt and spread during baking, but starting with good distribution helps ensure even coverage.
- Add optional toppings like chopped pecans at this point, sprinkling them over the butter layer.
- Bake uncovered for 45-50 minutes, until the top is golden brown and the fruit filling is bubbling enthusiastically around the edges. You should see thick, syrupy fruit bubbling up, and the cake topping should look set and lightly crispy on top.
- Cool slightly for 10-15 minutes before serving. This allows the cake to set up a bit, though it’s absolutely delicious served warm and gooey.
- Serve by scooping generous portions into bowls. Top with vanilla ice cream or whipped cream if desired. The contrast of cold ice cream with warm cake is phenomenal!
Notes
- Don’t mix anything! The beauty of dump cake is that you never stir or mix. Each layer stays separate, and magic happens in the oven.
- Butter placement matters: The more evenly you distribute the butter slices, the more evenly your cake will brown and crisp up.
- Check for doneness: The edges should be bubbly and the top golden. If the top browns too quickly before the fruit bubbles, tent loosely with foil.
- Flavor variations: Try different pie filling flavors—apple, peach, blueberry, or even a combination of two cans for mixed fruit dump cake.
- Make it special: Add a teaspoon of almond extract to cherry filling, cinnamon to apple filling, or coconut flakes on top for extra flavor.
Nutrition
- Serving Size: 1 slice (1/12 of recipe
- Calories: 285
- Sugar: 32g
- Sodium: 310mg
- Fat: 12g
- Saturated Fat: 6g
- Unsaturated Fat: 5g
- Trans Fat: 0g
- Carbohydrates: 43g
- Fiber: 1g
- Protein: 2g
- Cholesterol: 20mg
Note: Nutrition information is approximate and will vary based on specific brands used and optional ingredients added.
Tips & Variations
Flavor Variations to Try:
Create a Cherry Chocolate Dump Cake by using chocolate cake mix instead of yellow, and adding ½ cup of chocolate chips sprinkled over the fruit layer. This tastes like a decadent chocolate-covered cherry dessert.
Make a Tropical Pineapple Dump Cake using pineapple pie filling or crushed pineapple (drained), yellow cake mix, and top with shredded coconut before adding the butter. This tastes like a deconstructed piña colada dessert.
Try an Apple Spice Dump Cake with apple pie filling, spice cake mix, a sprinkle of cinnamon on the fruit layer, and chopped walnuts on top. Serve with caramel sauce drizzled over each portion.
Texture Adjustments:
For a crunchier top, increase the oven temperature to 375°F for the last 10 minutes of baking, watching carefully to prevent burning.
For extra gooeyness, add an additional ½ can of pie filling and extend baking time by 5-10 minutes.
Dietary Modifications:
Make it gluten-free by using a gluten-free cake mix—the results are nearly identical.
For a lower-sugar version, use sugar-free pie filling and a reduced-sugar cake mix, though the results will be slightly less sweet and moist.
Create a vegan dump cake by using plant-based butter and ensuring your cake mix is vegan (many are accidentally vegan—check the label).
Seasonal Twists:
In fall, make a Pumpkin Spice Dump Cake using pumpkin pie filling mixed with a bit of evaporated milk, spice cake mix, and pecans.
For summer, try a Mixed Berry Dump Cake using a combination of blueberry, raspberry, and strawberry pie fillings.
Pro Chef Tips
Temperature is everything: Always let your butter stay cold until the moment you slice it. Cold butter creates distinct pockets of richness rather than just soaking into the cake mix immediately. Those little butter puddles create the most delicious crispy-tender texture contrast.
Layer for success: When spreading your cake mix over the fruit, take an extra 30 seconds to ensure complete, even coverage. Any spots where fruit peeks through will create a gummy texture rather than that perfect cake-like consistency you’re after.
Butter distribution technique: Instead of just placing butter slices randomly, create a grid pattern across your cake. Cut your stick of butter into about 16-20 thin pats and arrange them in evenly spaced rows. This ensures every bite gets that buttery goodness.
The bubble test: Your dump cake is truly done when you see thick, slow-moving bubbles around the perimeter—almost like lava lamp bubbles. Thin, fast bubbles mean the fruit hasn’t thickened enough yet. Those thick bubbles indicate the filling has reduced and concentrated perfectly.
Rest before serving: I know it’s tempting to dive right in, but letting your dump cake rest for 10-15 minutes allows the filling to thicken slightly and the cake portion to set up. This makes serving much neater and actually intensifies the flavors as everything melds together.
Broiler finish trick: For an extra-special presentation, after your cake is fully baked, switch your oven to broil for 1-2 minutes (watch carefully!) to create an even more golden, crispy top with slightly caramelized edges. This adds a professional bakery finish.
Double fruit layer: For an extra-fruity version that’s almost like a cobbler-cake hybrid, spread half your fruit filling on the bottom, add a thin layer of half the cake mix, then repeat the layers. This creates interesting texture throughout.
Common Mistakes to Avoid
Mistake #1: Mixing the ingredients together. I know it feels wrong not to mix, but resist the urge! The whole magic of dump cake relies on the layers staying separate. Mixing creates a dense, gummy texture instead of that perfect fruit-topped-with-cake situation. Just dump, spread, and walk away.
Mistake #2: Using melted butter. Some recipes say to pour melted butter over the top, but this creates a greasy, uneven result. Cold, sliced butter that melts during baking distributes much more evenly and creates better texture. The gradual melting is key to the final product.
Mistake #3: Underbaking. Because the top might look done, people often pull dump cake too early. The fruit needs time to bubble and thicken, which takes the full baking time. If the top is browning too fast but the edges aren’t bubbling yet, loosely tent with foil and continue baking.
Mistake #4: Using the wrong pan size. A 9×13-inch pan is critical for the right ratio of fruit to cake mix. Using a smaller pan creates too-thick layers that won’t cook properly. Using a larger pan makes everything too spread out and dry. Stick with 9×13 for best results.
Mistake #5: Skipping the cooling time. Serving immediately means soup-like fruit filling and a cake topping that falls apart. Even just 10 minutes of cooling allows everything to set up properly, making serving easier and improving the overall texture and flavor.
Storage & Meal Prep
Refrigerator Storage: Dump cake stores beautifully in the refrigerator for up to 5 days. Let it cool completely, then cover your baking dish tightly with aluminum foil or plastic wrap, or transfer portions to an airtight container. The cake actually tastes amazing cold straight from the fridge—the fruit filling sets up like a pie filling and the cake portion becomes more firm.
Room Temperature Storage: While dump cake can sit at room temperature for 2-3 hours after baking (perfect for potlucks), it should be refrigerated after that due to the fruit filling. Don’t leave it out overnight or the fruit can ferment slightly and develop off-flavors.
Reheating Instructions: To recapture that fresh-baked magic, reheat individual portions in the microwave for 30-45 seconds, until warm and the fruit is bubbling again. For larger portions, reheat in a 300°F oven for 15-20 minutes covered with foil. You can also reheat the entire pan this way—just add 10 extra minutes of heating time.
Portion Control Tip: After the dump cake cools, cut it into 12 squares and transfer them to individual containers. This makes grabbing dessert throughout the week super convenient and helps with portion control if you’re watching calories.
Make-Ahead & Freezer Notes
Advance Preparation: You can assemble your dump cake up to 24 hours before baking. Layer the fruit, cake mix, and butter in your baking dish, then cover tightly and refrigerate. When you’re ready to bake, remove from the refrigerator, uncover, and add 5-10 minutes to the baking time since it’s starting cold.
Freezing Unbaked: Assemble the dump cake in a disposable aluminum pan, cover very tightly with plastic wrap and then aluminum foil, and freeze for up to 2 months. To bake, remove from freezer and let thaw in the refrigerator overnight, then bake as directed. You can also bake from frozen—just add 20-25 minutes to the baking time.
Freezing Baked Dump Cake: This freezes beautifully! Let the cake cool completely, then wrap the entire pan in plastic wrap followed by heavy-duty aluminum foil, or cut into individual portions and freeze in airtight containers. Frozen dump cake keeps for up to 3 months.
Thawing and Reheating from Frozen: For best results, thaw overnight in the refrigerator, then reheat as directed above. For a quicker option, individual frozen portions can be microwaved from frozen—start with 1 minute, then continue in 30-second intervals until heated through. The texture might be slightly different from fresh, but it’s still delicious.
Freezer Meal Strategy: Dump cakes make excellent freezer meals for busy seasons. Assemble 2-3 dump cakes in disposable pans, freeze, and you’ve got instant desserts ready for unexpected company or those nights when you need comfort food immediately.
Serving Suggestions
Dump cake is incredibly versatile and pairs beautifully with many accompaniments:
Classic Pairings: A generous scoop of vanilla ice cream is traditional and absolutely perfect—the cold creaminess melting into the warm, fruity cake creates pure dessert magic. Whipped cream (homemade or store-bought) adds a lighter touch that lets the fruit flavor shine through. For something extra special, try vanilla bean ice cream or even butter pecan ice cream with cherry dump cake.
Brunch Ideas: Serve dump cake for weekend brunch alongside strong coffee or mimosas. The sweet-tart fruit makes it appropriate for morning gatherings, and it’s much easier than making coffee cake or cinnamon rolls from scratch. Add a dollop of Greek yogurt for a lighter, tangier complement that feels more breakfast-appropriate.
Dinner Party Finale: Make dump cake the grand finale of a casual dinner party. Serve it family-style right in the baking dish for a homey, welcoming presentation. Provide bowls of vanilla ice cream, whipped cream, and caramel sauce so guests can customize their servings.
Beverage Pairings: Cherry dump cake pairs wonderfully with coffee, especially a bold dark roast. Peach or apple dump cake is lovely with hot tea, particularly black tea or chai. For an adult gathering, try serving with dessert wine, coffee liqueur, or bourbon—the boozy warmth complements the sweet fruit beautifully.
Potluck Presentation: Transport your dump cake in the baking dish wrapped in towels to keep it warm. Bring vanilla ice cream in a cooler and an ice cream scoop so guests can serve themselves. This presentation is always a hit and requires zero plating effort from you.
Holiday Additions: During holidays, elevate your dump cake by serving it with seasonal touches—peppermint ice cream with chocolate cherry dump cake at Christmas, maple whipped cream with apple dump cake at Thanksgiving, or fresh berry compote alongside summer fruit dump cakes.
FAQs Section
Can I use fresh fruit instead of canned pie filling?
Yes, absolutely! Use about 3-4 cups of fresh fruit mixed with ½ cup sugar and 2 tablespoons cornstarch to help it thicken. Toss everything together and spread in your pan before adding the cake mix. Fresh peaches, apples, berries, or cherries all work wonderfully. Just know the sweetness level may vary depending on your fruit’s ripeness.
Why is my dump cake soggy in the middle?
This usually means it needs more baking time. The cake mix needs enough time to absorb moisture and bake through while the fruit bubbles underneath. Make sure you’re seeing vigorous bubbling around the edges and the top is golden brown—not just lightly tan. If the top is browning too quickly, loosely tent with foil and continue baking until the edges bubble properly.
Can I make dump cake in a slow cooker?
Yes! Layer everything the same way in a greased slow cooker insert. Cook on high for 2-3 hours or low for 4-5 hours until the edges are set and the center no longer looks wet. The texture will be more spoon-bread-like and less crispy on top, but still delicious. Place a paper towel under the lid to catch condensation.
What’s the difference between dump cake and cobbler?
Cobblers typically have a batter or biscuit topping that’s mixed together and dropped or spread over fruit. Dump cake uses dry cake mix that isn’t mixed at all—it’s literally dumped over the fruit, creating a different texture that’s more cake-like than the typical cobbler topping. Both are delicious, just different textures and preparation methods.
How do I prevent the top from burning?
If your oven runs hot or if you’re baking at a higher elevation, tent your dump cake loosely with aluminum foil about halfway through baking. This allows it to continue cooking while protecting the top from over-browning. Also, make sure your oven temperature is accurate—an oven thermometer is a worthwhile investment.
Can I make mini dump cakes in individual ramekins?
Definitely! This makes a beautiful presentation for dinner parties. Use 6-8 ounce ramekins, reduce ingredient quantities proportionally (about 2-3 tablespoons each of fruit filling and cake mix per ramekin, topped with a pat of butter), and reduce baking time to 25-30 minutes. They’re adorable and eliminate the need for serving.
Is dump cake supposed to be gooey?
Yes! Dump cake should have a gooey, almost pudding-like fruit layer on the bottom with a more cake-like (but still moist) topping. It’s not meant to be dry or completely set like a traditional cake. That gooey, saucy fruit layer is part of what makes it so addictive. If you prefer less gooeyness, use only ¾ of the can of pie filling instead of the full amount.
Conclusion
There you have it—your complete guide to making the most irresistible, foolproof dump cake that’ll have everyone asking for seconds (and the recipe!). This humble dessert proves that you don’t need fancy techniques, expensive ingredients, or hours in the kitchen to create something absolutely delicious and memorable.
Whether you’re a complete baking novice or an experienced home cook looking for a quick dessert solution, dump cake delivers every single time. The warm, bubbly fruit combined with that buttery, golden cake topping creates pure comfort food magic that brings people together. It’s perfect for celebrating special occasions, feeding a crowd, or simply treating yourself to something sweet on a random Tuesday.
I’d love to hear about your dump cake adventures! Did you stick with classic cherry, or did you get creative with flavor combinations? Did you add nuts, coconut, or chocolate chips? Leave a comment below sharing your experience, and don’t forget to rate the recipe if you tried it.
Pin this recipe to your Pinterest dessert boards so you’ll have it saved for your next potluck, family gathering, or dessert emergency. And if you loved this easy dump cake as much as I think you will, share it with your friends—good recipes are meant to be shared!
Happy baking, and enjoy every gooey, delicious bite!