The Ultimate Homemade Oatmeal Cream Pie Recipe

There’s something absolutely magical about biting into a soft, chewy oatmeal cookie sandwiched around a pillow of sweet, fluffy cream filling. Oatmeal cream pies are the ultimate nostalgic treat that brings back childhood memories with every delicious bite. These homemade oatmeal cream pie cookies are so much better than the store-bought version—they’re softer, more flavorful, and made with real ingredients you can actually pronounce!
Perfect for lunchbox treats, afternoon snacks with coffee, potluck desserts, or weekend baking projects with the kids, these easy oatmeal cream pies are surprisingly simple to make at home. Whether you’re packing them for school lunches, serving them at a baking exchange, or simply craving that perfect combination of spiced oatmeal cookies and sweet vanilla cream, this recipe delivers every single time. The cookies stay soft for days, the filling is perfectly sweet without being overwhelming, and the whole recipe comes together in about 30 minutes of active time. Trust me, once you make these homemade versions, you’ll never go back to the packaged ones again!
History / Background
The oatmeal cream pie has been an iconic American snack cake since the early 1960s, though its exact origins are somewhat debated among food historians. The most famous commercial version was introduced by Little Debbie in 1960, quickly becoming one of the brand’s best-selling products and a lunchbox staple for generations of American children. However, the concept of sandwich cookies—two cookies with a cream filling—dates back much further, with similar treats appearing in American cookbooks as early as the 1920s.
The genius of the oatmeal cream pie lies in its perfect marriage of textures and flavors: chewy, spiced oatmeal cookies that taste like home baking, paired with a marshmallow-based cream filling that’s reminiscent of buttercream but lighter and fluffier. The recipe draws inspiration from traditional oatmeal cookies, which themselves have roots in Scottish oat cakes, but transforms them into something uniquely American with the addition of molasses, warm spices like cinnamon, and that signature cream center.
During the mid-20th century, as packaged snack cakes became increasingly popular in American households, the oatmeal cream pie carved out its own special niche. Unlike chocolate-heavy treats, it offered a more subtle, comforting flavor profile that appealed to both children and adults. The cookies’ soft texture—achieved through the moisture-retaining properties of oats and molasses—meant they stayed fresh longer than traditional cookies, making them ideal for packed lunches and road trips.
Today, homemade oatmeal cream pies have experienced a renaissance as home bakers seek to recreate childhood favorites with better ingredients and more authentic flavors. The homemade version allows you to control the sweetness, use real butter instead of shortening, and create a cream filling that’s made with actual vanilla extract rather than artificial flavoring. This recipe honors the nostalgic treat we all remember while elevating it to something truly special.
Why You’ll Love This Recipe
This homemade oatmeal cream pie recipe is about to become your new favorite baking project, and here’s why: these cookies are incredibly soft and chewy with the perfect balance of warm spices and hearty oat flavor, while the cream filling is sweet, fluffy, and melts in your mouth. Unlike store-bought versions that can taste artificial or overly sweet, these homemade treats taste like real food—because they are!
Here’s what makes this recipe absolutely irresistible:
- Nostalgia meets homemade quality – All the childhood memories with none of the artificial ingredients or preservatives
- Soft and chewy texture – These cookies stay incredibly soft for days, never getting hard or crumbly
- Better than store-bought – Made with real butter, pure vanilla extract, and quality ingredients you can actually taste
- Easy for beginners – Simple techniques that don’t require special skills or fancy equipment
- Budget-friendly – Uses pantry staples you probably already have on hand
- Perfect for meal prep – Makes a large batch that stores beautifully for school lunches and snacks
- Kid-approved – Children absolutely love these, and they’re fun to make together as a family baking project
- Customizable – Easy to adjust the spices, add mix-ins, or modify the filling to suit your preferences
- Great for gifting – Wrap them individually for bake sales, teacher gifts, or holiday cookie exchanges
- No chilling required – Unlike many cookie recipes, you can bake these immediately without waiting for dough to chill
Whether you’re an experienced baker or just starting out, this oatmeal cream pie recipe is forgiving, fun, and incredibly rewarding. The smell of these cookies baking will fill your entire house with the cozy aroma of cinnamon and vanilla!
Ingredient Notes
Let’s talk about what goes into making these absolutely delicious homemade oatmeal cream pies. Understanding your ingredients helps you make the best possible cookies!
For the Oatmeal Cookies:
Old-fashioned rolled oats – Use regular rolled oats, not instant or steel-cut. The rolled oats provide that classic chewy texture and nutty flavor. Quick oats will work in a pinch but won’t give quite the same texture.
All-purpose flour – Provides structure to the cookies. You can substitute up to half with whole wheat flour for a heartier cookie.
Brown sugar – Both light and dark work beautifully. Brown sugar adds moisture and a lovely molasses flavor that’s essential to the taste profile.
Unsalted butter – Must be softened to room temperature for proper creaming. Butter creates a richer flavor than shortening or oil.
Eggs – Binds everything together and adds moisture. Use large eggs at room temperature.
Molasses – Just a tablespoon adds deep flavor and keeps cookies soft. Don’t skip it! Use regular (not blackstrap) molasses.
Baking soda – The leavening agent that gives cookies their slight rise and chewy texture.
Cinnamon and vanilla extract – The warm spices that make these cookies taste like comfort. Use pure vanilla, not imitation.
Salt – Enhances all the other flavors and balances the sweetness.
For the Cream Filling:
Unsalted butter – Softened butter creates the base of the filling. It must be very soft and room temperature.
Vegetable shortening – This is the secret to that authentic, fluffy texture. Shortening doesn’t melt as easily as butter, so the filling holds up better.
Marshmallow fluff (or marshmallow cream) – This gives the filling its signature light, fluffy texture. Don’t substitute regular marshmallows.
Powdered sugar – Sweetens and thickens the filling. Sift it if it’s lumpy for the smoothest texture.
Vanilla extract – Pure vanilla is essential for that classic cream pie flavor.
Heavy cream or milk – Just a splash to achieve the perfect spreading consistency.
Equipment Needed
You don’t need any fancy equipment to make these oatmeal cream pies! Here’s what you’ll need:
- Stand mixer or electric hand mixer – For creaming butter and sugar, and making the filling
- Large mixing bowls – At least two (one for dry ingredients, one for wet)
- Measuring cups and spoons – For accurate measurements
- Baking sheets – You’ll need 2-3 for efficient baking
- Parchment paper or silicone baking mats – Prevents sticking and ensures even baking
- Cookie scoop – A 1.5 tablespoon (medium) cookie scoop ensures uniform cookies (optional but helpful)
- Wire cooling rack – Essential for cooling cookies completely before filling
- Rubber spatula – For scraping bowls and spreading filling
- Whisk – For combining dry ingredients
- Offset spatula or butter knife – Makes spreading filling onto cookies much easier
- Airtight storage container – For keeping your finished cream pies fresh and soft
Oatmeal Cream Pie Recipe
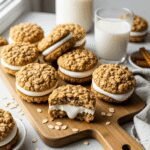
Soft, chewy homemade oatmeal cookies filled with a sweet, fluffy cream filling that tastes just like the nostalgic classic—but so much better! These easy oatmeal cream pies are perfect for lunchboxes, snacks, and dessert lovers of all ages.
- Prep Time: 20 minutes
- Cook Time: 10 minutes
- Total Time: 30 minutes (plus cooling time)
- Yield: 18-20 sandwich cookies 1x
- Category: Dessert
- Method: Baking
- Cuisine: American
- Diet: Vegetarian
Ingredients
For the Oatmeal Cookies:
- 1½ cups old-fashioned rolled oats
- 1 cup all-purpose flour
- ½ teaspoon baking soda
- ½ teaspoon ground cinnamon
- ¼ teaspoon salt
- ½ cup (1 stick) unsalted butter, softened
- ½ cup packed light brown sugar
- ¼ cup granulated sugar
- 1 large egg, room temperature
- 1 tablespoon molasses
- 1 teaspoon pure vanilla extract
For the Cream Filling:
- ½ cup (1 stick) unsalted butter, softened
- ¼ cup vegetable shortening
- 1 cup marshmallow fluff (marshmallow cream)
- 1½ cups powdered sugar, sifted
- 1 teaspoon pure vanilla extract
- 1-2 tablespoons heavy cream or whole milk
Instructions
Make the Cookies:
- Preheat and prepare: Preheat your oven to 350°F (175°C). Line two baking sheets with parchment paper or silicone baking mats and set aside.
- Mix dry ingredients: In a medium bowl, whisk together the oats, flour, baking soda, cinnamon, and salt until well combined. Set aside.
- Cream butter and sugars: In a large bowl using an electric mixer or stand mixer fitted with the paddle attachment, beat the softened butter, brown sugar, and granulated sugar together on medium speed for 2-3 minutes until light and fluffy.
- Add wet ingredients: Beat in the egg, molasses, and vanilla extract until fully incorporated and smooth, scraping down the sides of the bowl as needed.
- Combine wet and dry: Add the dry ingredient mixture to the wet ingredients and mix on low speed just until combined. Don’t overmix—the dough should be thick and slightly sticky.
- Shape cookies: Using a 1.5 tablespoon cookie scoop or spoon, drop rounded portions of dough onto the prepared baking sheets, spacing them about 2 inches apart. You should get about 36-40 cookies total. Gently flatten each mound slightly with your palm or the back of a spoon.
- Bake: Bake for 9-11 minutes, until the edges are just set but the centers still look slightly underdone. The cookies will continue to cook on the hot pan after removing from the oven. Don’t overbake—you want soft, chewy cookies!
- Cool completely: Let cookies cool on the baking sheet for 5 minutes, then transfer to a wire cooling rack to cool completely before filling. This is crucial—filling warm cookies will cause the cream to melt.
Make the Cream Filling:
- Beat butter and shortening: In a large bowl using an electric mixer, beat the softened butter and shortening together on medium speed for 1-2 minutes until smooth and creamy.
- Add marshmallow fluff: Add the marshmallow fluff and beat on medium speed for another minute until well combined.
- Add powdered sugar: With the mixer on low speed, gradually add the sifted powdered sugar, about ½ cup at a time, beating until smooth after each addition.
- Add vanilla and cream: Beat in the vanilla extract. Add 1 tablespoon of heavy cream and beat until light and fluffy. If the filling is too thick to spread easily, add another tablespoon of cream. The filling should be smooth, fluffy, and easily spreadable but not runny.
Assemble the Cream Pies:
- Fill cookies: Turn half of the cooled cookies upside down (flat side up). Using an offset spatula, butter knife, or piping bag, add about 1-2 tablespoons of cream filling to the center of each upturned cookie.
- Create sandwiches: Top with another cookie (flat side down) and gently press together until the filling spreads to the edges. Don’t press too hard or the filling will squish out completely.
- Set and serve: Let the assembled cream pies sit at room temperature for 15-20 minutes to allow the filling to set slightly before serving or storing.
Notes
- Cookie size matters: Keep cookies uniform in size so they pair up nicely when assembling the sandwiches. A cookie scoop is your best friend here!
- Don’t overbake: The cookies will look slightly underdone when you remove them from the oven—this is perfect! They’ll firm up as they cool and stay wonderfully soft.
- Room temperature ingredients: Make sure butter and eggs are at room temperature for the best texture in both cookies and filling.
- Filling consistency: If your filling is too stiff, add cream 1 teaspoon at a time. If it’s too loose, add more powdered sugar.
- Make ahead: You can bake cookies 1-2 days ahead and store them unfilled in an airtight container. Fill them the day you plan to serve for the freshest taste.
- Filling variation: For an extra authentic taste, you can use half butter and half shortening in the cookie dough as well, though I prefer all butter for flavor.
Nutrition
- Serving Size: 1 sandwich cookie Servings per Recipe: 18-20 Amount Per Serving
- Calories: 245
- Sugar: 22g
- Sodium: 85mg
- Fat: 11g
- Saturated Fat: 6g
- Unsaturated Fat: 4g
- Trans Fat: 0g
- Carbohydrates: 35g
- Fiber: 1g
- Protein: 2g
- Cholesterol: 30mg
Note: Nutrition information is calculated based on the ingredients and serving size listed. Individual values may vary depending on specific brands used and portion sizes.
Tips & Variations
Flavor Variations:
- Chocolate Chip Oatmeal Cream Pies: Fold ½ cup mini chocolate chips into the cookie dough before baking
- Pumpkin Spice Version: Add ¼ teaspoon nutmeg and ¼ teaspoon ginger to the cookie dough, plus 2 tablespoons pumpkin puree
- Maple Oatmeal Cream Pies: Replace the molasses with maple syrup and add 1 teaspoon maple extract to the filling
- Chocolate Cream Filling: Add 3 tablespoons cocoa powder to the cream filling for a chocolate twist
- Peanut Butter Filling: Replace half the filling with creamy peanut butter for a PB oatmeal cream pie
- Salted Caramel: Drizzle assembled cream pies with caramel sauce and sprinkle with flaky sea salt
Dietary Modifications:
- Gluten-Free: Use certified gluten-free oats and substitute 1:1 gluten-free flour blend for all-purpose flour
- Reduced Sugar: Cut the sugar in the cookies by ¼ cup and use half the filling for a less sweet version
- Vegan: Use vegan butter, flax eggs (1 tablespoon ground flaxseed + 3 tablespoons water), and vegan marshmallow cream
Texture Adjustments:
- Crispier cookies: Bake for an additional 1-2 minutes and let them cool completely on the pan
- Chewier cookies: Underbake by 1 minute and add an extra tablespoon of molasses
- Thicker filling: Add an extra ½ cup powdered sugar to make the filling more stable
Pro Chef Tips
Temperature control is everything: Your butter should be soft enough to leave an indent when pressed, but not melted or greasy. This is around 65-68°F. If your butter is too cold, the cookies will spread less and be cakey. Too warm, and they’ll spread too much and be flat.
Measure oats correctly: Spoon oats into your measuring cup rather than scooping directly from the container. Packing oats will give you too much, resulting in dry, crumbly cookies.
Don’t skip the molasses: Even if you don’t love molasses flavor, that single tablespoon is what keeps these cookies soft for days. It’s a moisture magnet that prevents the cookies from drying out.
Underbake slightly for maximum softness: The cookies should look just barely set around the edges with slightly puffed, matte centers when you pull them from the oven. They’ll continue cooking on the hot pan and firm up perfectly as they cool.
Cool cookies completely before filling: This can’t be stressed enough. Even slightly warm cookies will melt the filling, causing it to become runny and slide out. Be patient and let them cool for at least 30 minutes.
Whip that filling: Beat the filling on medium-high speed for a full 2-3 minutes after all ingredients are added. This incorporates air and makes it incredibly fluffy and light—just like the commercial version.
Use an offset spatula for assembly: This small tool makes spreading filling evenly so much easier than a regular knife. If you don’t have one, a small butter knife works, but an offset spatula is a game-changer for sandwich cookies.
Rotate your baking sheets: Halfway through baking, rotate your sheets front to back for the most even baking, especially if your oven has hot spots.
Common Mistakes to Avoid
Overmixing the cookie dough: Once you add the flour mixture, mix just until the ingredients are combined. Overmixing develops gluten, making cookies tough and cakey instead of soft and chewy. Stop mixing as soon as you no longer see streaks of flour.
Baking cookies too long: This is the #1 mistake! Oatmeal cream pie cookies should be soft and chewy, but overbaking makes them hard and crunchy. They might look slightly underdone when you pull them out—that’s perfect. Remember, they continue baking on the hot pan after leaving the oven.
Using cold ingredients: Cold butter won’t cream properly with the sugar, and cold eggs can cause the butter to seize up, resulting in dense cookies. Let all refrigerated ingredients sit at room temperature for 30-60 minutes before starting.
Making cookies different sizes: Uneven cookies mean mismatched pairs when you’re assembling your sandwiches. Use a cookie scoop to ensure uniform size, which also helps them bake evenly. No one wants one giant cookie matched with a tiny one!
Not sifting powdered sugar for the filling: Lumpy powdered sugar creates a gritty, unpleasant filling texture. Take 30 seconds to sift it—your taste buds will thank you. If you don’t have a sifter, press it through a fine-mesh strainer.
Filling cookies while still warm: Patience, friend! Warm cookies = melted, runny filling that slides right out. Wait until cookies are completely cool to room temperature, or you’ll have a mess on your hands (literally).
Storing cookies improperly: These soft cookies can dry out quickly if not stored in an airtight container. They can also stick together if stacked without parchment paper between layers. Proper storage is key to maintaining that pillowy soft texture!
Storage & Meal Prep
Room Temperature Storage:
Store assembled oatmeal cream pies in an airtight container at room temperature for up to 5 days. Place parchment paper or wax paper between layers to prevent them from sticking together. Keep them away from direct sunlight and heat sources. The cookies will actually get softer and more flavorful after a day or two as the filling moistens them slightly—they’re often best on day 2!
Refrigerator Storage:
While not necessary, you can refrigerate oatmeal cream pies if your kitchen is very warm or humid. Store in an airtight container for up to 1 week. Let them come to room temperature before eating for the best texture and flavor, as cold filling can be a bit firm. The cookies themselves stay perfectly soft even when chilled.
Reheating Tips:
These don’t really need reheating, but if you prefer them slightly warm, microwave one cream pie for just 5-7 seconds. Be careful—any longer and the filling will melt! Alternatively, let them sit at room temperature for 15-20 minutes after removing from the fridge.
Meal Prep Friendly:
These are fantastic for meal prep! Make a big batch on Sunday and pack them in lunchboxes throughout the week. Individually wrap each cream pie in plastic wrap or place in small sandwich bags for grab-and-go convenience. They’re perfect for school lunches, office snacks, or after-school treats.
Preventing Staleness:
The key to keeping these soft is moisture. Add a slice of bread to your storage container—it will sacrifice its moisture to keep the cookies soft. Replace the bread slice every couple of days. You can also include a small piece of apple, which does the same thing!
Make-Ahead & Freezer Notes
Make-Ahead Cookie Dough:
You can prepare the cookie dough up to 2 days in advance. Shape into balls, place on a parchment-lined baking sheet, cover tightly with plastic wrap, and refrigerate. When ready to bake, let the dough sit at room temperature for 10-15 minutes, then bake as directed, adding 1-2 minutes to the baking time since the dough will be cold.
Make-Ahead Baked Cookies:
Bake the cookies completely, let cool, and store unfilled in an airtight container at room temperature for up to 3 days before filling and assembling. This is perfect if you want to split the work over two days—bake cookies one day, make filling and assemble the next.
Make-Ahead Filling:
The cream filling can be made 1-2 days ahead and stored in an airtight container in the refrigerator. Before using, let it come to room temperature and give it a quick stir or beat with a mixer to restore its fluffy texture.
Freezing Assembled Cream Pies:
Yes! These freeze beautifully. Assemble the cream pies completely, then freeze them on a baking sheet until solid (about 2 hours). Once frozen, wrap each one individually in plastic wrap, then place in a freezer-safe container or zip-top freezer bag. They’ll keep for up to 3 months. Thaw at room temperature for 30-45 minutes before eating, or pack them frozen in lunchboxes—they’ll thaw by lunchtime and stay cool!
Freezing Cookie Dough:
Scoop cookie dough into balls, freeze on a baking sheet until solid, then transfer to a freezer bag. Frozen dough balls keep for up to 3 months. Bake straight from frozen, adding 2-3 minutes to the baking time. This is perfect for when you want fresh-baked cookies without the prep work!
Freezing Baked Cookies (Unfilled):
Place cooled, unfilled cookies in a freezer-safe container with parchment paper between layers. Freeze for up to 3 months. Thaw at room temperature, then make fresh filling and assemble. This gives you the best texture since the filling is always fresh.
Best Reheating Method from Frozen:
For assembled frozen cream pies, simply thaw at room temperature for 30-45 minutes. Don’t microwave from frozen, as this can make the cookies soggy. If you’re in a hurry, microwave for 10-15 seconds on 50% power, but room temperature thawing is always best.
Serving Suggestions
Oatmeal cream pies are delicious on their own, but here are some wonderful ways to serve them:
Beverages:
- Cold milk – The absolute classic pairing! Cold whole milk is perfect for dunking
- Hot coffee – Adults love these with their afternoon coffee
- Iced tea – Sweet tea or regular iced tea complements the spices beautifully
- Hot chocolate – Cozy fall and winter pairing
- Cold brew coffee – For a modern twist on the milk-and-cookies combo
Dessert Presentations:
- Ice cream sandwiches – Use oatmeal cream pie cookies instead of the filling and sandwich your favorite ice cream between them
- Crumbled over ice cream – Break them up and sprinkle over vanilla or cinnamon ice cream
- Trifle layers – Crumble cookies in layers with vanilla pudding and whipped cream
- Milkshake topping – Garnish milkshakes with a mini oatmeal cream pie
Party and Snack Ideas:
- Lunchbox treats – The perfect homemade alternative to store-bought snacks
- Afternoon tea service – Arrange on a pretty platter with other cookies and pastries
- Cookie exchange – These are always a hit at holiday cookie swaps
- Bake sale – Wrap individually in cellophane with ribbon for easy selling
- Picnic dessert – They travel beautifully and don’t need refrigeration
Fun Serving Twists:
- Drizzle with melted chocolate or caramel
- Dust with powdered sugar for a pretty presentation
- Serve alongside fresh berries for a lighter dessert plate
- Warm slightly and serve with vanilla ice cream melting on top
- Create a dessert charcuterie board with various cookies including these
Seasonal Serving:
- Fall: Serve with apple cider and cinnamon sticks
- Winter: Pair with hot cocoa and candy canes
- Spring: Serve alongside fresh strawberries and lemonade
- Summer: Perfect with cold lemonade or iced coffee at BBQs
FAQs Section
Can I use instant oats or quick oats instead of old-fashioned rolled oats?
While you can technically use quick oats in a pinch, I don’t recommend it for the best results. Quick oats are more finely cut and will absorb more moisture, resulting in cookies that are denser and less chewy with a mushier texture. Old-fashioned rolled oats give you that perfect chewy bite and authentic texture that makes these cream pies so special. Steel-cut oats won’t work at all—they’re too hard and won’t soften properly during baking.
Why are my cookies spreading too much or too little?
Cookie spreading issues usually come down to butter temperature and dough consistency. If cookies spread too much into thin, flat discs, your butter was probably too warm (melted or very soft), or you may have undermeasured the flour. Make sure butter is softened but still holds its shape. If cookies aren’t spreading enough and stay in puffy mounds, your butter was likely too cold, or you may have overmeasured the flour. Also, make sure your baking soda is fresh—old baking soda won’t provide proper lift and spread.
Can I make these without marshmallow fluff?
Marshmallow fluff is really what gives the filling its signature light, fluffy texture that’s reminiscent of the classic store-bought version. However, if you can’t find it, you can make a simpler buttercream filling using 1 cup softened butter, 3 cups powdered sugar, 2 teaspoons vanilla, and 2-3 tablespoons heavy cream. Beat until light and fluffy. It won’t taste exactly the same, but it’ll still be delicious! Don’t try to use regular marshmallows—they won’t melt or incorporate properly.
How do I keep the filling from squishing out when I bite into them?
This is all about filling amount and consistency! Don’t overfill—1-2 tablespoons of filling is plenty. Make sure your filling is the right consistency: thick enough to hold its shape but soft enough to spread easily. If it’s too soft, add more powdered sugar; if it’s too stiff, add a bit more cream. Also, let the assembled cream pies rest for 15-20 minutes before serving so the filling can set slightly. Finally, don’t press the cookies together too hard when assembling—gentle pressure is all you need.
My cookies turned out hard instead of soft and chewy. What happened?
The most common culprit is overbaking! These cookies should look slightly underdone when you remove them from the oven—they’ll continue to firm up as they cool. Baking them until they look “done” means they’re actually overbaked. Other possible issues: using too much flour (always spoon and level your measurements, don’t scoop), overmixing the dough which develops gluten, or using old baking soda that’s lost its potency. Make sure to use fresh baking soda and pull cookies out when the edges are just set but centers still look a tiny bit soft.
Can I make these cookies gluten-free?
Yes! Use certified gluten-free old-fashioned oats and replace the all-purpose flour with a 1:1 gluten-free baking flour blend that contains xanthan gum (like Bob’s Red Mill or King Arthur Measure for Measure). Don’t use single-purpose gluten-free flours like rice flour or almond flour alone—you need a blend designed for baking. The cookies may be slightly more delicate, so handle them gently when assembling. The texture won’t be exactly identical, but they’ll still be delicious and wonderfully soft!
How far in advance can I make these for a party or event?
For the absolute best texture and freshness, make these 1-2 days before your event. They actually improve after the first day as the filling moistens the cookies slightly. You can bake the cookies up to 3 days ahead and store them unfilled in an airtight container, then make the filling and assemble them 1-2 days before serving. If you need more time, freeze the assembled cream pies up to 3 months ahead, then thaw at room temperature the day of your event. For a party, I recommend making them no more than 2 days in advance for peak freshness.
Why does my cream filling taste greasy or separated?
This usually happens when the butter and shortening aren’t properly softened to room temperature, or when you add the powdered sugar too quickly. Make sure both fats are truly soft—they should be easily spreadable but not melted or greasy. Add powdered sugar gradually, about ½ cup at a time, beating well after each addition. If your filling does separate or become greasy, try beating in 1-2 tablespoons of additional powdered sugar while mixing on medium-high speed. The extra sugar will help re-emulsify the mixture and absorb excess moisture.
Conclusion
There you have it—the ultimate guide to making absolutely perfect homemade oatmeal cream pies that taste even better than the nostalgic childhood favorite we all remember! These soft, chewy cookies filled with fluffy, sweet cream are incredibly easy to make, use simple pantry ingredients, and stay deliciously soft for days. Whether you’re packing them in lunchboxes, bringing them to a potluck, enjoying them with your afternoon coffee, or simply treating yourself to a sweet bite of nostalgia, this recipe delivers every single time.
The beauty of these homemade oatmeal cream pies is that you control the ingredients—real butter, pure vanilla extract, and quality spices make all the difference in flavor. Plus, once you taste the difference between homemade and store-bought, you’ll never go back! These cookies are perfect for beginner bakers yet impressive enough to wow experienced home cooks. The recipe is forgiving, customizable, and endlessly delicious.
I’d absolutely love to hear how your oatmeal cream pies turn out! Did you try any of the variations? Did your kids help you make them? Leave a comment below sharing your experience, and don’t forget to rate this recipe if you loved it. And please, please, PLEASE save this recipe to your Pinterest boards—I promise these will become your new favorite homemade treat! Pin it now so you can find it easily whenever that oatmeal cream pie craving hits. Happy baking, friends! 🍪❤️