Easy Apple Fritters with Cinnamon Glaze (Ready in 35 Minutes!)
There’s something absolutely magical about biting into a warm, freshly fried apple fritter – that perfect marriage of crispy golden exterior giving way to a soft, pillowy interior studded with tender chunks of sweet-tart apples and finished with a glossy vanilla glaze dripping down the sides. If you’ve only ever experienced the dense, overly sweet versions from chain donut shops, you’re in for a revelation. These homemade apple fritters are the real deal – light, airy, packed with genuine apple flavor, and surprisingly easy to make in your own kitchen.
Apple fritters are the perfect treat for a cozy weekend breakfast, a special brunch gathering, an autumn celebration, or really any time you’re craving something indulgent and comforting. They’re fantastic served warm from the fryer, but they also keep beautifully for a day or two, making them ideal for meal prep or bringing to potlucks and bake sales. Whether you’re looking to impress guests, treat your family to something special, or simply satisfy your own sweet tooth, this apple fritter recipe delivers bakery-quality results that’ll have everyone asking for seconds.
History & Background of Apple Fritters
The humble apple fritter has deep roots in both European and American culinary traditions, with variations appearing across multiple cultures throughout history. The concept of frying battered fruit dates back centuries, with evidence of similar preparations in medieval European cookery where fruits were dipped in batters and fried during festival seasons.
In America, apple fritters became particularly popular in the Northeast and Mid-Atlantic regions during the 18th and 19th centuries, coinciding with the expansion of apple orchards across the colonies. Dutch settlers, who brought their tradition of “oliebollen” (oil balls – fried dough often containing apples and raisins), significantly influenced the development of American apple fritters. These treats became staples at county fairs, church socials, and harvest festivals, celebrating the abundant apple harvests each fall.
The Pennsylvania Dutch community perfected their own version called “apfelkuechle,” which featured apple slices dipped in batter and fried until golden. Meanwhile, Southern cooks developed heartier, cake-like fritters that were more substantial and filling. By the early 20th century, apple fritters had secured their place in American donut shops and bakeries, evolving into the chunky, irregular-shaped pastries we recognize today – distinctly different from the uniform rings of traditional donuts.
What makes apple fritters special is their rustic, imperfect appearance. Unlike precisely shaped pastries, fritters are meant to be wonderfully irregular, with crispy edges jutting out at different angles and pockets of apple peeking through the dough. This homestyle quality is part of their charm – they look homemade because they are, and that’s exactly what makes them so appealing and comforting.
Why You’ll Love This Apple Fritter Recipe
This isn’t just another apple fritter recipe – it’s been tested and perfected to give you that ideal combination of texture, flavor, and ease of preparation that makes homemade treats worth the effort.
The batter comes together in minutes with pantry staples you likely already have on hand, and the technique is straightforward enough for beginners while delivering professional-quality results. Unlike yeast-raised donuts that require hours of proofing, these fritters use a simple cake-style batter that’s ready to fry immediately.
Here’s why this recipe will become your go-to:
- Perfectly balanced texture – Crispy and golden on the outside, light and fluffy on the inside, never dense or greasy
- Real apple flavor – Packed with generous chunks of fresh apples in every bite, not just apple-flavored dough
- Quick and easy – No special equipment needed, no yeast, no lengthy rising time – just mix and fry
- Customizable – Easily adapted to your taste preferences with different apple varieties, spices, or glaze flavors
- Crowd-pleaser – Appeals to all ages and always disappears fast at gatherings
- Budget-friendly – Uses simple, affordable ingredients to make a dozen impressive treats
- Seasonal versatility – Perfect for fall but delicious year-round with any apple variety
- Make-ahead friendly – The batter can be prepared in advance, and finished fritters keep well
- Impressive presentation – Looks and tastes like you spent hours in a professional bakery
Ingredient Notes
Understanding your ingredients helps you make better choices and substitutions when needed. Here’s what goes into these incredible apple fritters:
All-Purpose Flour – Provides structure to the fritters. The moderate protein content creates a tender crumb that’s sturdy enough to hold the apple chunks but not tough. Cake flour will make them too delicate, while bread flour will make them chewy.
Granulated Sugar – Sweetens the dough and helps with browning. You can reduce slightly if your apples are very sweet, but don’t eliminate it entirely as it affects texture too.
Baking Powder – The leavening agent that makes fritters light and fluffy. Make sure yours is fresh (less than 6 months old) for best rise. Baking soda won’t work as a substitute here.
Salt – Enhances all the flavors and balances the sweetness. Even in sweet recipes, salt is crucial.
Cinnamon & Nutmeg – Classic warm spices that complement apples beautifully. Freshly ground spices will give more vibrant flavor than older, pre-ground versions.
Milk – Adds moisture and richness. Whole milk works best, but 2% is fine. Buttermilk can be substituted for a tangier flavor and even more tender texture.
Eggs – Bind everything together and add structure. Room temperature eggs incorporate more smoothly into the batter.
Butter – Melted butter adds richness and flavor. Can be substituted with neutral oil if needed, though you’ll lose some flavor depth.
Vanilla Extract – Pure vanilla extract elevates the overall flavor. Imitation vanilla works in a pinch but won’t taste as complex.
Apples – The star ingredient! Granny Smith apples are ideal because their tartness balances the sweet glaze and they hold their shape during frying. Honeycrisp, Braeburn, or Fuji apples also work well. Avoid Red Delicious or McIntosh as they’re too soft and will turn mushy.
Powdered Sugar (for glaze) – Creates a smooth, sweet glaze that hardens to a perfect finish. Granulated sugar won’t dissolve properly for glazing.
Oil for Frying – Use a neutral oil with a high smoke point like vegetable, canola, or peanut oil. Avoid olive oil or butter, which will burn at frying temperatures.
Equipment Needed
You don’t need fancy equipment to make exceptional apple fritters. Here’s what you’ll need:
- Large mixing bowl – For combining dry ingredients
- Medium mixing bowl – For whisking wet ingredients
- Whisk – For mixing the batter until smooth
- Measuring cups and spoons – Accurate measurements ensure consistent results
- Cutting board and sharp knife – For dicing apples into uniform pieces
- Heavy-bottomed pot or deep fryer – A Dutch oven or deep saucepan (at least 3-4 inches deep) works perfectly for frying
- Candy or deep-fry thermometer – Essential for maintaining the correct oil temperature (350°F)
- Slotted spoon or spider strainer – For safely adding batter to oil and removing finished fritters
- Wire cooling rack set over baking sheet – Allows fritters to drain and cool without getting soggy
- Paper towels – For additional draining if needed
- Small bowl – For mixing the glaze
- Fork or whisk – For drizzling glaze over fritters
Apple Fritter Recipe
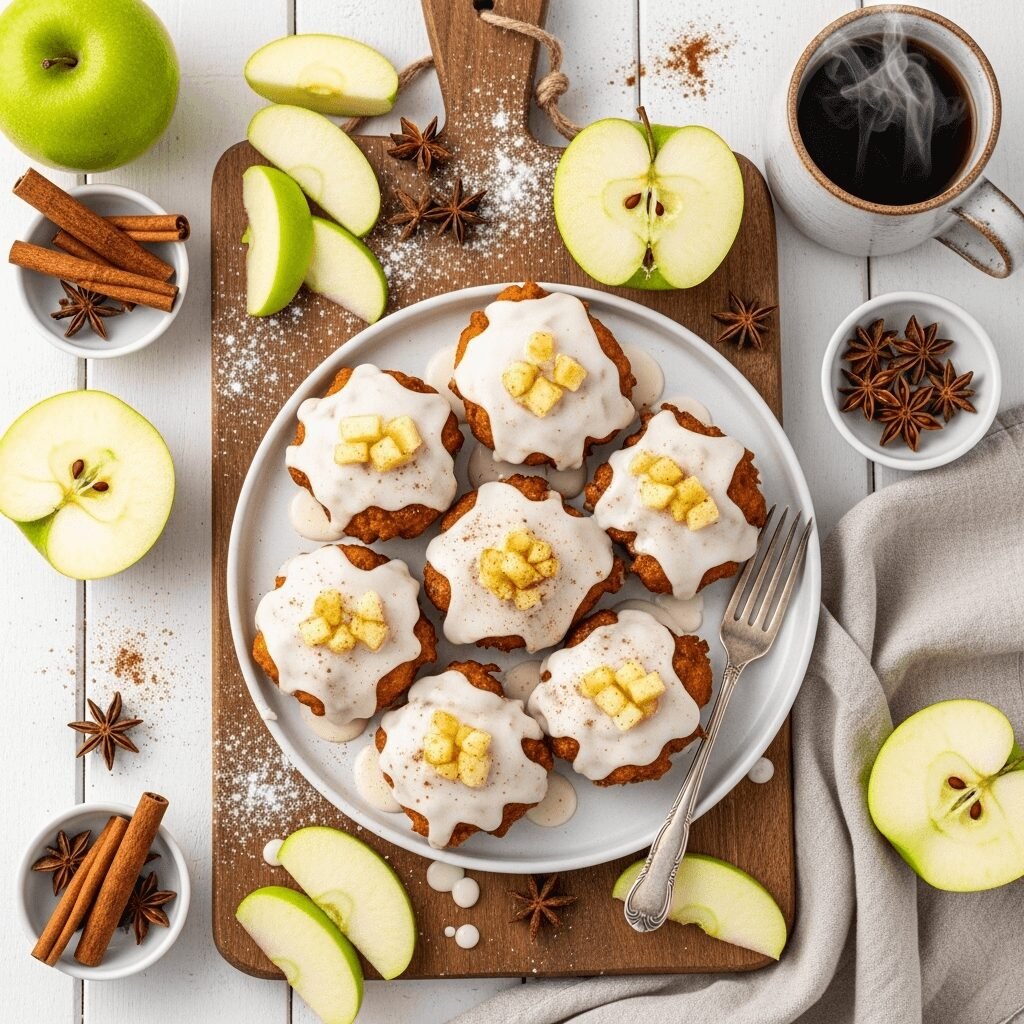
Golden, crispy homemade apple fritters loaded with fresh apple chunks, warm cinnamon, and finished with a sweet vanilla glaze. These bakery-style treats are surprisingly easy to make at home and taste infinitely better than store-bought versions. Perfect for breakfast, brunch, or dessert!
- Prep Time: 15 minutes
- Cook Time: 20 minutes
- Total Time: 35 minutes
- Yield: 12 fritters 1x
- Category: Dessert, Breakfast, Brunch
- Method: Deep Frying
Ingredients
For the Fritters:
- 2 cups all-purpose flour
- ⅓ cup granulated sugar
- 2 teaspoons baking powder
- 1 teaspoon ground cinnamon
- ½ teaspoon salt
- ¼ teaspoon ground nutmeg
- ⅔ cup whole milk
- 2 large eggs
- 2 tablespoons unsalted butter, melted
- 1 teaspoon pure vanilla extract
- 2 cups Granny Smith apples, peeled, cored, and diced into ¼-inch pieces (about 2 medium apples)
- Vegetable or canola oil for frying (about 6-8 cups)
For the Glaze:
- 2 cups powdered sugar
- ¼ cup milk (plus more if needed)
- ½ teaspoon vanilla extract
Instructions
- Prepare the apples: Peel, core, and dice your apples into small ¼-inch pieces. Smaller pieces distribute better throughout the fritters and cook more evenly. Set aside.
- Mix dry ingredients: In a large mixing bowl, whisk together the flour, granulated sugar, baking powder, cinnamon, salt, and nutmeg until well combined and no lumps remain.
- Combine wet ingredients: In a separate medium bowl, whisk together the milk, eggs, melted butter, and vanilla extract until smooth and fully incorporated.
- Make the batter: Pour the wet ingredients into the dry ingredients and stir with a wooden spoon or spatula just until combined. The batter should be thick and a bit lumpy – don’t overmix or your fritters will be tough. Gently fold in the diced apples until evenly distributed throughout the batter.
- Heat the oil: Pour oil into a heavy-bottomed pot or Dutch oven to a depth of about 2-3 inches. Heat over medium-high heat until the oil reaches 350°F on a candy thermometer. Maintaining this temperature is crucial for fritters that are cooked through without being greasy.
- Fry the fritters: Using a large spoon or ice cream scoop, carefully drop about ¼ cup portions of batter into the hot oil. Don’t overcrowd the pot – fry only 2-3 fritters at a time to maintain oil temperature. Fry for 2-3 minutes per side, flipping once, until deep golden brown all over. The fritters should float to the surface when they’re ready to flip.
- Drain: Use a slotted spoon or spider strainer to remove fritters from the oil and transfer to a wire rack set over a baking sheet. Let drain and cool for about 5 minutes. Check the oil temperature and adjust heat as needed between batches.
- Make the glaze: While fritters cool slightly, whisk together powdered sugar, milk, and vanilla extract in a small bowl until smooth. The glaze should be thick but pourable – add more milk by the teaspoon if it’s too thick, or more powdered sugar if too thin.
- Glaze the fritters: Once fritters have cooled for about 5 minutes (still warm but not hot), dip the top of each fritter into the glaze or drizzle glaze over them with a spoon or fork. Allow the glaze to set for a few minutes before serving.
- Serve: Enjoy your homemade apple fritters warm or at room temperature. They’re best enjoyed the day they’re made but will keep for 2-3 days stored properly.
Notes
- Temperature is key: If oil is too hot, fritters will brown too quickly on the outside while remaining raw inside. Too cool, and they’ll absorb excess oil and be greasy. Use a thermometer and adjust heat as needed.
- Batter consistency: The batter should be thick enough to hold its shape when dropped into oil but not so thick it doesn’t spread slightly. If too thin, add a tablespoon or two more flour.
- Apple varieties: Granny Smith apples are recommended for their tartness and firm texture, but Honeycrisp, Braeburn, Pink Lady, or Fuji also work beautifully.
- Glaze timing: Apply glaze while fritters are still slightly warm so it adheres properly but has set enough that the glaze doesn’t completely melt off.
Nutrition
- Serving Size: 1 fritter
- Calories: 285
- Sugar: 24g
- Sodium: 180mg
- Fat: 12g
- Saturated Fat: 3g
- Unsaturated Fat: 8g
- Trans Fat: 0g
- Carbohydrates: 41g
- Fiber: 1g
- Protein: 4g
- Cholesterol: 40mg
Nutrition information is approximate and based on standard ingredient measurements. Actual values may vary depending on specific brands and preparation methods.
Tips & Variations
Spice It Up: Add a pinch of cardamom or ground ginger to the batter for extra warmth, or include a dash of apple pie spice instead of individual spices.
Different Glazes: Try a maple glaze (substitute maple syrup for some of the milk), caramel glaze (brown the butter first), or cream cheese glaze (add softened cream cheese to the powdered sugar mixture).
Add Mix-Ins: Fold in ½ cup of chopped pecans or walnuts for crunch, or add ¼ cup of raisins or dried cranberries along with the apples.
Healthier Version: Use whole wheat pastry flour for half the all-purpose flour, reduce sugar by ¼ cup, and use unsweetened applesauce in place of half the butter. You can also bake them instead of frying (see below).
Baked Apple Fritters: While not quite as crispy, you can bake these at 400°F for 12-15 minutes if you prefer not to fry. Brush with melted butter before baking for better browning.
Cinnamon Sugar Coating: Skip the glaze and toss warm fritters in cinnamon sugar for a different finish that’s equally delicious.
Mini Fritters: Make bite-sized versions using just 1 tablespoon of batter per fritter. These are perfect for parties and will fry in about 1-2 minutes per side.
Seasonal Twists: Add pumpkin pie spice and a tablespoon of pumpkin puree in fall, or try using pears instead of apples for a different fruit flavor.
Pro Chef Tips
Dry your apples thoroughly – After dicing, pat the apple pieces with paper towels to remove excess moisture. Too much liquid from the apples can make the batter thin and affect frying.
Don’t skip the resting dough – While the recipe doesn’t call for long resting, letting the mixed batter sit for 5 minutes before frying allows the flour to fully hydrate, resulting in more tender fritters.
Maintain consistent oil temperature – This is the single most important factor in perfect fritters. Invest in a good thermometer and adjust your heat up or down between batches. If the oil gets too hot, remove the pot from heat briefly to cool it down.
Test fry one first – Before committing to frying all your batter, fry one test fritter to check oil temperature and batter consistency. This allows you to make adjustments before it’s too late.
Use a portioning scoop – An ice cream scoop or large cookie scoop ensures all fritters are the same size, which means they’ll cook evenly and be done at the same time.
Flip only once – Resist the urge to constantly flip and fiddle with frying fritters. Let them cook undisturbed on one side until golden, flip once, then cook the second side.
Double glaze for extra sweetness – For bakery-style ultra-sweet fritters, apply a first coat of glaze, let it set for 10 minutes, then apply a second coat.
Fresh spices make a difference – If your ground cinnamon and nutmeg have been sitting in your cabinet for years, replace them. Fresh spices will give your fritters noticeably better flavor.
Common Mistakes to Avoid
Overmixing the batter – Stirring too much develops gluten, making fritters tough and dense instead of light and tender. Mix just until the ingredients are combined and you still see a few small lumps.
Cutting apples too large – Big apple chunks won’t cook through properly and create pockets of raw fruit. Dice them small (about ¼ inch) for even distribution and cooking.
Frying at wrong temperature – Too hot and your fritters burn outside while staying raw inside; too cool and they absorb excess oil becoming greasy. Always use a thermometer and aim for 350°F.
Overcrowding the pan – Adding too many fritters at once drops the oil temperature dramatically and prevents proper crisping. Fry in small batches of 2-3 fritters.
Not draining properly – Placing hot fritters on paper towels traps steam underneath and makes the bottoms soggy. Always use a wire rack so air circulates all around.
Glazing too soon – If fritters are too hot when glazed, the glaze will simply melt and run off. Wait about 5 minutes for them to cool slightly but still be warm.
Using the wrong apples – Soft apples like McIntosh or Red Delicious will turn to mush when fried. Choose firm, tart varieties that hold their shape.
Storage & Meal Prep
Room Temperature Storage: Store completely cooled, glazed apple fritters in an airtight container at room temperature for up to 2 days. Place parchment paper between layers to prevent sticking.
Refrigeration: While not necessary for short-term storage, you can refrigerate fritters in an airtight container for up to 4 days. The glaze may soften slightly, but they’ll still taste delicious.
Reheating: For best results, reheat fritters in a 350°F oven for 5-7 minutes to restore some crispiness. You can also microwave for 15-20 seconds, though they’ll be softer. Avoid reheating glazed fritters in a toaster as the glaze will melt and make a mess.
Texture After Storage: Understand that fritters are always best fresh. After storage, they’ll lose some crispiness but will still be delicious. The flavor actually develops and intensifies slightly after a day.
Refreshing the Glaze: If the glaze looks dull after storage, you can make a fresh small batch and lightly drizzle it over stored fritters before serving.
Make-Ahead & Freezer Notes
Preparing Batter in Advance: You can mix the dry ingredients and wet ingredients separately up to 1 day ahead, storing them covered in the refrigerator. Add the apples and combine the two mixtures just before frying.
Freezing Uncooked Batter: This isn’t recommended as the apples release moisture during freezing, which will make the batter watery when thawed.
Freezing Cooked Fritters: Freeze unfrosted fritters in a single layer on a baking sheet until solid (about 2 hours), then transfer to a freezer-safe container or bag with parchment paper between layers. Freeze for up to 2 months. Thaw at room temperature and glaze just before serving.
Best Freezing Method: Flash-freeze first (as described above) to prevent fritters from sticking together, then store properly sealed to prevent freezer burn.
Reheating from Frozen: Thaw frozen fritters overnight in the refrigerator or for 30 minutes at room temperature, then reheat in a 325°F oven for 8-10 minutes. You can also reheat straight from frozen at 300°F for 12-15 minutes.
Glazing After Freezing: Always glaze fritters after thawing and reheating, not before freezing. Frozen glaze becomes sticky and unappealing when thawed.
Serving Suggestions
Apple fritters are incredibly versatile and pair beautifully with many accompaniments:
Hot Beverages: Serve alongside freshly brewed coffee, chai tea, apple cider (hot or cold), cappuccino, or a pumpkin spice latte for a cozy autumn breakfast.
Breakfast Spread: Include fritters as part of a brunch buffet with scrambled eggs, crispy bacon, fresh fruit salad, and yogurt parfaits.
Ice Cream Pairing: Serve warm fritters with a scoop of vanilla bean ice cream, salted caramel ice cream, or cinnamon ice cream for an indulgent dessert.
Whipped Cream: Top with fresh whipped cream or cinnamon whipped cream for extra decadence.
Caramel Drizzle: Add store-bought or homemade caramel sauce drizzled over the glaze for extra richness.
Fresh Fruit: Serve with a side of fresh apple slices, pear slices, or seasonal berries to balance the sweetness.
Yogurt Dip: Offer vanilla Greek yogurt mixed with honey and cinnamon as a lighter dipping option.
Fall Gathering: Make these the centerpiece of an autumn brunch alongside pumpkin muffins, apple butter, and spiced cider.
FAQs Section
Can I bake these instead of frying?
Yes! While they won’t be quite as crispy, you can bake apple fritters at 400°F for 12-15 minutes until golden brown. Brush them with melted butter before baking to help with browning. They’ll be more cake-like but still delicious.
Why are my fritters greasy?
This usually happens when the oil temperature is too low. Oil that’s not hot enough allows the fritters to absorb too much oil before the outside cooks and seals. Always maintain 350°F and use a thermometer to monitor. Also ensure you’re draining them properly on a wire rack.
Can I use a different type of apple?
Absolutely! While Granny Smith is recommended for its tartness and firm texture, other good options include Honeycrisp, Braeburn, Pink Lady, Fuji, or Gala. Avoid soft varieties like McIntosh or Red Delicious which turn mushy when cooked.
How do I know when the fritters are done?
Fritters should be deep golden brown on both sides and will float to the surface when ready. If you’re unsure, remove one and break it open – the interior should be fully cooked with no raw batter. They typically take 2-3 minutes per side at proper temperature.
Can I make these gluten-free?
Yes, you can substitute a 1:1 gluten-free flour blend for the all-purpose flour. The texture will be slightly different but still delicious. Make sure your blend contains xanthan gum or add ½ teaspoon if it doesn’t.
My batter is too thick/thin. What should I do?
The batter should be thick but scoopable – similar to thick pancake batter. If it’s too thick and difficult to scoop, add milk one tablespoon at a time. If it’s too thin and runs off the spoon, add flour one tablespoon at a time. Humidity can affect flour, so small adjustments are normal.
Can I make these dairy-free?
Yes! Use your favorite non-dairy milk (almond, oat, or soy work well) in place of regular milk, and substitute the butter with coconut oil or vegan butter. For the glaze, use non-dairy milk as well.
How do I prevent the glaze from being too thin or too thick?
Start with the recipe proportions, then adjust as needed. Add more powdered sugar for thicker glaze, or more milk (one teaspoon at a time) for thinner glaze. The glaze should be thick enough to coat the back of a spoon but thin enough to drizzle easily.
Conclusion
There’s truly nothing like the satisfaction of pulling a batch of golden, fragrant apple fritters from hot oil, watching that glossy glaze cascade over their crispy edges, and taking that first warm bite that perfectly balances sweet and tart, crispy and tender. These homemade apple fritters bring bakery-quality results straight to your kitchen, and once you see how easy they are to make, you’ll wonder why you ever waited in line at a donut shop.
Whether you’re making these for a special weekend breakfast, bringing them to a fall gathering, or simply treating yourself to something wonderful, this recipe delivers every single time. The combination of fresh apples, warm spices, and that irresistible fried-dough magic creates something truly special that brings people together and creates lasting memories.
So grab your favorite apples, heat up that oil, and get ready to become the hero of breakfast time. Don’t forget to snap a photo of your beautiful fritters and share it on Pinterest – your fellow home bakers will thank you! And if you loved this recipe, drop a comment below telling me how yours turned out. Did you add any special twists? I’d love to hear about your apple fritter adventures!
Happy frying, and enjoy every delicious bite! 🍎✨