The Ultimate Moist Banana Bread Recipe – Easy Homemade Classic

There’s something truly magical about the aroma of freshly baked banana bread wafting through your kitchen. This beloved classic has been warming hearts and homes for generations, and for good reason. My Ultimate Moist Banana Bread Recipe is the perfect way to transform those overripe bananas sitting on your counter into a tender, flavorful loaf that’s equally at home at breakfast, as an afternoon snack, or even as a sweet ending to dinner.
This isn’t just any banana bread – it’s the kind that stays incredibly moist for days, has a beautiful golden-brown crust, and features that perfect balance of banana sweetness with just a hint of vanilla warmth. Whether you’re a seasoned baker or just starting your baking journey, this foolproof recipe will quickly become your go-to for using up those spotty bananas. It’s wonderful served warm with a pat of butter, toasted the next day, or even frozen for future enjoyment. This is comfort baking at its finest, and I’m thrilled to share every secret to making it absolutely perfect.
History / Background
Banana bread has a fascinating history that’s deeply rooted in American ingenuity and resourcefulness. While bananas have been cultivated for thousands of years, banana bread as we know it didn’t appear in American cookbooks until the 1930s. The timing wasn’t coincidental – it emerged during the Great Depression when home cooks were looking for ways to use every ingredient and waste nothing.
The popularity of banana bread exploded thanks to two key developments: the widespread availability of baking powder and baking soda as commercial leavening agents, and the mass distribution of bananas throughout the United States by fruit companies. Before this, bananas were considered an exotic luxury, but by the 1930s, they had become affordable and widely available.
Thrifty homemakers realized that overripe bananas, which were too soft and sweet to eat fresh, could be transformed into something delicious rather than thrown away. This perfectly aligned with the Depression-era mindset of “waste not, want not.” Early banana bread recipes appeared in popular cookbooks like the Pillsbury Cookbook and became a staple of American home baking.
The recipe gained even more traction in the 1960s when Chiquita began printing banana bread recipes on their stickers, cementing its place in American culinary culture. Today, banana bread remains one of the most searched-for recipes online, especially during challenging times when people turn to comfort baking. It’s more than just a recipe – it’s a symbol of home, resourcefulness, and the simple pleasure of turning something simple into something wonderful.
Why You’ll Love This Recipe
This classic banana bread recipe has been perfected over countless batches to deliver consistent, bakery-quality results every single time. What makes it truly special is how it achieves that elusive combination of being incredibly moist without being dense or gummy, while developing a beautiful caramelized crust that adds wonderful texture contrast.
Here’s why this recipe will become your new favorite:
- Foolproof and beginner-friendly – Simple one-bowl method that anyone can master, with no mixer required
- Uses everyday pantry ingredients – No specialty items or expensive additions needed
- Incredibly moist texture – Stays fresh and tender for up to 5 days when stored properly
- Perfect sweetness balance – Not overly sweet, allowing the natural banana flavor to shine
- Highly customizable – Easy to adapt with your favorite mix-ins like chocolate chips, nuts, or spices
- Budget-friendly – Makes excellent use of overripe bananas that might otherwise be wasted
- Family-approved – Loved by kids and adults alike, making it perfect for lunchboxes or after-school snacks
- Quick preparation – Just 10 minutes of hands-on time before it goes in the oven
- Freezer-friendly – Bakes and freezes beautifully for meal prep or future treats
- Versatile serving options – Delicious for breakfast, snacks, dessert, or even brunch gatherings
Ingredient Notes
Understanding your ingredients is key to baking success. Here’s what you need to know about each component and how it contributes to the perfect loaf:
Overripe Bananas: The star of the show! Use bananas that are heavily spotted or even completely brown. The darker the peel, the sweeter and more flavorful your bread will be. You’ll need about 3-4 medium bananas (approximately 1½ cups mashed). If your bananas aren’t ripe enough, you can speed up the process by baking them in their peels at 300°F for 15-20 minutes. In a pinch, frozen bananas work wonderfully – just thaw and drain excess liquid.
All-Purpose Flour: Provides structure to the bread. I don’t recommend substituting with whole wheat flour entirely, as it can make the bread dense, but you can replace up to half the amount with white whole wheat flour for added nutrition.
Granulated Sugar: Adds sweetness and helps create that beautiful golden crust. You can reduce the sugar by ¼ cup if you prefer less sweetness, or substitute with coconut sugar for a deeper caramel flavor.
Eggs: Act as a binder and add richness. Use room temperature eggs for better incorporation. For a vegan version, substitute with flax eggs (1 tablespoon ground flaxseed mixed with 3 tablespoons water per egg).
Butter: Adds flavor and moisture. Use unsalted butter so you can control the salt level. Melted coconut oil or vegetable oil can be substituted, though butter gives the best flavor.
Baking Soda: The primary leavening agent that reacts with the natural acids in bananas to create lift. Don’t substitute with baking powder – they’re not interchangeable in this recipe.
Vanilla Extract: Enhances all the other flavors. Pure vanilla extract is worth the investment, but imitation will work in a pinch.
Salt: Essential for balancing sweetness and enhancing flavor. Don’t skip it!
Optional Add-ins: Chocolate chips, walnuts, pecans, cinnamon, or nutmeg can be added to customize your loaf.
Equipment Needed
Having the right tools makes baking easier and more enjoyable. Here’s what you’ll need:
- 9×5-inch loaf pan – Standard size for this recipe (an 8×4-inch pan will work but requires longer baking time)
- Large mixing bowl – For combining wet and dry ingredients
- Medium mixing bowl – For mashing bananas and mixing wet ingredients
- Fork or potato masher – For mashing bananas to your desired consistency
- Measuring cups and spoons – For accurate measurements
- Whisk – For combining dry ingredients
- Rubber spatula or wooden spoon – For folding ingredients together gently
- Toothpick or cake tester – For checking doneness
- Wire cooling rack – Essential for proper cooling
- Parchment paper or cooking spray – For greasing the pan
- Oven thermometer (optional but helpful) – To ensure accurate oven temperature
The Ultimate Moist Banana Bread Recipe – Easy Homemade Classic
This classic banana bread recipe delivers a perfectly moist, tender loaf with deep banana flavor and a beautiful golden crust. Made with simple pantry ingredients and requiring just one bowl, it’s the ultimate comfort baking recipe that transforms overripe bananas into something magical.
- Prep Time: 5 minutes
- Cook Time: 60-65 minutes
- Total Time: 1 hour 20 minutes
- Yield: 10-12 slices (1 loaf) 1x
- Category: Dessert, Breakfast, Snack
- Method: Baking
- Cuisine: American
- Diet: Vegetarian
Ingredients
- 3-4 very ripe medium bananas (about 1½ cups mashed)
- ⅓ cup melted unsalted butter (or coconut oil)
- ¾ cup granulated sugar
- 1 large egg, beaten (room temperature)
- 1 teaspoon pure vanilla extract
- 1 teaspoon baking soda
- Pinch of salt (about ¼ teaspoon)
- 1½ cups all-purpose flour
- Optional: ½ cup chocolate chips or chopped walnuts
Instructions
- Preheat and Prepare: Preheat your oven to 350°F (175°C). Grease a 9×5-inch loaf pan with butter or cooking spray, or line with parchment paper for easy removal. Set aside.
- Mash the Bananas: In a large mixing bowl, mash the ripe bananas with a fork or potato masher until mostly smooth. A few small lumps are fine and actually add nice texture. You should have about 1½ cups of mashed banana.
- Mix Wet Ingredients: Add the melted butter to the mashed bananas and stir until combined. Mix in the sugar, beaten egg, and vanilla extract. Stir until everything is well incorporated and the mixture is smooth.
- Add Leavening and Salt: Sprinkle the baking soda and salt over the banana mixture. Stir gently to combine. You’ll notice the mixture might get a bit bubbly – this is the baking soda reacting with the acidic bananas, which is exactly what you want.
- Incorporate Flour: Add the flour all at once to the wet ingredients. Using a rubber spatula or wooden spoon, gently fold the flour into the banana mixture. Mix just until the flour disappears and you don’t see any white streaks. Be careful not to overmix – this is crucial for tender banana bread. The batter should be thick and slightly lumpy.
- Add Mix-ins (Optional): If using chocolate chips or nuts, gently fold them into the batter now, reserving a small handful to sprinkle on top if desired.
- Transfer to Pan: Pour the batter into your prepared loaf pan. Use your spatula to spread it evenly and smooth the top. If you reserved any mix-ins, sprinkle them over the top now for a beautiful presentation.
- Bake: Place the pan in the center of your preheated oven. Bake for 60-65 minutes, or until a toothpick inserted into the center comes out clean or with just a few moist crumbs (no wet batter). The top should be deeply golden brown. If the top is browning too quickly, tent loosely with aluminum foil after 40 minutes.
- Cool Properly: Remove from the oven and let the banana bread cool in the pan for 10 minutes. This allows it to set properly and makes removal easier. Then carefully remove from the pan and transfer to a wire cooling rack. Let cool for at least 15-20 minutes before slicing (though it’s also delicious warm!).
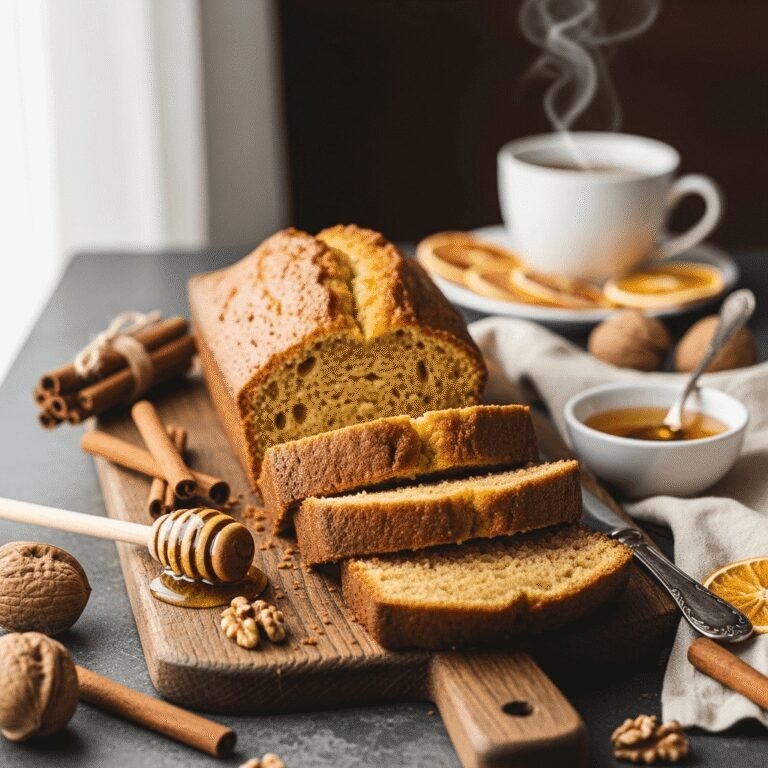
- Slice and Serve: Use a sharp serrated knife to cut clean slices. Wipe the knife between cuts for the neatest presentation. Serve as is, with butter, or toasted with a drizzle of honey.
Notes
- Banana Ripeness is Key: The riper your bananas, the sweeter and more flavorful your bread will be. Look for bananas with brown spots or completely brown peels.
- Don’t Overmix: Once you add the flour, mix just until combined. Overmixing develops gluten, which makes the bread tough and dense instead of tender.
- Check for Doneness: Oven temperatures vary, so start checking at 55 minutes. The toothpick test is your best friend – it should come out mostly clean.
- Loaf Pan Size Matters: Using a different pan size will affect baking time. Smaller pans require longer baking; larger or wider pans need less time.
- Room Temperature Matters: Let the baked bread cool before wrapping to prevent condensation, which makes it soggy.
Nutrition
- Serving Size: 1 slice (based on 12 slices)
- Calories: 185
- Sugar: 16g
- Sodium: 150mg
- Fat: 6g
- Saturated Fat: 3.5g
- Unsaturated Fat: 2g
- Trans Fat: 0g
- Carbohydrates: 31g
- Fiber: 1.5g
- Protein: 3g
- Cholesterol: 30mg
Note: Nutrition information is an estimate and will vary based on specific ingredients used and portion sizes. Add-ins like chocolate chips or nuts will increase calorie and fat content.
Tips & Variations
One of the best things about banana bread is how wonderfully adaptable it is to your preferences and dietary needs. Here are some fantastic ways to customize this recipe:
Flavor Variations:
- Chocolate Lover’s Banana Bread: Add ½ cup chocolate chips and 2 tablespoons cocoa powder for a chocolate banana combo
- Nutty Banana Bread: Fold in ½ cup chopped walnuts, pecans, or almonds for crunch and protein
- Spiced Banana Bread: Add 1 teaspoon cinnamon, ¼ teaspoon nutmeg, and a pinch of cardamom for warming spice
- Peanut Butter Banana Bread: Swirl 3-4 tablespoons of peanut butter into the batter before baking
- Tropical Banana Bread: Add ½ cup shredded coconut and ½ cup crushed pineapple (drain well)
Dietary Modifications:
- Healthier Version: Replace half the butter with Greek yogurt or applesauce, and use half whole wheat flour
- Gluten-Free: Use a 1:1 gluten-free flour blend designed for baking
- Vegan: Replace egg with flax egg, use plant-based butter or coconut oil, and add 2 tablespoons non-dairy milk
- Reduced Sugar: Cut sugar down to ½ cup and add a bit more vanilla extract for perceived sweetness
- Paleo-Friendly: Use almond flour (though texture will be different), coconut oil, coconut sugar, and reduce baking time
Texture Tweaks:
- For extra moist bread, add 2-3 tablespoons of sour cream or Greek yogurt
- For a lighter texture, separate the egg and fold in the beaten egg white at the end
- For denser, more compact bread (in a good way), add an extra banana
Pro Chef Tips
These professional techniques will take your banana bread from good to absolutely exceptional:
Banana Preparation: After mashing bananas, let them sit for 5 minutes. Any excess liquid will pool at the bottom – drain it off. This prevents soggy bread while keeping all the banana flavor.
Brown Your Butter: Instead of just melting the butter, brown it until it has a nutty aroma and golden color, then let it cool. This adds incredible depth of flavor with minimal extra effort.
The Creaming Secret: For an even more tender crumb, cream the sugar with the butter before adding the other wet ingredients. This incorporates air and creates a lighter texture.
Flour Technique: Spoon your flour into the measuring cup and level it off instead of scooping directly from the bag. Scooping packs the flour and can result in dry, dense bread. Even better, weigh your flour for perfect consistency (1½ cups = 180g).
The Tap Test: After mixing, tap the filled loaf pan firmly on the counter 2-3 times. This releases air bubbles that can create tunnels and uneven texture in the finished bread.
Rotate for Even Baking: Halfway through baking (around 30 minutes), quickly rotate the pan 180 degrees. This ensures even browning since most ovens have hot spots.
Steam for Moisture: Place a small oven-safe dish of water on the bottom rack while baking. This creates steam that keeps the bread extra moist and prevents the top from drying out.
The Skewer Advantage: Use a bamboo skewer instead of a toothpick for testing doneness – its length allows you to test the very center where the bread takes longest to bake.
Rest Before Slicing: As tempting as it is to cut into warm bread, letting it cool for at least 30 minutes allows the structure to set. You’ll get much cleaner, prettier slices.
Wrap While Slightly Warm: For maximum moisture retention, wrap the bread while it’s still slightly warm (but not hot). This traps steam and keeps it incredibly moist for days.
Common Mistakes to Avoid
Learning what NOT to do is just as important as following the recipe. Here are the most common banana bread pitfalls and how to avoid them:
Using Under-Ripe Bananas: Green or yellow bananas without brown spots won’t provide enough sweetness or moisture. The bread will be bland and may not rise properly. Always wait until your bananas are heavily spotted or brown.
Overmixing the Batter: Once you add flour to wet ingredients, mix only until you don’t see dry flour anymore. Overmixing develops gluten strands that make bread tough and chewy instead of tender. Those small lumps are actually good! Think of it as folding rather than stirring.
Incorrect Oven Temperature: If your oven runs hot, the outside will burn before the inside cooks. If it runs cool, you’ll get gummy, undercooked centers. Invest in an oven thermometer to know your true temperature, and adjust accordingly.
Opening the Oven Door Too Early: Every time you open the oven door, the temperature drops significantly. Don’t check the bread until at least 50 minutes have passed. The sudden temperature change can cause the bread to sink in the middle.
Not Greasing the Pan Properly: Even with non-stick pans, butter or spray every corner and the sides well. Better yet, line the pan with parchment paper with overhang on the sides for foolproof removal.
Cutting While Too Hot: I know it’s tempting, but hot banana bread is structurally fragile and will crumble or squish when you cut it. The starches need time to set up. Wait at least 15-20 minutes for the best texture.
Measuring Flour Incorrectly: Too much flour is the #1 cause of dry, crumbly banana bread. Always spoon flour into your measuring cup and level it off, never scoop directly from the bag.
Storage & Meal Prep
Proper storage ensures your banana bread stays fresh and delicious for as long as possible:
Room Temperature Storage: Once completely cooled, wrap the banana bread tightly in plastic wrap or aluminum foil, or place it in an airtight container. It will stay fresh at room temperature for 3-4 days. Keep it away from direct sunlight and heat sources.
Refrigerator Storage: While not necessary, refrigerating banana bread extends its life to about 1 week. Wrap it tightly in plastic wrap and then place in a sealed container or zip-top bag to prevent it from drying out or absorbing refrigerator odors. Let slices come to room temperature before eating, or toast them for best texture.
Individual Slice Storage: If you’re the only one eating the bread, slice it completely and wrap each slice individually in plastic wrap. Stack the wrapped slices in a freezer bag or container. This way, you can grab a single serving whenever you want one without exposing the whole loaf to air repeatedly.
Reviving Day-Old Bread: If your banana bread has become a bit dry, lightly brush slices with melted butter and toast them in a 350°F oven for 5-7 minutes, or warm them in the microwave for 10-15 seconds. This refreshes the texture and brings back moisture.
Keep It Fresh Longer: Adding a slice of bread to the container with your banana bread might sound odd, but it works! The banana bread will absorb moisture from the regular bread, staying soft while the bread slice goes stale instead.
Make-Ahead & Freezer Notes
Banana bread is one of the most freezer-friendly baked goods, making it perfect for meal prep and advance planning:
Freezing Baked Banana Bread: Let the loaf cool completely (this is crucial – any warmth will create ice crystals). Wrap it tightly in plastic wrap, then wrap again in aluminum foil, or place in a freezer-safe bag with air pressed out. Label with the date. Properly wrapped banana bread will stay fresh in the freezer for up to 3-4 months.
Freezing Individual Slices: Slice the cooled loaf completely, then wrap each slice individually in plastic wrap. Place all wrapped slices in a large freezer bag. This method is incredibly convenient – just pull out one slice at a time for breakfast or snacks. They’ll keep for up to 3 months.
Thawing Methods: For the whole loaf, remove from the freezer and let it thaw at room temperature in its wrapping for 2-3 hours, or overnight on the counter. For individual slices, they thaw in about 30-45 minutes at room temperature, or you can microwave them for 20-30 seconds. Toasting frozen slices works beautifully too!
Baking from Frozen: You can even bake banana bread from a frozen state. Prepare the batter, pour into a lined pan, and freeze for up to 1 month. When ready to bake, place the frozen batter (in its pan) directly into a preheated oven and add 15-20 minutes to the baking time.
Make-Ahead Batter: While fresh is best, you can prepare the batter up to 2 hours in advance. Keep it covered in the refrigerator, then bring to room temperature for 15 minutes before baking. The baking soda will start working immediately when mixed, so don’t prepare it too far in advance or your bread won’t rise as well.
Overripe Banana Storage: Here’s a pro tip: when bananas get perfectly ripe but you’re not ready to bake, just peel them, place them in a freezer bag, and freeze them whole. When you’re ready to make banana bread, thaw them (they’ll be mushy and perfect), drain excess liquid, and use as normal. This way you always have bananas ready for banana bread!
Serving Suggestions
Banana bread is wonderfully versatile and can be enjoyed in countless ways throughout the day:
Classic Breakfast Options:
- Toasted with butter melting into the warm slices
- Spread with cream cheese, peanut butter, or almond butter
- Topped with fresh banana slices and a drizzle of honey
- Served alongside scrambled eggs and crispy bacon for a sweet-savory breakfast
- With a dollop of Greek yogurt and fresh berries
Snack & Dessert Presentations:
- Warmed and topped with vanilla ice cream for an easy dessert
- Served with whipped cream and chocolate drizzle
- Cut into small squares as part of a dessert board with fresh fruit
- Drizzled with cream cheese glaze or chocolate ganache for special occasions
- Paired with a hot cup of coffee, tea, or cold glass of milk
Beverage Pairings:
- Strong black coffee – the bitterness balances the sweetness perfectly
- Chai tea or spiced herbal tea
- Cold brew or iced coffee for warm weather
- Hot chocolate for a cozy treat
- Fresh orange juice or smoothies for breakfast
Complete Meal Ideas:
- Part of a weekend brunch spread with egg dishes, fresh fruit, and pastries
- Afternoon tea service with other baked goods and finger sandwiches
- Breakfast on-the-go paired with a travel mug of coffee
- After-school snack with apple slices and cheese
Creative Serving Ideas:
- Make French toast using thick slices of banana bread
- Cube and use as the base for a bread pudding
- Toast and top with ricotta, honey, and chopped pistachios
- Serve with caramelized bananas and rum sauce for an elevated dessert
FAQs Section
Q: Why is my banana bread gummy or undercooked in the middle?
A: This usually happens when the bread hasn’t baked long enough or the oven temperature is too low. The outside looks done but the inside is still wet. Make sure you’re testing with a toothpick or skewer in the very center – it should come out clean or with just a few crumbs. Also check your oven temperature with a thermometer, as many ovens run 25°F cooler or hotter than they display. If your bread consistently has this problem, lower the oven temperature by 25°F and bake longer.
Q: Can I reduce the sugar in this recipe?
A: Yes, you can reduce the sugar to ½ cup without drastically affecting the texture. The bread will be less sweet but the banana flavor will be more pronounced. Keep in mind that sugar does more than sweeten – it also helps with browning and moisture retention, so going too low may result in paler, slightly drier bread. If you want less sugar but still good results, try using ⅔ cup instead.
Q: My banana bread rose beautifully but then sank in the middle. What happened?
A: A sunken center is usually caused by undermixing the leavening (baking soda wasn’t evenly distributed), opening the oven door too early and letting temperature drop dramatically, or incorrect oven temperature causing the outside to set before the inside was done. Make sure you’re mixing the baking soda in thoroughly, and don’t open your oven door until at least 50 minutes of baking time has passed.
Q: Can I use frozen bananas for this recipe?
A: Absolutely! Frozen bananas actually work wonderfully. Thaw them completely (you can speed this up in the microwave), and you’ll notice they release quite a bit of liquid. Drain most of this liquid off before mashing, otherwise your batter will be too thin. The bananas will be very mushy and easy to mash, which is perfect for banana bread.
Q: My loaf is very brown on top but not done inside. How do I prevent this?
A: Your oven is too hot, or the pan is too dark (dark pans absorb more heat and brown faster). Try reducing your oven temperature to 325°F and baking longer. You can also tent the top loosely with aluminum foil after 40 minutes of baking to prevent further browning while the inside finishes cooking. Light-colored pans work better than dark ones for even baking.
Q: Is it normal for banana bread to crack on top?
A: Yes! That beautiful crack down the center is actually a sign of properly baked banana bread. It happens because the outside sets first, and as the inside continues to rise and expand, it creates that signature crack. It’s not a flaw – it’s a feature that shows your bread baked correctly.
Q: How do I know when my bananas are ripe enough for banana bread?
A: The riper, the better! Look for bananas with brown spots all over (called “sugar spots”), or even bananas that are entirely brown or black. The peel might look unappetizing, but inside, the banana will be soft, sweet, and perfect for bread. If your bananas aren’t ripe enough, you can speed up the process by placing them in a paper bag for a day or two, or baking them in their peels at 300°F for 15-20 minutes until the skins turn black.
Conclusion
There you have it – everything you need to know to bake the most amazing, moist, and flavorful banana bread! This recipe has been my go-to for years, and I’m so excited for you to experience how simple yet incredibly delicious homemade banana bread can be. Whether you’re using up those brown bananas that have been sitting on your counter, baking for a special breakfast, or just craving the comforting aroma of something sweet coming out of your oven, this banana bread delivers every single time.
The beauty of this recipe is that once you’ve mastered the basic version, you can get creative with endless variations to suit your family’s tastes. Add chocolate chips one week, fold in walnuts the next, or swirl in some peanut butter for a fun twist. Every loaf is an opportunity to make it your own.
I’d absolutely love to hear how your banana bread turns out! Did you add any special mix-ins? Did your family devour it warm from the oven? Drop a comment below and let me know, and if you loved this recipe, please share it with your friends and save it to your Pinterest boards so you can find it again. There’s nothing better than knowing this recipe is bringing joy to kitchens everywhere.
Happy baking, friend! Now go preheat that oven and let’s turn those overripe bananas into something absolutely wonderful. 🍌✨