The Ultimate Southern Banana Pudding Recipe – Creamy, Dreamy, and Irresistible!

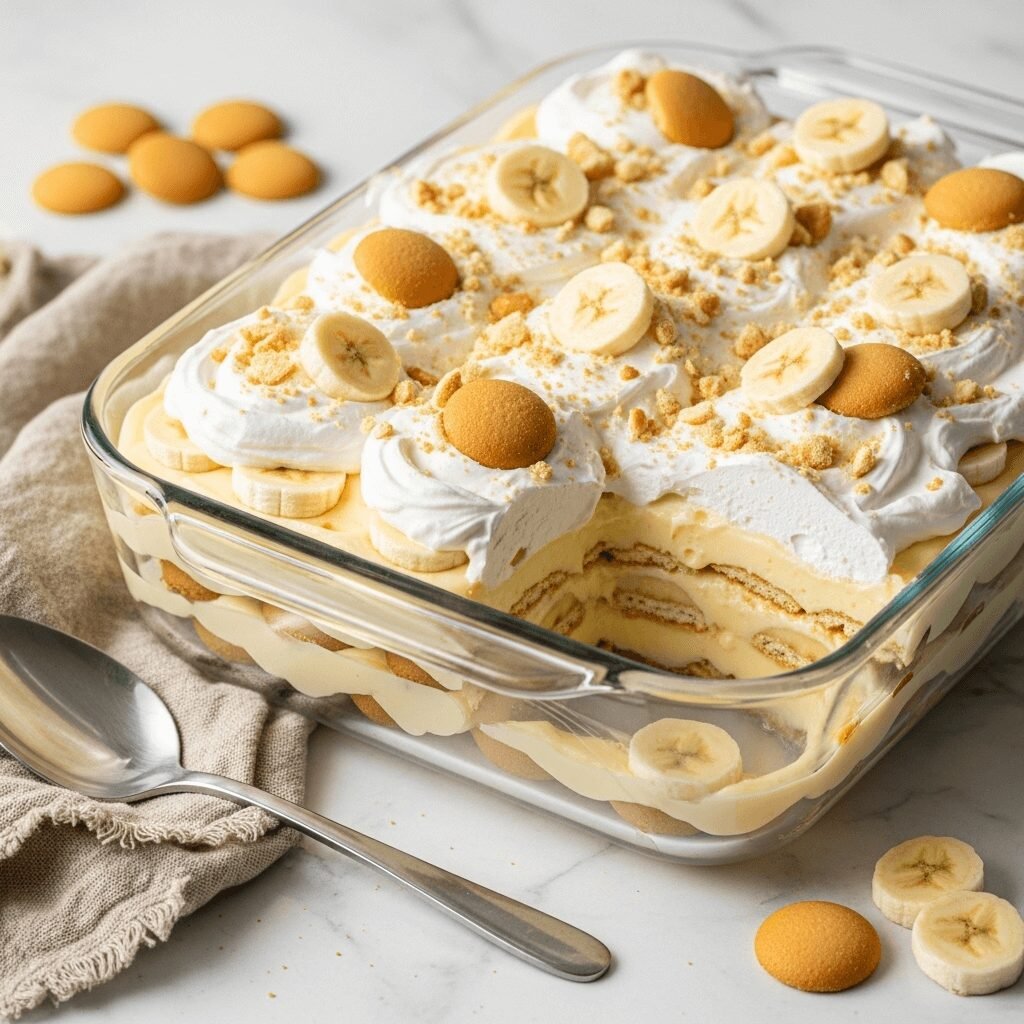
There’s something magical about a chilled bowl of homemade banana pudding that instantly transports you to a warm Southern kitchen filled with love and laughter. This classic Southern banana pudding recipe features layers of creamy vanilla custard, fresh banana slices, and vanilla wafer cookies that soften into pillowy perfection. Topped with billowy clouds of whipped cream or fluffy meringue, this dessert is the epitome of comfort food that never goes out of style.
Whether you’re planning a summer potluck, a family reunion, a holiday gathering, or just craving something sweet and nostalgic, this easy banana pudding recipe delivers every single time. It’s the kind of dessert that disappears fast at parties, gets requested for every celebration, and creates memories that last a lifetime. The best part? You don’t need to be an experienced baker to create this showstopping dessert. With simple ingredients and straightforward steps, you’ll have a crowd-pleasing treat ready in under an hour.
This recipe strikes the perfect balance between traditional Southern charm and modern convenience. While some recipes use instant pudding mix, we’re making a luscious homemade vanilla custard from scratch that takes this dessert from good to absolutely spectacular. Trust me—once you taste the difference that real vanilla custard makes, you’ll never want to go back to the boxed stuff. The silky texture, the rich vanilla flavor, and the way it melds with those sweet banana slices is pure dessert heaven.
History / Background
Banana pudding has deep roots in Southern American cuisine, though its origins are actually more complex than many people realize. The dessert as we know it today emerged in the late 19th and early 20th centuries, coinciding with several important developments: the mass production of vanilla wafer cookies, improved refrigeration technology, and the increased availability of bananas in the United States.
Bananas were once considered exotic and expensive fruits in America, but by the early 1900s, improved shipping methods made them more accessible and affordable. The United Fruit Company (now Chiquita) played a significant role in popularizing bananas, and banana pudding recipes began appearing in cookbooks and on the back of vanilla wafer boxes.
The Nabisco company, maker of Nilla Wafers, published a banana pudding recipe on their box in the 1940s, which helped standardize and popularize this dessert across the country. However, the South truly claimed banana pudding as its own, elevating it to iconic status at church suppers, family reunions, and Sunday dinners. Southern cooks added their special touches—some topped it with meringue and toasted it to golden perfection, while others preferred fresh whipped cream. Some let the pudding sit overnight so the wafers could soften completely, creating an almost cake-like texture.
Today, banana pudding remains a beloved symbol of Southern hospitality and home cooking. It’s often served at significant gatherings, from graduation parties to wedding receptions, and many families guard their specific recipe variations as treasured secrets passed down through generations. The dessert has even inspired modern variations like banana pudding cheesecake, ice cream, and even cocktails, but the classic layered version remains the gold standard.
Why You’ll Love This Recipe
This homemade banana pudding recipe is about to become your new favorite dessert, and here’s why: it combines the nostalgic flavors you remember from childhood with the quality and richness that only homemade cooking can provide. The creamy vanilla custard is silky smooth and infused with real vanilla extract, the bananas add natural sweetness and a lovely texture contrast, and those vanilla wafers create the most delightful soft, cookie-like layers throughout.
Here’s what makes this recipe absolutely irresistible:
- Made from scratch but still easy – No instant pudding here! The homemade custard is surprisingly simple and tastes infinitely better than anything from a box
- Perfect make-ahead dessert – Actually tastes better the next day when the flavors have melded together beautifully
- Feeds a crowd – This recipe makes a generous 9×13 pan that serves 12-15 people, perfect for gatherings
- Budget-friendly – Uses everyday ingredients that won’t break the bank
- Kid-approved – Children absolutely love the sweet, creamy layers and fun vanilla wafer cookies
- No baking required – Just cooking custard on the stovetop and assembling layers—no oven needed for the classic version
- Customizable – Top with whipped cream or meringue, add extra layers, or adjust sweetness to your preference
- Impressive presentation – Looks stunning when served in a trifle dish or glass bowl where you can see all the beautiful layers
- Comfort food at its finest – This is the kind of dessert that makes people smile and ask for seconds
Whether you grew up eating banana pudding at every family function or you’re discovering it for the first time, this recipe will win your heart. It’s creamy, dreamy, and absolutely irresistible!
Ingredient Notes
Let’s talk about what goes into this luscious Southern classic and why each ingredient matters. Understanding your ingredients helps you make smart substitutions and ensures perfect results every time.
Whole Milk – The base of our custard. Whole milk provides the richness and creamy texture we’re looking for. You can use 2% milk in a pinch, but avoid skim milk as it will make the custard too thin. For an extra-decadent version, replace half the milk with heavy cream.
Granulated Sugar – Sweetens the custard and helps thicken it. Don’t reduce the sugar too much or the custard won’t set properly.
All-Purpose Flour – Acts as a thickening agent for the custard. Some recipes use cornstarch, but flour creates a more stable, silky custard that holds up beautifully when layered.
Egg Yolks – These are crucial for richness, color, and helping the custard thicken to that perfect spoonable consistency. Use fresh eggs at room temperature for best results.
Pure Vanilla Extract – This is where quality matters! Use real vanilla extract, not imitation. It makes a noticeable difference in flavor. For extra luxury, you can use vanilla bean paste or scrape in the seeds from a vanilla bean.
Butter – A small amount of butter stirred into the hot custard adds silky richness and a beautiful sheen. Use unsalted butter so you can control the sweetness.
Bananas – Choose bananas that are ripe but still firm—they should be yellow with just a few brown spots. Overly ripe, mushy bananas will turn brown quickly and make the pudding watery. You’ll need about 4-5 medium bananas.
Vanilla Wafer Cookies – Nilla Wafers are the traditional choice and what most Southern cooks swear by. You’ll need an 11-ounce box. Store-brand vanilla wafers work fine if that’s what you have.
Heavy Whipping Cream – For the topping. Whip it with a little sugar and vanilla for homemade whipped cream that’s far superior to the stuff from a can. Alternatively, you can make a meringue topping if you prefer the traditional baked version.
Equipment Needed
Having the right tools makes this recipe even easier. Here’s what you’ll need:
- Medium heavy-bottomed saucepan – For cooking the custard without scorching
- Wire whisk – Essential for smooth, lump-free custard
- Wooden spoon or silicone spatula – For stirring and scraping
- Measuring cups and spoons – For accurate measurements
- Mixing bowls – Various sizes for separating eggs and preparing ingredients
- 9×13-inch baking dish or large trifle bowl – For assembling your pudding
- Plastic wrap – To cover the custard while it cools and to prevent skin from forming
- Sharp knife and cutting board – For slicing bananas
- Electric mixer (optional) – For whipping cream or making meringue
- Fine mesh strainer (optional) – For ultra-smooth custard, though it’s not necessary if you whisk well
The Ultimate Southern Banana Pudding Recipe – Creamy, Dreamy, and Irresistible!

This classic Southern banana pudding features layers of homemade vanilla custard, fresh banana slices, and vanilla wafer cookies, all topped with billowy whipped cream. It’s a nostalgic, crowd-pleasing dessert that’s perfect for any gathering.
- Prep Time: 25 minutes
- Cook Time: 15 minutes
- Total Time: 4 hours 40 minutes
- Yield: 12-15 servings 1x
- Category: Dessert
- Method: Stovetop + No-Bake Assembly
- Cuisine: Southern American
- Diet: Vegetarian
Ingredients
For the Vanilla Custard:
- 3/4 cup granulated sugar
- 1/3 cup all-purpose flour
- 1/4 teaspoon salt
- 3 cups whole milk
- 4 large egg yolks, lightly beaten
- 2 tablespoons unsalted butter
- 2 teaspoons pure vanilla extract
For Assembly:
- 1 box (11 oz) vanilla wafer cookies
- 4-5 medium bananas, sliced into 1/4-inch rounds
- 1 tablespoon lemon juice (to prevent browning)
For the Whipped Cream Topping:
- 2 cups heavy whipping cream, cold
- 1/4 cup powdered sugar
- 1 teaspoon vanilla extract
Instructions
Make the Vanilla Custard:
- Combine dry ingredients: In a medium heavy-bottomed saucepan, whisk together the sugar, flour, and salt until well combined with no lumps.
- Add milk gradually: Slowly pour in the milk while whisking constantly to prevent lumps from forming. The mixture should be smooth and well incorporated.
- Cook the custard: Place the saucepan over medium heat and cook, stirring constantly with a whisk or wooden spoon, until the mixture thickens and comes to a gentle boil. This will take 8-10 minutes. The custard should coat the back of a spoon when ready.
- Temper the egg yolks: Remove the saucepan from heat. In a small bowl, quickly whisk the egg yolks. Slowly add about 1 cup of the hot custard mixture to the yolks while whisking constantly (this is called tempering—it prevents the eggs from scrambling).
- Finish the custard: Pour the tempered egg mixture back into the saucepan with the remaining custard, whisking constantly. Return to medium-low heat and cook for 2-3 more minutes, stirring constantly, until the custard is thick and creamy.
- Add butter and vanilla: Remove from heat and stir in the butter and vanilla extract until the butter is completely melted and incorporated. Place a piece of plastic wrap directly on the surface of the custard to prevent a skin from forming. Let it cool for about 15-20 minutes.
Assemble the Banana Pudding:
- Prepare the bananas: Slice the bananas into 1/4-inch rounds. Gently toss them with lemon juice to help prevent browning.
- Create the first layer: Spread a thin layer of the warm (but not hot) custard on the bottom of a 9×13-inch baking dish. Arrange a single layer of vanilla wafers over the custard, covering as much of the bottom as possible.
- Add bananas and custard: Layer half of the banana slices over the vanilla wafers. Pour half of the remaining custard over the bananas, spreading it evenly to cover.
- Repeat layers: Add another layer of vanilla wafers, then the remaining banana slices, and finally the remaining custard. Spread the top layer of custard evenly and smooth it out.
- Chill: Cover the dish tightly with plastic wrap and refrigerate for at least 4 hours, or preferably overnight. This allows the flavors to meld and the vanilla wafers to soften beautifully.
Make the Whipped Cream Topping:
- Whip the cream: Just before serving, pour the cold heavy cream into a large mixing bowl. Using an electric mixer on medium-high speed, beat the cream until it begins to thicken. Add the powdered sugar and vanilla extract, then continue beating until stiff peaks form. Be careful not to overbeat or you’ll end up with butter!
- Top and serve: Spread or pipe the whipped cream over the chilled banana pudding. For an extra touch, garnish with crushed vanilla wafers and banana slices. Serve immediately and watch it disappear!
Notes
- Make-ahead tip: This dessert actually tastes better when made a day in advance, allowing the cookies to soften perfectly.
- Banana browning: The lemon juice helps slow browning, but for best appearance, add the top layer of banana slices right before serving.
- Meringue option: For traditional Southern-style, replace the whipped cream with meringue (made from 4 egg whites and 1/2 cup sugar), spread it over the pudding, and bake at 350°F for 10-15 minutes until golden.
- Leftover egg whites: Save them for making meringue, or freeze for future use in other recipes.
- Storage: Keep covered in the refrigerator for up to 3 days. The texture is best within the first two days.
Nutrition
- Serving Size: 1 slice (1/12 of recipe)
- Calories: 385
- Sugar: 32g
- Sodium: 160mg
- Fat: 18g
- Saturated Fat: 10g
- Unsaturated Fat: 6g
- Trans Fat: 0g
- Carbohydrates: 52g
- Fiber: 2g
- Protein: 5g
- Cholesterol: 110mg
Note: Nutrition information is calculated per serving and is approximate. Values may vary based on specific ingredients and portion sizes.
Tips & Variations
Lighter Version:
Use 2% milk instead of whole milk, and reduce the sugar in the custard by 2 tablespoons. Top with light whipped topping instead of heavy cream for a slightly lighter dessert.
Chocolate Banana Pudding:
Add 1/4 cup cocoa powder to the custard mixture, or layer in chocolate pudding along with the vanilla custard. Use chocolate wafer cookies for an even richer chocolate experience.
Peanut Butter Banana Pudding:
Stir 1/2 cup creamy peanut butter into the warm custard for an irresistible peanut butter twist. Top with chopped peanut butter cups for extra decadence.
Individual Servings:
Assemble the pudding in mason jars, wine glasses, or small dessert cups for cute individual portions perfect for parties.
Coconut Banana Pudding:
Replace 1 cup of milk with coconut milk and add 1/2 cup toasted coconut flakes to the layers. Top with more toasted coconut for a tropical twist.
Caramel Banana Pudding:
Drizzle salted caramel sauce between the layers and over the top for an elegant upgrade.
Healthier Sweetener:
Replace half the granulated sugar with honey or maple syrup for a less refined sweetness (though the texture may be slightly different).
Pro Chef Tips
Temperature control is everything: When making custard, medium heat is your friend. Too high and you risk scrambling the eggs or scorching the bottom. Patience pays off with silky-smooth results.
Temper those eggs properly: Adding hot liquid to eggs too quickly will give you scrambled eggs instead of custard. Add the hot custard to the eggs slowly while whisking vigorously, then add it back to the pot. This crucial step ensures smooth, lump-free custard.
The plastic wrap trick: Pressing plastic wrap directly onto the surface of your custard while it cools prevents that unappetizing skin from forming on top. This small step makes a big difference in the final texture.
Choose your bananas wisely: Slightly underripe bananas (yellow with minimal brown spots) hold up better and won’t turn brown as quickly as fully ripe ones. Save those spotty bananas for banana bread!
Let it rest overnight: While you can serve banana pudding after 4 hours, letting it sit overnight in the refrigerator creates magic. The vanilla wafers soften to a cake-like texture, and all the flavors meld together beautifully. This is when banana pudding truly shines.
Whip cream at the last minute: For the fluffiest, most stable whipped cream, make it right before serving. Start with cold cream and a chilled bowl for best results.
Layer strategically: Make sure each layer of custard completely covers the bananas. This prevents exposed banana slices from oxidizing and turning brown.
Common Mistakes to Avoid
Not stirring constantly while cooking custard: This is the #1 mistake! Custard needs constant attention and stirring to prevent lumps, scorching, and uneven cooking. Stay at the stove and keep that whisk moving.
Using overripe bananas: Those brown, mushy bananas are perfect for banana bread but terrible for banana pudding. They’ll turn brown quickly, release too much moisture, and make your pudding watery. Stick with firm, just-ripe bananas with yellow skin.
Skipping the tempering step: If you add cold eggs directly to hot custard, you’ll get scrambled eggs. Always temper your eggs by slowly adding hot liquid while whisking, then return the mixture to the pot.
Not allowing enough chill time: Banana pudding needs at least 4 hours to set properly and for the vanilla wafers to reach that perfect soft texture. Rushing this step results in a runny, underwhelming dessert.
Assembling while custard is too hot: If you add bananas to piping hot custard, they’ll essentially cook and turn to mush. Let your custard cool for 15-20 minutes until it’s warm but not hot before assembling.
Overbeating the whipped cream: Watch your cream carefully while whipping. It goes from perfect to butter very quickly. Stop beating as soon as you see stiff peaks form.
Storage & Meal Prep
Refrigerator Storage:
Store your banana pudding covered tightly with plastic wrap or in an airtight container in the refrigerator for up to 3 days. The texture and flavor are absolutely best within the first 48 hours, though it remains safe to eat on day three. The vanilla wafers will continue to soften over time, eventually breaking down into the custard.
Preventing Banana Browning:
Even with lemon juice, the bananas will gradually brown over time due to oxidation. For the most visually appealing presentation, save the top layer of banana slices and add them fresh right before serving. You can also press plastic wrap directly onto the surface of the pudding to minimize air exposure.
Custard Storage Separately:
If you’re meal prepping components, you can make the custard up to 2 days in advance and store it separately in the refrigerator with plastic wrap pressed to its surface. Assemble the pudding the day before you plan to serve it.
Whipped Cream Timing:
Always make whipped cream fresh right before serving. Homemade whipped cream will weep and deflate if added too far in advance. If you must prepare it ahead, stabilize it with 1 teaspoon of unflavored gelatin or a tablespoon of cream cheese beaten in.
Leftover Portions:
Cover individual portions tightly to prevent the pudding from absorbing refrigerator odors. The creamy texture holds up well, though the aesthetic appeal diminishes as bananas darken.
Make-Ahead & Freezer Notes
Perfect Make-Ahead Dessert:
Banana pudding is actually an ideal make-ahead dessert! In fact, it benefits from overnight refrigeration. Make it a full day before your event for the best texture and flavor. The vanilla wafers need time to soften and absorb the custard, creating that signature cake-like texture that makes banana pudding so special.
Timeline for Best Results:
- Make the custard: 2 days ahead
- Assemble the pudding: 1 day ahead
- Add whipped cream: Just before serving
Freezing Banana Pudding (Not Recommended):
I don’t recommend freezing banana pudding. The bananas turn brown and mushy when thawed, the custard separates and becomes watery, and the vanilla wafers become soggy in an unpleasant way. The texture simply doesn’t survive the freezing and thawing process. This is one dessert best enjoyed fresh from the fridge.
Freezing Components Separately:
You can freeze the vanilla custard alone (before assembly) for up to 2 months in an airtight container. Thaw it overnight in the refrigerator and whisk it smooth before assembling your pudding. Assemble with fresh bananas and wafers when ready to serve.
Party Planning Tip:
If you’re bringing this to a potluck or party, assemble it the night before and transport it in a cooler with ice packs. Add the whipped cream topping after you arrive, or bring it separately in a container and add it right before serving.
Serving Suggestions
Banana pudding is delicious enough to shine all on its own, but here are some wonderful ways to serve it and what to pair it with:
Classic Presentation:
Serve in a clear glass trifle bowl or individual parfait glasses so guests can see all those beautiful layers. Garnish the top with extra vanilla wafers, banana slices, and a dusting of cinnamon or vanilla wafer crumbs.
Beverage Pairings:
- Sweet iced tea (a Southern classic combo!)
- Cold milk or chocolate milk
- Coffee or espresso to balance the sweetness
- Vanilla cream soda for an extra-indulgent treat
Serve It With:
- After a backyard BBQ with grilled chicken, ribs, and coleslaw
- Following a Southern comfort food dinner of fried chicken and mac and cheese
- At summer potlucks alongside other classic desserts
- As a special treat after Sunday dinner with the family
Complementary Desserts for a Dessert Table:
- Peach cobbler
- Pecan pie
- Chess squares
- Strawberry shortcake
- Pound cake
Garnish Ideas:
- Fresh mint leaves for a pop of color
- Caramel or chocolate drizzle
- Crushed vanilla wafers or graham cracker crumbs
- Toasted coconut flakes
- A sprinkle of cinnamon
- Fresh berries for a fruit medley
Temperature Tip:
Banana pudding is best served well-chilled. Remove it from the refrigerator just before adding the whipped cream and serving. The contrast of cold, creamy pudding is part of what makes this dessert so refreshing and satisfying.
FAQs Section
Can I use instant pudding instead of homemade custard?
You certainly can! While homemade custard provides superior flavor and texture, you can use two 3.4-ounce boxes of instant vanilla pudding prepared according to package directions if you’re short on time. The dessert will be quicker but less rich and flavorful.
How do I prevent my bananas from turning brown?
Toss your banana slices with lemon juice before layering—this slows oxidation. Also, make sure each layer of bananas is completely covered with custard to minimize air exposure. For the prettiest presentation, save banana garnishes for the top and add them right before serving.
Can I make this with a meringue topping instead of whipped cream?
Absolutely! For traditional Southern-style banana pudding with meringue, beat 4 egg whites with 1/2 cup sugar until stiff peaks form. Spread over the assembled pudding, making sure the meringue touches the edges to prevent shrinking. Bake at 350°F for 10-15 minutes until golden brown. Serve warm or chilled.
Why is my custard lumpy?
Lumpy custard usually happens from not whisking enough when adding the milk to the flour mixture, or from cooking over heat that’s too high. Make sure to whisk constantly and use medium heat. If you do get lumps, you can strain the custard through a fine-mesh sieve.
How long does banana pudding need to chill before serving?
At minimum, banana pudding needs 4 hours in the refrigerator to set properly and for the vanilla wafers to soften. However, it’s truly best when made a day ahead and chilled overnight. This allows all the flavors to develop and the textures to meld perfectly.
Can I use low-fat or non-dairy milk?
You can use 2% milk with decent results, though the custard will be less rich. Skim milk will result in a thin, less satisfying custard. For non-dairy options, try full-fat coconut milk or oat milk—they provide enough fat to create a creamy texture. You may need to adjust the thickener amounts slightly.
What can I do with leftover egg whites?
Don’t waste those egg whites! Use them to make the meringue topping, whip them into an omelet, make meringue cookies, add them to smoothies for extra protein, or freeze them in an airtight container for up to 3 months for future use.
Why didn’t my whipped cream hold its shape?
Your cream may have been too warm, you may have under-beaten it, or you may have added it too far in advance. Always start with cold cream and a chilled bowl. Beat until stiff peaks form (when you lift the beaters, the peaks should stand straight up). Add the whipped cream right before serving, or stabilize it with gelatin if you must make it ahead.
Conclusion
There you have it—the ultimate Southern banana pudding recipe that’s guaranteed to become a staple in your dessert rotation! This classic comfort food dessert combines everything we love about Southern cooking: simple ingredients, straightforward techniques, and absolutely delicious results that bring people together. Whether you’re making it for a special occasion or just because you’re craving something sweet and nostalgic, this creamy banana pudding delivers pure happiness in every spoonful.
The beauty of this recipe is that it’s both impressive and approachable. You don’t need fancy equipment or advanced baking skills—just a little patience while making the custard and some chill time in the refrigerator. The homemade vanilla custard elevates this dessert far above the instant pudding versions, and once you taste the difference, you’ll understand why it’s worth the extra few minutes of stirring.
I’d love to hear how your banana pudding turns out! Did you go classic with whipped cream or traditional with meringue? Did you try any of the fun variations? Drop a comment below and let me know. And if you loved this recipe, please share it with your friends and save it to your Pinterest boards so you can find it easily next time you need a show-stopping dessert. Your future self (and your dinner guests) will thank you!
Happy baking, and enjoy every creamy, dreamy bite! 🍌