Black Forest Cake Recipe – Decadent Chocolate Cherry Layer Cake
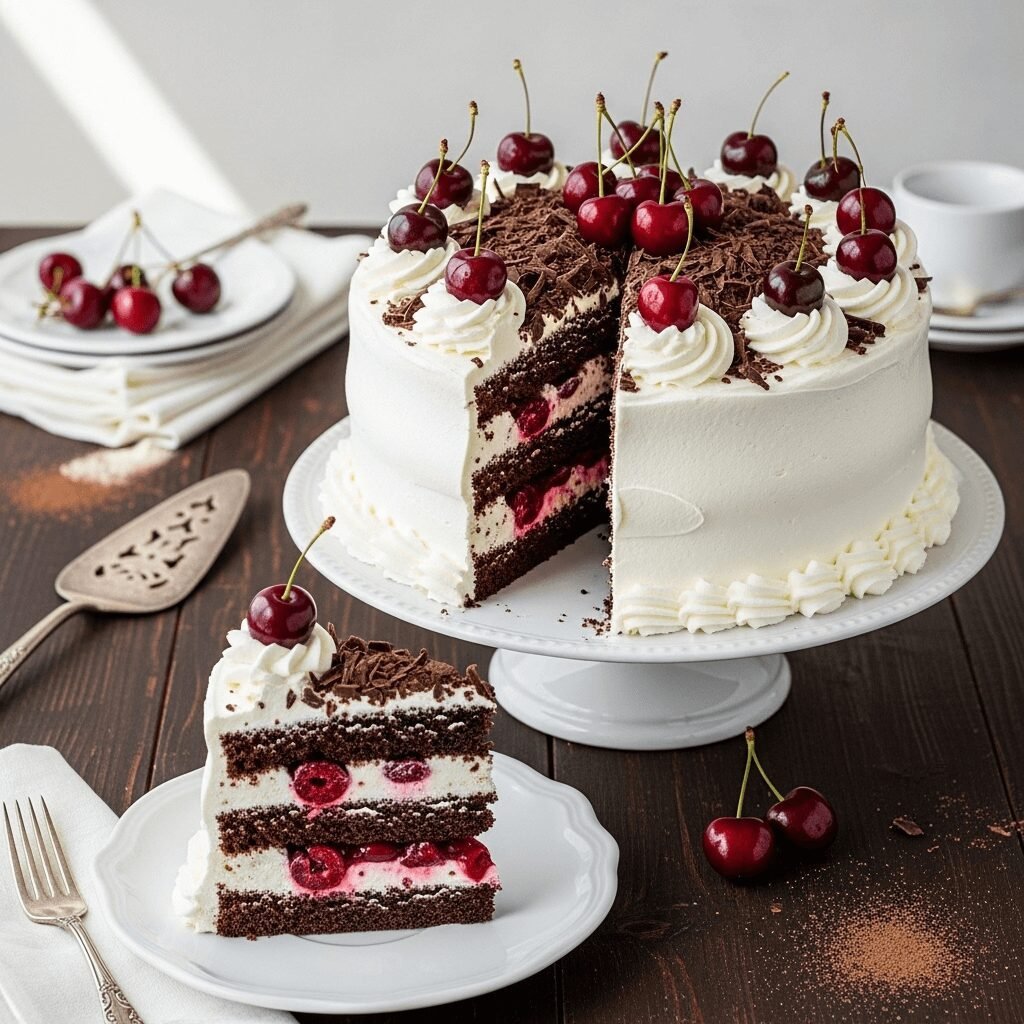
Few desserts capture the essence of celebration quite like a towering Black Forest cake with its dramatic layers of rich chocolate cake, sweet cherry filling, and billowy whipped cream. This iconic German dessert, known as Schwarzwälder Kirschtorte in its homeland, has captivated dessert lovers worldwide with its perfect balance of deep chocolate flavor, tart cherries, and light cream that somehow manages to be both indulgent and refreshing at the same time.
What makes this Black Forest cake truly special is the interplay of textures and flavors – moist chocolate cake soaked with cherry syrup, tangy cherry filling that cuts through the richness, and clouds of sweetened whipped cream that tie everything together. The final touch of chocolate shavings and fresh cherries transforms this cake into a showstopper that looks like it came from a European patisserie.
While Black Forest cake has a reputation for being complicated, this recipe breaks down every step into manageable tasks that even intermediate bakers can master. It’s the perfect choice for milestone birthdays, anniversary celebrations, holiday gatherings, or any time you want to create a truly memorable dessert that will have everyone asking for seconds. Whether you’re celebrating a special occasion or simply want to treat yourself to something extraordinary, this homemade Black Forest cake delivers that perfect “wow” moment when you slice through those beautiful layers.
History / Background
The Black Forest cake’s origin story is as rich and layered as the dessert itself, rooted in the Black Forest region of southwestern Germany. The Schwarzwald, or Black Forest, is a mountainous, densely wooded area known for its dark coniferous trees, charming villages, and centuries-old traditions – including the production of Schwarzwälder Kirschwasser, a clear cherry brandy that gives authentic Black Forest cake its distinctive flavor.
While chocolate cakes with cherries existed in various forms throughout Germany for generations, the modern Black Forest cake as we know it was likely created in the early 20th century. The most widely accepted origin story credits Josef Keller, a pastry chef working at the Café Agner in Bad Godesberg, with inventing the cake in 1915. However, some food historians suggest the cake evolved more organically from traditional recipes in the Black Forest region, where cherries, cream, and Kirschwasser were local staples.
What’s undisputed is that by the 1930s, Black Forest cake had become popular throughout Germany. The name “Schwarzwälder Kirschtorte” translates literally to “Black Forest cherry torte,” though there’s delightful debate about whether the “Black Forest” refers to the dark chocolate cake resembling the region’s dense forests, the chocolate shavings that look like dark tree bark, or simply the traditional cherry brandy produced in that region.
The cake gained international fame after World War II, spreading throughout Europe and eventually conquering dessert menus worldwide during the 1960s and 1970s. It became particularly popular in the United States, though American versions often reduced or eliminated the Kirschwasser to make it more family-friendly. By the 1980s, Black Forest cake had achieved such iconic status that it appeared in upscale restaurants, grocery store bakeries, and home kitchens across the globe.
Traditional German Black Forest cake follows strict rules: it must contain Kirschwasser-soaked cake layers, whipped cream (never buttercream), and sour cherries (preferably Morello cherries). In fact, German law actually regulates what can legally be called “Schwarzwälder Kirschtorte” in Germany – it must contain Kirschwasser, though interestingly, chocolate is technically optional according to the legal definition!
Today, Black Forest cake remains one of Germany’s most famous culinary exports, celebrated each year on March 28th as National Black Forest Cake Day in the United States. Its enduring popularity speaks to the timeless appeal of chocolate and cherries – a combination that continues to delight generations of dessert lovers.
Why You’ll Love This Recipe
This Black Forest cake recipe takes an intimidating classic and makes it achievable for home bakers while maintaining all the elegance and flavor that made it famous. You’ll discover that creating this impressive layer cake is more about patience and organization than advanced baking skills, and the spectacular results are absolutely worth the effort.
Here’s why this Black Forest cake recipe deserves a place in your special occasion repertoire:
- Showstopping presentation – Those dramatic layers visible from the side, topped with chocolate curls and cherries, create an undeniably impressive centerpiece that photographs beautifully
- Balanced flavors – The combination of rich chocolate, tart cherries, and light whipped cream creates perfect harmony that’s indulgent without being overwhelmingly heavy
- Make-ahead friendly – You can bake the cake layers in advance and assemble the day of your event, reducing stress when entertaining
- Customizable alcohol content – Easily adjust or omit the Kirschwasser to suit your preferences and guests, making it family-friendly or authentically boozy
- Surprisingly achievable – Despite its fancy reputation, this cake uses straightforward techniques that intermediate bakers can master with careful attention
- Feeds a crowd – One cake generously serves 12-16 people, making it economical for large gatherings
- Timeless appeal – This classic dessert never goes out of style and appeals to multiple generations, from grandparents to grandchildren
- Multiple texture experience – Every bite delivers soft cake, creamy filling, juicy cherries, and crunchy chocolate – keeping your palate interested
- Natural color contrast – The dark chocolate, white cream, and red cherries create stunning visual appeal without artificial food coloring
- Celebration-worthy – This cake instantly elevates any occasion and shows guests you went the extra mile
Whether you’re an ambitious home baker ready to tackle your first layer cake or someone looking to expand beyond basic desserts, this Black Forest cake will build your confidence while delivering professional-looking results that taste even better than they look.
Ingredient Notes
Understanding your ingredients and their specific roles will help you achieve Black Forest cake perfection and make smart substitutions when necessary.
For the Chocolate Cake Layers:
All-Purpose Flour – Creates the cake’s structure. Measure by spooning into cups and leveling off for accuracy. Cake flour can be substituted for an even more tender crumb, but all-purpose works beautifully here.
Dutch-Process Cocoa Powder – This is key for authentic deep chocolate flavor and dark color. Dutch-process cocoa has been treated to neutralize acidity, resulting in a smoother, more mellow chocolate taste and darker appearance than natural cocoa. Don’t substitute natural cocoa powder as it will affect both color and flavor significantly.
Granulated Sugar – Provides sweetness and helps create a tender, moist crumb. The amount here balances perfectly with the chocolate’s bitterness.
Eggs – Large eggs at room temperature provide structure, richness, and help bind everything together. Room temperature eggs incorporate more easily and create better volume.
Vegetable Oil – Unlike butter-based cakes, this recipe uses oil for ultra-moist texture that stays soft even when refrigerated. Use neutral-flavored oil like canola or vegetable, not olive oil.
Buttermilk – The acidity reacts with baking soda to create lift while adding tanginess that enhances chocolate flavor. Make your own by adding 1 tablespoon lemon juice to 1 cup regular milk and letting it sit for 5 minutes.
Hot Coffee or Water – Coffee intensifies chocolate flavor without making the cake taste like coffee. Even coffee-haters won’t detect it, but it makes the chocolate taste more chocolatey. Hot water works as a substitute but coffee is highly recommended.
For the Cherry Filling:
Jarred or Canned Sour Cherries – Look for Morello cherries in syrup, found in the international or baking aisle. These tart cherries are traditional and provide the perfect counterpoint to sweet whipped cream. Fresh cherries can be used but require more prep. Avoid cherry pie filling, which is too sweet and gloppy.
Cornstarch – Thickens the cherry juices into a luscious, spoonable filling that won’t make your cake soggy.
Kirschwasser (Cherry Brandy) – This clear cherry brandy is traditional and adds sophisticated depth. It’s available at liquor stores. For alcohol-free versions, use cherry juice or omit entirely and increase vanilla extract.
For the Whipped Cream:
Heavy Whipping Cream – Must be cold and contain at least 36% fat for proper whipping. Heavy cream is essential; half-and-half or light cream won’t whip properly.
Powdered Sugar – Dissolves instantly into cream and helps stabilize it slightly. Granulated sugar won’t dissolve properly and creates grainy texture.
Pure Vanilla Extract – Enhances sweetness and adds aromatic complexity to the cream.
For Decoration:
Dark Chocolate Bar – Use good-quality chocolate for making curls and shavings. A vegetable peeler works perfectly for creating decorative chocolate curls.
Fresh Cherries with Stems – The classic garnish that signals “Black Forest” immediately. Try to find cherries with stems attached for the most attractive presentation.
Equipment Needed
Having the right tools makes assembling this impressive layer cake much easier. Here’s what you’ll need:
- Three 8-inch or 9-inch round cake pans – For baking the chocolate layers; same size is crucial for even stacking
- Parchment paper – Line pan bottoms to ensure easy cake removal
- Stand mixer or hand mixer – Essential for whipping cream to stiff peaks; stand mixer makes it easier
- Large mixing bowls – Multiple bowls for preparing different components
- Medium saucepan – For cooking the cherry filling
- Wire cooling racks – Allow proper air circulation for cooling cakes
- Offset spatula – Makes spreading whipped cream between layers much easier
- Cake turntable (optional but helpful) – Makes frosting the cake dramatically easier
- Serrated knife – For leveling cake layers if needed
- Cake board or serving platter – Sturdy base for your finished cake
- Vegetable peeler or knife – For creating chocolate curls and shavings
- Pastry brush – For brushing cherry syrup onto cake layers
- Measuring cups and spoons – Accurate measurements are crucial in baking
- Rubber spatula – For folding and scraping bowls
- Strainer or fine-mesh sieve – For draining cherries and reserving liquid
- Piping bag with star tip (optional) – For decorative whipped cream borders
Black Forest Cake Recipe – Decadent Chocolate Cherry Layer Cake

An authentic Black Forest cake featuring layers of moist chocolate cake soaked with cherry syrup, tart cherry filling, and billowy whipped cream frosting. This German classic is topped with chocolate shavings and fresh cherries for a showstopping dessert perfect for special celebrations.
- Prep Time: 45 minutes
- Cook Time: 30 minutes
- Total Time: 1 hour 15 minutes (plus cooling and assembly time)
- Yield: 12-16 servings 1x
- Category: Dessert
- Method: Baking
- Cuisine: German
- Diet: Vegetarian
Ingredients
For the Chocolate Cake:
- 2 cups all-purpose flour
- 2 cups granulated sugar
- ¾ cup Dutch-process cocoa powder
- 2 teaspoons baking soda
- 1 teaspoon baking powder
- 1 teaspoon salt
- 2 large eggs, room temperature
- 1 cup buttermilk, room temperature
- 1 cup strong brewed coffee or hot water
- ½ cup vegetable oil
- 2 teaspoons pure vanilla extract
For the Cherry Filling:
- 2 (24-ounce) jars Morello cherries in syrup (or 4 cups fresh pitted cherries with 1 cup sugar)
- ¼ cup cornstarch
- ¼ cup granulated sugar
- ¼ cup Kirschwasser (cherry brandy), optional
- 1 teaspoon vanilla extract
For the Whipped Cream Frosting:
- 3 cups cold heavy whipping cream
- ½ cup powdered sugar
- 2 teaspoons pure vanilla extract
For Assembly and Decoration:
- ¼ cup reserved cherry syrup (from jarred cherries)
- 2-3 tablespoons Kirschwasser, optional
- 4 ounces dark chocolate (for shavings)
- 12-16 fresh cherries with stems
Instructions
Make the Chocolate Cake:
- Preheat and prepare pans: Preheat oven to 350°F (175°C). Grease three 8-inch or 9-inch round cake pans, line the bottoms with parchment paper circles, and grease the parchment. Lightly flour the pans, tapping out excess.
- Mix dry ingredients: In a large bowl, whisk together flour, sugar, cocoa powder, baking soda, baking powder, and salt until well combined with no lumps.
- Combine wet ingredients: In a medium bowl, whisk together eggs, buttermilk, coffee, oil, and vanilla until smooth.
- Make the batter: Pour wet ingredients into dry ingredients. Mix with a wooden spoon or electric mixer on low speed just until combined. The batter will be very thin – this is correct! Don’t worry, it will bake into perfect cake.
- Bake: Divide batter evenly among the three prepared pans (about 2 cups per pan for 8-inch pans). Bake for 28-32 minutes, until a toothpick inserted in the center comes out clean and the tops spring back when lightly touched.
- Cool: Let cakes cool in pans for 10 minutes, then turn out onto wire racks. Remove parchment paper and let cool completely before assembling, at least 1 hour.
Make the Cherry Filling:
- Prepare cherries: Drain cherries, reserving 1 cup of the syrup. If using fresh cherries, combine pitted cherries with 1 cup water and ¼ cup sugar, simmer for 10 minutes, then strain and reserve 1 cup liquid.
- Thicken filling: In a medium saucepan, whisk together the reserved 1 cup cherry syrup, cornstarch, and sugar. Cook over medium heat, stirring constantly, until mixture thickens and bubbles, about 5-7 minutes.
- Add cherries: Remove from heat. Stir in drained cherries, Kirschwasser (if using), and vanilla extract. Let cool completely before using, about 30 minutes. The mixture will thicken more as it cools.
Make the Whipped Cream:
- Whip cream: In a large bowl or stand mixer fitted with whisk attachment, combine cold heavy cream, powdered sugar, and vanilla. Beat on medium-low speed until it begins to thicken, then increase to medium-high and whip until stiff peaks form, 3-5 minutes. Don’t overbeat or it will become grainy. Refrigerate until ready to assemble.
Assemble the Cake:
- Prepare syrup: Mix ¼ cup reserved cherry syrup with Kirschwasser (if using). Set aside for brushing layers.
- Level cakes: If your cake layers domed during baking, use a serrated knife to carefully level them so they stack evenly.
- First layer: Place one cake layer on your serving platter or cake board. Brush generously with cherry syrup mixture. Spread with about 1 cup whipped cream, leaving a ½-inch border around the edge. Spoon half the cherry filling over the cream, spreading gently (cherries can poke through cream).
- Second layer: Add the second cake layer, brush with syrup, spread with 1 cup whipped cream, and top with remaining cherry filling.
- Third layer: Add the final cake layer (place it upside-down for a flat top), and brush with remaining syrup.
- Frost exterior: Using an offset spatula, frost the top and sides of the cake with the remaining whipped cream. You can make it rustic with visible swirls or smooth it for a clean finish.
- Decorate: Use a vegetable peeler to create chocolate curls from the chocolate bar (slightly warm chocolate peels better). Press chocolate shavings gently onto the sides of the cake and sprinkle over the top. Arrange fresh cherries on top. If desired, pipe whipped cream rosettes around the top edge using a star tip.
- Chill and serve: Refrigerate the cake for at least 1 hour before slicing to let it set. This cake is best served cold.
Notes
- Thin batter is correct – The cake batter will be very thin and pourable, almost like liquid. This creates the moist texture. Don’t add more flour.
- Cherry juice alternatives – If your jarred cherries don’t have much syrup, make simple syrup by simmering ½ cup water with ¼ cup sugar until dissolved.
- Whipped cream stability – For longer hold time, add 1 tablespoon of cornstarch or 1 teaspoon of gelatin bloomed in 1 tablespoon water to the cream while whipping.
- Alcohol-free version – Simply omit Kirschwasser and use cherry juice for soaking layers. The cake is still delicious without alcohol.
- Assembly timing – Assemble the cake no more than 24 hours before serving for best texture. The whipped cream can make the cake soggy if assembled too far in advance.
- Chocolate shaving tip – Let the chocolate bar sit at room temperature for 10-15 minutes before peeling for easier, more attractive curls.
Nutrition
- Serving Size: 1 slice (1/14 of cake)
- Calories: 485
- Sugar: 48g
- Sodium: 325mg
- Fat: 26g
- Saturated Fat: 14g
- Unsaturated Fat: 10g
- Trans Fat: 0g
- Carbohydrates: 58g
- Fiber: 2g
- Protein: 6g
- Cholesterol: 90mg
Note: Nutrition information is approximate and will vary based on specific ingredients used, portion sizes, and whether optional alcohol is included.
Tips & Variations
The classic Black Forest cake is spectacular as written, but these variations let you customize it to your preferences or what you have available.
Flavor Variations:
- Raspberry Forest Cake – Substitute fresh raspberries for cherries in the filling, and use raspberry liqueur (Chambord) instead of Kirschwasser for a pink-tinged variation
- Triple Cherry – Use cherry extract in the cake batter, cherry jam between layers, and fresh cherries on top for maximum cherry flavor
- Mint Chocolate Forest – Add 1 teaspoon peppermint extract to the whipped cream for a refreshing twist
- Orange Chocolate – Add orange zest to cake batter and use Grand Marnier instead of Kirschwasser
- Mocha Forest – Add 2 tablespoons instant espresso powder to the cake batter for intense coffee-chocolate flavor
Cherry Alternatives:
- Use frozen dark sweet cherries (thawed and drained) when fresh Morello cherries aren’t available
- Try cherry preserves thinned with a little cherry juice for a quicker filling
- Substitute fresh strawberries or mixed berries for a summer variation
- Use dried cherries rehydrated in hot water and simmered with sugar
Frosting Variations:
- Chocolate Whipped Cream – Add ¼ cup cocoa powder and 2 extra tablespoons powdered sugar to the whipped cream
- Stabilized Whipped Cream – Add 1 teaspoon unflavored gelatin bloomed in 2 tablespoons water for longer-lasting frosting
- Cream Cheese Whipped Cream – Beat 4 ounces softened cream cheese until smooth, then fold into whipped cream for tangier, more stable frosting
Size Adjustments:
- Two-Layer Version – Make 2 thicker layers for easier assembly; bake in 9-inch pans for 35-40 minutes
- Cupcakes – Bake batter in lined muffin tins at 350°F for 18-22 minutes; top each with cherry and whipped cream
- Sheet Cake – Bake in 9×13 inch pan for 35-40 minutes; cut into squares and top each with whipped cream and cherry
Healthier Modifications:
- Reduce sugar in cake by ¼ cup (it will still be sweet)
- Use Greek yogurt in place of half the whipped cream for protein boost
- Reduce whipped cream quantity and use more cherries for lower fat
- Use sugar substitute suitable for baking (check package directions for conversion)
Pro Chef Tips
Professional pastry chefs use specific techniques to create picture-perfect Black Forest cakes. These insider secrets will elevate your cake from homemade to bakery-quality.
Room temperature ingredients are crucial: For the cake batter, room temperature eggs and buttermilk incorporate more smoothly, creating better texture and rise. Cold ingredients can cause the batter to seize or mix unevenly. Set eggs and buttermilk out 30-60 minutes before baking.
The thin batter is intentional: New bakers often panic when they see how liquid the chocolate cake batter is. Don’t add extra flour! This thin batter is what creates the incredibly moist, tender crumb that makes Black Forest cake special. It will bake into perfect cake layers.
Cool completely before assembling: Patience is essential here. If you try to frost warm cakes, the whipped cream will melt immediately and create a soupy mess. Wait until cakes are completely cool to room temperature, at least 1-2 hours. Refrigerating them briefly can speed this up.
Brush cherry syrup generously: Don’t be shy with the cherry syrup mixture. The cake layers should be noticeably moist but not dripping. This soaking is traditional in European tortes and keeps the cake from drying out while adding flavor depth. The syrup soaks in fully within an hour.
Whip cream to stiff peaks: For successful cake assembly and decorating, your whipped cream needs to hold its shape firmly. It should stand up in peaks that don’t droop or fold over. Under-whipped cream will slide off the cake layers and won’t hold its shape for piping decorations.
Work quickly with whipped cream: Whipped cream continues to break down as it sits at room temperature. Once you start assembling, work efficiently to get the cake back in the refrigerator. If your kitchen is very warm, chill your cake platter and spatula beforehand.
Create a crumb coat for cleaner sides: For a professional finish, apply a thin initial layer of whipped cream over the entire cake to seal in crumbs, then refrigerate for 30 minutes before applying the final coating. This makes achieving smooth sides much easier.
Temperature affects chocolate shavings: For beautiful chocolate curls, the chocolate needs to be slightly warm. Let your chocolate bar sit at room temperature for 10-15 minutes, or warm it very gently in your hands. Too cold and it will just crumble; too warm and it will be too soft to curl.
Drain cherries thoroughly: Excess cherry liquid will make your whipped cream weepy and create soggy cake. Drain the cherries well and pat them dry with paper towels before using. The cornstarch thickening is essential for a spreadable, not runny, cherry filling.
Chill before slicing: A well-chilled cake (at least 1 hour in the refrigerator) slices much more cleanly than a room-temperature one. Use a long, sharp knife dipped in hot water and wiped dry between each slice for clean, professional-looking pieces.
Common Mistakes to Avoid
Even experienced bakers can run into trouble with layer cakes. Here’s how to sidestep the most common Black Forest cake pitfalls.
Using natural cocoa powder instead of Dutch-process: This is a critical error that affects both color and flavor. Natural cocoa powder is more acidic and lighter in color, which will give you a lighter brown cake instead of the deep, dark chocolate color that defines Black Forest cake. It also reacts differently with the leavening agents. Always use Dutch-process cocoa for this recipe.
Not leveling the cake layers: If your cakes domed during baking and you try to stack them without leveling, you’ll end up with a lopsided, unstable cake that’s difficult to frost. Use a long serrated knife or cake leveler to carefully slice off any domes, creating flat, even surfaces for stacking. Save the scraps for snacking!
Over-whipping or under-whipping the cream: Over-whipped cream becomes grainy and can turn to butter if you go too far. Stop beating as soon as stiff peaks form – they should stand up straight without drooping. Under-whipped cream won’t hold its shape and will slide off the cake layers. The sweet spot is firm peaks that hold their shape but still look smooth and creamy.
Skipping the cherry syrup soaking: Some bakers skip this step thinking it’s optional, but it’s actually essential for authentic Black Forest cake. Without the soaking, your cake layers will be drier and lack the characteristic moisture and flavor that make this cake special. The cherry-flavored syrup penetrates the layers and ties all the flavors together.
Assembling the cake while layers are still warm: This is perhaps the most common disaster that befalls ambitious bakers. Warm cake will immediately melt whipped cream, creating a slippery, sliding mess that’s impossible to frost properly. Even slightly warm cakes will cause problems. Be patient and let them cool completely, or even refrigerate them before assembly.
Using cherry pie filling instead of proper cherries: Canned cherry pie filling is too sweet, too gloppy, and contains thickeners that create the wrong texture. It will make your cake taste like cheap grocery store cake instead of authentic Black Forest torte. Use jarred Morello cherries or make your own cherry filling from fresh or frozen fruit.
Not refrigerating before serving: Whipped cream frosting needs time to firm up and set. Trying to slice a freshly assembled cake will result in messy, sloppy pieces with filling squishing out everywhere. Give it at least an hour in the refrigerator, preferably 2-3 hours, before cutting.
Storage & Meal Prep
Black Forest cake requires special storage considerations due to its whipped cream frosting and fresh components.
Refrigeration is Essential: Unlike buttercream-frosted cakes that can sit at room temperature, Black Forest cake must be refrigerated at all times due to the whipped cream and fresh cherry filling. Store loosely covered with plastic wrap or in a cake keeper in the refrigerator. The cake will stay fresh for 3-4 days when properly stored.
Preventing Drying: Whipped cream can absorb refrigerator odors and dry out if not properly covered. Use a cake dome or cover loosely with plastic wrap (don’t let it touch the frosting directly). If you don’t have a cake keeper, invert a large bowl over the cake on its platter.
Serving Temperature: For best flavor, remove the cake from the refrigerator 15-20 minutes before serving. This takes the chill off slightly while keeping the whipped cream stable. Don’t let it sit at room temperature longer than 30 minutes, especially in warm weather.
Leftover Slices: Individual slices can be wrapped in plastic wrap and refrigerated for up to 4 days. Place a piece of parchment or wax paper between slices if stacking them in a container to prevent them from sticking together.
Texture Changes Over Time: The cherry filling and soaked cake layers become softer and more melded together after a day, which many people prefer. However, after 3-4 days, the whipped cream may begin to weep slightly and the cake can become overly soft. This cake is best consumed within 2-3 days of assembly.
Preventing Sogginess: If you’re concerned about the cake becoming too moist, you can brush the layers with less syrup or add a thin layer of whipped cream before adding the cherry filling to create a slight barrier.
Make-Ahead & Freezer Notes
While Black Forest cake is best assembled close to serving time, you can prep components in advance to spread out the work.
Baking Cake Layers in Advance: Cake layers can be baked up to 2 days ahead. Let them cool completely, wrap each layer tightly in plastic wrap, and refrigerate. Bring to room temperature before assembling. You can also bake layers and freeze them for up to 2 months – wrap in plastic wrap, then aluminum foil. Thaw in the refrigerator overnight while still wrapped.
Cherry Filling Ahead: The cherry filling can be made up to 3 days in advance and stored in an airtight container in the refrigerator. In fact, making it ahead allows the flavors to meld beautifully. Stir it before using as it will thicken more when cold.
Whipped Cream Cannot Be Made Ahead: Unlike the other components, whipped cream must be made fresh on the day of assembly. It doesn’t hold well for more than a few hours, even refrigerated. If you need longer stability, use the gelatin stabilization method mentioned in the tips section.
Assembly Timeline: For best results, assemble the cake no more than 24 hours before serving. The soaked cake layers and whipped cream will continue to soften over time. Assembling the morning of or night before an evening event works perfectly.
Freezing Assembled Cake: While not ideal, you can freeze assembled Black Forest cake. Place the fully decorated cake in the freezer uncovered for 1-2 hours until the frosting is frozen solid, then wrap very carefully in plastic wrap and aluminum foil. Freeze for up to 1 month. Thaw overnight in the refrigerator. The whipped cream texture will be slightly different, and you may need to touch up decorations. Fresh cherries on top should be added after thawing, not before freezing.
Chocolate Shavings Ahead: Chocolate curls and shavings can be made several days in advance and stored in an airtight container in a cool, dry place (not the refrigerator, which can cause condensation). Apply them to the cake just before serving.
Serving Suggestions
Black Forest cake is substantial enough to stand alone, but these accompaniments can enhance the experience and round out your dessert service.
Beverage Pairings:
The rich chocolate and tart cherries pair beautifully with various drinks. Serve alongside hot espresso or strong coffee, which echoes the coffee in the cake. Sweet dessert wines like Port, late-harvest Riesling, or Schwarzwälder Kirschwasser (cherry schnapps) create an authentic German experience. For non-alcoholic options, try cherry juice, chocolate milk for kids, or sparkling water with a splash of cherry syrup.
Plated Presentation:
For formal dinners, present individual slices on white dessert plates. Pool a small amount of chocolate sauce on the plate, position the cake slice at an angle, and add a small dollop of extra whipped cream. Garnish with a fresh cherry, a mint sprig, and a dusting of cocoa powder on the plate rim. This restaurant-style presentation takes seconds but looks incredibly elegant.
Ice Cream Additions:
While not traditional, a small scoop of vanilla, cherry, or chocolate ice cream alongside Black Forest cake creates a delightful temperature contrast. Cherry Garcia ice cream is particularly complementary, echoing the cake’s chocolate-cherry theme.
Fruit Accompaniments:
Fresh berries make an excellent side – try a small bowl of mixed berries macerated with a touch of sugar and Kirschwasser. Raspberry coulis (pureed raspberries strained and sweetened) drizzled on the plate adds color and tartness. Chocolate-covered cherries as a garnish reinforce the flavor profile.
Coffee Service Presentation:
For afternoon coffee gatherings or brunch, present the whole cake on a beautiful cake stand as a centerpiece, surrounded by coffee cups, small plates, and napkins. Offer both regular and decaf coffee. This casual, help-yourself style works perfectly for informal entertaining.
Holiday Occasions:
For Christmas, add a dusting of powdered sugar to create a snowy effect and garnish with sugared cranberries and rosemary sprigs. For Valentine’s Day, arrange the cherry garnish in a heart shape and add chocolate hearts. The cake’s dramatic colors make it naturally festive.
German-Themed Dinner:
Serve Black Forest cake as the finale to a German-inspired meal featuring schnitzel, spaetzle, and red cabbage. Pair with German coffee and perhaps a small glass of Kirschwasser for an authentic cultural experience.
FAQs Section
Q: Can I make Black Forest cake without alcohol?
A: Absolutely! The Kirschwasser is traditional but completely optional. Simply omit it from both the cherry filling and the soaking syrup. You can replace it with additional cherry juice, vanilla extract, or just use plain syrup. The cake will still be delicious and authentic-tasting, just with slightly less complexity. Many family-friendly versions skip the alcohol entirely without sacrificing the overall experience.
Q: Why is my cake dry even though I followed the recipe?
A: The most common causes are overbaking, incorrect measurement of flour (scooping compacts flour, giving you too much), or not soaking the layers sufficiently with cherry syrup. Make sure you’re measuring flour by spooning it into cups and leveling, not scooping directly. Check your cake at the minimum baking time – it’s better to slightly underbake than overbake. Finally, don’t skimp on the cherry syrup soaking step, which keeps the layers moist.
Q: Can I use buttercream instead of whipped cream?
A: While you technically could, it wouldn’t be an authentic Black Forest cake. The light, airy whipped cream is essential to the cake’s character – it balances the rich chocolate and provides textural contrast. Buttercream would make it much heavier and change the flavor profile significantly. If stability is a concern, use the stabilized whipped cream method with gelatin mentioned in the tips section rather than switching to buttercream.
Q: How do I prevent my cake layers from sticking to the pans?
A: Proper pan preparation is key. Grease the pans thoroughly with butter or baking spray, line the bottoms with parchment paper circles, then grease the parchment as well. A light dusting of flour (or cocoa powder for chocolate cakes) provides extra insurance. Let the cakes cool in the pans for exactly 10 minutes before inverting – too soon and they’ll fall apart, too long and they’ll stick. Run a knife around the edges before inverting to help release them.
Q: Can I use fresh cherries instead of jarred Morello cherries?
A: Yes! Use about 4 cups of fresh pitted cherries. Combine them with 1 cup water and ¼ cup sugar in a saucepan. Simmer for 10 minutes until cherries soften and release their juices. Strain, reserving 1 cup of the liquid for the filling and soaking syrup. Proceed with the recipe as written. Fresh cherries give excellent results, though they’re more work. Dark sweet cherries or sour cherries both work well.
Q: My whipped cream became runny and separated. What happened?
A: This can happen for several reasons. You may have over-whipped the cream, causing it to break down and separate into butter and buttermilk. Or the cream wasn’t cold enough when you started whipping. Heavy cream, bowl, and beaters should all be cold for best results. If your whipped cream starts to look grainy or curdled, you’ve gone too far. Stop beating the moment stiff peaks form. Once over-whipped, there’s no fixing it – you’ll need to start over with fresh cream.
Q: How far in advance can I assemble the cake?
A: For optimal texture and appearance, assemble Black Forest cake no more than 24 hours before serving. The whipped cream will gradually soften the cake layers and may begin to weep after a day. Many bakers prefer assembling it the morning of an evening event, or the night before a lunch event. If you need more advance preparation time, bake and freeze the cake layers, make the cherry filling ahead, and assemble with fresh whipped cream close to serving time.
Q: Why are my cake layers uneven or lopsided?
A: Uneven layers usually result from uneven oven temperature, unlevel oven racks, or uneven batter distribution in the pans. Use an oven thermometer to verify your oven temperature is accurate. Check that your oven racks are perfectly level using a small level tool. Measure the batter into each pan for even distribution (about 2 cups per 8-inch pan). Rotate pans halfway through baking if your oven has hot spots. You can also level domed cakes with a serrated knife after cooling.
Q: Can I make this cake gluten-free?
A: Yes, but with modifications. Use a 1:1 gluten-free flour blend that contains xanthan gum (like Bob’s Red Mill or King Arthur Measure for Measure). The texture will be slightly more delicate and crumbly than the original, so handle the layers gently. Everything else in the recipe remains the same. Note that gluten-free cakes tend to dry out faster, so serve within 2 days and consider brushing with extra cherry syrup for moisture.
Conclusion
Creating a magnificent Black Forest cake from scratch is one of those baking achievements that truly builds confidence and brings joy to everyone who tastes it. Yes, it involves multiple steps and components, but each one is manageable on its own, and the result is absolutely worth every minute spent in the kitchen. There’s something deeply satisfying about slicing through those beautiful layers and revealing the dramatic stripes of dark chocolate cake, ruby-red cherries, and pristine white cream.
This homemade Black Forest cake recipe honors the German tradition while remaining achievable for home bakers. The combination of rich chocolate, tart cherries, and light whipped cream creates a dessert that’s indulgent yet balanced, impressive yet comforting. Whether you’re celebrating a milestone birthday, anniversary, holiday gathering, or simply treating your family to something extraordinary, this cake delivers that special “wow” moment that makes celebrations memorable.
The beauty of mastering this classic recipe is that it opens doors to countless variations and gives you the skills to tackle other elaborate layer cakes with confidence. Once you’ve successfully assembled a Black Forest cake, you’ll feel ready to take on any baking challenge that comes your way.
Ready to create your own bakery-worthy Black Forest cake masterpiece? Gather your ingredients, set aside an afternoon for baking, and prepare to impress everyone at your next gathering. The process is meditative, the assembly is fun, and the finished cake is nothing short of spectacular.
I’d absolutely love to see your Black Forest cake creations! Share your results in the comments below – tell me how it turned out, any creative variations you tried, or questions that came up during the process. Did you add extra cherries? Try a different liqueur? Serve it for a special occasion? Your experiences and photos help inspire other bakers and create a wonderful community of home cooks supporting each other.
Don’t forget to save this recipe to your Pinterest boards so you can find it when you’re ready to tackle this impressive dessert! Pin it to your cake recipes, German desserts, or special occasion boards. Share it with friends who love to bake or anyone celebrating something special who deserves an extraordinary homemade cake. Here’s to creating beautiful, delicious memories one layer at a time!