The Ultimate Chocolate Crinkle Cookies Recipe: Fudgy, Festive, and Perfectly Crackled
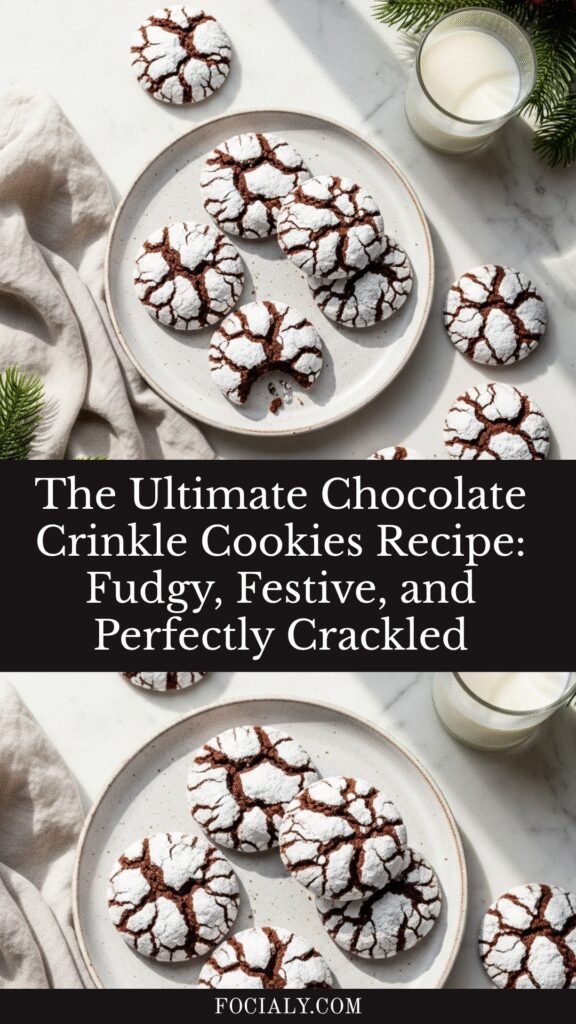
Chocolate crinkle cookies are those stunning, snow-dusted treats that look like they’ve been kissed by winter itself. These beautifully crackled cookies feature a rich, fudgy chocolate interior wrapped in a delicate shell of powdered sugar that creates dramatic contrast when they bake and crack open. They’re the perfect blend of brownie-like texture and cookie convenience, making them ideal for holiday cookie exchanges, festive gatherings, birthday parties, or simply satisfying your chocolate cravings on a cozy afternoon.
What makes these cookies truly special is their stunning appearance—those signature white cracks against deep chocolate create an eye-catching effect that photographs beautifully for Pinterest and Instagram. But beyond their looks, chocolate crinkle cookies deliver intense chocolate flavor with a texture that’s crispy on the outside and wonderfully chewy in the center. They’re surprisingly easy to make, requiring just one bowl and simple pantry ingredients, yet they look impressively professional.
Whether you’re baking for the holidays, preparing treats for a bake sale, or simply want to create something special for your family, these chocolate crinkle cookies are guaranteed to become a beloved favorite. They’re also wonderfully versatile—you can customize them with different extracts, add-ins like chocolate chips or nuts, or even create variations with peppermint or espresso for an elevated twist.
History / Background
Chocolate crinkle cookies have an interesting history that’s somewhat shrouded in mystery, much like the powdered sugar that coats them. While the exact origin is debated among food historians, these distinctive cookies became popular in American home baking during the mid-20th century, appearing in community cookbooks and women’s magazines throughout the 1950s and 1960s.
Some food historians trace the recipe’s roots to German and Eastern European baking traditions, where similar crackled cookies were made with different flavorings. The technique of rolling dough in powdered sugar before baking creates the signature crinkled appearance—a simple but brilliant method that transforms an ordinary chocolate cookie into something visually spectacular.
The cookies gained widespread popularity during the post-war era when chocolate became more readily available and American home bakers were experimenting with new recipes and techniques. Betty Crocker and other major recipe developers helped standardize the recipe, making it accessible to home cooks across the country. The name “crinkle” perfectly describes the wrinkled, cracked surface that develops as the cookies spread and the powdered sugar coating breaks apart during baking.
Today, chocolate crinkle cookies have become particularly associated with Christmas and holiday baking, thanks to their festive, snow-covered appearance. They’re a staple at cookie exchanges, appear on holiday dessert platters, and have earned their place among classic American Christmas cookies alongside gingerbread men, sugar cookies, and snickerdoodles. However, chocolate lovers know that these cookies are absolutely delicious year-round—their rich flavor and beautiful presentation make them appropriate for any occasion.
Why You’ll Love This Recipe
These chocolate crinkle cookies are about to become your go-to chocolate cookie recipe, and here’s why: they deliver maximum impact with minimal effort, creating bakery-quality results that will have everyone asking for your secret. The recipe combines the deep, fudgy satisfaction of brownies with the grab-and-go convenience of cookies, giving you the best of both worlds.
Here’s what makes this recipe absolutely irresistible:
- Stunning visual appeal – Those dramatic white cracks against rich chocolate make every cookie Instagram and Pinterest-worthy
- Intensely chocolatey – Made with both cocoa powder and melted chocolate for double the chocolate flavor
- Perfect texture – Crispy, crackled exterior gives way to a soft, fudgy, brownie-like center
- Easy to make – One-bowl mixing method means less cleanup and simpler preparation
- Make-ahead friendly – The dough can be prepared and chilled overnight, perfect for busy schedules
- Crowd-pleaser – Kids and adults alike love these cookies—they’re universally appealing
- Holiday showstopper – Beautiful enough for gifting and impressive on any dessert table
- Budget-friendly – Uses simple, affordable pantry staples you probably already have
- Versatile – Easy to customize with different extracts, add-ins, or flavor variations
- Perfect for freezing – Both the dough and baked cookies freeze beautifully for future cravings
Ingredient Notes
Understanding your ingredients is key to baking perfect chocolate crinkle cookies. Here’s what goes into these beauties and why each component matters:
Unsweetened Cocoa Powder: The foundation of chocolate flavor. Use high-quality Dutch-process cocoa for deeper, smoother chocolate taste, or natural cocoa powder for brighter, more acidic notes. Dutch-process creates darker cookies with more intense flavor—my preferred choice for this recipe.
Semisweet or Bittersweet Chocolate: Melted into the dough for additional richness and fudgy texture. Choose chocolate with 60-70% cacao for best results. You can substitute chocolate chips in a pinch, but bar chocolate melts more smoothly.
Granulated Sugar: Provides sweetness and helps create the cookie’s structure. Don’t substitute with other sugars as they’ll affect the texture.
Eggs: Bind the ingredients and contribute to the fudgy, brownie-like texture. Use large eggs at room temperature for best incorporation.
Vegetable Oil: Creates a tender, moist crumb. You can substitute melted butter for richer flavor, but oil creates a slightly chewier texture.
Vanilla Extract: Enhances the chocolate flavor. Use pure vanilla extract rather than imitation for best results.
All-Purpose Flour: Provides structure. Measure correctly by spooning into your measuring cup and leveling off—don’t pack it.
Baking Powder: Creates lift and helps the cookies spread properly, contributing to the crackled appearance.
Salt: Essential for balancing sweetness and amplifying chocolate flavor. Don’t skip it.
Powdered Sugar: The magic ingredient that creates those beautiful white cracks. Also called confectioners’ sugar or icing sugar. You’ll need plenty—don’t try to economize here.
Equipment Needed
Having the right tools makes baking these cookies a breeze. Here’s what you’ll need:
- Mixing bowls (medium and large)
- Whisk or electric mixer
- Rubber spatula for folding and scraping
- Measuring cups and spoons (accurate measurements are crucial)
- Baking sheets (2-3 for efficient baking)
- Parchment paper or silicone baking mats (prevents sticking and ensures even baking)
- Small bowls for the sugar coatings
- Cookie scoop (1½-tablespoon size for uniform cookies)
- Wire cooling rack
- Microwave-safe bowl or double boiler for melting chocolate
- Plastic wrap for chilling dough
- Kitchen scale (optional but helpful for precision)
Chocolate Crinkle Cookies Recipe

These classic chocolate crinkle cookies feature a rich, fudgy chocolate center wrapped in a crispy, powdered sugar coating that cracks beautifully as they bake. With their stunning appearance and intense chocolate flavor, they’re perfect for holidays, gift-giving, or satisfying serious chocolate cravings.
- Prep Time: 20 minutes (plus 3 hours chilling time)
- Cook Time: 12 minutes
- Total Time: 3 hours 32 minutes
- Yield: 48 cookies 1x
- Category: Dessert
- Method: Baking
- Cuisine: American
- Diet: Vegetarian
Ingredients
- 1 cup (120g) unsweetened cocoa powder (preferably Dutch-process)
- 2 cups (400g) granulated sugar
- ½ cup (120ml) vegetable oil
- 4 large eggs, at room temperature
- 2 teaspoons pure vanilla extract
- 4 ounces (113g) semisweet or bittersweet chocolate, melted and cooled slightly
- 2 cups (250g) all-purpose flour
- 2 teaspoons baking powder
- ½ teaspoon salt
- 1 cup (120g) powdered sugar, for coating
Instructions
- Mix the chocolate base: In a large mixing bowl, whisk together the cocoa powder and granulated sugar until well combined. Add the vegetable oil and whisk vigorously until the mixture is smooth and resembles wet sand.
- Add eggs and chocolate: Add eggs one at a time, whisking well after each addition until the mixture becomes glossy and smooth. Stir in the vanilla extract and melted chocolate until completely incorporated.
- Combine dry ingredients: In a separate bowl, whisk together the flour, baking powder, and salt. Add the dry ingredients to the chocolate mixture and stir with a rubber spatula just until no flour streaks remain. The dough will be quite soft and sticky—this is normal.
- Chill the dough: Cover the bowl tightly with plastic wrap and refrigerate for at least 3 hours or overnight. This step is crucial—the dough must be firm enough to handle and shape. Overnight chilling actually improves the flavor and texture.
- Prepare for baking: When ready to bake, preheat your oven to 350°F (175°C). Line two baking sheets with parchment paper or silicone baking mats. Place the powdered sugar in a small, shallow bowl.
- Shape the cookies: Using a 1½-tablespoon cookie scoop or two spoons, portion the chilled dough into balls. Roll each portion between your palms to create smooth balls (your hands can be slightly damp to prevent sticking).
- Coat generously: Roll each dough ball thoroughly in the powdered sugar, making sure it’s completely coated. Be generous with the sugar—this creates the dramatic crackle effect. Place coated balls on prepared baking sheets, spacing them about 2 inches apart.
- Bake: Bake for 11-13 minutes. The cookies will puff up, spread slightly, and develop beautiful cracks. The centers should look slightly underdone—they’ll continue cooking on the hot pan after removal. Don’t overbake or they’ll lose their fudgy texture.
- Cool: Let cookies cool on the baking sheet for 5 minutes (they’ll be very delicate when hot), then carefully transfer to a wire rack to cool completely. The cookies will firm up as they cool.
- Serve and store: Enjoy your beautiful chocolate crinkle cookies! Store in an airtight container at room temperature for up to one week.
Notes
- Chilling is essential: Don’t skip the refrigeration time. Warm dough will spread too much and won’t create the signature crackles.
- Generous sugar coating: Don’t be shy with the powdered sugar—it’s what creates the beautiful white cracks.
- Don’t overbake: These cookies should look slightly underdone in the center when you remove them. They’ll firm up as they cool.
- Chocolate quality matters: Better chocolate equals better flavor. Use chocolate you’d enjoy eating on its own.
- Room temperature eggs: They incorporate more smoothly and create better texture.
Nutrition
- Serving Size: 1 cookie Calories
- Calories: 98
- Sugar: 12g
- Sodium: 42mg
- Fat: 4g
- Saturated Fat: 1g
- Unsaturated Fat: 2.5g
- Trans Fat: 0g
- Carbohydrates: 16g
- Fiber: 1g
- Protein: 2g
- Cholesterol: 16mg
Tips & Variations
Flavor Variations:
- Peppermint Crinkles: Add ½ teaspoon peppermint extract to the dough and mix in crushed candy canes
- Espresso Chocolate: Dissolve 2 tablespoons instant espresso powder in the eggs before adding to deepen the chocolate flavor
- Orange Chocolate: Add 1 tablespoon orange zest and ½ teaspoon orange extract for a sophisticated twist
- Double Chocolate: Fold in ¾ cup mini chocolate chips before chilling the dough
- Nutty Crinkles: Add 1 cup finely chopped toasted pecans or walnuts for extra texture
Dietary Adaptations:
- Gluten-Free: Substitute with a 1-to-1 gluten-free flour blend (add ¼ teaspoon xanthan gum if your blend doesn’t include it)
- Dairy-Free: This recipe is already dairy-free! Just ensure your chocolate is dairy-free too
- Reduced Sugar: You can reduce the granulated sugar to 1½ cups, though the texture will be slightly less fudgy
Size Options:
- Make mini versions using a 1-tablespoon scoop for bite-sized treats (bake for 8-9 minutes)
- Create bakery-style large cookies with a 3-tablespoon scoop (bake for 15-17 minutes)
Pro Chef Tips
Temperature control is everything: Work with properly chilled dough, but if it gets too warm while shaping, pop it back in the fridge for 15 minutes. The dough should be firm enough to handle without sticking excessively to your hands.
The double-coating trick: For extra-dramatic crackles, roll the dough balls in granulated sugar first, then in powdered sugar. This creates more defined cracks and a slightly different texture.
Watch your oven temperature: Use an oven thermometer to ensure accuracy. Even 25 degrees too hot will cause the cookies to spread too much and lose their shape. If your cookies are spreading excessively, your oven may be running hot.
Don’t crowd the pan: Space cookies adequately—they need room to spread. Overcrowding causes uneven baking and can lead to cookies running into each other.
The underbake secret: Remove cookies when they still look slightly soft in the center. They’ll continue cooking from residual heat and will be perfectly fudgy when cooled. Overbaked crinkle cookies become dry and cakey instead of fudgy and chewy.
Use quality cocoa: The cocoa powder is a star ingredient here—using high-quality Dutch-process cocoa makes a noticeable difference in color and flavor depth. Brands like Valrhona, Callebaut, or even Hershey’s Special Dark deliver excellent results.
Common Mistakes to Avoid
Not chilling the dough long enough: This is the number one mistake. If your dough isn’t properly chilled, the cookies will spread into flat puddles instead of maintaining their shape and developing cracks. Always chill for at least 3 hours, and overnight is even better.
Using too little powdered sugar: Skimping on the coating means fewer dramatic cracks. Coat generously—the excess sugar will fall off, and what remains creates those beautiful white fissures.
Overbaking: These cookies should look slightly underdone when you remove them from the oven. If you wait until they look fully baked, they’ll be overdone once cooled. The centers should still appear soft and slightly shiny.
Rolling dough balls that are too large or too small: Inconsistent sizing leads to uneven baking. Some cookies will be overdone while others are underdone. Use a cookie scoop for uniform results.
Opening the oven door repeatedly: This causes temperature fluctuations that affect how the cookies crack. Resist the temptation to peek—just set your timer and trust the process.
Using expired baking powder: Old baking powder won’t create enough lift, resulting in dense cookies without proper crackles. Test your baking powder by adding a teaspoon to hot water—it should bubble vigorously.
Storage & Meal Prep
Room Temperature Storage: Store completely cooled cookies in an airtight container at room temperature for up to 1 week. Place parchment paper between layers to prevent them from sticking together. They actually taste even better on day 2-3 as the flavors develop and the texture becomes perfectly chewy.
Refrigerator Storage: While not necessary, you can refrigerate these cookies for up to 2 weeks in an airtight container. Bring to room temperature before serving for the best texture and flavor.
Maintaining Freshness: Add a slice of white bread to your storage container—it will keep the cookies soft and fresh by providing moisture. Replace the bread every few days.
Preventing Sticking: If your cookies tend to stick together in storage, place small squares of parchment paper between layers. This is especially helpful if you’re gifting cookies or making large batches.
Make-Ahead & Freezer Notes
Freezing Unbaked Dough: The dough can be prepared, shaped into balls, and frozen before coating in powdered sugar. Freeze dough balls on a baking sheet until solid (about 2 hours), then transfer to a freezer-safe bag or container for up to 3 months. When ready to bake, roll frozen dough balls in powdered sugar and add 1-2 minutes to the baking time—no need to thaw.
Freezing Baked Cookies: Fully baked and cooled cookies freeze beautifully for up to 3 months. Layer them between sheets of parchment paper in an airtight container or freezer bag. Thaw at room temperature for about 30 minutes before serving.
Make-Ahead Dough: Prepare the dough up to 3 days in advance and keep it refrigerated until ready to bake. This actually improves the flavor and makes a chewier cookie. You can also divide the dough, baking some immediately and refrigerating the rest for later in the week.
Best Reheating Method: While these cookies are delicious at room temperature, you can warm them slightly in a 300°F oven for 5 minutes to recreate that fresh-baked texture. Alternatively, microwave individual cookies for 10-15 seconds for a warm, gooey treat.
Gift-Giving Tip: These cookies are perfect for holiday gift-giving. Package frozen baked cookies in decorative tins or boxes with parchment paper between layers. They’ll thaw beautifully when your recipient opens them.
Serving Suggestions
Chocolate crinkle cookies are versatile enough to enjoy on their own, but here are some delicious ways to elevate your cookie experience:
Beverages: Pair with cold milk (classic!), hot coffee, espresso, hot chocolate, or even a glass of red wine for an adult dessert. Dunking these cookies in milk creates the perfect sweet treat.
Ice Cream Sandwiches: Use two cookies to sandwich your favorite ice cream flavor. Vanilla, mint chip, or coffee ice cream work beautifully with the intense chocolate flavor.
Dessert Platter: Arrange on a platter with other holiday favorites like gingerbread cookies, sugar cookies, and peppermint bark for a festive cookie exchange or dessert buffet.
À la Mode: Serve a warm cookie (reheated briefly) with a scoop of vanilla ice cream and a drizzle of chocolate sauce for an indulgent plated dessert.
Coffee Bar Addition: These cookies are perfect alongside a DIY coffee bar at brunch gatherings or holiday parties.
Gift Packaging: Layer cookies in decorative tins or cellophane bags tied with ribbon for beautiful homemade gifts that show you care.
FAQs Section
Can I make these cookies without eggs?
Eggs are crucial for the fudgy texture, but you can try substituting with flax eggs (1 tablespoon ground flaxseed mixed with 3 tablespoons water per egg, let sit 5 minutes). The texture will be slightly different—less fudgy, more cakey—but still delicious.
Why did my cookies spread into flat puddles?
This usually happens when the dough isn’t chilled long enough or your oven temperature is too low. Make sure to chill the dough for at least 3 hours and verify your oven temperature with an oven thermometer.
Can I use Dutch-process or natural cocoa powder?
Yes! Dutch-process cocoa creates darker cookies with mellower, deeper chocolate flavor, while natural cocoa produces lighter cookies with brighter, more acidic chocolate notes. Both work beautifully—it’s a matter of preference.
My cookies didn’t crack much. What went wrong?
This usually happens due to insufficient powdered sugar coating, dough that’s too warm, or overbaking. Make sure to coat the dough balls generously and ensure the dough is properly chilled before baking.
Can I make these cookies smaller or larger?
Absolutely! Adjust the baking time accordingly—smaller cookies (1 tablespoon of dough) bake for 8-9 minutes, while larger cookies (3 tablespoons) need 15-17 minutes. Watch for the characteristic cracks and slightly underbaked centers.
Do I have to use vegetable oil? Can I use butter instead?
You can substitute melted and cooled butter for the oil. Butter will create a slightly richer flavor and marginally different texture, but the cookies will still turn out beautifully.
How do I know when the cookies are done?
The cookies are done when they’ve puffed up, spread slightly, developed beautiful cracks, and the edges look set while the centers still appear soft and slightly shiny. They’ll firm up as they cool.
Conclusion
There you have it—everything you need to create absolutely stunning, bakery-quality chocolate crinkle cookies right in your own kitchen! These beauties prove that impressive results don’t require complicated techniques or fancy equipment. With just one bowl, simple pantry ingredients, and a little patience during the chilling time, you’ll have gorgeous cookies that taste every bit as amazing as they look.
Whether you’re baking for the holidays, preparing for a special occasion, or simply treating yourself to some serious chocolate indulgence, these crinkle cookies deliver on all fronts. That magical combination of crispy, sugar-coated exterior and fudgy, brownie-like interior makes them absolutely irresistible—and practically impossible to eat just one!
I’d love to hear how your chocolate crinkle cookies turn out! Did you try any of the flavor variations? What occasions are you baking these for? Drop a comment below and let me know about your baking adventures. And if you love this recipe as much as I do, please share it with your fellow chocolate lovers and save it to your Pinterest boards so you can find it again whenever a chocolate craving strikes!
Happy baking, and may your cookies always have perfectly dramatic crackles! 🍪✨