The Ultimate Homemade Crullers Recipe: Crispy, Light & Irresistibly Delicious

There’s something absolutely magical about biting into a fresh, warm cruller—that delicate crunch giving way to a pillowy-soft interior, all wrapped up in a sweet glaze that makes your taste buds dance. Crullers are those beautifully twisted, ridged donuts that look fancy but are surprisingly achievable in your own kitchen. Unlike their cakey donut cousins, crullers are made from choux pastry (the same dough used for cream puffs and éclairs), which gives them their signature airy, almost hollow interior and that incredible crispy-yet-tender texture.
These French-style pastries are perfect for weekend brunches, special breakfast treats, holiday mornings, or whenever you want to impress your family without spending hours in the kitchen. They’re also wonderful for bake sales, potlucks, or simply because it’s Tuesday and you deserve something special. The beauty of homemade crullers is that they’re infinitely better than store-bought versions—fresher, lighter, and made with love in your own kitchen.
History / Background
The cruller has a fascinating history that spans continents and centuries. The word “cruller” comes from the Dutch word “kruller,” meaning “to curl,” which perfectly describes these twisted beauties. Dutch settlers brought their version of crullers to America in the early colonial period, particularly to New York (then New Amsterdam), where they became a beloved breakfast staple.
Interestingly, there are two main types of crullers in American baking. The French cruller, which we’re making today, is made from choux pastry—that magical dough that puffs up when fried due to the high moisture content creating steam. This European technique elevates the cruller from a simple fried cake to an elegant pastry. The other type, sometimes called a cake cruller or twisted cruller, is made from a denser cake-like batter and is more common in certain regions of the United States.
French crullers gained popularity in American bakeries throughout the 20th century, especially in the Northeast. They became a signature item at classic donut shops and French patisseries alike. What makes French crullers special is their delicate structure—they’re lighter than air, with a texture that’s closer to a cream puff than a traditional donut. The ridged, fluted shape isn’t just for looks; it increases the surface area, giving you more of that coveted crispy exterior while keeping the inside wonderfully soft.
Today, crullers remain a beloved treat that represents the perfect marriage of French pastry technique and American donut culture. Making them at home connects you to this rich baking tradition while giving you complete control over the ingredients and freshness.
Why You’ll Love This Recipe
This homemade crullers recipe is a game-changer for anyone who loves fresh pastries but doesn’t want to deal with complicated yeast doughs or long rising times. The choux pastry comes together quickly on your stovetop, and the results are absolutely spectacular.
Here’s why this recipe will become your new favorite:
- No yeast, no waiting – Unlike traditional donuts, there’s no proofing time required, so you can go from craving to eating in under an hour
- Impressive but achievable – The fancy fluted shape and professional bakery texture make these look like you spent all day, but they’re actually beginner-friendly
- Incredibly light and airy – The choux pastry technique creates a texture that’s crispy outside and almost hollow inside, making them feel indulgent without being heavy
- Customizable glazes – Start with a classic vanilla glaze, then experiment with chocolate, maple, or any flavor your heart desires
- Budget-friendly – Made with simple pantry staples like flour, eggs, butter, and sugar—no fancy ingredients required
- Perfect for sharing – Makes about a dozen crullers, ideal for family breakfasts or bringing joy to your neighbors
- Freezer-friendly – You can freeze the fried crullers and glaze them fresh whenever a craving hits
Ingredient Notes
All-Purpose Flour: The foundation of your choux pastry. All-purpose flour provides the right balance of structure and tenderness. Don’t substitute with cake flour (too soft) or bread flour (too strong), as the protein content affects how the crullers puff.
Butter: Use unsalted butter so you can control the salt level. The butter adds richness and flavor while contributing to the tender texture. European-style butter with higher fat content will make even more luxurious crullers, but regular supermarket butter works beautifully.
Eggs: Room temperature eggs incorporate more easily into the warm dough. Eggs are crucial for structure and help create that signature puff. You’ll typically need 4 large eggs, but depending on humidity and flour absorption, you might need slightly more or less.
Sugar: Just a touch goes into the dough itself for subtle sweetness. The real sweetness comes from the glaze, so the cruller itself is only lightly sweet.
Salt: Essential for balancing flavors and enhancing the butter’s richness. Don’t skip it!
Vanilla Extract: Adds warmth and depth to both the dough and the glaze. Pure vanilla extract is best, but imitation works in a pinch.
Powdered Sugar: For the glaze, powdered sugar dissolves smoothly and creates that classic shiny coating. Granulated sugar won’t work for glazing.
Milk or Heavy Cream: Thins the glaze to the perfect consistency. Heavy cream makes a richer, more opaque glaze, while milk creates a thinner, more translucent coating.
Oil for Frying: Use a neutral oil with a high smoke point like vegetable oil, canola oil, or peanut oil. You’ll need enough to fill your pot 2-3 inches deep for proper frying.
Equipment Needed
- Medium saucepan – For cooking the choux pastry dough on the stovetop
- Wooden spoon or sturdy spatula – For stirring the hot dough vigorously
- Electric hand mixer or stand mixer – Optional but helpful for beating in the eggs smoothly
- Large piping bag – For piping the cruller shapes; a disposable piping bag works great
- Large star tip – A star tip (Wilton 1M or similar) creates those beautiful ridges; you can also use a French star tip for deeper grooves
- Parchment paper – For piping the crullers onto squares before frying
- Scissors – For cutting parchment paper into squares
- Deep, heavy-bottomed pot or Dutch oven – For frying; needs to hold at least 2-3 inches of oil safely
- Candy thermometer or instant-read thermometer – Essential for maintaining the correct oil temperature (365-375°F)
- Spider strainer or slotted spoon – For carefully flipping and removing crullers from hot oil
- Wire cooling rack – Set over a baking sheet to catch glaze drips and let crullers cool
- Shallow bowl – For mixing the glaze
- Whisk – For combining glaze ingredients smoothly
Crullers Recipe
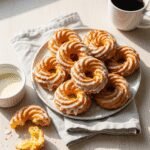
These homemade French crullers feature a light, airy choux pastry that’s fried to golden perfection and coated in a sweet vanilla glaze. With their signature ridged shape and delicate texture, these bakery-style treats are easier to make than you think and absolutely irresistible fresh from your kitchen.
- Prep Time: 20 minutes
- Cook Time: 20 minutes
- Total Time: 40 minutes
- Yield: 12 crullers 1x
- Category: Dessert, Breakfast, Brunch
- Method: Stovetop, Frying
- Cuisine: American
- Diet: Vegetarian
Ingredients
For the Crullers:
- 1 cup water
- ½ cup (1 stick) unsalted butter, cut into pieces
- 1 tablespoon granulated sugar
- ¼ teaspoon salt
- 1 cup all-purpose flour
- 4 large eggs, room temperature
- 1 teaspoon vanilla extract
- Vegetable oil for frying (about 6-8 cups, depending on pot size)
For the Vanilla Glaze:
- 2 cups powdered sugar
- 3-4 tablespoons milk or heavy cream
- 1 teaspoon vanilla extract
- Pinch of salt
Instructions
- Prepare your piping setup: Cut parchment paper into twelve 4-inch squares. Place them on a large baking sheet. Fit a large piping bag with a large star tip (Wilton 1M or similar) and set aside.
- Make the choux pastry: In a medium saucepan, combine water, butter, sugar, and salt. Place over medium-high heat and bring to a rolling boil, stirring occasionally to ensure the butter melts completely.
- Add the flour: Once boiling, remove from heat and immediately dump in all the flour at once. Stir vigorously with a wooden spoon until the mixture forms a cohesive ball and pulls away from the sides of the pan. This should take about 30 seconds to 1 minute.
- Cook the dough: Return the pan to medium-low heat. Continue stirring and pressing the dough against the sides of the pan for about 2-3 minutes. This cooks out excess moisture and helps create structure. You’ll notice a thin film forming on the bottom of the pan—this is good! The dough should look smooth and slightly glossy.
- Cool slightly: Transfer the hot dough to a mixing bowl (or the bowl of your stand mixer) and let it cool for 3-4 minutes. You want it warm but not scalding hot, or it will cook the eggs when you add them.
- Add the eggs: Beat in the eggs one at a time, mixing thoroughly after each addition. The dough will look separated and slimy at first, but keep beating—it will come together into a smooth, glossy paste. After all eggs are incorporated, beat in the vanilla extract. The final consistency should be thick but pipeable, holding its shape but slowly flowing when lifted.
- Pipe the crullers: Transfer the dough to your prepared piping bag. Pipe 3-inch rings onto each parchment square, overlapping the ends slightly to close the circle. Pipe in a continuous motion to create even ridges all around. The rings will look small—that’s okay, they’ll puff up significantly when fried.
- Heat the oil: Pour oil into a large, heavy pot to a depth of 2-3 inches. Heat to 365-375°F over medium heat, monitoring with a thermometer. Maintaining proper temperature is crucial for perfectly cooked crullers.
- Fry the crullers: Working in batches of 2-3, carefully flip each parchment square upside down so the cruller drops into the hot oil, then use tongs to remove the paper (it should peel away easily). Fry for about 2-3 minutes per side until deep golden brown. The crullers will puff up dramatically and float. Use a spider strainer or slotted spoon to flip them halfway through and remove them when done.
- Drain: Transfer fried crullers to a wire rack set over a baking sheet to drain and cool for about 5 minutes. Let them cool completely before glazing for the cleanest results, or glaze while slightly warm for a thinner glaze that soaks in a bit.
- Make the glaze: In a shallow bowl, whisk together powdered sugar, 3 tablespoons milk, vanilla, and salt until smooth. The glaze should be thick but pourable—add more milk by the teaspoon if needed to reach the right consistency. It should slowly drip off a spoon rather than running off quickly.
- Glaze the crullers: Dip the top of each cruller into the glaze, letting excess drip back into the bowl, then flip right-side up and place on the wire rack. The glaze will set in about 10-15 minutes. For an extra-thick coating, let the first glaze set completely, then dip again.
Notes
- Egg additions: Depending on your flour and humidity levels, you may need slightly more or less egg. The dough should be thick but pipeable. If it seems too stiff after 4 eggs, beat in another tablespoon of beaten egg at a time until you reach the right consistency.
- Oil temperature: Keep your thermometer in the oil and adjust heat as needed. If the oil is too cool, crullers will absorb grease; too hot, and they’ll brown before cooking through.
- Parchment trick: Using parchment squares makes transferring the delicate raw crullers to oil much easier and helps them keep their shape.
- Glaze variations: Try chocolate glaze (add 2 tablespoons cocoa powder), maple glaze (replace vanilla with maple extract and add a tablespoon of maple syrup), or citrus glaze (use lemon or orange juice instead of milk and add zest).
- Freshness: Crullers are best enjoyed the day they’re made, ideally within 4-6 hours of frying, when they’re at their crispiest.
Nutrition
- Serving Size: 1 cruller
- Calories: 245
- Sugar: 18g
- Sodium: 120mg
- Fat: 14g
- Saturated Fat: 5g
- Unsaturated Fat: 8g
- Trans Fat: 0g
- Carbohydrates: 27g
- Fiber: 0.5g
- Protein: 3g
- Cholesterol: 75mg
Note: Nutrition information is approximate and will vary based on exact ingredients used and glaze absorption.
Tips & Variations
Chocolate Lovers: Make a rich chocolate glaze by adding 3 tablespoons of unsweetened cocoa powder to the powdered sugar and using 4-5 tablespoons of milk to thin. Or dip half the cruller in vanilla glaze and half in chocolate for a stunning two-tone look.
Maple Pecan Delight: Replace vanilla extract with maple extract in both the dough and glaze, add a tablespoon of pure maple syrup to the glaze, and sprinkle toasted chopped pecans on top while the glaze is still wet.
Citrus Twist: Add 1 teaspoon of lemon or orange zest to the choux dough, then make a citrus glaze using fresh lemon or orange juice instead of milk and adding extra zest to the glaze.
Cinnamon Sugar Style: Skip the glaze entirely and toss warm crullers in a mixture of granulated sugar and cinnamon for a simpler, less sweet option that’s reminiscent of churros.
Filled Crullers: Once cooled, use a piping bag fitted with a small round tip to inject pastry cream, jam, or lemon curd into the center of each cruller for an extra-decadent treat.
Baked Version: While traditional crullers are fried, you can bake them at 425°F for 20-25 minutes until puffed and golden. The texture won’t be identical, but they’ll still be delicious and much lighter in calories.
Matcha Glaze: Add 1-2 teaspoons of matcha powder to the powdered sugar for a beautiful green tea glaze that’s both gorgeous and delicious.
Spiced Crullers: Add ½ teaspoon of cinnamon, ¼ teaspoon of nutmeg, and a pinch of cardamom to the dough for warm spiced flavor, then pair with a simple vanilla or coffee-flavored glaze.
Pro Chef Tips
Temperature is everything: The success of choux pastry relies heavily on proper temperatures. Make sure your water-butter mixture comes to a full rolling boil before adding flour, cook the dough paste adequately, cool it enough before adding eggs (but not too much), and maintain steady frying temperature. These temperature control points make the difference between bakery-quality crullers and disappointing ones.
The “dough test”: Professional bakers use this trick: when you think your choux dough is ready, lift some with your spoon or spatula. It should form a V-shape or triangle that slowly falls but holds its general shape. If it’s too runny, it won’t pipe well or hold its ridges. If it’s too stiff, the crullers won’t puff properly.
Pipe with confidence: Use steady, even pressure when piping. Hesitation creates lumps and uneven ridges. Practice on parchment paper first if you’re nervous—you can scrape it up and reload the piping bag. The key is continuous, smooth motion as you pipe around the circle.
The film is your friend: When cooking the choux paste, that thin film forming on the bottom of your pan isn’t burning—it’s excess moisture evaporating, which is exactly what you want. This step ensures your dough has the right consistency and your crullers will be crisp, not soggy.
Fry in batches: Overcrowding the pot drops the oil temperature too quickly, resulting in greasy crullers that don’t puff properly. Stick to 2-3 at a time maximum, and give the oil time to return to temperature between batches.
Double-glaze for perfection: Professional bakeries often glaze crullers twice. The first coat seals the surface and creates a base; after it sets (about 15 minutes), a second dip creates that thick, luscious glaze coating you see in bakeries.
Room temperature eggs incorporate better: Cold eggs can cool down your dough too much, making it harder to achieve the right consistency. Let eggs sit at room temperature for 30 minutes before starting, or place them in warm water for 5-10 minutes.
Common Mistakes to Avoid
Not cooking the flour paste enough: If you don’t cook the dough paste on the stove long enough (step 4), excess moisture remains, leading to crullers that don’t puff properly or have dense, gummy interiors. Cook it for the full 2-3 minutes until you see that film forming on the pan bottom.
Adding eggs to dough that’s too hot: If your dough is still steaming hot when you add eggs, you’ll get scrambled eggs mixed into your paste instead of smooth choux. Let it cool for 3-4 minutes until it’s warm but not scalding.
Oil temperature too low: Frying at temperatures below 350°F causes crullers to absorb excess oil and become greasy instead of crispy. Always use a thermometer and wait for the oil to return to temperature between batches. If you don’t have a thermometer, test with a small piece of dough—it should sizzle immediately and float to the surface.
Glazing while too warm: If crullers are still hot from frying, the glaze will be too thin and slide right off. Cool them for at least 5 minutes (ideally until room temperature) for glaze that sets properly and has that beautiful thick coating.
Opening the oven door (if baking): For those trying the baked version, opening the oven door before crullers are set causes them to deflate. The steam inside is what creates their structure. Resist the urge to peek until at least 18-20 minutes into baking.
Storage & Meal Prep
Crullers are absolutely at their peak the day they’re made—ideally within the first 4-6 hours when they’re at their crispiest. However, with proper storage, you can extend their life a bit.
Room Temperature Storage: Store glazed crullers in an airtight container at room temperature for up to 2 days. Place parchment or wax paper between layers to prevent them from sticking together. Be aware that the glaze may soften them slightly, and they’ll lose some of their signature crispness after the first day.
Refrigeration: While not ideal, you can refrigerate crullers for up to 3 days. The cold makes them more dense, but they’re still tasty. Bring to room temperature before serving, or warm briefly (see reheating notes below).
Reheating: To refresh day-old crullers, place them on a baking sheet in a 300°F oven for 3-5 minutes. This won’t restore full crispness, but it warms them through and improves texture. Avoid microwaving, as it makes them soggy and tough.
Best Practice: If you’re making these for a special occasion, time it so they’re fresh. The actual hands-on time is only about 40 minutes total, so you can make them the morning of your event for maximum impact.
Make-Ahead & Freezer Notes
Freezing Fried, Unglazed Crullers: This is the best make-ahead method. After frying and cooling completely, place unglazed crullers in a single layer on a baking sheet and freeze until solid (about 2 hours). Transfer to a freezer-safe bag or container with parchment between layers. Freeze for up to 2 months. To serve, thaw at room temperature for about an hour, warm in a 300°F oven for 5 minutes if desired, then glaze fresh.
Freezing Glazed Crullers: While possible, the glaze can crack and look less attractive when thawed. If you do freeze glazed crullers, pack them carefully with parchment between layers and thaw in the refrigerator, then bring to room temperature before serving.
Can You Freeze the Dough?: Unfortunately, raw choux pastry doesn’t freeze well. The moisture content changes during freezing and thawing, affecting the puff. It’s better to fry them first, then freeze.
Make-Ahead Glaze: The glaze can be made up to 3 days ahead and stored in an airtight container in the refrigerator. Before using, bring to room temperature and whisk well. You may need to add a splash of milk to restore the right consistency.
Piping in Advance: You can pipe the crullers onto parchment squares up to 1 hour before frying. Cover loosely with plastic wrap and keep at room temperature. Don’t wait longer than that, as they can develop a skin that affects how they puff.
Best Reheating Method from Frozen: Place frozen unglazed crullers directly on a baking sheet in a 325°F oven for 8-10 minutes until warmed through. Let cool for 5 minutes, then glaze. This method produces results very close to freshly made.
Serving Suggestions
Crullers are incredibly versatile and shine in various settings. Here are some wonderful ways to serve them:
Classic Coffee Shop Style: Serve fresh crullers alongside premium coffee—the French pastry pairs beautifully with a dark roast, cappuccino, or café au lait. Add a small bowl of fresh berries and you’ve got an elegant continental breakfast.
Brunch Centerpiece: Arrange crullers on a tiered cake stand as the star of your brunch spread. Serve with scrambled eggs, crispy bacon, fresh fruit salad, and mimosas or fresh-squeezed orange juice for a memorable weekend gathering.
Afternoon Tea: Present crullers alongside other petit fours, scones, and finger sandwiches for a French-inspired tea party. Pair with Earl Grey, chamomile, or jasmine tea.
Dessert Plate: Serve a cruller with a scoop of vanilla ice cream or a dollop of fresh whipped cream, drizzle with chocolate sauce, and add a few fresh raspberries for an elegant plated dessert.
Kids’ Breakfast: Make Saturday morning special by serving warm crullers with cold milk and cut-up fruit. Kids love the fun shape and sweet glaze.
Ice Cream Sandwich: Slice a cruller in half horizontally and sandwich a scoop of ice cream between the layers. Press gently and serve immediately for an indulgent treat.
Coffee Bar Display: If you’re hosting, create a coffee bar with various brew methods, flavored syrups, cream options, and a platter of fresh crullers for guests to enjoy.
Pair with Savory: Balance the sweetness by serving crullers alongside savory quiche, frittata, or smoked salmon and cream cheese for a French-bistro-inspired brunch.
FAQs Section
Can I make crullers without a piping bag?
While technically possible, a piping bag with a star tip is really essential for achieving the signature ridged shape and proper texture. Those ridges aren’t just decorative—they increase surface area for more crispiness and help the crullers cook evenly. If you don’t have a piping bag, you could use a heavy-duty freezer bag with a large star tip inserted in one corner, but invest in proper piping equipment for best results—they’re inexpensive and useful for many recipes.
Why didn’t my crullers puff up?
Several factors affect puffing: oil temperature too low (below 350°F), not cooking the flour paste long enough on the stovetop (it needs that full 2-3 minutes), adding too many eggs making the dough too thin, or not adding enough eggs making it too stiff. The choux paste should be glossy and thick but pipeable. Also ensure you’re using fresh eggs and all-purpose flour with proper protein content.
Can I bake these instead of frying them?
Yes, though the texture will be different. Pipe onto parchment-lined baking sheets (no need for individual squares) and bake at 425°F for 20-25 minutes until golden and puffed. They’ll be more like cream puffs—still delicious but lighter and less crispy than fried versions. Don’t open the oven door until they’re nearly done, or they’ll deflate.
How do I know when the oil is the right temperature?
A candy thermometer or instant-read thermometer is essential—aim for 365-375°F. Without one, drop a tiny piece of dough into the oil; it should sizzle immediately, float to the surface within seconds, and gradually turn golden (not brown in seconds). If it sinks and takes a long time to brown, the oil is too cool. If it browns in under 30 seconds, it’s too hot.
Why is my glaze too thick or too thin?
Glaze consistency depends on the ratio of powdered sugar to liquid. For thicker glaze that coats heavily, use less milk (starting with 3 tablespoons). For thinner glaze that creates a lighter coating, use 4-5 tablespoons. Remember that the glaze will continue to thicken slightly as it sits due to evaporation. Always add liquid gradually—you can add more, but you can’t take it away.
Can I make these ahead for a party?
For best quality, fry them the morning of your party. If you need more advance prep, fry and freeze unglazed crullers up to 2 months ahead, then warm from frozen and glaze the morning of your event. The glaze takes just 2 minutes to make, so that’s not a significant time addition.
What can I do with leftover choux pastry dough?
If you have extra dough, pipe small puffs on parchment and fry them as “cruller holes” or baby crullers—kids love them! You can also pipe the dough into traditional cream puff shapes and bake at 400°F for 25-30 minutes, then fill with pastry cream or whipped cream.
Why are my crullers greasy?
Greasy crullers usually indicate oil temperature that’s too low. When the temperature drops below 350°F, crullers cook more slowly and absorb excess oil instead of crisping up quickly. Use a thermometer, don’t crowd the pot, fry in small batches, and let the oil return to temperature between batches. Also make sure you’re draining them properly on a wire rack, not paper towels which can trap steam.
Conclusion
There’s something truly special about pulling off a batch of homemade crullers that look and taste like they came from a French patisserie. That first bite—the delicate crunch, the airy interior, the sweet glaze—makes every step worthwhile. While crullers might seem intimidating, the technique becomes intuitive after making them once or twice. The choux pastry method is actually forgiving and versatile, and once you master it, you’ll find yourself making cream puffs, éclairs, and of course, these magnificent crullers again and again.
The beauty of this recipe is that it brings bakery-quality pastries into your home kitchen using simple ingredients you probably already have. There’s no overnight proofing, no complicated temperature-controlled environments, just straightforward cooking techniques that yield spectacular results. And let’s be honest—nothing beats the pride of serving pastries you made yourself, especially when they look this impressive.
I hope this recipe inspires you to heat up that oil and start piping! Whether you’re making these for a special weekend breakfast, a holiday brunch, or just because Wednesday needs a little more sweetness, these crullers will not disappoint. They’re best enjoyed fresh and warm, preferably with someone you love and a good cup of coffee.
Give this recipe a try and let me know how it turns out! Leave a comment below with your results, any creative glaze variations you tried, or questions you have. And if you love these as much as I do, please share this recipe with your friends and save it to your Pinterest boards so you can find it again. Happy frying, and may your crullers be forever crispy and golden!