The Ultimate Danish Pastry Recipe: Flaky, Buttery, and Absolutely Divine

There’s something utterly magical about biting into a freshly baked Danish pastry—those delicate, paper-thin layers that shatter at the slightest touch, revealing a buttery, tender crumb inside. Whether you’re enjoying a simple cinnamon swirl or one topped with sweet cream cheese and fruit, Danish pastries represent the pinnacle of European baking artistry.
Danish pastries are those beautiful, golden pastries you see in bakery windows that make you stop in your tracks. They’re perfect for weekend brunch, special breakfast occasions, holiday mornings, or anytime you want to impress your family and friends with your baking prowess. While they have a reputation for being difficult, I’m here to show you that with patience and the right technique, you can absolutely master these stunning pastries in your own kitchen.
This recipe will guide you through creating authentic Danish pastry dough from scratch—complete with all those gorgeous, flaky layers—and show you how to shape and fill them like a professional baker. Yes, it takes time, but the process is incredibly rewarding, and the results are restaurant-quality pastries that cost a fraction of what you’d pay at a fancy bakery.
History / Background
Despite their name, Danish pastries have a wonderfully complex international history that spans across Europe. The story begins in Austria in the 1850s, where Viennese bakers created a rich, laminated dough similar to croissant dough. However, the pastry we know today as “Danish” was actually perfected in Denmark, where it’s called “wienerbrød,” which literally translates to “Viennese bread”—a nod to its Austrian roots.
The legend goes that during a bakers’ strike in Denmark in 1850, bakery owners brought in replacement workers from Austria. These Austrian bakers introduced their laminated dough techniques to Denmark, and the Danish bakers fell in love with the method. They adapted the recipe, making it their own by adding more eggs and slightly adjusting the butter ratio, creating a dough that was richer and more pliable than the original Austrian version.
Danish immigrants then brought this pastry to America in the early 20th century, where it became a staple in bakeries across the country. Americans fell head over heels for these buttery treats, and they became particularly popular in the 1930s and 1940s. Today, Danish pastries are beloved worldwide, with each country adding its own unique fillings and shapes.
In Denmark, these pastries are an integral part of the coffee culture, enjoyed during “hygge” moments—those cozy times spent with loved ones. They’re not just breakfast food; they’re a celebration of craftsmanship, patience, and the simple pleasure of quality baking.
Why You’ll Love This Recipe
This homemade Danish pastry recipe brings bakery-quality results right to your kitchen, and once you taste the difference between store-bought and homemade, you’ll never look back. While the technique requires some time and patience, the actual hands-on work is quite manageable, and the process itself is deeply satisfying.
Here’s why this recipe is absolutely worth making:
- Impressive but achievable – The lamination technique looks fancy but follows a simple, repetitive pattern that anyone can master with practice
- Incredibly buttery and flaky – The layers created through lamination give you that signature shatter-and-melt texture that’s simply irresistible
- Versatile filling options – Use the same dough to create countless variations with different fillings, from fruit preserves to cream cheese to almond paste
- Makes a stunning presentation – These pastries look like they came from an expensive European bakery, making them perfect for special occasions
- Better than store-bought – Nothing compares to the fresh, buttery aroma and taste of pastries straight from your own oven
- Great for meal prep – The dough freezes beautifully, so you can make it ahead and bake fresh pastries whenever you want
- Cost-effective for special occasions – Making a dozen Danish pastries at home costs far less than buying them from a bakery
- Deeply satisfying to make – There’s something incredibly rewarding about creating those perfect layers through your own effort
Ingredient Notes
All-Purpose Flour: This forms the structure of your pastry. Use a quality all-purpose flour with around 10-12% protein content. Bread flour has too much protein and will make the dough tough, while cake flour won’t provide enough structure. You can substitute with European-style flour for an even more authentic result.
European-Style Butter (high-fat content): This is crucial for authentic Danish pastries. European butter contains 82-84% butterfat compared to American butter’s 80%, which makes a noticeable difference in flavor and texture. The higher fat content also means less water, which helps create crispier, more defined layers. Brands like Kerrygold, Plugrá, or any butter labeled “European-style” work beautifully. If you can only find regular butter, the recipe will still work, just with slightly less dramatic results.
Whole Milk: Adds richness and helps activate the yeast. You can substitute with 2% milk if needed, though whole milk gives better flavor. For a dairy-free version, use oat milk or soy milk with similar fat content.
Active Dry Yeast or Instant Yeast: Provides the rise and creates those airy pockets between the buttery layers. Instant yeast can be mixed directly into the flour, while active dry should be dissolved in warm milk first. They’re interchangeable in equal amounts.
Granulated Sugar: Adds a touch of sweetness to the dough and feeds the yeast. The amount in the dough is relatively modest since most sweetness comes from the fillings.
Eggs: Contribute to the rich, golden color and tender texture. They also add structure and help bind the dough. Room temperature eggs incorporate more easily.
Salt: Essential for balancing flavors and strengthening the gluten structure. Never skip the salt, even though it seems like a small amount.
Vanilla Extract: Adds depth and enhances the overall flavor profile. Pure vanilla extract is always preferable to imitation.
Cream Cheese, Fruit Preserves, or Almond Paste (for filling): Traditional fillings vary, but cream cheese sweetened with a bit of sugar and vanilla is incredibly popular in America. Fruit preserves like apricot, raspberry, or cherry are classic Danish choices. Almond paste (remonce) is traditional in Denmark. Choose based on your preference.
Equipment Needed
- Stand mixer with dough hook (or mix by hand, though a mixer makes it much easier)
- Rolling pin (a French-style rolling pin without handles works best for lamination)
- Large baking sheets (at least two)
- Parchment paper or silicone baking mats
- Bench scraper or dough cutter
- Pastry brush (for egg wash)
- Plastic wrap or reusable dough covers
- Ruler or measuring tape (for precise measurements during laminating)
- Sharp knife or pizza cutter
- Instant-read thermometer (helpful for checking milk temperature)
- Large work surface (clean countertop or marble slab, preferably chilled)
Danish Pastry Recipe

Buttery, flaky homemade Danish pastries with gorgeous laminated layers and your choice of sweet fillings. This authentic recipe creates bakery-quality results with beautiful golden-brown pastries that shatter delicately with each bite.
- Prep Time: 4 hours (including chilling time)
- Cook Time: 20 minutes
- Total Time: 4 hours 20 minutes
- Yield: 12-16 pastries 1x
- Category: Breakfast, Brunch, Dessert
- Method: Baking, Lamination
- Cuisine: Danish, European
- Diet: Vegetarian
Ingredients
For the Dough:
- 4 cups (500g) all-purpose flour, plus more for dusting
- ¼ cup (50g) granulated sugar
- 2¼ teaspoons (7g) instant yeast or 1 packet active dry yeast
- 1 teaspoon salt
- 1 cup (240ml) whole milk, warmed to 110°F
- 2 large eggs, room temperature
- 1 teaspoon vanilla extract
- 2 tablespoons (28g) unsalted butter, softened
For the Butter Block:
- 1¼ cups (282g) European-style butter, cold
- 2 tablespoons (16g) all-purpose flour
For the Filling (Cream Cheese Version):
- 8 oz (226g) cream cheese, softened
- ¼ cup (50g) granulated sugar
- 1 egg yolk
- 1 teaspoon vanilla extract
- Fruit preserves (optional, for topping)
For Egg Wash:
- 1 large egg
- 1 tablespoon milk or cream
For the Glaze:
- 1 cup (120g) powdered sugar
- 2-3 tablespoons milk
- ½ teaspoon vanilla extract
Instructions
Step 1: Make the Dough In the bowl of a stand mixer fitted with the dough hook, combine flour, sugar, yeast, and salt. In a separate bowl, whisk together warm milk, eggs, and vanilla. Pour the wet ingredients into the dry ingredients and mix on low speed until a shaggy dough forms. Add the softened butter and continue mixing for 5-7 minutes until the dough is smooth and elastic. It should be soft but not sticky.
Step 2: First Chill Shape the dough into a rectangle about 1 inch thick, wrap tightly in plastic wrap, and refrigerate for at least 1 hour or up to overnight. This initial rest allows the gluten to relax and makes the dough easier to roll out.
Step 3: Prepare the Butter Block While the dough chills, prepare your butter block. Place the cold butter between two sheets of parchment paper. Using your rolling pin, pound and roll the butter into a 7×10-inch rectangle. The butter should be pliable but still cold—about the same consistency as the dough will be. Dust with the 2 tablespoons of flour and work it into the butter. This helps prevent the butter from becoming greasy during lamination. Refrigerate the butter block until ready to use.
Step 4: First Lamination (Creating the Butter Envelope) On a lightly floured surface, roll the chilled dough into a 10×20-inch rectangle. Place the butter block in the center of the dough. Fold the top third of the dough down over the butter, then fold the bottom third up, like folding a business letter. You’ve just completed your first “fold.” Rotate the dough 90 degrees so the seam is on your right (like a book spine).
Step 5: Create the Layers Roll the dough out again into a long rectangle, about 10×20 inches. Fold it into thirds again (this is your second fold). Wrap in plastic wrap and refrigerate for 30 minutes. Repeat this rolling and folding process two more times, chilling for 30 minutes between each fold. After the fourth and final fold, refrigerate for at least 1 hour or overnight. These folds create hundreds of alternating layers of butter and dough.
Step 6: Prepare the Filling Beat together the softened cream cheese, sugar, egg yolk, and vanilla until smooth and creamy. Set aside. If using other fillings like almond paste or jam, prepare them according to your preference.
Step 7: Shape the Pastries Roll the laminated dough out to a large rectangle, about 12×16 inches and ¼ inch thick. Using a sharp knife or pizza cutter, cut into 4-inch squares. You should get 12-16 squares depending on your sizing. For pinwheel shapes, cut from each corner toward the center (stopping about ½ inch from the middle), then fold alternating points to the center. For envelopes, place filling in the center and fold corners over. For simple rectangles, fold in half over the filling.
Step 8: Second Rise Place shaped pastries on parchment-lined baking sheets, spacing them 2-3 inches apart. Cover loosely with plastic wrap or a clean kitchen towel and let rise in a warm place for 45-60 minutes until puffy and nearly doubled. They should feel light and airy to the touch.
Step 9: Apply Egg Wash and Fill Preheat oven to 400°F (200°C). Whisk together the egg and milk for the egg wash. Brush each pastry generously with egg wash, being careful not to let it drip onto the pan (which can prevent rising). Add your filling to the center of each pastry—about 1-2 tablespoons of cream cheese filling, or a dollop of jam.
Step 10: Bake Bake for 18-22 minutes until the pastries are deeply golden brown and puffed with visible layers. The bottoms should be golden and crisp. Don’t underbake—properly baked Danish pastries have that signature crispy, flaky texture.
Step 11: Glaze While pastries cool for 10 minutes, whisk together powdered sugar, milk, and vanilla to create a smooth glaze. Drizzle over the warm pastries. Let cool completely on the baking sheets before serving.
Notes
- Temperature is crucial: Keep your butter and dough at similar temperatures during lamination—both should be cold but pliable. If butter gets too warm, it will blend into the dough instead of staying in distinct layers. If too cold, it will break.
- Work quickly but carefully: When laminating, work in a cool kitchen and work efficiently to prevent the butter from melting into the dough.
- Don’t skip the rests: Each refrigeration period is essential for allowing the gluten to relax and keeping the butter properly chilled.
- Customize your fillings: Try different combinations like apple cinnamon, cherry almond, lemon curd, or even savory options like ham and cheese for breakfast pastries.
- Egg wash is non-negotiable: It creates that beautiful, shiny golden-brown finish that makes Danish pastries so appealing.
Nutrition
- Serving Size: 1 pastry
- Calories: 285
- Sugar: 12g
- Sodium: 180mg
- Fat: 18g
- Saturated Fat: 11g
- Unsaturated Fat: 6g
- Trans Fat: 0g
- Carbohydrates: 26g
- Fiber: 1g
- Protein: 5g
- Cholesterol: 75mg
Tips & Variations
Chocolate Lover’s Version: Add mini chocolate chips to your cream cheese filling or drizzle with melted dark chocolate instead of vanilla glaze.
Fruit-Forward Pastries: Use seasonal fruit preserves like strawberry, blueberry, or apricot. You can also add fresh fruit slices on top before baking for a beautiful presentation.
Almond Danish: Make traditional Danish remonce by mixing softened butter with sugar and almond paste, then spread this on your pastries before shaping.
Cinnamon Sugar Twist: Brush the rolled dough with melted butter, sprinkle generously with cinnamon sugar, then cut into strips and twist before baking.
Savory Breakfast Version: Skip the sweet filling and use scrambled eggs, cheese, and cooked bacon or sausage for a savory brunch option.
Lighter Option: Use reduced-fat cream cheese in the filling and reduce the butter in the lamination to 1 cup (though this will affect the flakiness somewhat).
Nutella Filling: Spread Nutella in the center of each pastry and top with chopped hazelnuts for a chocolate-hazelnut treat.
Make Them Mini: Cut smaller squares (2-3 inches) for bite-sized Danish pastries perfect for parties or brunches.
Pro Chef Tips
Invest in Quality Butter: The butter is the star of laminated dough. Using European-style butter with higher butterfat content makes a tremendous difference in both flavor and texture. It’s worth the extra dollar or two per pound.
Keep a Bowl of Ice Water Nearby: If your butter starts getting too soft while laminating, place the dough package over a bowl of ice water for a minute to quickly chill it back down without a long refrigerator wait.
Use a Marble Slab if Possible: Professional bakers love marble for laminating because it stays cool naturally, helping keep the butter from melting into the dough. If you have a marble cutting board, chill it in the refrigerator and work on that.
The Book Fold Technique: For extra-flaky pastries, try a “book fold” on your final turn: fold the dough in quarters instead of thirds. This creates even more layers and an incredibly flaky texture.
Rotate Your Pans: Halfway through baking, rotate your baking sheets from front to back and switch oven racks if baking multiple sheets. This ensures even browning on all pastries.
Don’t Overwork the Dough: Handle the dough gently during lamination. Excessive rolling and rerolling will develop too much gluten, making the pastries tough rather than tender.
Check Your Oven Temperature: Use an oven thermometer to verify your oven’s accuracy. Danish pastries need a hot oven to puff properly, and many home ovens run cooler than their settings indicate.
Common Mistakes to Avoid
Mistake #1: Butter melting into the dough – This happens when the dough or butter gets too warm during lamination. Always refrigerate between folds, and if you notice the butter getting soft, pop everything back in the fridge immediately. Working in a cool kitchen (below 70°F) makes a huge difference.
Mistake #2: Rolling the dough unevenly – Uneven rolling creates pastries that bake inconsistently, with some areas overcooked and others underbaked. Always roll from the center outward, applying even pressure, and check your thickness with a ruler if needed.
Mistake #3: Not allowing proper rise time – Skipping or rushing the final proof results in dense pastries without that characteristic lightness. Your pastries should look noticeably puffy and feel airy before baking. This can take anywhere from 45 minutes to 90 minutes depending on kitchen temperature.
Mistake #4: Overbaking or underbaking – Underbaked pastries are doughy and lack the crispy layers, while overbaked ones are dry. You want a deep golden color all over, not pale blonde. The bottoms should be golden brown when you peek underneath.
Mistake #5: Cutting corners on chilling times – Those refrigeration periods aren’t suggestions—they’re essential. Rushing the process results in poor lamination, tough pastries, and butter leaking out during baking.
Storage & Meal Prep
Room Temperature Storage: Danish pastries are best enjoyed the day they’re baked, but they’ll keep at room temperature in an airtight container for up to 2 days. The texture won’t be quite as crispy, but they’ll still taste delicious.
Refrigerator Storage: If your pastries contain perishable fillings like cream cheese, store them in the refrigerator in an airtight container for up to 4 days. Let them come to room temperature before serving, or warm briefly in a 300°F oven for 5 minutes to refresh.
Reheating Instructions: To restore that fresh-baked crispiness, place pastries on a baking sheet and warm in a 325°F oven for 5-8 minutes. Avoid the microwave, which will make them soggy.
Shelf Life Indicators: Properly stored Danish pastries will gradually lose their crispness over time. If they develop any off smells or visible mold (especially in humid climates), discard them immediately.
Make-Ahead & Freezer Notes
Make-Ahead Dough: The laminated dough can be prepared through all four folds, then wrapped tightly and refrigerated for up to 3 days before shaping and baking. This is actually ideal for busy weekends—do the lamination work mid-week, then shape and bake fresh on Saturday or Sunday morning.
Freezing Unbaked Pastries: Shape your pastries completely, place them on a baking sheet, and freeze until solid (about 2 hours). Transfer to freezer bags or airtight containers and freeze for up to 3 months. When ready to bake, place frozen pastries on baking sheets, cover, and let them thaw and rise at room temperature for 2-3 hours before baking as directed.
Freezing Baked Pastries: Fully baked and cooled pastries can be frozen in airtight containers or freezer bags for up to 2 months. Thaw overnight in the refrigerator, then reheat in a 325°F oven for 8-10 minutes to restore crispness.
Freezing the Dough Block: After completing all the folds, you can freeze the entire laminated dough block wrapped tightly in plastic wrap and placed in a freezer bag. It will keep for up to 3 months. Thaw overnight in the refrigerator before rolling, shaping, and baking.
Best Reheating Method: Whether you’ve frozen baked or unbaked pastries, the key to great texture is finishing them in the oven. The dry heat restores that crispy, flaky exterior that makes Danish pastries so irresistible.
Serving Suggestions
Danish pastries shine as the centerpiece of a beautiful breakfast or brunch spread. Serve them warm alongside:
Coffee or Tea: The traditional pairing! A rich, dark roast coffee or Earl Grey tea complements the buttery pastries perfectly.
Fresh Fruit Salad: The brightness of fresh berries, melon, and citrus cuts through the richness beautifully.
Scrambled Eggs or Quiche: For a more substantial brunch, add protein-rich dishes to balance the sweet pastries.
Yogurt Parfaits: Layer Greek yogurt with granola and berries for a lighter accompaniment.
Mimosas or Bellinis: For special occasions, sparkling wine cocktails add a celebratory touch to your brunch spread.
Smoked Salmon Platter: Create a full Danish-inspired spread with smoked salmon, capers, red onion, and cream cheese on bagels.
Hot Chocolate or Latte: Especially cozy during fall and winter mornings.
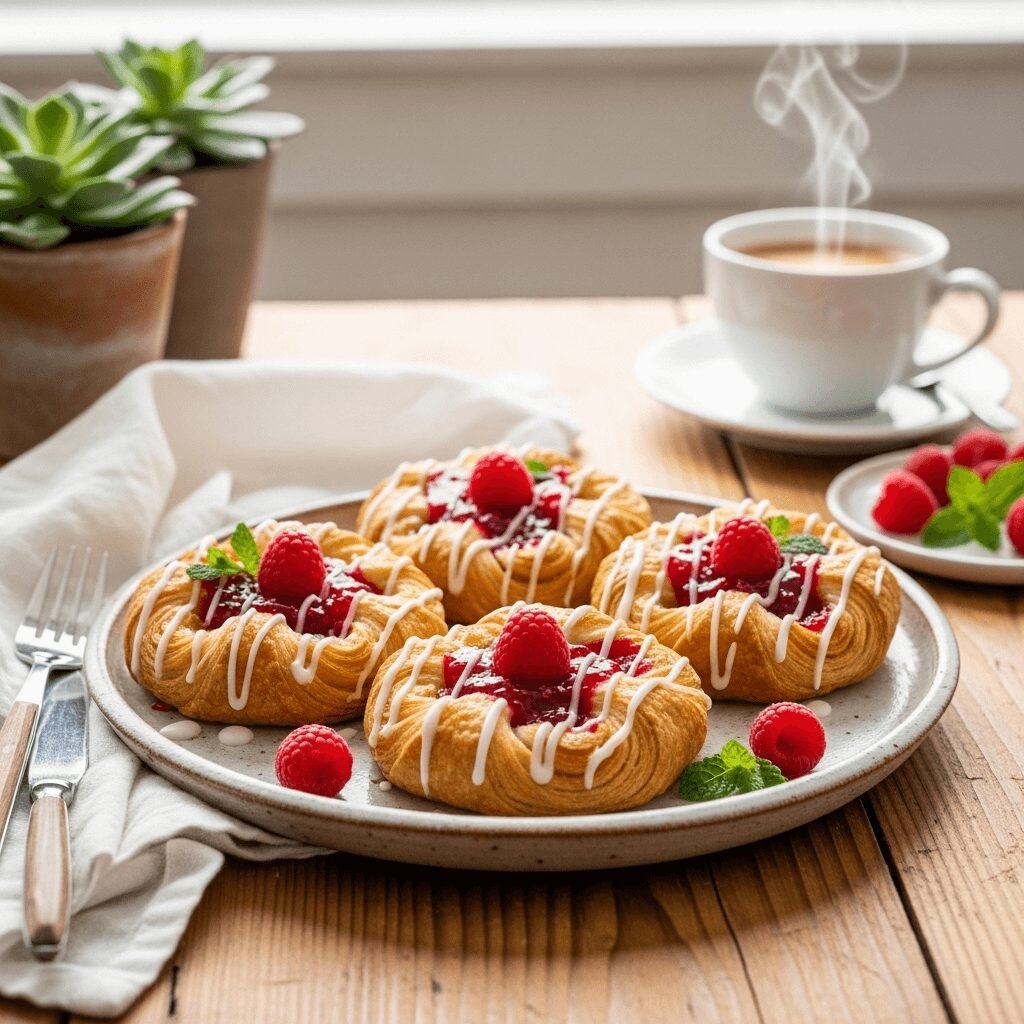
Presentation Ideas: Arrange pastries on a wooden board or cake stand, garnish with fresh berries and mint leaves, dust with powdered sugar, or serve on vintage china for an elegant tea party vibe.
FAQs Section
Q: Can I make Danish pastries without a stand mixer?
A: Absolutely! While a stand mixer makes the initial dough easier to prepare, you can easily mix and knead the dough by hand. It will take about 10-12 minutes of kneading to develop the gluten properly. The lamination process is all done by hand anyway, so a mixer is just a convenience for the first step.
Q: Why did my butter leak out during baking?
A: This typically happens when the butter got too warm during the lamination process and merged with the dough, or when the pastries weren’t given enough rise time before baking. Make sure to maintain cold temperatures throughout lamination and allow the full rise time so the gluten structure can support the butter layers.
Q: Can I use regular American butter instead of European butter?
A: Yes, you can, though your results won’t be quite as dramatic. American butter has a lower fat content and higher water content, which can make the layers slightly less crisp and defined. If using American butter, the recipe will still work—just expect a slightly different texture.
Q: How do I know when my pastries have proofed enough?
A: Properly proofed Danish pastries should look noticeably puffy and feel light and airy when you gently touch them. They should have increased in size by about 50%. If you press lightly with your finger, the indentation should slowly spring back. If they’re underproofed, they’ll be dense; if overproofed, they may collapse in the oven.
Q: My dough keeps shrinking back when I roll it. What am I doing wrong?
A: This means the gluten is too tight and needs more rest time. Pop the dough back in the refrigerator for 15-30 minutes to allow the gluten to relax, then try rolling again. This is especially common if you’re working in a warm kitchen or if you’ve done a lot of rolling without sufficient rest periods.
Q: Can I make the dough the night before and bake in the morning?
A: Yes! Complete all the lamination folds, wrap the dough tightly, and refrigerate overnight. In the morning, let the dough sit at room temperature for 10-15 minutes to take the chill off, then roll, shape, proof, and bake. Alternatively, you can shape the pastries the night before, cover them, refrigerate, and let them come to room temperature and complete their final rise in the morning before baking.
Q: What’s the difference between Danish pastries, croissants, and puff pastry?
A: All three use lamination (creating butter layers), but they differ in composition. Danish pastry includes eggs and more sugar in the dough, making it richer and more bread-like than puff pastry, which contains only flour, butter, water, and salt. Croissants are similar to Danish but contain less sugar and egg, and are shaped differently. Danish pastries are the richest and most tender of the three.
Conclusion
Making Danish pastries from scratch is truly a labor of love, but the results are absolutely spectacular. There’s something deeply satisfying about creating those hundreds of delicate, buttery layers with your own hands, then watching them transform into golden, flaky works of art in your oven. The aroma that fills your kitchen is absolutely heavenly, and the taste—well, there’s simply nothing like it.
Yes, this recipe requires time and patience. Yes, you’ll need to plan ahead and refrigerate the dough multiple times. But I promise you, the process itself becomes meditative and enjoyable once you get the hang of it. And when you pull those gorgeous pastries from your oven and see your family’s faces light up, you’ll know it was absolutely worth every minute.
Whether you’re making these for a special holiday breakfast, a weekend brunch with friends, or just because you want to challenge yourself and learn a classic baking technique, these Danish pastries will not disappoint. They make stunning gifts, impressive brunch contributions, and will definitely earn you a reputation as an amazing baker among your friends and family.
So grab your rolling pin, clear your schedule for a relaxing baking session, and get ready to create something truly beautiful. Don’t forget to save this recipe to your Pinterest boards so you can find it easily the next time that Danish pastry craving hits! And when you make these, I’d absolutely love to see your results—share your photos and tag me so I can celebrate your baking triumph with you!
Happy baking, and may your layers be flaky and your butter forever cold! 🥐✨