Moist and Delicious Date Cake Recipe – A Classic Middle Eastern Dessert

There’s something absolutely magical about a perfectly moist date cake that melts in your mouth with every bite. This Date Cake recipe is a beloved dessert that combines the natural sweetness of dates with warm spices and a tender, pudding-like texture that’ll have everyone asking for seconds. Whether you’re hosting a dinner party, celebrating a special occasion, or simply craving something sweet and comforting, this date cake delivers every single time.
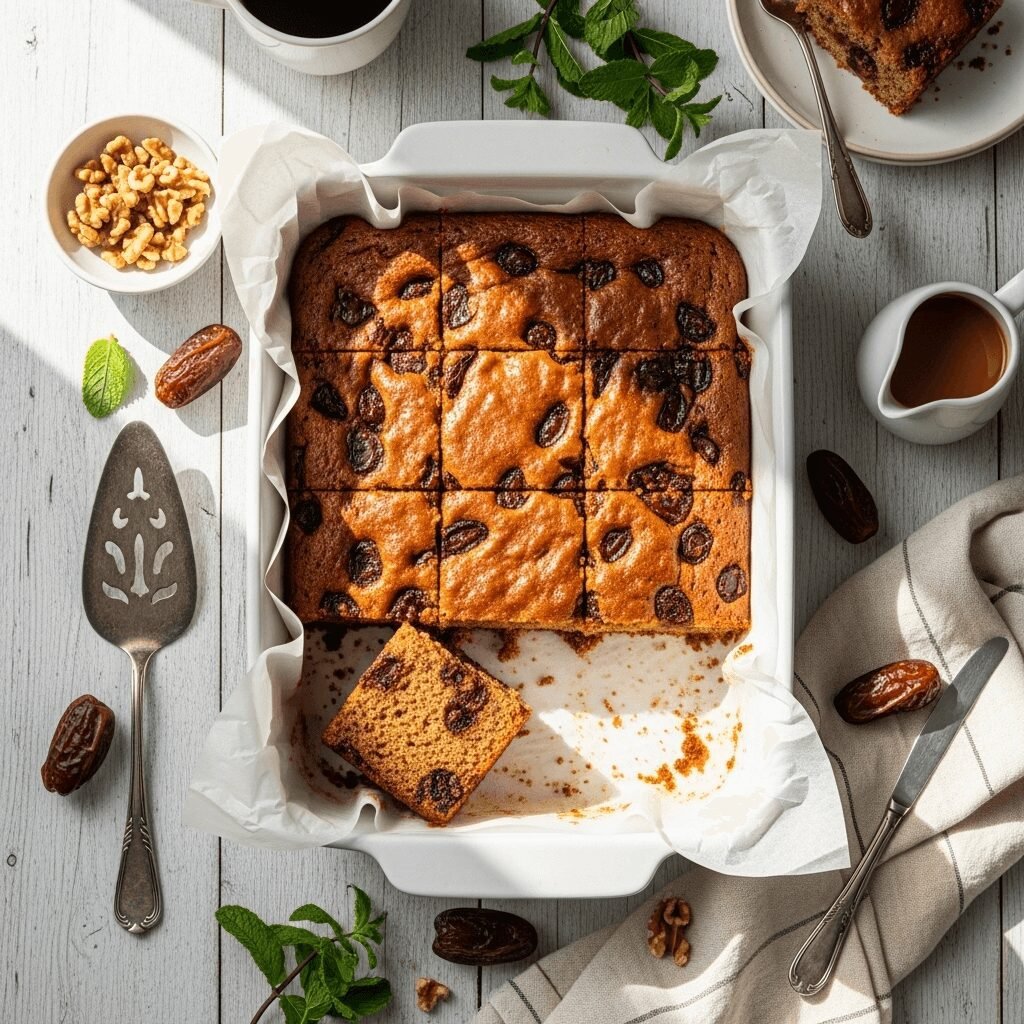
What makes this recipe truly special is how the dates transform during baking – they become incredibly soft and almost caramelized, creating pockets of intense sweetness throughout the cake. The addition of warm spices like cinnamon and nutmeg brings depth, while a hint of vanilla rounds out the flavors beautifully. This isn’t just any cake; it’s a conversation starter, a memory maker, and quite possibly the easiest impressive dessert you’ll ever make.
Perfect for autumn gatherings, holiday celebrations, or cozy weekend baking sessions, this date cake pairs wonderfully with a hot cup of tea or coffee. It’s substantial enough to serve as a dessert yet not so heavy that you’ll feel weighed down. Plus, it stays moist for days, making it an excellent make-ahead option for busy hosts.
History / Background
Date cake has deep roots in Middle Eastern and North African cuisine, where dates have been cultivated for thousands of years and hold significant cultural importance. The date palm is often called the “tree of life” in these regions, providing not just fruit but also materials for shelter, baskets, and rope. Dates were one of the earliest cultivated fruits, with evidence of date cultivation dating back to ancient Mesopotamia around 4000 BCE.
The transition of date-based desserts to Western cuisine happened gradually through trade routes and cultural exchange. British colonialism in the Middle East during the 19th and early 20th centuries introduced British bakers to the wonderful possibilities of cooking with dates. The classic sticky toffee pudding, now considered quintessentially British, is actually believed to have been inspired by Middle Eastern date cakes.
In America, date cakes gained popularity in the early 1900s, particularly in California where date palms were successfully cultivated in the Coachella Valley. The region became known as the “Date Capital of America,” and local cooks began incorporating dates into traditional American baking recipes. During World War II, when sugar was rationed, dates became an even more valuable ingredient due to their natural sweetness.
Today, date cake represents a beautiful fusion of cultures – it honors ancient Middle Eastern traditions while embracing Western baking techniques. The version we’re sharing today is an Americanized take that maintains the essence of traditional date cakes while making them accessible to modern home bakers with readily available ingredients.
Why You’ll Love This Recipe
This date cake is about to become your new favorite dessert, and I’m not exaggerating! The combination of simplicity and impressive results makes this recipe absolutely irresistible for home bakers of all skill levels.
Here’s why this recipe is a winner:
- Incredibly moist texture – The dates and their soaking liquid create an almost pudding-like consistency that stays fresh for days
- Naturally sweetened – Dates provide natural sweetness, meaning you need less refined sugar than traditional cakes
- Simple ingredients – No fancy or hard-to-find ingredients required; most items are probably already in your pantry
- Foolproof method – Even beginner bakers get perfect results every time with clear, straightforward instructions
- Make-ahead friendly – Actually tastes better the next day, making it perfect for stress-free entertaining
- Crowd-pleaser – Appeals to both kids and adults, and those who claim they “don’t like dates” often change their minds
- Versatile serving options – Delicious on its own, with whipped cream, vanilla ice cream, or drizzled with caramel sauce
- Budget-friendly – Uses affordable ingredients that don’t break the bank
- Perfect any season – While especially cozy in fall and winter, this cake works beautifully year-round
- Healthier dessert option – Packed with fiber from dates and uses less refined sugar than typical cakes
Ingredient Notes
Understanding your ingredients is the key to baking success, so let’s break down what makes this date cake so special:
Dates (Medjool or Deglet Noor): The star of the show! Medjool dates are larger, softer, and sweeter with a caramel-like flavor, while Deglet Noor dates are slightly firmer with a more subtle sweetness. Either works beautifully. Make sure to remove all pits before chopping. If your dates are very dry, soak them a bit longer in the boiling water.
Baking Soda: This reacts with the dates to create a tender, moist crumb. Don’t skip it or substitute with baking powder – they’re not interchangeable in this recipe.
Boiling Water: Essential for softening the dates and activating the baking soda. This creates that signature pudding-like texture.
All-Purpose Flour: Provides structure to the cake. You can substitute with a 1:1 gluten-free baking flour if needed, though the texture will be slightly different.
Butter (Unsalted): Adds richness and flavor. Room temperature butter creams better with sugar. Can substitute with coconut oil for a dairy-free version.
Brown Sugar: Creates moisture and adds a subtle molasses flavor that complements the dates perfectly. Light or dark brown sugar both work.
Eggs: Bind everything together and add structure. Use room temperature eggs for best results.
Vanilla Extract: Enhances all the other flavors. Pure vanilla extract is preferred over imitation.
Cinnamon & Nutmeg: Warm spices that complement the dates beautifully. Freshly ground spices provide the most intense flavor.
Salt: Don’t skip this! It balances the sweetness and enhances all the other flavors.
Walnuts or Pecans (Optional): Add wonderful texture and nutty flavor. Toast them first for even more depth.
Equipment Needed
Having the right tools makes baking so much easier! Here’s what you’ll need for this date cake:
- 9×13-inch baking pan (or 9-inch square pan for a thicker cake)
- Medium saucepan for boiling water and softening dates
- Large mixing bowl for combining wet and dry ingredients
- Electric mixer (hand mixer or stand mixer) for creaming butter and sugar
- Wooden spoon or spatula for folding ingredients
- Sharp knife and cutting board for chopping dates
- Measuring cups and spoons for accurate measurements
- Wire cooling rack to cool the cake properly
- Parchment paper (optional but recommended) for easy removal
- Fine mesh strainer for sifting dry ingredients
- Whisk for combining dry ingredients
- Toothpick or cake tester to check for doneness
Date Cake Recipe

This incredibly moist Date Cake combines chopped dates with warm spices and a tender crumb for an irresistible dessert. Perfect for holidays, special occasions, or whenever you’re craving something sweet and comforting. The dates create a naturally sweet, pudding-like texture that stays fresh for days.
- Prep Time: 20 minutes
- Cook Time: 35-40 minutes
- Total Time: 55-60 minutes (plus cooling time)
- Yield: 12 servings 1x
- Category: Dessert
- Method: Baking
- Cuisine: Middle Eastern-American Fusion
- Diet: Vegetarian
Ingredients
For the Date Mixture:
- 1½ cups (250g) pitted dates, chopped
- 1¼ cups boiling water
- 1 teaspoon baking soda
For the Cake:
- 1¾ cups (220g) all-purpose flour
- 1 teaspoon baking powder
- ½ teaspoon ground cinnamon
- ¼ teaspoon ground nutmeg
- ¼ teaspoon salt
- 6 tablespoons (85g) unsalted butter, room temperature
- ¾ cup (150g) packed brown sugar
- 2 large eggs, room temperature
- 1 teaspoon pure vanilla extract
- ¾ cup (90g) chopped walnuts or pecans (optional)
For the Optional Toffee Sauce:
- ½ cup (115g) butter
- ¾ cup (150g) brown sugar
- ¾ cup (180ml) heavy cream
- 1 teaspoon vanilla extract
- Pinch of salt
Instructions
Step 1: Prepare the Dates Preheat your oven to 350°F (175°C). Grease and line a 9×13-inch baking pan with parchment paper, leaving an overhang on the sides for easy removal. Place the chopped dates in a medium bowl, add the baking soda, then pour the boiling water over them. Stir gently and let this mixture sit for 15-20 minutes while the dates soften and absorb the liquid. The mixture will look thick and slightly darker.
Step 2: Mix Dry Ingredients While the dates are soaking, whisk together the flour, baking powder, cinnamon, nutmeg, and salt in a medium bowl. Set this aside – having your dry ingredients ready to go makes the process much smoother.
Step 3: Cream Butter and Sugar In a large mixing bowl, beat the softened butter and brown sugar together using an electric mixer on medium speed for about 3-4 minutes until the mixture is light and fluffy. This step incorporates air and creates a tender crumb, so don’t rush it!
Step 4: Add Eggs and Vanilla Add the eggs one at a time to the butter mixture, beating well after each addition. The mixture might look slightly curdled at first, but that’s completely normal. Stir in the vanilla extract until everything is well combined.
Step 5: Combine Everything Mash the date mixture slightly with a fork (it doesn’t need to be smooth – some chunks are perfect). Add half of the flour mixture to the butter mixture and stir gently with a wooden spoon or spatula. Add half of the date mixture, then repeat with the remaining flour and dates. Fold everything together until just combined – don’t overmix, as this can make the cake tough. If using nuts, fold them in now.
Step 6: Bake Pour the batter into your prepared pan and spread it evenly with a spatula. Bake for 35-40 minutes, or until a toothpick inserted into the center comes out with just a few moist crumbs (not wet batter). The top should be golden brown and spring back when lightly pressed.
Step 7: Cool and Serve Let the cake cool in the pan for 15 minutes, then use the parchment paper overhang to lift it onto a wire rack. Serve warm or at room temperature, plain or with your favorite toppings.
Step 8: Make Optional Toffee Sauce (If Desired) Combine butter and brown sugar in a saucepan over medium heat, stirring until melted. Add cream and bring to a gentle boil. Cook for 3-4 minutes, stirring constantly, until slightly thickened. Remove from heat and stir in vanilla and salt. Drizzle warm over cake slices.
Notes
- Date Selection: Medjool dates create a richer, more caramel-like flavor, while Deglet Noor dates are slightly less sweet. Both work beautifully.
- Mashing Dates: Don’t worry about mashing the dates perfectly smooth – some texture is desirable and adds character to the cake.
- Pan Size: Using a 9-inch square pan will give you a thicker cake that takes 5-7 minutes longer to bake.
- Testing for Doneness: The cake should be moist but not gummy. A few crumbs on the toothpick are perfect.
- Flavor Development: This cake actually tastes better the day after baking as the flavors meld together.
Nutrition
- Serving Size: 1 slice (1/12 of cake without sauce)
- Calories: 285
- Sugar: 32g
- Sodium: 180mg
- Fat: 11g
- Saturated Fat: 5g
- Unsaturated Fat: 5g
- Trans Fat: 0g
- Carbohydrates: 45g
- Fiber: 3g
- Protein: 4g
- Cholesterol: 55mg
Note: Nutrition information is approximate and will vary based on specific ingredients used and portion sizes.
Tips & Variations
Flavor Variations:
- Chocolate Chip Date Cake: Fold in 1 cup of semi-sweet chocolate chips for a decadent twist
- Orange Date Cake: Add 2 tablespoons of orange zest and replace vanilla with orange extract
- Coconut Date Cake: Fold in ¾ cup shredded coconut and top with toasted coconut flakes
- Spiced Date Cake: Increase cinnamon to 1½ teaspoons and add ¼ teaspoon cardamom and ground ginger
Dietary Modifications:
- Gluten-Free: Use a 1:1 gluten-free baking flour blend
- Dairy-Free: Replace butter with coconut oil and serve without cream-based toppings
- Vegan: Use flax eggs (2 tablespoons flaxseed meal + 6 tablespoons water) and vegan butter
- Lower Sugar: Reduce brown sugar to ½ cup – the dates provide plenty of natural sweetness
Texture Tweaks:
- For an even moister cake, add ¼ cup of Greek yogurt to the batter
- For a denser, more pudding-like texture, use 2 cups of dates instead of 1½ cups
- For a lighter crumb, separate the eggs and fold in the whipped egg whites at the end
Pro Chef Tips
Temperature Matters: Room temperature ingredients blend together more easily and create a smoother batter with better rise. Take your eggs and butter out 30-60 minutes before baking.
Don’t Skip the Soak: Allowing the dates to soak in the boiling water with baking soda is crucial. This process softens the dates and begins breaking down their fibers, creating that signature sticky, moist texture. Rushing this step will result in a drier cake.
Master the Cream: When creaming butter and sugar, you want to see the mixture lighten in color and increase in volume. This takes a full 3-4 minutes. This process creates air pockets that make your cake tender and light despite the heavy dates.
The Gentle Fold: Once you add the flour, switch from your mixer to a spatula and fold gently. Overmixing develops gluten, which creates a tough, dense cake. Mix only until you can’t see dry flour streaks.
Oven Hot Spots: Rotate your pan halfway through baking if your oven has hot spots. This ensures even browning and consistent texture throughout the cake.
The Toothpick Test: When testing for doneness, a few moist crumbs clinging to the toothpick are perfect. If it comes out completely clean, the cake is actually slightly overbaked.
Cooling Strategy: While it’s tempting to cut into a warm cake, letting it cool for at least 15 minutes allows the structure to set properly. Cutting too soon can make the cake fall apart.
Common Mistakes to Avoid
Using Old, Dried-Out Dates: Dates that are rock-hard and dried out won’t soften properly even with soaking. Look for dates that are slightly soft and pliable. If your dates are very dry, soak them for an extra 10 minutes and add 2 tablespoons more water.
Undermixing the Butter and Sugar: This is one case where you can’t overmix! If you don’t cream the butter and sugar long enough, your cake will be dense instead of tender. Set a timer for 3-4 minutes and let your mixer do its work.
Overmixing After Adding Flour: The opposite problem happens once flour is involved. Overmixing develops gluten strands that create a tough, chewy texture. Mix only until ingredients are just combined.
Incorrect Oven Temperature: An oven that’s too hot will brown the outside before the inside cooks, while too cool creates a gummy texture. Use an oven thermometer to ensure accuracy – most home ovens are off by 25°F or more.
Cutting the Cake Too Soon: I know the smell is intoxicating, but patience pays off! Cutting into a hot cake causes it to fall apart and lose moisture through steam. Wait at least 15 minutes, or better yet, let it cool completely for the cleanest slices.
Storage & Meal Prep
Room Temperature Storage: This date cake actually improves with time! Store it covered tightly with plastic wrap or in an airtight container at room temperature for up to 4 days. The flavors deepen and the texture becomes even more moist as it sits.
Refrigerator Storage: If your kitchen is warm or humid, store the cake in the refrigerator for up to 1 week. Bring slices to room temperature before serving, or warm them slightly in the microwave for 15-20 seconds for that fresh-baked taste.
Individual Portions: Cut the cake into individual slices and wrap each one separately in plastic wrap. This makes it easy to grab a quick dessert or pack in lunchboxes throughout the week.
Reheating Tips: Microwave individual slices for 15-20 seconds to enjoy warm cake. For the whole cake, warm it covered with foil in a 300°F oven for 10-15 minutes. This brings back that just-baked texture beautifully.
Keeping It Moist: If you notice the edges drying out, brush them lightly with simple syrup (equal parts sugar and water, heated until dissolved) or warm milk before covering. This revives any dry spots instantly.
Make-Ahead & Freezer Notes
Make-Ahead Baking: This cake is an excellent make-ahead dessert! Bake it 1-2 days before you need it and store at room temperature. The flavors actually improve and the texture becomes even more tender as it rests. Just wait to add any toppings or sauce until ready to serve.
Freezing the Whole Cake: Cool the cake completely, wrap it tightly in plastic wrap (two layers), then wrap again in aluminum foil. Label with the date and freeze for up to 3 months. Thaw overnight in the refrigerator, still wrapped, then bring to room temperature before serving.
Freezing Individual Slices: Cut the cake into portions, wrap each slice individually in plastic wrap, then place all wrapped slices in a freezer-safe bag or container. This is perfect for portioning control and quick individual servings. Slices thaw in about 30 minutes at room temperature or can be microwaved from frozen for 30-45 seconds.
Freezing Unbaked Batter: While not traditional, you can freeze the batter in the pan, wrapped tightly, for up to 1 month. Bake directly from frozen, adding 10-15 extra minutes to the baking time. Note that the texture may be slightly denser than fresh batter.
Best Reheating from Frozen: For the best texture, thaw frozen cake overnight in the refrigerator, then warm individual slices in the microwave for 15-20 seconds or the whole cake in a 300°F oven for 15-20 minutes.
Sauce Considerations: If making the toffee sauce, prepare it fresh rather than freezing with the cake. The sauce stores separately in the refrigerator for up to 1 week and reheats beautifully in the microwave or on the stovetop.
Serving Suggestions
This versatile date cake shines on its own but becomes absolutely spectacular with the right accompaniments! Here are some delicious ways to serve it:
Classic Pairings:
- Warm cake with a generous scoop of vanilla ice cream melting over the top
- A dollop of freshly whipped cream with a sprinkle of cinnamon
- Drizzle with warm toffee sauce or caramel sauce for ultimate decadence
- Serve with a side of crème anglaise or vanilla custard
Beverage Pairings:
- Strong black coffee or espresso to balance the sweetness
- Chai tea or spiced tea that echoes the cake’s warm spices
- Dessert wine like tawny port or cream sherry
- Hot apple cider during fall and winter months
Breakfast or Brunch:
- Serve slightly warm with Greek yogurt and fresh berries
- Pair with cream cheese frosting for a coffee cake experience
- Toast leftover slices and spread with butter for breakfast
Elegant Presentation Ideas:
- Dust with powdered sugar and garnish with fresh mint
- Top with candied walnuts or pecans for added crunch
- Serve on a pool of caramel sauce with sea salt flakes
- Add a quenelle of mascarpone cream for an Italian twist
Side Dishes:
- Fresh fruit salad with citrus to cut through the richness
- Light green salad with vinaigrette after a heavy meal
- Cheese board featuring aged cheddar or blue cheese for contrast
FAQs Section
Q: Can I use date paste instead of whole dates? A: Yes! You can substitute 1 cup of date paste for the chopped dates. Mix it with the boiling water and baking soda, and you may need to stir more vigorously to incorporate everything smoothly. The texture will be slightly more uniform throughout the cake.
Q: Why is baking soda mixed with the dates instead of with the flour? A: The baking soda reacts with the natural acids in the dates, helping to break down their fibers and creating that signature tender, pudding-like texture. It also slightly darkens the dates, creating a richer color and deeper flavor. This is a traditional technique that makes a significant difference in the final result.
Q: My dates are very dry and hard. Can I still use them? A: Absolutely! Just soak them longer – about 30 minutes instead of 15-20 minutes. You can also add an extra ¼ cup of boiling water to help soften them. If they’re extremely dried out, consider simmering them in the water for 5 minutes before adding the baking soda.
Q: Can I make this cake in a Bundt pan? A: Yes, a Bundt pan works beautifully! Grease and flour the pan very well (or use baking spray with flour). The baking time will increase to about 45-50 minutes. Check for doneness by inserting a long skewer into the center. Let it cool in the pan for 15 minutes before inverting onto a wire rack.
Q: Is this cake supposed to be this moist, or did I underbake it? A: This cake is intentionally very moist – almost pudding-like in texture, especially in the center. If a toothpick comes out with a few moist crumbs but no liquid batter, it’s perfectly done. This isn’t a fluffy American-style cake; it’s meant to be dense and sticky.
Q: Can I reduce the sugar since dates are naturally sweet? A: Yes, you can reduce the brown sugar to ½ cup if you prefer a less sweet cake. However, the brown sugar contributes to moisture as well as sweetness, so the cake may be slightly drier. I recommend trying the recipe as written first to see if you find it too sweet.
Q: How do I prevent the nuts from sinking to the bottom? A: Toss the chopped nuts in 1 tablespoon of flour before folding them into the batter. This light coating helps them stay suspended throughout the cake rather than sinking. Also, make sure your batter is thick enough – if it’s too thin, nuts will sink regardless.
Q: Can I make this without eggs? A: Yes, for a vegan version, use flax eggs (2 tablespoons ground flaxseed mixed with 6 tablespoons water, let sit 10 minutes) or commercial egg replacer. The texture will be slightly denser but still delicious. Add an extra ¼ teaspoon of baking powder to help with rise.
Conclusion
There you have it – a thoroughly tested, absolutely foolproof date cake recipe that’s about to become your new favorite dessert! This cake represents the perfect marriage of ancient culinary traditions and modern baking techniques, bringing the rich flavors of Middle Eastern date desserts to your American kitchen.
What I love most about this recipe is how it makes you look like a baking superstar with minimal effort. The ingredients are simple, the method is straightforward, and the results are consistently spectacular. Whether you’re serving it to impressed dinner guests, bringing it to a potluck, or simply treating yourself on a cozy evening, this date cake delivers comfort and sophistication in equal measure.
The beauty of this cake extends beyond just the day you bake it. It improves with time, stores beautifully, freezes like a dream, and adapts wonderfully to your creative variations. It’s the kind of reliable recipe that becomes part of your regular rotation, the one people request by name, the one you’ll be making for years to come.
I’d absolutely love to hear about your experience making this date cake! Did you add your own creative twist? Serve it with a special sauce? Discover a new favorite way to enjoy it? Share your photos on Pinterest and tag them with #DateCakeRecipe so we can all admire your beautiful creations. And don’t forget to leave a comment below letting me know how it turned out – your feedback helps other bakers and brings so much joy to this little corner of the internet.
Happy baking, friends! May your kitchen smell amazing and your cake turn out perfectly moist and delicious. Now go preheat that oven and create some sweet memories! 🍰✨