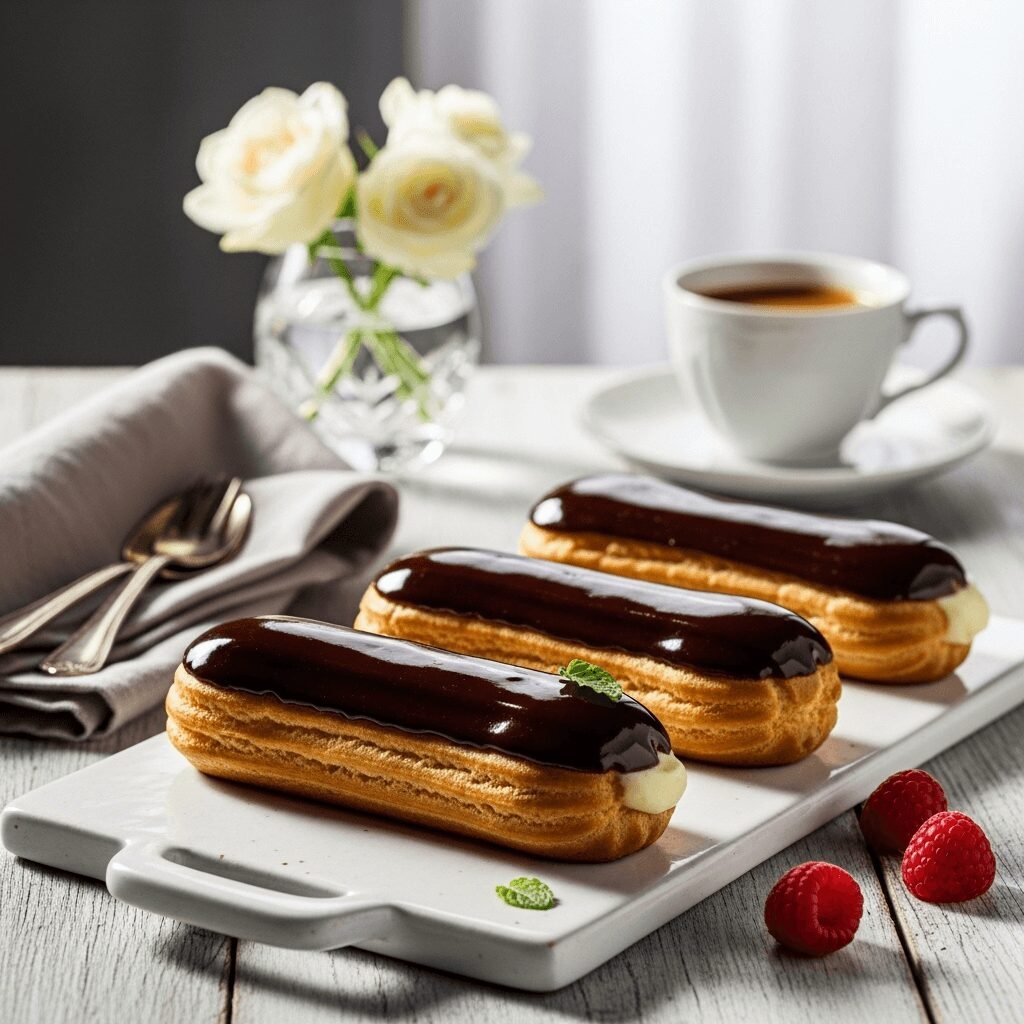
Perfect Homemade Eclairs Recipe – Light, Crispy, and Absolutely Divine!

There’s something truly magical about biting into a freshly made eclair—that delicate, crispy choux pastry shell gives way to smooth, luxurious cream, all topped with a glossy chocolate glaze that melts on your tongue. These elegant French pastries might look intimidating, but I’m here to tell you that making eclairs at home is not only possible, it’s actually incredibly rewarding!
Eclairs are the perfect dessert for special occasions like dinner parties, bridal showers, birthday celebrations, or whenever you want to impress your guests (or yourself!) with something extraordinary. They’re also wonderful for afternoon tea, holiday gatherings, or as a show-stopping finale to a romantic dinner. The best part? Once you master the basic technique, you’ll find yourself making these beauties again and again because they’re surprisingly straightforward to prepare.
While eclairs have a reputation for being fancy bakery fare, this recipe breaks down every step into manageable, confidence-building instructions. You’ll learn how to create that signature hollow pastry shell, make silky-smooth pastry cream, and achieve that beautiful chocolate glaze that makes eclairs so visually stunning. Whether you’re a seasoned baker or someone who’s always admired eclairs from afar, this recipe will guide you to delicious success.
History / Background
The eclair has a fascinating history that traces back to 19th-century France, where it emerged as one of the most celebrated creations of French patisserie. The word “éclair” literally means “lightning” in French, and there are several charming theories about how this elegant pastry got its name. Some culinary historians believe it’s called éclair because it’s eaten so quickly—in a flash, like lightning! Others suggest the name comes from the way the glossy chocolate glaze glistens and reflects light, resembling a flash of lightning.
The eclair as we know it today is believed to have been perfected by the legendary French chef Marie-Antoine Carême in the early 1800s, though similar pastries existed before his time. Carême, often considered the founder of French haute cuisine, elevated the simple choux pastry into an art form. The classic eclair was originally called “pain à la Duchesse” (Duchess bread) or “petite duchesse” before the name éclair became popular in the mid-19th century.
Choux pastry itself, the foundation of the eclair, has even older roots dating back to the 16th century. It was invented by Panterelli, the head chef of Catherine de Medici, and later refined by his apprentice Popelini. However, it wasn’t until the 19th century that French pastry chefs began filling these light, airy pastries with cream and topping them with chocolate.
Traditional French eclairs are filled with crème pâtissière (pastry cream) and topped with fondant icing, though chocolate ganache has become equally popular. Over the years, eclairs have evolved to include countless flavor variations—from coffee and caramel to pistachio and raspberry—but the classic vanilla cream with chocolate topping remains the most beloved version worldwide. Today, eclairs are found in patisseries across the globe and have become a symbol of French baking excellence, representing the perfect marriage of technique, flavor, and visual appeal.
Why You’ll Love This Recipe
This homemade eclair recipe is truly special because it demystifies a classic French pastry and makes it accessible to home bakers everywhere. I’ve tested and refined this recipe countless times to ensure you get bakery-quality results in your own kitchen, with clear instructions that eliminate the guesswork and build your confidence with each step.
Here’s why this recipe will become your go-to for impressive desserts:
- Easier than you think – The step-by-step instructions break down each component, making what seems complicated actually quite manageable, even for intermediate bakers
- Spectacular presentation – These eclairs look like they came straight from a French patisserie, guaranteed to wow your family and guests
- Make-ahead friendly – You can prepare components in advance, making party prep so much less stressful
- Customizable flavors – Once you master the basic technique, you can experiment with different fillings and toppings to create your own signature eclairs
- Fresher than store-bought – Homemade eclairs have an unbeatable texture and flavor that commercial versions simply can’t match—the pastry is crisper, the cream is silkier, and everything tastes more vibrant
- Perfect for special occasions – Whether it’s a birthday, anniversary, or holiday gathering, homemade eclairs show effort and care that makes any celebration more memorable
- Satisfying to master – There’s an incredible sense of accomplishment when you pull off a classic French pastry technique and see those beautiful golden shells emerge from the oven
Ingredient Notes
For the Choux Pastry:
- Water and Butter – The liquid and fat that create steam in the oven, causing the pastries to puff up. Use unsalted butter for better control over the final flavor, and make sure it’s fully melted into the water before adding flour.
- All-Purpose Flour – Provides structure to the pastry. It’s important to measure accurately (use the spoon-and-level method) to avoid dense pastries.
- Eggs – The key ingredient that gives choux pastry its rise and hollow interior. Room temperature eggs incorporate more easily. You’ll need about 4 large eggs, though you might not use all of the last egg—the dough should be smooth and fall slowly from the spoon.
- Sugar and Salt – Just a touch of sugar adds subtle sweetness, while salt enhances all the flavors.
For the Pastry Cream:
- Whole Milk – The base of your cream filling. Whole milk creates the richest, most luxurious texture, though you can use 2% in a pinch.
- Egg Yolks – These thicken the cream and give it that gorgeous golden color. Save those egg whites for meringues or an omelet!
- Granulated Sugar – Sweetens the cream and helps create that smooth, pudding-like consistency.
- Cornstarch – The thickening agent that gives pastry cream its structure. Some recipes use flour, but cornstarch creates a smoother, less starchy-tasting result.
- Vanilla Extract – Pure vanilla extract is essential here—it’s the star flavor, so don’t skimp! You can also use vanilla bean paste or scrape a real vanilla bean for extra elegance.
- Butter – A small amount added at the end gives the pastry cream a silky finish and rich mouthfeel.
For the Chocolate Glaze:
- Semi-Sweet Chocolate – Use good-quality chocolate chips or chopped chocolate bars. The better your chocolate, the better your glaze will taste.
- Heavy Cream – Creates a smooth, pourable ganache that sets to a beautiful glossy finish.
- Butter – Just a touch adds shine and helps the glaze set properly.
- Corn Syrup or Honey (optional) – A small amount keeps the glaze glossy even after it sets.
Possible Substitutions:
- For a lighter version, you can fill eclairs with whipped cream instead of pastry cream
- Use dark chocolate or milk chocolate for the glaze depending on your preference
- Make it gluten-free by using a 1:1 gluten-free flour blend (though texture may vary slightly)
- For dairy-free eclairs, use plant-based milk and butter, though results will differ from the classic version
Equipment Needed
Having the right tools makes the eclair-making process so much smoother. Here’s what you’ll need:
- Medium Saucepan – For cooking the choux pastry dough and heating the milk for pastry cream
- Wooden Spoon or Sturdy Spatula – Essential for stirring the choux dough as it cooks and comes together
- Mixing Bowls – Various sizes for different components
- Whisk – For making smooth, lump-free pastry cream
- Electric Mixer or Strong Arm – While not essential, a handheld or stand mixer makes incorporating eggs into the choux pastry much easier
- Baking Sheets – Two large, flat baking sheets for piping the eclair shells
- Parchment Paper or Silicone Baking Mats – Prevents sticking and ensures even baking
- Piping Bags – You’ll need at least two: one with a large round tip for piping the shells, and one with a small round tip for filling
- Piping Tips – A large round tip (about ½-inch) for shells and a small round tip (about ¼-inch) for filling
- Fine-Mesh Strainer – For straining the pastry cream to ensure it’s perfectly smooth
- Offset Spatula or Butter Knife – For spreading or dipping the chocolate glaze
- Cooling Rack – Allows air circulation around the baked shells for maximum crispness
- Kitchen Thermometer (optional but helpful) – Ensures your pastry cream reaches the proper temperature
Eclairs Recipe

These classic French eclairs feature light and crispy choux pastry shells filled with smooth vanilla pastry cream and topped with rich chocolate glaze. Bakery-quality results made easy at home!
- Prep Time: 45 minutes
- Cooling Time: 2 hours
- Cook Time: 35 minutes
- Total Time: 3 hours 20 minutes
- Yield: 12 eclairs 1x
Ingredients
Choux Pastry:
- 1 cup (240ml) water
- ½ cup (113g) unsalted butter, cut into pieces
- 1 tablespoon granulated sugar
- ¼ teaspoon salt
- 1 cup (125g) all-purpose flour
- 4 large eggs, room temperature
Vanilla Pastry Cream:
- 2 cups (480ml) whole milk
- 5 large egg yolks
- ½ cup (100g) granulated sugar
- ¼ cup (32g) cornstarch
- 2 tablespoons (28g) unsalted butter
- 2 teaspoons pure vanilla extract
- Pinch of salt
Chocolate Glaze:
- 4 ounces (113g) semi-sweet chocolate, chopped
- ½ cup (120ml) heavy cream
- 1 tablespoon unsalted butter
- 1 tablespoon light corn syrup (optional, for shine)
Instructions
Make the Pastry Cream (prepare first):
- In a medium saucepan, heat the milk over medium heat until it just begins to steam and small bubbles form around the edges. Don’t let it boil.
- While the milk heats, whisk together the egg yolks, sugar, cornstarch, and salt in a medium bowl until smooth and pale yellow.
- Once the milk is hot, slowly pour about half of it into the egg mixture while whisking constantly. This tempers the eggs and prevents them from scrambling.
- Pour the egg-milk mixture back into the saucepan with the remaining milk. Cook over medium heat, whisking constantly, until the mixture thickens significantly and comes to a gentle boil, about 2-3 minutes. It should coat the back of a spoon thickly.
- Remove from heat and whisk in the butter and vanilla extract until smooth. Strain the pastry cream through a fine-mesh strainer into a clean bowl to remove any lumps.
- Press plastic wrap directly onto the surface of the pastry cream to prevent a skin from forming. Refrigerate for at least 2 hours until completely chilled and set.
Make the Choux Pastry:
- Preheat your oven to 425°F (220°C). Line two baking sheets with parchment paper or silicone baking mats. If you like, you can draw guidelines on the parchment (4-inch lines spaced 2 inches apart) to help pipe uniform eclairs.
- In a medium saucepan, combine the water, butter, sugar, and salt. Heat over medium-high heat until the butter melts completely and the mixture comes to a full rolling boil.
- Remove the pan from heat and add all the flour at once. Stir vigorously with a wooden spoon until the mixture forms a ball and pulls away from the sides of the pan.
- Return the pan to medium-low heat and cook, stirring constantly, for about 2 minutes. This dries out the dough slightly and cooks the flour, which helps create a better rise. The dough should look slightly glossy.
- Transfer the dough to a mixing bowl (or the bowl of your stand mixer). Let it cool for about 3-4 minutes—it should be warm but not hot to the touch.
- Add the eggs one at a time, beating well after each addition. The dough will look separated at first but will come together as you continue mixing. After adding 3 eggs, check the consistency. The dough should be smooth, glossy, and fall slowly from the spoon in a thick ribbon. If it’s still too stiff, beat the fourth egg in a separate bowl and add it gradually until you reach the right consistency. You might not need all of it.
Pipe and Bake:
- Transfer the choux pastry to a piping bag fitted with a large round tip (about ½-inch opening). Pipe 4-inch long strips onto your prepared baking sheets, spacing them about 2 inches apart. You should get about 12 eclairs.
- Use a damp finger to gently smooth any peaks or points on the piped dough—these can burn during baking.
- Bake at 425°F (220°C) for 15 minutes, then reduce the temperature to 375°F (190°C) without opening the oven door. Continue baking for another 15-20 minutes until the eclairs are deeply golden brown and feel light and hollow when picked up. Don’t underbake or they’ll collapse!
- Turn off the oven, crack the door slightly, and let the eclairs dry in the oven for 10 minutes. This helps ensure crispy shells.
- Remove from the oven and transfer to a cooling rack. Use a sharp knife to poke a small hole in each end of each eclair to let steam escape. Let cool completely.
Make the Chocolate Glaze:
- Place the chopped chocolate in a heatproof bowl. In a small saucepan, heat the heavy cream until it just begins to simmer.
- Pour the hot cream over the chocolate and let sit for 1 minute. Add the butter and corn syrup (if using), then whisk until completely smooth and glossy. Let cool slightly until it thickens to a dipping consistency, about 5-10 minutes.
Assemble the Eclairs:
- Once the pastry cream is chilled and the shells are completely cool, whisk the pastry cream until smooth. Transfer to a piping bag fitted with a small round tip.
- Insert the piping tip into one of the holes you poked in each eclair. Gently squeeze the pastry cream into the shell, moving from one end to the other. You’ll feel the eclair become heavier as it fills. Repeat with all eclairs.
- Dip the top of each filled eclair into the chocolate glaze, letting any excess drip off. Place on a rack or parchment paper to set.
- Let the chocolate set at room temperature for about 30 minutes, or refrigerate for 10-15 minutes for faster setting.
- Serve immediately for the crispest shells, or refrigerate until ready to serve (up to 4 hours ahead).
Notes
- Temperature matters: Room temperature eggs incorporate more smoothly into the choux pastry. Set them out 30 minutes before baking.
- Don’t open the oven: Opening the oven door during the first 30 minutes of baking can cause the eclairs to deflate. Resist the temptation!
- Texture check: Properly baked eclairs should be deeply golden and sound hollow when tapped. Pale eclairs will be soggy.
- Filling options: You can also fill eclairs with whipped cream, coffee-flavored pastry cream, chocolate pastry cream, or even ice cream for a frozen treat.
- Glaze alternatives: Instead of chocolate ganache, you can use chocolate fondant, coffee glaze, or caramel for different flavor profiles.
- Make it ahead: Unfilled eclair shells can be frozen for up to 1 month. Thaw and crisp in a 300°F oven for 5 minutes before filling.
Nutrition
- Serving Size: 1 eclair
- Calories: 285
- Sugar: 18g
- Sodium: 95mg
- Fat: 17g
- Saturated Fat: 10g
- Unsaturated Fat: 6g
- Trans Fat: 0g
- Carbohydrates: 28g
- Fiber: 1g
- Protein: 6g
- Cholesterol: 165mg
Tips & Variations
Flavor Variations:
- Coffee Eclairs: Add 2 tablespoons of instant espresso powder to the pastry cream for a sophisticated mocha flavor
- Chocolate Eclairs: Replace 2 tablespoons of cornstarch with 3 tablespoons of cocoa powder in the pastry cream
- Raspberry Eclairs: Fold ½ cup of raspberry puree into the finished pastry cream and top with white chocolate glaze
- Salted Caramel Eclairs: Fill with caramel pastry cream and drizzle with salted caramel instead of chocolate
- Pistachio Eclairs: Add pistachio paste to your pastry cream and top with a pistachio glaze
- Lemon Eclairs: Add lemon zest and lemon juice to your pastry cream for a bright, citrusy twist
Dietary Modifications:
- Lighter version: Use low-fat milk in the pastry cream and fill with stabilized whipped cream instead
- Smaller portions: Pipe mini eclairs (2 inches long) for party-sized treats—adjust baking time to 10 minutes at 425°F, then 10-12 minutes at 375°F
Creative Presentations:
- Drizzle white chocolate over the dark chocolate glaze for an elegant look
- Sprinkle with chopped nuts, coconut flakes, or edible flowers before the glaze sets
- Dust with powdered sugar for a simpler, rustic presentation
- Add a stripe of contrasting glaze down the center for bakery-style decoration
Pro Chef Tips
Temperature Control is Everything: The key to perfect choux pastry is proper heat management. When you first bring the water and butter to a boil, make sure it’s a vigorous, rolling boil before adding flour. This ensures enough steam develops to create those hollow shells. Conversely, let the dough cool slightly before adding eggs, or they’ll cook instead of incorporating smoothly.
The “Ribbon Test” Never Fails: When determining if your choux pastry has the right consistency, lift your spoon and let the dough fall back into the bowl. It should form a thick, slow-moving ribbon that holds its shape for a few seconds before settling. If it’s too stiff and holds peaks, add more egg. If it’s too loose and runs quickly, you’ve added too much liquid and might need to start over.
Dry Your Dough on the Stove: After adding the flour and forming a ball, return the pan to low heat and stir for 1-2 minutes. You’ll see a thin film form on the bottom of the pan—this is exactly what you want! This step removes excess moisture and helps create a more stable dough that puffs better.
Pierce and Dry for Maximum Crispness: Professional pastry chefs always pierce their eclairs and let them dry in a cooling oven. Those small holes allow trapped steam to escape instead of making the shells soggy from the inside. The 10-minute rest with the oven door cracked is crucial for maintaining that signature crispy texture.
Strain Your Pastry Cream: Even experienced bakers get a few lumps in pastry cream occasionally. Straining through a fine-mesh sieve ensures silky-smooth results every time and removes any bits of cooked egg that might have formed.
Glaze Temperature Matters: Your chocolate glaze should be warm enough to flow smoothly but not so hot that it runs off the eclairs. The perfect temperature is around 90-95°F (32-35°C)—it should coat the back of a spoon but still drip slowly. If it gets too thick, warm it gently over a water bath.
Use the Weight Test: When checking if your eclairs are done baking, carefully pick one up (it’ll be hot, so use a towel). It should feel surprisingly light and hollow—much lighter than you’d expect from something that size. If it feels heavy or dense, it needs more time in the oven.
Common Mistakes to Avoid
Opening the Oven Door Too Early: This is the number one reason eclairs deflate! The first 30 minutes of baking are critical—the steam inside is creating the structure. Opening the door releases that steam and causes collapse. Always resist the urge to peek, no matter how tempting it is.
Underbaking the Shells: Pale, blonde eclairs might look done, but they’re not! They need to be deeply golden brown—almost looks like they might be too dark. Underbaked shells will seem crispy when they first come out but will turn soggy within 30 minutes as the moisture inside makes them soft. Trust the color more than the time.
Adding Eggs to Hot Dough: If your choux pastry is too hot when you add eggs, they’ll start to cook and you’ll end up with scrambled bits in your dough, which prevents proper rising. Always let the dough cool for 3-4 minutes until it’s just warm to the touch before adding eggs.
Not Piping Uniform Shapes: Eclairs that vary significantly in size will bake unevenly—some will be done while others are still raw. Take your time piping, and if you’re nervous, draw guidelines on the back of your parchment paper before flipping it over to pipe.
Filling Eclairs Too Early: If you fill eclairs while the shells are still warm or while the pastry cream isn’t fully chilled, the cream will thin out and make the shells soggy. Both components must be completely cool before assembly for the best texture and longest shelf life.
Storage & Meal Prep
Room Temperature: Filled eclairs are best eaten within 4-6 hours of assembly for optimal crispness. If your kitchen is cool and dry, they can sit at room temperature for 2-3 hours before serving. After that, the shells will begin to soften.
Refrigerator Storage: Store filled eclairs in an airtight container in the refrigerator for up to 24 hours. The shells will soften in the fridge, but they’ll still taste delicious—the texture just won’t be as crispy. Let them sit at room temperature for 10-15 minutes before serving for the best flavor.
Unfilled Shells: Baked, unfilled eclair shells can be stored in an airtight container at room temperature for 1-2 days. Before filling, refresh them in a 300°F (150°C) oven for 5 minutes to restore crispness, then let them cool completely.
Pastry Cream Storage: Homemade pastry cream keeps in the refrigerator for up to 3 days when stored in an airtight container with plastic wrap pressed directly on the surface. Always whisk it smooth before using, as it thickens significantly when chilled.
Chocolate Glaze: Leftover ganache can be refrigerated in an airtight container for up to 1 week. Rewarm gently in the microwave or over a double boiler, stirring until smooth before using.
Reheating Tips: If your eclairs have been refrigerated and the shells softened, you can place unfilled shells in a 300°F oven for 5 minutes to crisp them up again. Let cool, then fill and glaze as usual.
Make-Ahead & Freezer Notes
Advance Preparation Timeline:
- 3 Days Ahead: Make and refrigerate the pastry cream
- 1-2 Days Ahead: Bake the eclair shells and store at room temperature
- 1 Day Ahead: Make the chocolate glaze and refrigerate
- Day Of: Crisp the shells if needed, fill, and glaze 2-4 hours before serving
Freezing Unfilled Shells: Eclair shells freeze beautifully! Let them cool completely after baking, then place in a single layer in a freezer-safe container or bag, separating layers with parchment paper. Freeze for up to 1 month. To use, thaw at room temperature for 30 minutes, then crisp in a 300°F oven for 5-7 minutes. Cool completely before filling.
Freezing Filled Eclairs: While not ideal, you can freeze filled eclairs for up to 1 month. Freeze them on a baking sheet until solid, then transfer to a freezer container. Thaw in the refrigerator overnight. The texture won’t be quite as crispy as fresh, but they’re still delicious—almost like an ice cream sandwich!
Do Not Freeze: Pastry cream doesn’t freeze well on its own, as it can separate and become grainy when thawed. Always freeze it only when it’s already inside the eclair shells.
Best Reheating Method: For frozen unfilled shells, let them thaw at room temperature for about 30 minutes, then place in a 300°F (150°C) oven for 5-7 minutes to restore crispness. Let them cool completely to room temperature before filling—filling warm shells will make the pastry cream runny.
Party Planning Pro Tip: For stress-free entertaining, bake and freeze the shells up to a month ahead, make the pastry cream 2-3 days before, and assemble everything the morning of your event. Your eclairs will taste freshly made, and you’ll have minimal last-minute work!
Serving Suggestions
Eclairs are impressive enough to stand alone as dessert, but pairing them with complementary items can create a truly memorable experience:
Beverage Pairings:
- Coffee or Espresso: The classic accompaniment—the slightly bitter notes balance the sweet richness perfectly
- Champagne or Prosecco: For celebrations, sparkling wine cuts through the cream beautifully
- French Hot Chocolate: Double down on chocolate for an ultra-indulgent treat
- Earl Grey Tea: The bergamot notes complement vanilla pastry cream wonderfully
- Dessert Wine: A sweet Sauternes or late-harvest Riesling pairs beautifully with the chocolate glaze
Dessert Platters:
- Create a French pastry assortment with cream puffs, madeleines, and macarons
- Serve alongside fresh berries—strawberries, raspberries, and blueberries add brightness
- Add a small scoop of vanilla bean ice cream for an elegant plated dessert
- Include some delicate butter cookies or shortbread for textural variety
Special Occasion Ideas:
- Wedding or Baby Shower: Arrange mini eclairs on a tiered stand with fresh flowers
- Birthday Celebration: Make eclairs in different flavors and let guests choose their favorite
- Dinner Party Finale: Serve with espresso and a small glass of dessert wine
- Afternoon Tea: Present on elegant platters with finger sandwiches and scones
- Holiday Gatherings: Decorate with seasonal toppings like crushed peppermint or edible gold for Christmas
Plating Suggestions:
- Dust the plate with cocoa powder and add a mint sprig for restaurant-style presentation
- Drizzle with caramel or raspberry sauce for extra flavor and visual appeal
- Add a quenelle of whipped cream alongside each eclair
- Garnish with fresh berries and a light dusting of powdered sugar
FAQs Section
Q: Why did my eclairs deflate after baking?
A: Deflated eclairs usually mean they were either underbaked or the oven door was opened too early. The shells need to be deeply golden brown and completely set before you open the oven. The internal structure needs time to firm up, so never open the door during the first 30 minutes of baking. Also, make sure to pierce the shells to let steam escape as they cool.
Q: Can I make eclairs without a piping bag?
A: While a piping bag gives the most uniform results, you can use a ziplock bag with a corner cut off in a pinch. Cut about a ½-inch opening for piping the shells. Just know that your eclairs might not look quite as professional, but they’ll still taste amazing! For filling, you can also carefully slice the eclairs lengthwise and spoon in the pastry cream.
Q: My choux pastry dough is too thick/too thin. Can I fix it?
A: If your dough is too thick and won’t pipe smoothly, you can beat in a bit more beaten egg, a tablespoon at a time, until it reaches the right consistency (should fall from the spoon in a thick ribbon). If it’s too thin and runny, unfortunately there’s no easy fix—the ratios are off and you’ll likely get flat eclairs. This is why it’s crucial to add the fourth egg gradually and check consistency as you go.
Q: How do I know when my pastry cream is thick enough?
A: Your pastry cream is ready when it coats the back of a spoon thickly and you can draw a line through it with your finger that stays in place. It should also come to a gentle boil and bubble for at least 1-2 minutes to fully cook the cornstarch. If it’s not thick enough, it will be too runny to pipe and will leak out of the eclairs.
Q: Can I use store-bought pudding instead of making pastry cream?
A: While homemade pastry cream tastes significantly better, you can use instant vanilla pudding in a pinch. Prepare it according to package directions but use slightly less milk than called for to make it thicker. You can also fold in whipped cream to make it lighter and more luxurious. However, true pastry cream has a silkier texture and more complex flavor.
Q: Why is my chocolate glaze too thick or too runny?
A: The ratio of chocolate to cream determines the consistency. If your glaze is too thick, warm it slightly and stir in a tablespoon of heavy cream at a time until it reaches dipping consistency. If it’s too thin, let it cool longer—it will thicken as it sits. You can also refrigerate it for a few minutes, stirring occasionally, to speed up the thickening process.
Q: Can I make eclairs ahead of time for a party?
A: Absolutely! Bake the shells 1-2 days ahead and store at room temperature. Make the pastry cream up to 3 days ahead and refrigerate. Prepare the glaze 1 day ahead. On the day of your party, crisp the shells briefly in the oven if needed, then fill and glaze 2-4 hours before serving. This gives you maximum freshness while minimizing day-of stress.
Conclusion
There you have it—your complete guide to creating stunning, bakery-worthy eclairs right in your own kitchen! While eclairs might seem intimidating at first, I hope this detailed recipe has shown you that with the right techniques and a little patience, these elegant French pastries are absolutely achievable for home bakers.
The beauty of mastering eclairs is that once you’ve got the basic technique down, you can experiment endlessly with different flavors, fillings, and toppings. Maybe you’ll create a signature flavor combination that becomes your specialty, or perhaps you’ll stick with the classic vanilla and chocolate that never goes out of style. Either way, the joy on people’s faces when you serve homemade eclairs is absolutely priceless.
Remember, even if your first batch isn’t perfect, each attempt teaches you something new about working with choux pastry. The hollow shells, the glossy glaze, the creamy filling—every element comes together to create something truly special. And honestly, even “imperfect” eclairs taste absolutely delicious!
I’d love to hear about your eclair-making adventures! Did you try a different flavor combination? Did you discover any helpful tips along the way? Leave a comment below sharing your experience, and don’t forget to rate this recipe if you loved it. If you’re as excited about these eclairs as I am, please save this recipe to your Pinterest boards and share it with your fellow baking enthusiasts—let’s spread the joy of homemade French pastries together!
Happy baking, and may your eclairs always be crispy, creamy, and absolutely divine! 🥐✨