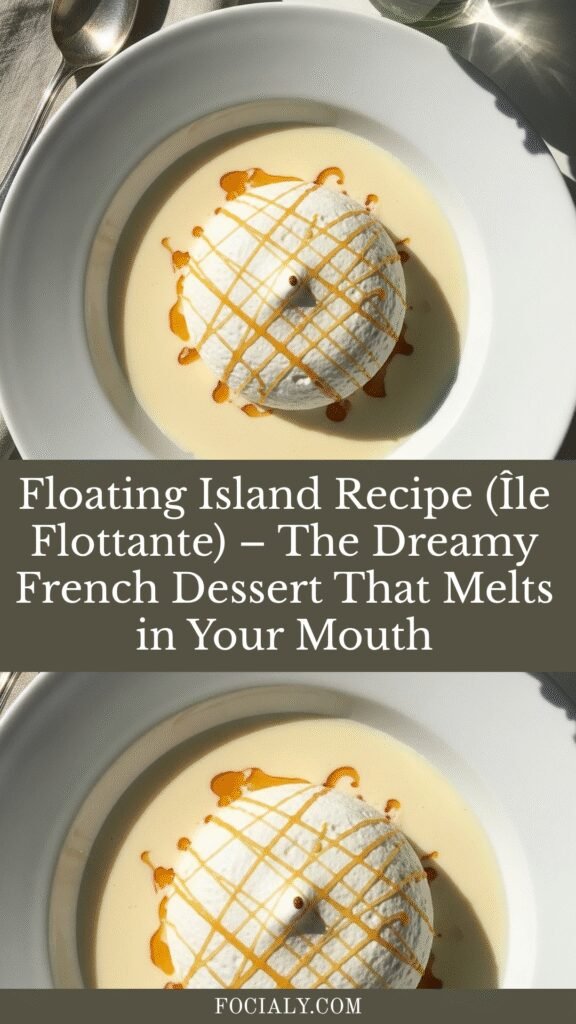
Floating Island Recipe (Île Flottante) – The Dreamy French Dessert That Melts in Your Mouth
There’s something truly magical about a dessert that looks like it belongs in a French patisserie window but comes together with just a handful of simple ingredients you probably already have in your kitchen. Floating Island, or Île Flottante as the French call it, is exactly that kind of showstopper – billowy clouds of soft meringue floating on a sea of silky vanilla custard, topped with threads of golden caramel that shatter delicately with each spoonful. This elegant dessert has been gracing French dinner tables for centuries, and once you taste it, you’ll understand why it’s stood the test of time.
Introduction to Floating Island
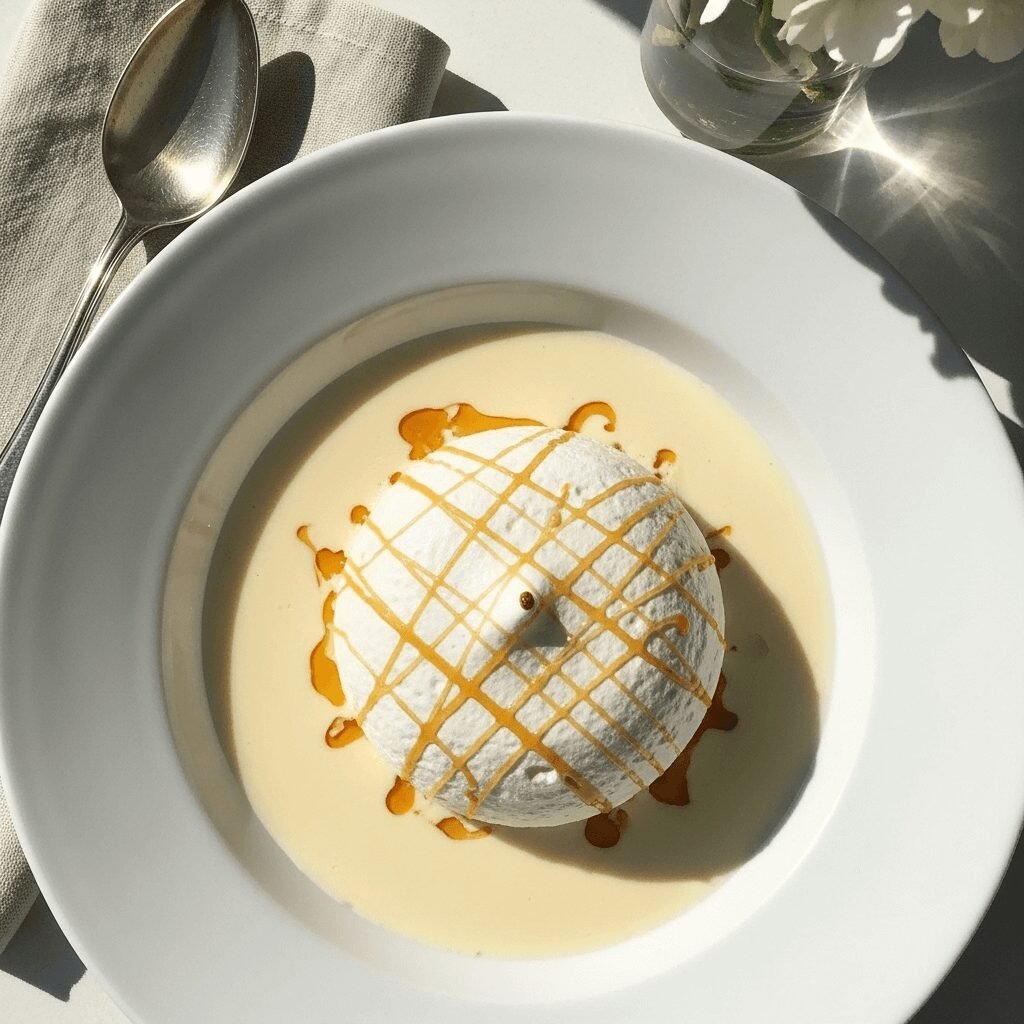
Floating Island is a classic French dessert that combines two beloved components: poached meringue and crème anglaise (vanilla custard sauce). The name perfectly describes what you see – ethereal white meringue “islands” literally floating atop a pool of rich, creamy custard. What makes this dessert so special is the contrast in textures: the meringue is impossibly light and airy with a slightly crispy exterior and marshmallow-soft interior, while the custard is smooth, velvety, and luxurious. It’s typically finished with delicate caramel threads or a drizzle of caramel sauce that adds a beautiful bittersweet note to balance the sweetness.
This is the kind of dessert you serve when you want to impress dinner guests without spending hours in the kitchen. It’s perfect for Easter celebrations, Mother’s Day brunches, anniversary dinners, or any special occasion where you want something that looks restaurant-quality but is surprisingly achievable at home. The French often serve it at Sunday family dinners and holiday gatherings, and it’s become increasingly popular in upscale restaurants across America. Despite its elegant appearance, Floating Island is actually quite forgiving and doesn’t require any special pastry skills – just a little patience and attention to detail.
History & Background of Floating Island
The origins of Floating Island trace back to 17th century France, where it was originally known as œufs à la neige (eggs in snow) or Île Flottante. Interestingly, food historians debate whether these were originally two different desserts that eventually merged into one. The earliest versions appeared in French cookbooks during the reign of Louis XIV, when elaborate desserts were all the rage at Versailles. Back then, resourceful French cooks were masters at transforming simple ingredients like eggs, milk, and sugar into spectacular creations that delighted the aristocracy.
The dessert gained widespread popularity throughout France during the 18th and 19th centuries, eventually becoming a staple in bistros and home kitchens alike. What’s fascinating is how this dessert democratized fine dining – it used inexpensive, accessible ingredients but delivered the kind of elegance usually reserved for expensive pastries. By the early 20th century, Île Flottante had become one of France’s most beloved traditional desserts, taught in culinary schools and featured prominently in classic French cookbooks like Larousse Gastronomique.
The dessert made its way across the Atlantic with French immigrants and became popular in New Orleans and other areas with strong French culinary influences. American adaptations sometimes include additions like toasted almonds, praline, or chocolate sauce, though purists insist the classic version with just meringue, custard, and caramel is perfection itself. Today, you’ll find variations of Floating Island in fine dining restaurants worldwide, but the traditional French version remains the gold standard – a testament to the timeless appeal of simple, perfectly executed techniques.
Why You’ll Love This Floating Island Recipe
This Floating Island recipe strikes the perfect balance between impressive presentation and achievable technique. While it might look like something only a trained pastry chef could create, the reality is that each component uses basic cooking methods that home cooks can absolutely master. The poached meringues are surprisingly forgiving, the custard comes together with gentle heat and patience, and the caramel requires just sugar and attention – no candy thermometer needed.
Here’s why this recipe deserves a spot in your dessert rotation:
- Elegant but Easy – Looks like you spent all day in the kitchen, but the actual hands-on time is under an hour
- Make-Ahead Friendly – Both the custard and meringues can be prepared in advance, making it perfect for entertaining
- Light Yet Indulgent – Feels luxurious without being heavy, making it the ideal ending to a rich meal
- Uses Basic Ingredients – Eggs, milk, sugar, and vanilla are likely already in your pantry
- Impressive Presentation – Your guests will think you’re a culinary genius when you serve this restaurant-quality dessert
- Naturally Gluten-Free – Perfect for those avoiding gluten without any special modifications needed
- Budget-Friendly Elegance – Costs just a few dollars to make but looks like a million bucks
- Teaches Essential Techniques – You’ll learn meringue-making, custard preparation, and caramel work all in one recipe
Ingredient Notes
Eggs – The star of this show! You’ll need to separate the yolks from the whites, so use fresh eggs at room temperature for the easiest separation. The yolks create the rich custard base while the whites transform into those beautiful meringue clouds. Don’t waste those extra yolks if you make larger meringues – save them for making pasta, mayonnaise, or hollandaise sauce.
Granulated Sugar – Used in both the meringue and custard, plus for the caramel topping. Regular white sugar works perfectly. The sugar in the meringue provides structure and sweetness, while in the custard it balances the richness of the cream and adds that classic sweet note.
Whole Milk – Creates the base for your crème anglaise. Whole milk gives you the best flavor and texture, though you can use 2% milk if that’s what you have on hand. Don’t use skim milk as it will result in a thin, less flavorful custard.
Heavy Cream – Adds richness and silky texture to the custard. This is what takes the custard from good to absolutely luxurious. You can reduce the cream and increase milk for a lighter version, but the traditional recipe uses cream for that signature velvety mouthfeel.
Vanilla Extract or Vanilla Bean – Essential for that classic French custard flavor. Pure vanilla extract works beautifully, but if you want to take it to the next level, scrape the seeds from a fresh vanilla bean into your milk mixture. You’ll see those gorgeous little black specks throughout your custard, and the flavor is incomparable.
Salt – Just a pinch enhances all the flavors and balances the sweetness. Never skip it!
Cream of Tartar – Stabilizes the egg whites and helps create perfect, glossy meringue peaks. If you don’t have it, you can substitute with an equal amount of lemon juice or white vinegar.
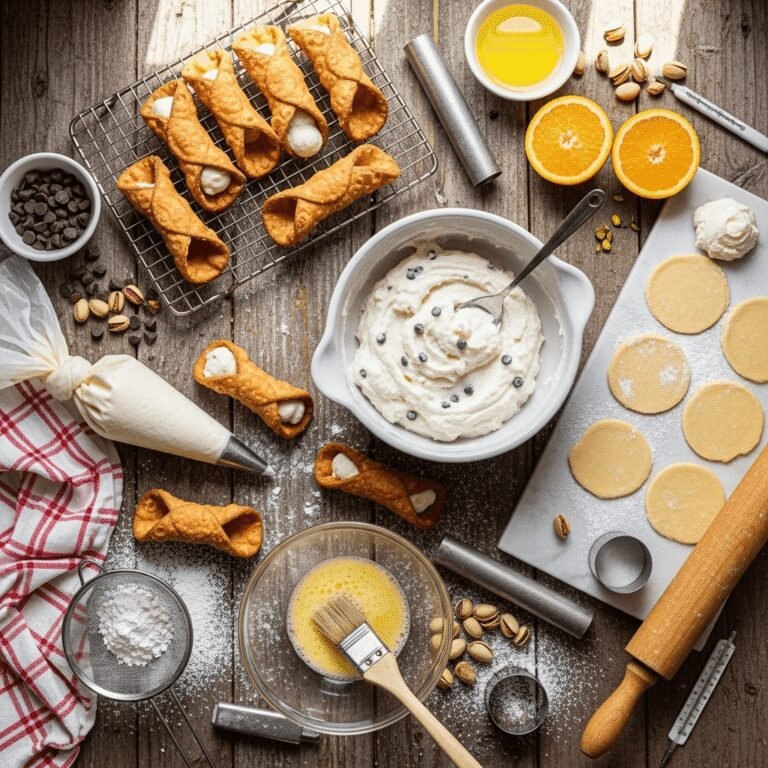
Equipment Needed
- Large mixing bowls (at least 2)
- Electric hand mixer or stand mixer with whisk attachment
- Medium-heavy saucepan for custard
- Large, wide skillet or sauté pan for poaching meringues
- Whisk (both balloon whisk and regular whisk)
- Fine-mesh strainer
- Rubber spatula
- Slotted spoon or large spoon
- Small saucepan for caramel
- Measuring cups and spoons
- Kitchen thermometer (optional but helpful)
- Serving bowls or dessert plates
- Clean kitchen towels or paper towels
Floating Island Recipe

Classic French Floating Island (Île Flottante) features pillowy poached meringue clouds floating on silky vanilla custard, finished with delicate caramel threads. This elegant dessert looks impressive but uses simple techniques and everyday ingredients to create a showstopping finale for any special meal.
- Prep Time: 30 minutes
- Cook Time: 30 minutes
- Total Time: 1 hour (plus chilling time)
- Yield: 6 servings 1x
- Category: Dessert
- Method: Stovetop, Poaching
- Cuisine: French
- Diet: Vegetarian
Ingredients
For the Crème Anglaise (Vanilla Custard):
- 2 cups whole milk
- 1 cup heavy cream
- 6 large egg yolks
- ⅔ cup granulated sugar
- 2 teaspoons pure vanilla extract
- Pinch of salt
For the Meringue Islands:
- 6 large egg whites (room temperature)
- ⅓ cup granulated sugar
- ¼ teaspoon cream of tartar
- Pinch of salt
- 1 teaspoon vanilla extract
For the Caramel:
- ¾ cup granulated sugar
- 3 tablespoons water
Instructions
Make the Crème Anglaise:
- Heat the milk and cream: In a medium saucepan, combine the whole milk and heavy cream. Heat over medium heat until small bubbles form around the edges and the mixture is steaming (about 180°F), but don’t let it boil. Remove from heat and set aside.
- Whisk the egg yolks: In a large mixing bowl, whisk together the egg yolks, ⅔ cup sugar, and salt until the mixture becomes pale yellow and slightly thickened, about 2-3 minutes. This creates the base of your custard.
- Temper the eggs: This is the crucial step! Slowly pour about ½ cup of the hot milk mixture into the egg yolks while whisking constantly. This gradually raises the temperature of the eggs without scrambling them. Continue adding the hot milk mixture in a slow, steady stream while whisking continuously until all the milk is incorporated.
- Cook the custard: Pour the entire mixture back into the saucepan. Cook over medium-low heat, stirring constantly with a wooden spoon or heatproof spatula, until the custard thickens enough to coat the back of the spoon (about 170-175°F on a thermometer). When you draw your finger across the back of the spoon, it should leave a clear line. This takes about 8-10 minutes. Don’t let it boil or the eggs will curdle!
- Strain and cool: Immediately remove from heat and strain the custard through a fine-mesh strainer into a clean bowl to remove any bits of cooked egg. Stir in the vanilla extract. Place plastic wrap directly on the surface of the custard to prevent a skin from forming. Refrigerate until completely chilled, at least 2 hours or overnight.
Prepare the Meringue Islands:
- Set up your poaching liquid: Fill a large, wide skillet or sauté pan with about 2 inches of water. Heat over medium-low heat until barely simmering – you want gentle, barely bubbling water, not a rolling boil.
- Beat the egg whites: In a spotlessly clean bowl (any trace of fat will prevent proper whipping), beat the egg whites with an electric mixer on medium speed until foamy. Add the cream of tartar and salt, then increase speed to medium-high and beat until soft peaks form.
- Add sugar gradually: With the mixer running, gradually add the ⅓ cup sugar one tablespoon at a time, beating well after each addition. Continue beating until stiff, glossy peaks form and the sugar is completely dissolved (rub a bit of meringue between your fingers – it should feel smooth, not gritty). Beat in the vanilla extract.
- Poach the meringues: Using two large spoons, shape the meringue into egg-shaped ovals (quenelles). Gently slide them into the barely simmering water. Don’t overcrowd – poach 3-4 at a time. Poach for 2 minutes, then carefully flip them over with a slotted spoon and poach for another 2 minutes. The meringues should puff up and feel slightly firm to the touch.
- Drain and cool: Remove the poached meringues with a slotted spoon and place them on a clean kitchen towel or paper towels to drain. Let them cool to room temperature. You can prepare these several hours ahead and refrigerate them on a parchment-lined plate.
Make the Caramel:
- Cook the sugar: In a small, heavy-bottomed saucepan, combine the ¾ cup sugar and 3 tablespoons water. Swirl gently to combine (don’t stir). Heat over medium-high heat without stirring until the sugar dissolves and the mixture begins to boil.
- Caramelize: Continue cooking, swirling the pan occasionally, until the sugar turns a deep amber color (this happens quickly once it starts to color, so watch carefully!). Remove from heat immediately when it reaches the right color – it will continue to cook from residual heat.
- Create caramel threads: Working quickly (caramel hardens fast!), dip a fork into the hot caramel and drizzle it back and forth over the meringues in thin threads. You can also drizzle caramel directly over each serving. Alternatively, let the caramel cool slightly until it’s thick and syrupy, then drizzle it over the assembled desserts.
Assemble the Floating Islands:
- Plate the dessert: Pour the chilled crème anglaise into shallow dessert bowls or deep plates, filling them about halfway. Gently place one or two meringue islands on top of the custard in each bowl.
- Finish with caramel: Drizzle the caramel threads over the meringues or create a decorative caramel design on top. Serve immediately for the best texture contrast, or refrigerate for up to 2 hours before serving.
Notes
- Temperature control is key: The custard must cook low and slow to avoid curdling. If you see any signs of curdling, immediately remove from heat and strain through a fine sieve.
- Meringue texture: The poaching water should be at a bare simmer, not a rolling boil, or the meringues will fall apart.
- Caramel safety: Hot caramel can cause serious burns. Be extremely careful and keep children away from the stove during this step.
- Make it ahead: Both components can be made a day in advance and assembled just before serving for the freshest presentation.
- Size flexibility: You can make 6 large meringue islands or 12 smaller ones depending on your preference.
Nutrition
- Serving Size: 1 dessert (with custard and meringue)
- Calories: 385
- Sugar: 52g
- Sodium: 145mg
- Fat: 16g
- Saturated Fat: 9g
- Unsaturated Fat: 6g
- Trans Fat: 0g
- Carbohydrates: 55g
- Fiber: 0g
- Protein: 8g
- Cholesterol: 265mg
Tips & Variations
Classic Variations:
- Île Flottante with Praline: Sprinkle crushed caramelized almonds or hazelnuts over the custard before adding the meringues for a nutty crunch.
- Chocolate Version: Add 2 tablespoons of cocoa powder to the meringue mixture, or drizzle dark chocolate sauce over the custard alongside the caramel.
- Coffee-Infused: Steep 2 tablespoons of coffee beans in the warm milk for 20 minutes before making the custard, then strain them out.
- Citrus Twist: Add orange or lemon zest to the custard for a bright, refreshing note that cuts through the richness.
Dietary Modifications:
- Lighter Version: Use half-and-half instead of heavy cream and reduce the sugar slightly in the custard.
- Dairy-Free Alternative: While traditional Floating Island relies on dairy, you can make a lighter version using coconut cream and coconut milk for the custard (though the flavor profile will be quite different).
Presentation Ideas:
- Serve in individual glass bowls or stemmed glasses so guests can see the beautiful layers
- Garnish with fresh berries, mint leaves, or edible flowers for color
- Create a caramel cage over the meringues for an ultra-dramatic presentation
- Use mini ramekins for individual portions at a dinner party
Pro Chef Tips
Perfect Custard Every Time: The key to smooth, lump-free crème anglaise is patience and constant stirring. Professional pastry chefs use a figure-eight stirring motion to ensure even heat distribution. Never let the custard boil – if you see even one bubble, it’s too hot. An instant-read thermometer is your best friend here; aim for 170-175°F.
Foolproof Meringue: The secret to stable, glossy meringue is adding the sugar gradually and beating until it’s completely dissolved. Chef’s trick: turn the bowl upside down – if the meringue doesn’t move, you’ve beaten it enough! Also, make sure your bowl and beaters are completely clean and dry; even a tiny drop of oil or yolk will prevent the whites from whipping properly.
Caramel Mastery: Professional chefs recommend using a light-colored saucepan so you can see the color change clearly. Don’t stir the caramel once it starts cooking – swirling the pan is enough. If you want to slow down the cooking, have a bowl of ice water ready and carefully dip the bottom of the pan in it for a few seconds when it reaches the perfect amber color.
Texture Contrast: For the most impressive presentation, serve the dessert within 30 minutes to 2 hours of assembly. This timing gives you the perfect texture contrast – the meringues will have a delicate crust on the outside while remaining marshmallow-soft inside, and they won’t absorb too much custard.
Restaurant Presentation: Top chefs often use a kitchen torch to create a light caramelized crust on the meringues just before serving, adding another layer of texture. You can also pipe the meringue mixture instead of spooning it for perfectly uniform shapes.
Common Mistakes to Avoid
Scrambled Custard: The most common disaster! This happens when you add hot liquid too quickly to the egg yolks or cook the custard over too-high heat. Always temper your eggs gradually and cook over medium-low heat while stirring constantly. If you do see lumps forming, immediately remove from heat and strain through a fine-mesh sieve to save it.
Flat, Weepy Meringue: This results from under-beating the egg whites or not adding the sugar gradually enough. The sugar needs time to dissolve completely into the whites. Also, make sure your bowl and beaters are completely grease-free – even a tiny bit of fat will prevent proper whipping. Another culprit: poaching water that’s too hot, which can cause the meringues to deflate.
Grainy Caramel: Stirring the sugar while it’s caramelizing can cause crystallization, resulting in a grainy texture. Once you’ve dissolved the sugar and it starts boiling, resist the urge to stir! Just gently swirl the pan. If you do get crystals forming on the sides of the pan, brush them down with a wet pastry brush.
Overcooking the Meringues: Poaching for too long or at too high a temperature makes the meringues tough and rubbery. They should float to the surface and feel springy but still tender when gently pressed. The water should be at a bare simmer – you should see just a few lazy bubbles, not a rolling boil.
Watery Custard: This happens when the custard isn’t cooked long enough or the heat is too low. The custard needs to reach about 170-175°F to thicken properly. Be patient and keep stirring – it will suddenly thicken and coat the spoon beautifully when it’s ready.
Storage & Meal Prep
Refrigerator Storage: The crème anglaise can be made up to 3 days in advance and stored in an airtight container in the refrigerator. Always place plastic wrap directly on the surface to prevent a skin from forming. The poached meringues are best made the day you plan to serve them, but they can be refrigerated for up to 24 hours on a parchment-lined plate loosely covered with plastic wrap.
Shelf Life: Once assembled, Floating Island should be served within 2-3 hours for the best texture. The meringues will begin to dissolve into the custard if left too long, though some people actually enjoy this softer texture! If you have leftover assembled desserts, they’ll keep refrigerated for up to 1 day, but the meringues will lose their delicate texture.
Reheating: This dessert is meant to be served chilled, so reheating isn’t recommended. However, if your custard has been refrigerated and is too thick, you can gently warm it over very low heat while whisking constantly, then chill it again before serving.
Component Storage: Store the caramel in an airtight container at room temperature for up to 1 week, but note that it will harden. You can gently rewarm it in the microwave in 10-second bursts or over low heat to make it pourable again.
Make-Ahead & Freezer Notes
Make-Ahead Timeline: This dessert is actually ideal for entertaining because you can prepare everything in stages. Make the crème anglaise 1-3 days ahead and keep it refrigerated. The morning of your dinner party, prepare and poach the meringues, then refrigerate them. About 30 minutes before serving, make the caramel (or reheat pre-made caramel) and assemble the desserts.
Freezer-Friendly? The crème anglaise can be frozen for up to 1 month in an airtight, freezer-safe container. Thaw overnight in the refrigerator and whisk well before using – it may need a quick strain if any separation occurs. Unfortunately, the meringues don’t freeze well as they become watery and lose their delicate texture when thawed.
Best Assembly Method: For make-ahead entertaining, keep all components separate until just before serving. Pour the chilled custard into serving bowls, add the meringues, and drizzle with caramel right before bringing to the table. This ensures the meringues maintain their beautiful texture and don’t dissolve into the custard.
Party Planning: If you’re serving this for a dinner party of 8 or more, consider setting up an assembly station in the kitchen. Have your custard in a pitcher for easy pouring, meringues on a tray, and caramel ready to drizzle. You can plate all the desserts in about 5 minutes and carry them to the table for a dramatic presentation.
Serving Suggestions
Floating Island is elegant enough to stand alone as a dessert, but there are some wonderful accompaniments that can enhance the experience:
Classic Pairings:
- Serve alongside delicate French butter cookies like langues de chat or tuiles for a textural contrast
- A small glass of dessert wine such as Sauternes, late-harvest Riesling, or Moscato d’Asti complements the sweetness beautifully
- Espresso or strong coffee provides a perfect bitter contrast to the sweet dessert
- Fresh berries – especially raspberries or strawberries – add a tart, fresh element
Complete French Dinner Menu:
- Start with French onion soup or a simple green salad with Dijon vinaigrette
- Main course: Coq au vin, beef bourguignon, or herb-roasted chicken
- Side: Roasted vegetables or garlic green beans
- Finish with this stunning Floating Island for dessert
Beverage Pairings:
- Champagne or sparkling wine for a celebration
- Sweet Muscat or Beaumes-de-Venise
- Aged tawny port for something richer
- Earl Grey or chamomile tea for a lighter option
For Brunch:
- Serve smaller portions after a quiche or savory crepe brunch
- Pair with mimosas or bellinis
- Offer alongside a fruit salad for guests who want something lighter
FAQs About Floating Island
Can I use low-fat milk instead of whole milk?
Yes, but the custard won’t be as rich and creamy. Whole milk gives you the best flavor and texture, but 2% milk will work in a pinch. I don’t recommend skim milk as the custard will be too thin. If you use low-fat milk, you might want to increase the heavy cream slightly to maintain richness.
Why did my meringues sink or deflate?
This usually happens for one of three reasons: the egg whites weren’t beaten stiff enough before poaching, the poaching water was boiling too vigorously (it should be at a bare simmer), or there was fat residue in your mixing bowl that prevented the whites from whipping properly. Make sure your bowl and beaters are spotlessly clean and completely dry.
Can I make this dessert without the caramel?
Absolutely! While the caramel adds beautiful flavor and visual appeal, the dessert is still delicious with just the meringue and custard. Some people prefer it without caramel, and it’s actually more traditional in some French households to serve it plain. You could also substitute with a drizzle of fruit coulis or melted chocolate.
How do I know when the custard is thick enough?
The classic test is the “spoon test” – dip a wooden spoon or heatproof spatula into the custard, lift it out, and run your finger across the back. If the line stays clear and doesn’t run, your custard is ready. It should coat the spoon in a thin layer. Using a thermometer is even more reliable: aim for 170-175°F. The custard will continue to thicken as it cools.
Can I flavor the meringue?
Yes! You can add extracts like almond or peppermint (start with ½ teaspoon), or fold in a tablespoon of cocoa powder for chocolate meringues. Some cooks add a tiny bit of rosewater or orange blossom water for a delicate floral note. Just be careful not to add too much liquid or it will affect the meringue’s stability.
What if my caramel gets too dark?
Dark caramel will taste bitter rather than pleasantly caramelized. If this happens, unfortunately you’ll need to start over – there’s no way to reverse it. The key is to watch it carefully once it starts to turn golden, and remove it from heat when it reaches a medium amber color (it will continue to darken slightly from residual heat).
Is there a difference between Floating Island and Île Flottante?
In France, Île Flottante traditionally refers to the version with individual poached meringue ovals, while œufs à la neige sometimes refers to a variation where a large meringue is baked or poached in a ring mold. However, these days the terms are often used interchangeably, and both refer to the classic dessert of poached meringue floating on custard.
Conclusion
There’s something truly special about mastering a classic French dessert like Floating Island – it connects you to centuries of culinary tradition while impressing everyone at your table with its ethereal beauty and sophisticated flavors. The gentle sweetness of the vanilla custard, the cloud-like texture of the meringue, and the bittersweet crackle of caramel come together in a dessert that’s somehow both comforting and elegant at the same time.
Don’t let the fancy French name intimidate you! Once you’ve made this a couple of times, you’ll realize it’s actually quite simple – just three basic components that come together into something extraordinary. The techniques you’ll learn here (making custard, whipping meringue, and caramelizing sugar) are fundamental skills that will serve you well in countless other recipes.
I’d love to hear how your Floating Island turns out! Did you add any creative variations? What did your family think? Drop a comment below and let me know, and if you loved this recipe, please share it on Pinterest so other home cooks can discover this gorgeous French dessert. There’s nothing quite like the look on your guests’ faces when you bring these beautiful clouds of meringue to the table – so go ahead and give yourself a chance to play pastry chef for the day. You’ve got this!
Happy cooking, and bon appétit! ☁️✨