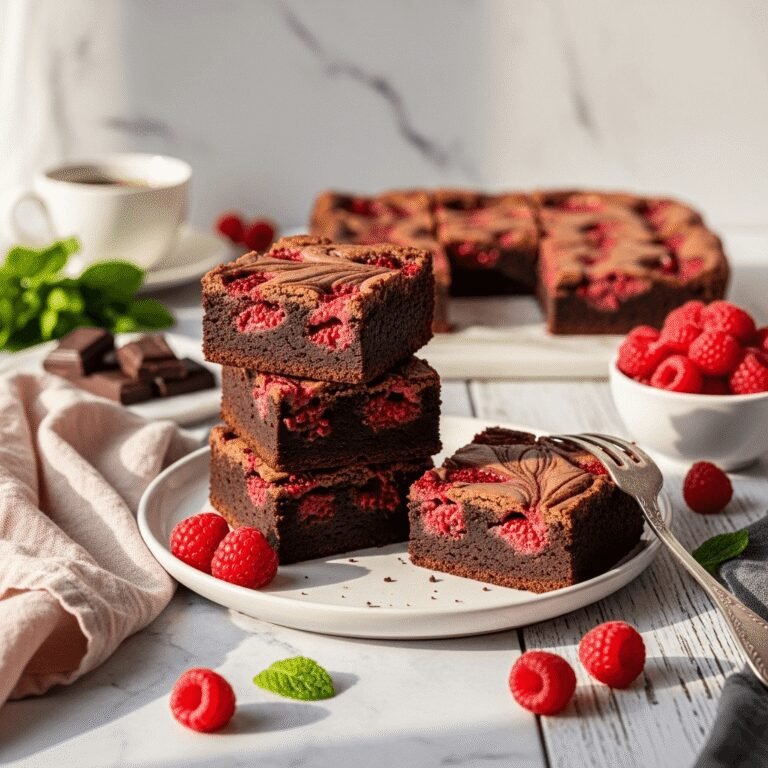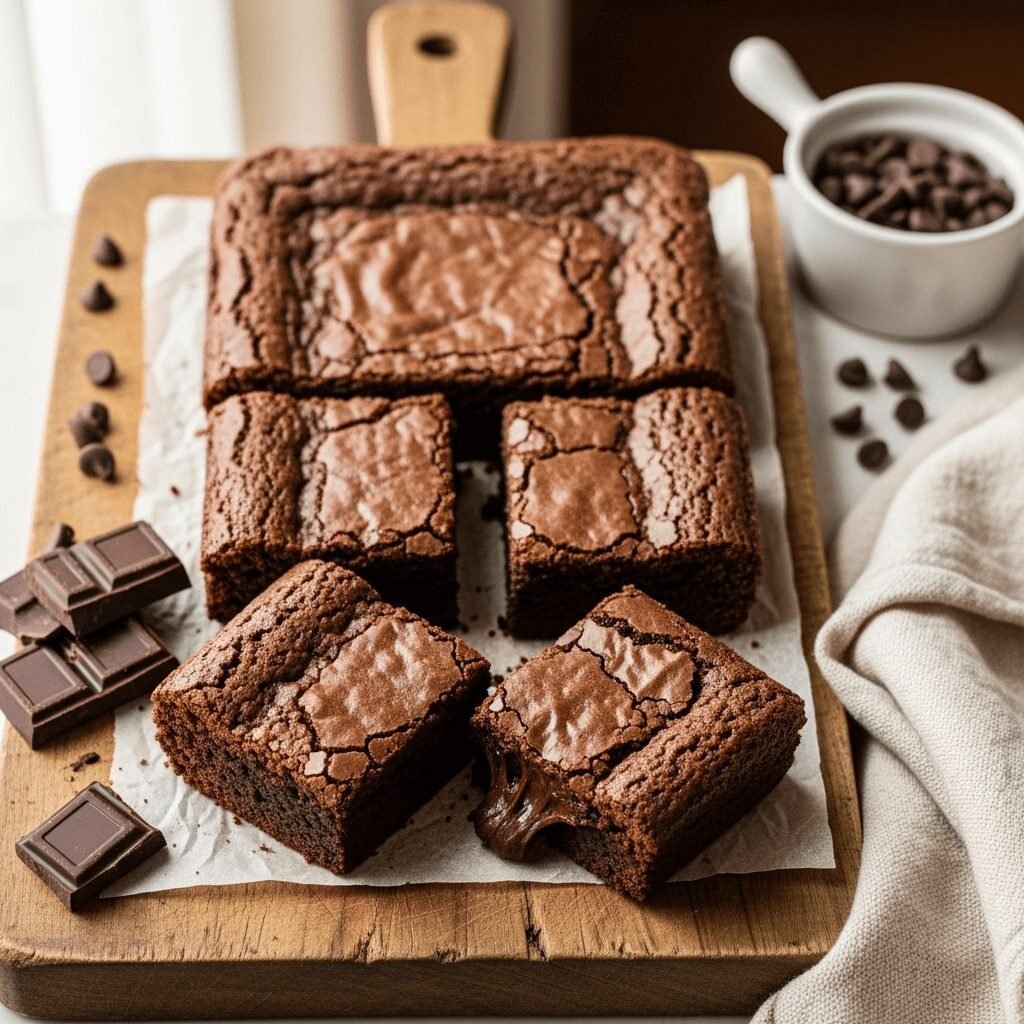
The Ultimate Fudge Brownies Recipe – Rich, Chewy & Ridiculously Easy!

There’s something absolutely magical about a perfectly baked batch of fudge brownies. These aren’t just any brownies—we’re talking about thick, ultra-fudgy, melt-in-your-mouth squares of chocolate heaven that deliver that signature crackly top and impossibly gooey center. Whether you’re a seasoned baker or just starting your baking journey, this fudge brownies recipe is your golden ticket to dessert success.
Fudge brownies are the kind of treat that works for absolutely every occasion. Baking them for a weekend family gathering? Perfect. Need something impressive for a potluck or bake sale? These brownies will disappear in minutes. Craving a midnight snack that hits all the right notes? Pop one in the microwave for 10 seconds and thank me later. Unlike their cakey cousins, fudge brownies are dense, intensely chocolatey, and have that addictive chewy texture that keeps you reaching for “just one more piece.”
What makes this recipe truly special is its simplicity. You don’t need fancy equipment, hard-to-find ingredients, or professional baking skills. Just one bowl, a whisk, and about 10 minutes of prep time stand between you and the most decadent brownies you’ve ever tasted. These brownies strike the perfect balance—rich enough to satisfy serious chocolate lovers, but not so heavy that you can’t enjoy them with a cold glass of milk or a scoop of vanilla ice cream.
History / Background
The brownie’s origin story is steeped in delicious American culinary history, and like many beloved desserts, it came about somewhat by accident. The most widely accepted tale dates back to 1893 at the Palmer House Hotel in Chicago. Bertha Palmer, a prominent socialite hosting the World’s Columbian Exposition, requested a dessert that was smaller than a cake but more substantial than a cookie—something elegant ladies could eat while attending the fair without making a mess. The hotel’s pastry chef created a dense chocolate dessert with walnuts and an apricot glaze, and the brownie was born.
However, another origin story credits a housewife in Bangor, Maine, who supposedly forgot to add baking powder to her chocolate cake batter. The result? A dense, flat, but incredibly delicious chocolate treat that became an instant hit. Regardless of which story you believe, brownies quickly became an American staple, appearing in cookbooks by the early 1900s.
The term “fudge brownie” specifically refers to the dense, gooey texture that resembles fudge candy rather than cake. This style became increasingly popular in the 1980s and 1990s when home bakers started perfecting the ratio of butter, chocolate, and eggs to create that coveted fudgy interior. Today, the debate between fudge brownie lovers and cake brownie enthusiasts runs deep—but for those of us in the fudge camp, there’s simply no comparison. The richness, the intensity, the way they practically melt on your tongue—that’s what brownies should be.
Fudge brownies have become a cornerstone of American baking culture, appearing at bake sales, birthday parties, holidays, and potlucks across the country. They’re often one of the first recipes young bakers tackle, and they remain a beloved favorite well into adulthood. The beauty of brownies lies in their versatility and reliability—they’re nearly impossible to mess up, and they always deliver satisfaction.
Why You’ll Love This Recipe
This fudge brownies recipe is about to become your absolute go-to dessert, and here’s why: it delivers bakery-quality results with minimal effort and ingredients you probably already have in your pantry. I’ve spent years perfecting this recipe, testing different ratios and techniques, and I can confidently say these are the brownies that will make you famous among your friends and family.
Here’s what makes these brownies absolutely irresistible:
- Incredibly easy to make – Just one bowl, one whisk, and about 10 minutes of hands-on time. No mixer required, no complicated techniques, and minimal cleanup!
- Ultimate fudgy texture – Dense, moist, and so fudgy they’re almost truffle-like. That perfect chew with every bite is what brownie dreams are made of.
- Rich chocolate flavor – Using both cocoa powder and melted butter creates intense chocolate depth that tastes like you used expensive chocolate bars.
- Perfect crackly top – That beautiful, shiny, slightly crackled surface isn’t just for show—it adds a delightful textural contrast to the gooey interior.
- Budget-friendly – No need for pricey chocolate bars or specialty ingredients. This recipe uses affordable pantry staples that cost a fraction of boxed mixes.
- Foolproof results every time – The measurements and method are designed to give you consistent, reliable brownies whether you’re baking at sea level or high altitude.
- Customizable – Easy to add your favorite mix-ins like nuts, chocolate chips, swirls of peanut butter, or even a sprinkle of sea salt.
- Make-ahead friendly – These brownies actually taste even better the next day as the flavors meld together beautifully.
- Crowd-pleaser – I’ve never met anyone who doesn’t love these brownies—they’re universally adored by kids and adults alike.
- Perfect for any occasion – Casual enough for a Tuesday night craving, impressive enough for special celebrations.
Ingredient Notes
The secret to exceptional fudge brownies lies in understanding your ingredients and how they work together. Let’s break down what makes this recipe so special:
Unsalted Butter – The foundation of richness in these brownies. Butter provides flavor, moisture, and helps create that fudgy texture. We use unsalted so you can control the salt level. If you only have salted butter, reduce the added salt by half. Don’t substitute with oil—butter’s flavor is irreplaceable here.
Granulated Sugar – Not just for sweetness! Sugar contributes to that gorgeous crackly top and helps create the proper texture. It also keeps the brownies moist for days.
Large Eggs – These are your binding agent and provide structure. Room temperature eggs incorporate more easily and create a smoother batter. The eggs also contribute to the fudgy texture—more eggs would make them cakey.
Vanilla Extract – Pure vanilla extract enhances the chocolate flavor exponentially. Don’t skip it! If you want to get fancy, try using vanilla bean paste for those beautiful specks.
All-Purpose Flour – Provides just enough structure without making the brownies cakey. Measuring flour correctly is crucial—spoon it into your measuring cup and level it off rather than scoking the cup directly into the bag.
Unsweetened Cocoa Powder – This is where the deep chocolate flavor comes from. Use a good quality cocoa powder (Dutch-process creates a darker color and smoother taste, while natural cocoa is slightly more acidic). Don’t use hot cocoa mix—it contains sugar and won’t work!
Salt – Enhances all the flavors and balances the sweetness. That pinch makes a huge difference.
Espresso Powder (Optional) – Just 1/2 teaspoon intensifies the chocolate flavor without making the brownies taste like coffee. It’s a secret ingredient professional bakers swear by!
Equipment Needed
The beauty of this recipe is that you don’t need any fancy equipment. Here’s what you’ll need:
- 9×9-inch baking pan – This is the standard size for thick, perfect brownies. You can use an 8×8-inch pan for thicker brownies (add 5 minutes to baking time) or a 9×13-inch pan for thinner brownies (reduce baking time by 5 minutes).
- Parchment paper or aluminum foil – Line your pan with an overhang on two sides for easy removal. This is your secret weapon for cutting perfect squares!
- Medium saucepan – For melting the butter. You could also use a microwave-safe bowl.
- Large mixing bowl – For combining all your ingredients.
- Whisk – A simple whisk is all you need—no electric mixer required.
- Rubber spatula – For scraping down the bowl and spreading batter evenly in the pan.
- Measuring cups and spoons – Accurate measurements matter in baking!
- Toothpick or cake tester – For checking doneness (though we want it to come out with moist crumbs, not clean).
- Wire cooling rack – Allows air to circulate under the pan for even cooling.
Fudge Brownies Recipe

These ultra-fudgy brownies are rich, decadent, and incredibly easy to make from scratch. With a shiny crackly top and gooey center, they’re everything a brownie should be. Perfect for chocolate lovers seeking that intense, melt-in-your-mouth texture that beats any boxed mix!
- Prep Time: 15 minutes
- Cook Time: 30 minutes
- Total Time: 45 minutes
- Yield: 16 brownies 1x
- Category: Dessert
- Method: Baking
- Cuisine: American
- Diet: Vegetarian
Ingredients
- 1 cup (2 sticks or 226g) unsalted butter
- 2 cups (400g) granulated sugar
- 4 large eggs, room temperature
- 1 tablespoon vanilla extract
- 1 cup (125g) all-purpose flour
- 3/4 cup (75g) unsweetened cocoa powder
- 1/2 teaspoon salt
- 1/2 teaspoon espresso powder (optional, but recommended)
- 1 cup (175g) chocolate chips (optional, for extra fudginess)
Instructions
- Preheat and prepare: Preheat your oven to 350°F (175°C). Line a 9×9-inch baking pan with parchment paper, leaving an overhang on two sides for easy removal. Lightly grease the parchment with butter or cooking spray.
- Melt the butter: In a medium saucepan over medium-low heat, melt the butter completely. Remove from heat and let it cool for 2-3 minutes so it doesn’t cook the eggs when mixed.
- Mix sugar and eggs: In a large mixing bowl, whisk together the melted butter and sugar until well combined, about 1 minute. Add the eggs one at a time, whisking vigorously after each addition until the mixture becomes smooth and glossy. Stir in the vanilla extract.
- Combine dry ingredients: In a separate bowl, sift together the flour, cocoa powder, salt, and espresso powder (if using). Sifting removes lumps and ensures even distribution.
- Create the batter: Gently fold the dry ingredients into the wet ingredients using a rubber spatula. Stir just until no flour streaks remain—don’t overmix or your brownies will be tough. The batter should be thick and glossy. If using chocolate chips, fold them in now.
- Bake: Pour the batter into your prepared pan and spread it evenly with a spatula. Tap the pan gently on the counter a few times to release any air bubbles. Bake for 28-32 minutes. The brownies are done when a toothpick inserted into the center comes out with a few moist crumbs (not wet batter, but definitely not clean).
- Cool completely: This is the hardest part! Let the brownies cool in the pan on a wire rack for at least 1 hour before cutting. They need this time to set properly. For the cleanest cuts, refrigerate for 30 minutes before slicing.
- Cut and serve: Use the parchment overhang to lift the brownies out of the pan. Place on a cutting board and use a sharp knife, wiping it clean between cuts, to slice into 16 squares.
Notes
- Don’t overbake: Fudgy brownies should look slightly underdone in the center. They’ll continue cooking as they cool.
- Room temperature eggs: This helps them incorporate smoothly and creates better texture.
- Measuring flour: Use the spoon-and-level method to avoid too much flour, which makes dry brownies.
- Storage: Keep brownies in an airtight container at room temperature for 4 days, refrigerated for 1 week, or frozen for 3 months.
- Altitude adjustment: If baking above 3,500 feet, reduce sugar by 2 tablespoons and increase flour by 2 tablespoons.
Nutrition
- Serving Size: 1 brownie (1/16 of recipe)
- Calories: 285
- Sugar: 28g
- Sodium: 95mg
- Fat: 15g
- Saturated Fat: 9g
- Unsaturated Fat: 5g
- Trans Fat: 0g
- Carbohydrates: 37g
- Fiber: 2g
- Protein: 4g
- Cholesterol: 75mg
Tips & Variations
One of the best things about this brownie recipe is how adaptable it is. Here are some delicious ways to customize these fudge brownies to suit your taste:
Add Mix-Ins: Fold in 1 cup of chopped walnuts, pecans, or white chocolate chips for extra texture. You can also try toffee bits, crushed Oreos, or chopped peanut butter cups.
Swirl It Up: Before baking, drop dollops of peanut butter, Nutella, or cream cheese on top of the batter. Use a knife to swirl it through for a beautiful marbled effect.
Make Them Minty: Add 1/2 teaspoon peppermint extract to the batter and top with crushed candy canes or Andes mints after baking.
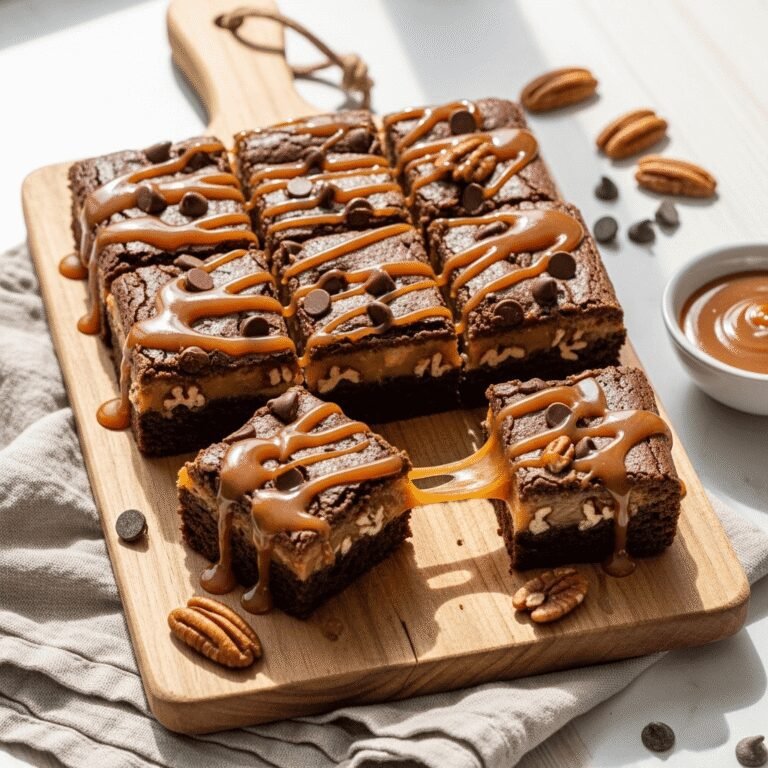
Salted Caramel Brownies: Drizzle with salted caramel sauce after baking and sprinkle with flaky sea salt.
Double Chocolate: Increase the chocolate chips to 1.5 cups and mix in a combination of dark, milk, and white chocolate chips.
Espresso Brownies: Increase espresso powder to 1 tablespoon for a pronounced coffee flavor that complements the chocolate.
Healthier Version: Substitute half the butter with Greek yogurt or applesauce, though this will make them slightly less fudgy.
Gluten-Free Option: Replace all-purpose flour with a 1:1 gluten-free baking flour blend.
Vegan Adaptation: Use vegan butter and replace eggs with flax eggs (1 tablespoon ground flaxseed + 3 tablespoons water per egg, let sit 5 minutes).
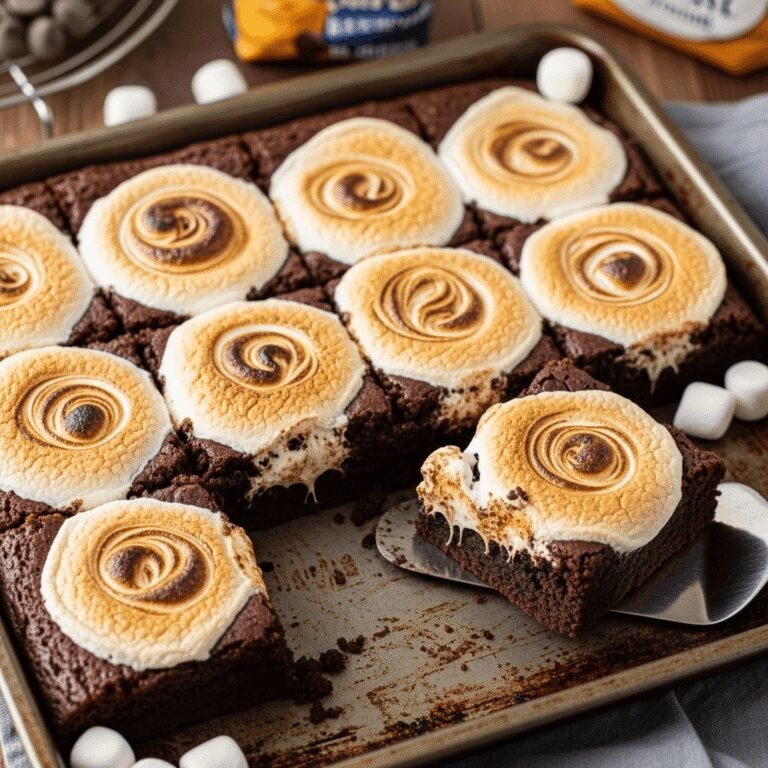
Brownie Sundae: Serve warm brownies topped with vanilla ice cream, hot fudge, whipped cream, and a cherry!
Pro Chef Tips
Want to take your brownies from great to absolutely extraordinary? These professional techniques will elevate your baking game:
Brown the butter: Instead of just melting the butter, brown it in the saucepan until it smells nutty and turns golden. This adds incredible depth of flavor with caramelized, toasty notes.
Use quality cocoa: Invest in Dutch-process cocoa powder like Droste or Valrhona for a darker color and smoother, less acidic taste. The difference is noticeable!
Beat the eggs longer: After adding eggs, whisk vigorously for 2-3 minutes until the mixture becomes pale and forms ribbons. This incorporates air and contributes to that shiny crackly top.
Don’t skip sifting: Sifting the cocoa powder prevents lumps and ensures it disperses evenly throughout the batter, giving you consistent chocolate flavor in every bite.
Line with parchment properly: Let the parchment paper hang over the edges like handles. This makes removing the brownies foolproof and helps you cut perfect squares.
The toothpick test: Insert a toothpick about 1 inch from the edge (not the center). It should come out with moist crumbs attached. The center will look slightly underdone but will set as it cools.
Cool before cutting: I know it’s tempting, but cutting hot brownies creates a crumbly mess. Cool completely, or even chill them for 30 minutes, for clean cuts with perfect edges.
Warm your knife: For the cleanest cuts, run your knife under hot water, dry it, then slice. Wipe the blade clean and reheat between each cut.
Let them rest: Brownies actually taste better the day after baking. The flavors meld together and the texture becomes even more fudgy. Store them covered overnight before serving if possible.
Room temperature ingredients: Beyond eggs, make sure your vanilla extract isn’t ice cold from the fridge. Room temperature ingredients blend more smoothly.
Common Mistakes to Avoid
Even though brownies are relatively foolproof, here are the most common pitfalls and how to avoid them:
Overbaking is enemy number one. Brownies continue to cook from residual heat after removing from the oven. Take them out when a toothpick still has moist crumbs attached—not clean! They may look underdone, but they’ll firm up perfectly as they cool. Overbaked brownies are dry and cakey, not fudgy.
Overmixing the batter creates tough brownies. Once you add the flour, mix gently until just combined. You want to see flour streaks disappear, but stop immediately after. Overmixing develops gluten, which makes brownies tough and chewy in a bad way.
Using a pan that’s too large or small affects texture dramatically. If your pan is too big, brownies will be thin and overbake quickly. Too small, and they’ll be thick and undercooked in the center. Stick to the 9×9-inch size specified, or adjust baking time accordingly.
Not letting them cool completely ruins your cut. I know the wait is torturous, but warm brownies will crumble and fall apart when you try to slice them. Give them at least an hour at room temperature, or 30 minutes in the fridge for perfectly clean squares.
Forgetting to line the pan makes removal a nightmare. Always use parchment paper with an overhang. Greasing alone isn’t enough—brownies will stick, tear, and leave half the batch in the pan. The parchment paper trick is essential for beautiful presentation.
Measuring flour incorrectly leads to dry, dense brownies. Never scoop flour directly from the bag with your measuring cup. This packs it down and you’ll end up with too much. Instead, fluff the flour with a spoon, spoon it into the measuring cup, and level it off with a knife.
Using cold eggs prevents proper incorporation. Cold eggs don’t mix as smoothly into the butter-sugar mixture, which can result in a grainy texture. Set your eggs on the counter for 30 minutes before baking, or place them in warm water for 5 minutes.
Storage & Meal Prep
These fudge brownies stay fresh and delicious for days when stored properly, making them perfect for advance preparation.
Room Temperature Storage: Store brownies in an airtight container at room temperature for up to 4 days. Place parchment paper between layers if stacking to prevent sticking. They’ll maintain their fudgy texture beautifully without refrigeration.
Refrigerator Storage: Brownies can be refrigerated for up to 1 week in an airtight container. Cold brownies have a firmer, almost truffle-like texture that some people prefer. Let them come to room temperature for 15-20 minutes before serving, or enjoy them cold!
Reheating: Warm individual brownies in the microwave for 10-15 seconds for that just-baked experience. You can also reheat a whole pan covered with foil in a 300°F oven for 10 minutes. The warmth makes them extra gooey and melty.
Cutting for Storage: If you’re not serving immediately, consider storing the brownies in one large square rather than pre-cut. This keeps them fresher longer by reducing exposed edges. Cut into squares as needed.
Shelf Life Indicators: Brownies are still good if they’re moist and smell chocolatey. Discard if you see any mold, if they smell off, or if they’ve become completely hard and dried out (though this is rare with proper storage).
Make-Ahead & Freezer Notes
Brownies are one of the best make-ahead desserts, perfect for party planning or satisfying future chocolate cravings!
Make-Ahead Instructions: You can bake these brownies up to 2 days in advance. Once completely cooled, cover the pan tightly with plastic wrap or transfer cut brownies to an airtight container. They actually taste better after sitting overnight as the flavors develop and meld together.
Freezing Baked Brownies: These freeze beautifully for up to 3 months! Cut into squares, wrap each brownie individually in plastic wrap, then place all wrapped brownies in a freezer-safe ziplock bag or container. This allows you to grab single servings whenever a craving hits.
Freezing the Whole Pan: Alternatively, cool the brownies completely in the pan, cover tightly with plastic wrap, then wrap the entire pan in aluminum foil. Freeze for up to 3 months. This is perfect when you want to bring them to a party later.
Thawing Instructions: Remove brownies from the freezer and let them thaw at room temperature for 2-3 hours, or overnight in the refrigerator. For a quick thaw, microwave individual brownies for 20-30 seconds. They’ll taste freshly baked!
Freezing Unbaked Batter: You can also freeze the unbaked batter! Line your pan with plastic wrap, pour in the batter, freeze until solid (about 4 hours), then lift out and wrap tightly in plastic wrap and foil. Freeze for up to 2 months. When ready to bake, unwrap, place back in the pan, and bake from frozen, adding 10-15 minutes to the baking time.
Best Reheating Method: For the ultimate indulgence, microwave a frozen or thawed brownie for 15-20 seconds until warm and gooey. Serve with a scoop of ice cream for an instant dessert that rivals any restaurant!
Serving Suggestions
Fudge brownies are absolutely delicious on their own, but here are some amazing ways to serve them that will take your dessert game to the next level:
Classic Pairings: Serve brownies with a tall glass of cold milk—the classic combination is unbeatable. The milk cuts through the richness perfectly. Coffee or hot chocolate also make excellent companions, especially for adult gatherings.
Ice Cream Bar: Create a brownie sundae bar with vanilla, chocolate, and coffee ice cream, hot fudge sauce, caramel sauce, whipped cream, chopped nuts, sprinkles, and maraschino cherries. Let guests build their own masterpieces!
Fresh Fruit: Balance the richness with fresh raspberries, strawberries, or sliced bananas. The bright, tart fruit cuts through the chocolate beautifully and adds a refreshing element.
Whipped Cream or Frosting: Top warm brownies with a dollop of vanilla whipped cream, cream cheese frosting, or chocolate ganache for extra indulgence.
Brownie à la Mode: The classic restaurant dessert—warm brownie topped with vanilla ice cream, drizzled with hot fudge, and finished with whipped cream and a cherry.
Dessert Platter: Arrange brownie squares on a platter with cookies, chocolate-covered strawberries, and petit fours for an elegant dessert display at parties.
Coffee Pairing: Serve alongside espresso, cappuccino, or a specialty coffee drink for a café-style experience at home.
Dessert Boards: Include brownie squares on a dessert charcuterie board with chocolate truffles, cookies, candies, fresh fruit, and nuts.
FAQs Section
Q: Why are my brownies cakey instead of fudgy?
A: This usually happens from too much flour, too many eggs, or overbaking. Make sure you’re measuring flour correctly using the spoon-and-level method, not scooping directly from the bag. Also, take brownies out when a toothpick still has moist crumbs attached—not clean. Fudgy brownies should look slightly underdone in the center.
Q: Can I use oil instead of butter?
A: While you technically can substitute vegetable oil for butter (use 3/4 cup oil for 1 cup butter), I don’t recommend it. Butter provides irreplaceable flavor and contributes to that gorgeous crackly top. Oil makes brownies greasier with less chocolate flavor. Stick with butter for the best results!
Q: How do I know when brownies are done?
A: Insert a toothpick about 1 inch from the edge (not the center). It should come out with moist, fudgy crumbs attached—not wet batter, but definitely not clean. The center will look slightly underdone and may even jiggle a tiny bit, but it will set as it cools. Remember, brownies continue cooking from residual heat after leaving the oven.
Q: Can I double this recipe?
A: Absolutely! Double all ingredients and bake in a 9×13-inch pan for 35-40 minutes, or make two 9×9-inch pans. The 9×13 pan will give you thinner brownies, while two 9×9 pans maintain that perfect thick, fudgy texture. Just bake them on the same oven rack and rotate positions halfway through.
Q: Why do my brownies have a crumbly, dry texture?
A: The most common cause is overbaking. Even an extra 5 minutes can dry out brownies. Make sure your oven temperature is accurate—use an oven thermometer to check. Also, ensure you’re not using too much flour. Finally, avoid overmixing the batter once flour is added, as this develops gluten and makes brownies tough.
Q: Can I make these brownies without eggs?
A: Yes! For each egg, mix 1 tablespoon ground flaxseed with 3 tablespoons water and let sit for 5 minutes to thicken. You can also try using 1/4 cup unsweetened applesauce per egg. Note that the texture will be slightly different but still delicious—perhaps a bit more cakey than fudgy.
Q: How do I get that shiny, crackly top?
A: The signature brownie top comes from beating sugar and eggs together vigorously to dissolve the sugar and incorporate air. Whisk for 2-3 minutes until the mixture becomes pale and glossy. Using enough fat (butter) and not overbaking also contributes to that beautiful shiny crust.
Conclusion
There you have it—the ultimate guide to making the most incredible fudge brownies you’ve ever tasted! These brownies are everything you could want from a chocolate dessert: intensely rich, perfectly fudgy, with that gorgeous crackly top that makes them irresistible. The best part? They’re incredibly simple to make with just one bowl and basic pantry ingredients.
Whether you’re baking these brownies for a special occasion, a weekend treat, or just because it’s Tuesday and you deserve something delicious, I promise they won’t disappoint. The recipe is foolproof, the results are consistent, and the compliments will be endless. Once you make these from scratch, you’ll never go back to boxed mixes again!
I’d love to hear how your brownies turn out! Have you tried any of the variations? Do you prefer them warm with ice cream or at room temperature? Drop a comment below and share your brownie success stories. And if you love this recipe as much as I do, please save it to your Pinterest boards so you can make them again and again. Happy baking, and enjoy every fudgy, chocolatey bite! 🍫✨