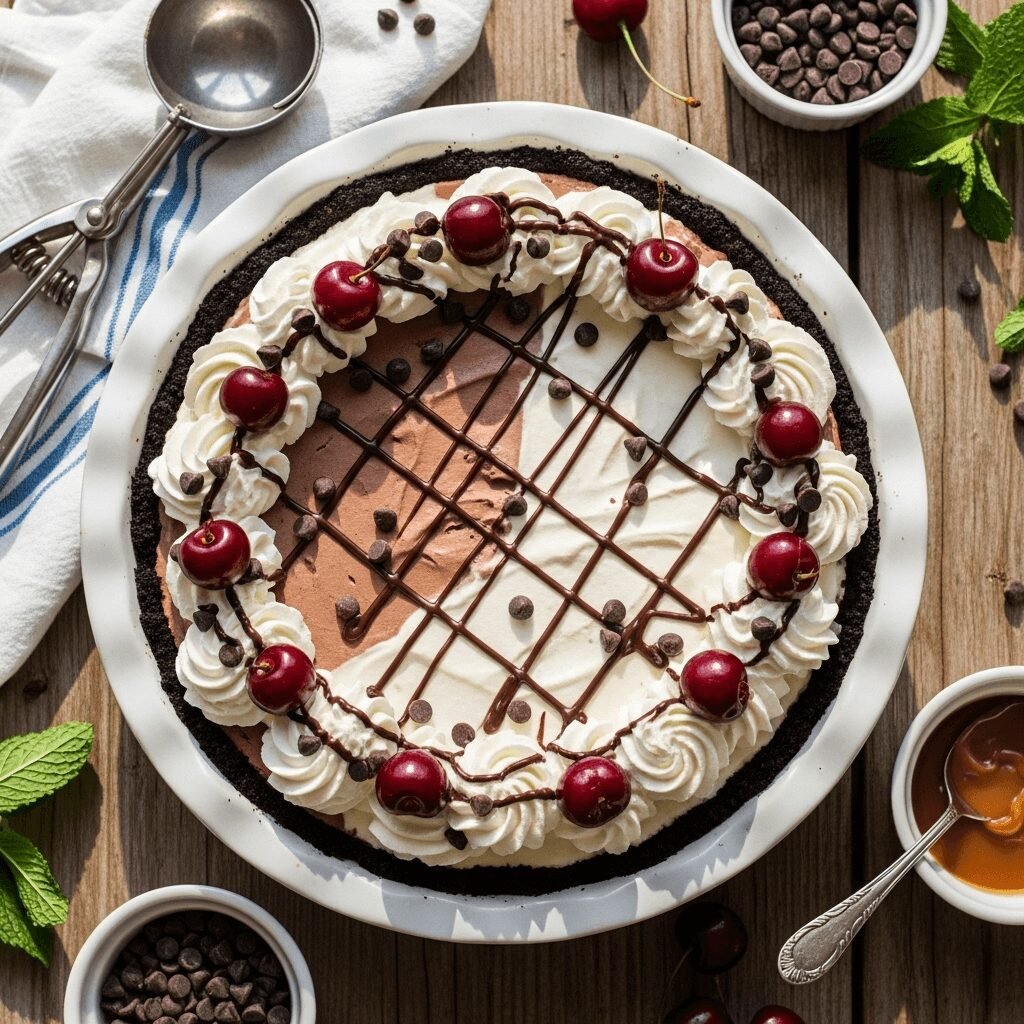
The Ultimate Ice Cream Pie Recipe – Easy No-Bake Dessert Perfect for Summer

If you’re looking for a dessert that’s guaranteed to make everyone at the table smile, this Ice Cream Pie is your answer. This delightful no-bake treat combines a crunchy cookie crust with layers of creamy ice cream and your favorite toppings, creating a showstopping dessert that requires minimal effort and zero oven time. It’s the perfect solution for hot summer days when you want something sweet and impressive but don’t want to heat up your kitchen.
This ice cream pie recipe is incredibly versatile – you can customize it with any ice cream flavor combination you love, from classic vanilla and chocolate to more adventurous options like salted caramel brownie or mint chocolate chip. Serve it at birthday parties, Fourth of July barbecues, family gatherings, or just because it’s Tuesday and you deserve something special. The best part? While it looks and tastes like you spent hours in the kitchen, this dessert comes together in about 20 minutes of active time, then just needs to chill in the freezer until you’re ready to serve.
History / Background
The ice cream pie has become an iconic American dessert, though its exact origins are somewhat difficult to pinpoint. The concept of frozen desserts dates back centuries, but the modern ice cream pie as we know it really took off in the 1950s and 1960s when home freezers became standard appliances in American households. This democratization of frozen dessert storage made it possible for home cooks to create and store elaborate frozen treats that previously could only be enjoyed at ice cream parlors or soda fountains.
The ice cream pie evolved from earlier frozen desserts like baked Alaska and ice cream cakes, but with a distinctly American twist – simplicity and accessibility. Post-war American homemakers embraced convenience foods and easy entertaining, and the ice cream pie fit perfectly into this lifestyle. Early recipes often appeared in women’s magazines and community cookbooks, featuring store-bought cookie crusts and readily available ice cream flavors.
Over the decades, the ice cream pie has remained a beloved fixture at summer gatherings, diners, and family celebrations across the United States. Regional variations emerged, with some areas favoring graham cracker crusts while others preferred chocolate cookie or even pretzel crusts. The dessert gained particular popularity in the South and Midwest, where it became a staple at church potlucks and backyard barbecues. Today, ice cream pies have experienced a renaissance with gourmet versions appearing in trendy restaurants and bakeries, but the homemade version remains just as delicious and infinitely more personal.
Why You’ll Love This Recipe
This ice cream pie recipe is about to become your go-to dessert for every occasion, and here’s why: it delivers maximum impact with minimum effort, making you look like a dessert genius without requiring any advanced baking skills. The combination of textures – from the crunchy crust to the smooth, creamy ice cream filling – creates a satisfying contrast in every bite, while the endless customization options mean you’ll never get bored making it.
Here’s what makes this recipe absolutely irresistible:
- No-bake simplicity – No oven required, which means your kitchen stays cool and you avoid any baking mishaps
- Make-ahead friendly – Prepare it days in advance and pull it from the freezer when you’re ready to serve
- Endlessly customizable – Use any ice cream flavors, mix-ins, or toppings you love to create your signature version
- Budget-friendly – Uses simple, affordable ingredients you can find at any grocery store
- Crowd-pleaser – Appeals to kids and adults alike, making it perfect for mixed-age gatherings
- Impressive presentation – Looks fancy and bakery-worthy with minimal effort
- Quick assembly – Only about 20 minutes of hands-on time from start to freezer
- Perfect portion control – Serves 8-10 people with clean, beautiful slices
- Year-round versatility – While perfect for summer, it’s also a refreshing treat during the holidays
Ingredient Notes
Let’s talk about what goes into this incredible ice cream pie and why each component matters. Understanding your ingredients helps you make smart substitutions and creates the best possible results.
Cookie Crust Base: The foundation of your pie typically uses chocolate sandwich cookies (like Oreos), graham crackers, or vanilla wafers. Chocolate cookies create a rich, indulgent base that pairs beautifully with almost any ice cream flavor. The cookies are crushed into fine crumbs and mixed with melted butter to create a crust that holds together when sliced. You can substitute with gluten-free cookies if needed, or try gingersnaps for a spicy kick.
Butter: Unsalted butter is mixed with the cookie crumbs to bind them together. The butter solidifies when frozen, creating structure for your crust. You can use salted butter if that’s what you have, but unsalted gives you better control over the final flavor. For a dairy-free version, coconut oil works as a substitute.
Ice Cream: This is where your creativity shines! The recipe traditionally uses two complementary flavors, but you can use one, two, or even three different flavors in layers. Premium ice cream brands work best because they have less air whipped into them, creating denser, more stable layers. Let the ice cream soften at room temperature for 10-15 minutes before spreading – it should be spreadable but not melted.
Toppings: Hot fudge sauce, caramel sauce, whipped cream, chocolate chips, nuts, fresh fruit, crushed candy bars, sprinkles – the sky’s the limit! These add visual appeal, extra flavor, and textural contrast. Choose toppings that complement your ice cream flavors.
Stabilizers (Optional): Some recipes include a small amount of whipped topping or marshmallow fluff mixed into the softened ice cream to help prevent ice crystals and maintain a creamier texture after freezing.
Equipment Needed
Having the right tools makes this recipe even easier. Here’s what you’ll need:
- 9-inch pie pan (standard or deep-dish, glass or metal)
- Food processor or blender (for crushing cookies into fine crumbs)
- Medium mixing bowl (for combining crust ingredients)
- Measuring cups and spoons (for accurate measurements)
- Rubber spatula or offset spatula (for spreading ice cream evenly)
- Plastic wrap or aluminum foil (for covering the pie while freezing)
- Sharp knife (for slicing clean pieces)
- Ice cream scoop or large spoon (for scooping and spreading ice cream)
- Ziplock bag and rolling pin (alternative method for crushing cookies if no food processor)
- Small saucepan (for melting butter, if not using microwave)
Ice Cream Pie Recipe

This easy no-bake Ice Cream Pie features a crunchy chocolate cookie crust filled with layers of your favorite ice cream flavors and topped with decadent sauces and toppings. Perfect for summer entertaining or any time you need an impressive dessert without turning on the oven!
- Prep Time: 20 minutes Cook Time:
- Cook Time: 0 minutes
- Total Time: 4 hours 20 minutes
- Yield: 8-10 servings 1x
- Category: Dessert
- Method: No-Bake, Freezer
- Cuisine: American
- Diet: Vegetarian
Ingredients
For the Crust:
- 24 chocolate sandwich cookies (about 2½ cups crushed, such as Oreos)
- 5 tablespoons unsalted butter, melted
- Pinch of salt
For the Filling:
- 1½ quarts (6 cups) ice cream, divided into 2-3 flavors of your choice, slightly softened
- ½ cup hot fudge sauce, warmed (optional)
- ½ cup caramel sauce (optional)
For Topping:
- 1 cup whipped cream or whipped topping
- ¼ cup chocolate chips or chopped nuts
- Additional sauce for drizzling
- Maraschino cherries (optional)
- Sprinkles (optional)
Instructions
Step 1: Prepare the Crust
Add the chocolate sandwich cookies (including the cream filling) to a food processor and pulse until you have fine, even crumbs. You should have about 2½ cups of crumbs. Transfer the crumbs to a medium bowl, add the melted butter and a pinch of salt, and stir until the mixture resembles wet sand and holds together when pressed.
Step 2: Press Crust into Pan
Press the cookie mixture firmly and evenly into the bottom and up the sides of a 9-inch pie pan. Use the bottom of a measuring cup or glass to pack it down tightly, ensuring there are no gaps or thin spots. The crust should be about ¼-inch thick. Place the crust in the freezer for 15 minutes to set while you prepare the filling.
Step 3: Add First Ice Cream Layer
Remove your first ice cream flavor from the freezer and let it sit at room temperature for 10-15 minutes until it’s soft enough to spread easily but not melted. Scoop the softened ice cream into the chilled crust and spread it evenly using a rubber spatula or offset spatula, smoothing the top. Work quickly to prevent excessive melting.
Step 4: Add Sauce Layer (Optional)
If using, drizzle half of the warmed hot fudge or caramel sauce over the first ice cream layer. You can swirl it gently with a knife for a marbled effect, or leave it as a distinct layer.
Step 5: Add Second Ice Cream Layer
Repeat the process with your second ice cream flavor, spreading it evenly over the first layer. If using three flavors, add the third layer now. Smooth the top surface as evenly as possible.
Step 6: Initial Freeze
Cover the pie tightly with plastic wrap or aluminum foil, making sure it doesn’t touch the top surface. Place in the freezer for at least 4 hours, or preferably overnight, until completely solid.
Step 7: Add Final Toppings
About 10-15 minutes before serving, remove the pie from the freezer. Add your final toppings – pipe or spread whipped cream around the edges or over the entire top, drizzle with remaining sauces, sprinkle with chocolate chips or nuts, and add any other decorative toppings you like.
Step 8: Slice and Serve
Let the pie sit at room temperature for 5-10 minutes to make slicing easier. Dip a sharp knife in hot water, wipe it dry, and slice clean pieces. Wipe the knife between cuts for the neatest slices. Serve immediately and enjoy!
Notes
- For the cleanest slices, freeze the pie overnight rather than just 4 hours.
- If you’re adding a sauce layer between ice cream layers, make sure it’s not too hot, or it will melt the ice cream.
- You can make the crust up to 3 days in advance and keep it covered in the freezer.
- Premium ice cream brands work best as they have less air and create denser, more stable layers.
- To prevent ice crystals, cover the pie tightly and consume within 1 week for best quality.
Nutrition
- Serving Size: 1 slice (1/8 of pie)
- Calories: 425
- Sugar: 38g
- Sodium: 220mg
- Fat: 23g
- Saturated Fat: 13g
- Unsaturated Fat: 8g
- Trans Fat: 0.5g
- Carbohydrates: 52g
- Fiber: 2g
- Protein: 6g
- Cholesterol: 65mg
Carbohydrates: 52g
Fiber: 2g
Protein: 6g
Cholesterol: 65mg
Note: Nutrition information is approximate and varies based on ice cream flavors and toppings used.
Tips & Variations
The beauty of this ice cream pie recipe is its incredible versatility. Here are some delicious ways to customize it to your preferences:
Flavor Combinations to Try:
- Classic: Vanilla and chocolate ice cream with hot fudge
- Cookies & Cream: Use an Oreo crust with cookies and cream ice cream, topped with crushed Oreos
- Peanut Butter Lovers: Peanut butter and chocolate ice cream with peanut butter cups and hot fudge
- Mint Chocolate: Mint chocolate chip and chocolate ice cream with chocolate shavings
- Coffee House: Coffee and caramel ice cream with caramel drizzle and toffee bits
- Fruity Fresh: Strawberry and vanilla with fresh berry topping
- Birthday Cake: Use funfetti or birthday cake ice cream with rainbow sprinkles
Crust Variations:
- Graham cracker crust for a more traditional flavor
- Pretzel crust for a sweet-and-salty combination
- Brownie crust for an extra chocolatey base
- Peanut butter cookie crust
- Nilla wafer crust for a lighter option
Healthy Swaps:
- Use low-fat or non-dairy ice cream
- Replace butter with coconut oil in the crust
- Add fresh fruit instead of candy toppings
- Use sugar-free hot fudge and whipped cream
- Choose frozen yogurt instead of ice cream
Make It Adults-Only: Add a splash of liqueur to complement your ice cream flavors – Irish cream with coffee ice cream, amaretto with chocolate, or rum with butter pecan.
Pro Chef Tips
Want to take your ice cream pie from good to absolutely spectacular? Here are insider secrets that will elevate your dessert game:
Temperature Management is Key: The most common mistake is working with ice cream that’s too soft or too hard. The sweet spot is when it’s spreadable like thick frosting but still cold. If it melts too much, the layers will blend together and create an icy texture when refrozen.
Create a Barrier Layer: Professional pastry chefs often spread a thin layer of melted chocolate (that’s been slightly cooled) over the frozen crust before adding ice cream. This creates a moisture barrier that keeps the crust crispy and prevents sogginess. Let the chocolate set in the freezer for 10 minutes before adding ice cream.
Use the Right Spreading Technique: An offset spatula dipped in hot water makes spreading ice cream infinitely easier. The warm metal glides through the cold ice cream without tearing or creating gaps. Wipe and re-warm the spatula between layers.
Prevent Ice Crystal Formation: Ice crystals form when air reaches your frozen dessert. Press plastic wrap directly onto the surface of the pie before covering with foil. This double-layer protection keeps your pie creamy and prevents freezer burn.
The Hot Water Slicing Method: For picture-perfect slices, fill a tall glass with very hot water. Dip your knife completely in the water, wipe it dry with a towel, and immediately slice. The warm blade cuts through frozen dessert like butter. Repeat this process between each slice.
Strategic Sauce Placement: If you’re drizzling sauce on top for serving, do it at the very last minute. Sauce that sits too long on frozen ice cream will freeze solid and become difficult to cut through. For sauce between layers, it should be warm (not hot) and slightly thick to prevent it from running to the bottom.
Common Mistakes to Avoid
Even though this recipe is beginner-friendly, there are a few pitfalls that can impact your results. Here’s what to watch out for:
Not Packing the Crust Firmly Enough: A loosely packed crust will crumble when you try to slice the pie. Press down with serious pressure, especially in the corners where the bottom meets the sides. If your crust is falling apart, you might not have used enough butter to bind the crumbs together.
Working with Melted Ice Cream: If your ice cream melts completely during assembly, it will refreeze with an icy, crystallized texture instead of staying creamy. Work quickly, and if the ice cream starts getting too soft, pop it back in the freezer for 10 minutes before continuing.
Skipping the Freezing Time: Rushing the freezing process results in a pie that won’t hold its shape when sliced. Four hours is the minimum, but overnight is ideal. A fully frozen pie will give you clean, beautiful slices that don’t collapse.
Forgetting to Let It Soften Before Slicing: Trying to cut a rock-hard frozen pie will result in bent knives, cracked crusts, and mangled slices. Always let the pie sit at room temperature for 5-10 minutes before serving, and use the hot water knife method.
Using Low-Quality Ice Cream: Budget ice creams often contain more air and stabilizers, which can result in a less satisfying texture. They also tend to melt faster and refreeze with more ice crystals. Spending a bit more on premium ice cream makes a noticeable difference in your final result.
Storage & Meal Prep
Proper storage ensures your ice cream pie stays delicious from the first slice to the last. Here’s everything you need to know:
Freezer Storage: Keep your ice cream pie tightly covered in the freezer at 0°F (-18°C) or below. The pie will maintain best quality for up to 1 week, though it’s technically safe to eat for 1-2 months. After a week, the texture may become slightly grainy and ice crystals can form.
Covering Properly: Use plastic wrap pressed directly onto the surface, then wrap the entire pie dish with aluminum foil. This double-layer method prevents freezer burn and keeps other freezer odors from affecting your dessert. If your pie pan came with a lid, that’s even better.
Shelf Life Considerations: Because you’re working with store-bought ice cream that’s been softened and refrozen, the pie should be consumed sooner than the ice cream’s original expiration date. The quality is best within the first week of making it.
Thawing for Serving: Never thaw the pie completely – it should only soften slightly. Remove from the freezer 5-10 minutes before serving, depending on your room temperature. In very warm weather, 5 minutes is plenty. You want it soft enough to slice cleanly but still frozen enough to hold its shape.
Leftover Slices: If you have leftover slices, wrap each one individually in plastic wrap and store in an airtight container. This prevents them from absorbing other flavors and makes it easy to grab a single serving whenever a craving hits.
Make-Ahead & Freezer Notes
This dessert is a meal-prepper’s dream because it actually requires advance preparation. Here’s how to plan ahead:
Complete Make-Ahead Timeline: You can make this pie up to 1 week before serving for optimal quality. For parties, I recommend making it 2-3 days in advance – this ensures it’s completely frozen solid but hasn’t been in the freezer so long that ice crystals become an issue.
Component Prep: The crust can be made and pressed into the pan up to 3 days before adding the ice cream. Keep it covered tightly in the freezer. This is helpful if you want to spread out the work or if you’re making multiple pies for a large gathering.
Day-of Prep: On the day you’re serving, add the final decorative toppings (whipped cream, drizzles, sprinkles) about 15-30 minutes before serving. These fresh toppings look much better than ones that have been frozen, and they add a just-made quality to your presentation.
Freezer-Friendly Variations: Nearly all versions of this pie freeze beautifully. However, if you’re using fresh fruit as a topping, add it just before serving rather than freezing it. Frozen and thawed fresh fruit can become mushy and watery. Bananas, strawberries, and other high-water-content fruits are particularly problematic when frozen on top of the pie.
Best Reheating Method: This doesn’t apply here since you never want to “reheat” an ice cream pie! The key is proper serving temperature – frozen but slightly softened. If you accidentally let it get too soft, simply return it to the freezer for 20-30 minutes before serving.
Long-Term Freezing: While the pie is safe to eat for 1-2 months in the freezer, I don’t recommend storing it that long because the quality diminishes. Ice crystals form, flavors can dull, and the texture becomes less creamy. This dessert is best enjoyed within a week of making it.
Serving Suggestions
While ice cream pie is certainly spectacular on its own, the right accompaniments can turn it into an unforgettable dessert experience. Here are some delicious serving ideas:
Classic Pairings: Serve slices with an extra drizzle of hot fudge or caramel sauce on the plate for added decadence. A dollop of fresh whipped cream on the side (rather than on top) keeps it from getting too sweet. For chocolate pies, a dusting of cocoa powder on the plate creates an elegant presentation.
Coffee and Beverage Pairings: Ice cream pie pairs beautifully with hot coffee or espresso – the temperature contrast is delightful. For kids’ parties, serve with cold milk. Adult gatherings might enjoy it with dessert wine, Irish coffee, or a rich hot chocolate.
Fresh Fruit Accompaniments: A small serving of fresh berries (strawberries, raspberries, or blueberries) on the side adds color, freshness, and cuts through the richness. Macerated berries (tossed with a little sugar and left to release their juices) are even better.
Cookie or Brownie Addition: For true dessert lovers, serve the pie alongside a warm brownie or cookie. The combination of frozen and warm, crispy and creamy, creates an incredible textural experience.
Breakfast Twist: Believe it or not, ice cream pie can make an indulgent weekend breakfast treat. Serve a thin slice with fresh fruit and granola for a playful “breakfast sundae” vibe that kids and adults will love.
Party Presentation Ideas: For special occasions, create an ice cream pie bar where guests can choose their own toppings. Set out bowls of whipped cream, various sauces, nuts, candies, and fresh fruit. This interactive element makes dessert time more fun and memorable.
Seasonal Styling: In summer, garnish with fresh mint leaves and serve on bright, colorful plates. During holidays, use themed sprinkles or candy decorations. For fall, pair with caramel apples or cinnamon whipped cream.
FAQs Section
Q: Can I make this ice cream pie dairy-free?
A: Absolutely! Use dairy-free ice cream (coconut milk, almond milk, or oat milk-based varieties work great) and substitute coconut oil for butter in the crust. Many dairy-free ice creams are excellent quality now and work just as well as traditional ice cream. Just be sure to choose brands that freeze solid rather than staying soft-serve-like in the freezer.
Q: How do I prevent my ice cream layers from mixing together?
A: The key is temperature management. Make sure your first layer is completely frozen solid before adding the second layer – this usually takes about 1 hour in the freezer. Also, don’t let your ice cream soften too much before spreading; it should be spreadable but still cold and thick. Working quickly also helps prevent melting and mixing.
Q: Can I use a store-bought crust instead of making my own?
A: Yes! Store-bought graham cracker or chocolate cookie crusts work perfectly and save time. However, homemade crusts are more customizable and often taste better since you can control the butter content and thickness. If using a store-bought crust, you might want to reinforce it by brushing the inside with melted chocolate and freezing before adding ice cream.
Q: Why does my ice cream pie get icy and crystallized?
A: Ice crystals form when your pie is exposed to air or temperature fluctuations. Always cover your pie tightly with plastic wrap pressed directly on the surface, plus a layer of foil. Also, avoid repeatedly taking it in and out of the freezer. The best texture comes from making the pie, freezing it once completely, and then slicing what you need without refreezing leftovers multiple times.
Q: How far in advance can I make this pie?
A: For the best texture and flavor, make the pie 2-7 days before serving. You can technically make it earlier, but after a week, the quality starts to decline. The crust alone can be made up to 3 days ahead, and then you can add the ice cream layers closer to serving time.
Q: What’s the best way to slice the pie cleanly?
A: The hot water knife method is foolproof! Dip a sharp knife in hot water, wipe it dry with a towel, and immediately make one clean cut. Wipe the knife clean, dip it in hot water again, and make the next cut. This technique ensures smooth, bakery-worthy slices. Also, let the pie soften at room temperature for 5-10 minutes before slicing.
Q: Can I add mix-ins to the ice cream layers?
A: Definitely! Crushed cookies, candy pieces, chocolate chips, chopped nuts, or even brownie chunks can be folded into the softened ice cream before spreading it in the crust. This adds extra texture and flavor. Just make sure your mix-ins are small enough to allow for easy slicing, and don’t add so many that the ice cream doesn’t freeze properly.
Conclusion
There you have it – everything you need to create the most incredible, crowd-pleasing ice cream pie! This dessert combines simplicity with spectacular results, making it perfect for both novice cooks and experienced home bakers looking for an easy win. The no-bake nature means it’s foolproof, while the endless customization options ensure you’ll never get bored making it.
Whether you’re preparing for a summer barbecue, a birthday celebration, a holiday gathering, or just treating yourself on a random Tuesday, this ice cream pie delivers every single time. The combination of that crunchy cookie crust with layers of creamy ice cream and your favorite toppings creates a dessert that’s both nostalgic and exciting, familiar and special.
I hope this recipe becomes a staple in your dessert rotation! Once you make it the first time, you’ll be amazed at how simple it is and how impressive the results look. Don’t be surprised if you become known as “the ice cream pie person” in your friend group – it’s a delicious reputation to have.
Now it’s your turn! Give this recipe a try and let me know how it turns out. What ice cream flavor combinations did you use? Did you add any creative toppings? I’d love to hear about your ice cream pie adventures in the comments below. And if you love this recipe, please share it with your friends and save it to your Pinterest boards so you can find it easily next time that ice cream pie craving hits!
Happy freezing, and enjoy every creamy, dreamy bite! 🍦🥧