Impossible Pie Recipe
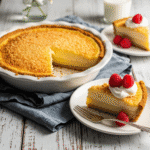
This magical Impossible Pie creates its own crust while baking! With just one simple batter, you’ll get three delicious layers: a golden coconut crust on the bottom, a creamy custard center, and a light cake-like topping. Perfect for busy weeknights or impressive enough for company, this vintage recipe uses pantry staples and comes together in just 10 minutes of prep time.
- Prep Time: 10 minutes
- Cook Time: 45 minutes
- Total Time: 55 minutes (plus cooling time)
- Yield: 8 servings 1x
- Category: Dessert
- Method: Baking
- Cuisine: American
- Diet: Vegetarian
Ingredients
Scale
- 4 large eggs (room temperature preferred)
- 1¾ cups (420ml) whole milk
- ½ cup (115g) unsalted butter, melted and slightly cooled
- ¾ cup (150g) granulated sugar
- ½ cup (60g) Bisquick baking mix
- 1 teaspoon pure vanilla extract
- 1 cup (85g) sweetened shredded coconut
- ¼ teaspoon salt (optional, if using unsalted butter)
- Pinch of ground nutmeg (optional, for a hint of warmth)
Instructions
- Preheat and Prepare: Preheat your oven to 350°F (175°C). Generously grease a 9-inch pie dish with butter or cooking spray, making sure to coat the bottom and sides completely. This prevents sticking and helps achieve a golden crust.
- Blend the Batter: Add eggs, milk, melted butter, sugar, Bisquick, vanilla extract, and salt (if using) to a blender. Blend on medium-high speed for about 30 seconds until completely smooth and well combined. Alternatively, whisk vigorously by hand in a large bowl for 2-3 minutes until no lumps remain and the mixture is homogenous.
- Add the Coconut: Add the shredded coconut to the blender or bowl. Pulse a few times or stir gently just until the coconut is evenly distributed throughout the batter. Don’t over-blend – you want the coconut to maintain some texture.
- Pour and Settle: Pour the batter into your prepared pie dish. Tap the dish gently on the counter a few times to release any air bubbles and help the batter settle evenly. The coconut may float to the top at this stage – that’s perfectly normal!
- Bake to Perfection: Place the pie dish on the center rack of your preheated oven. Bake for 45-50 minutes, or until the top is golden brown and the center is just set with only a slight jiggle. A knife inserted near (but not in) the center should come out mostly clean. The pie will continue cooking slightly as it cools due to residual heat.
- Cool and Set: Remove from the oven and place on a wire cooling rack. Let the pie cool for at least 30 minutes before slicing. As it cools, you’ll notice the layers have magically formed! The pie can be served warm, at room temperature, or chilled – all three ways are delicious. For cleanest slices, chill for 2-3 hours before cutting.
- Slice and Serve: Use a sharp knife dipped in hot water (and dried) for the cleanest cuts. Wipe the knife between slices. Serve with whipped cream, vanilla ice cream, fresh berries, or a dusting of powdered sugar.
Notes
- Testing for Doneness: The center should have just a slight jiggle when you gently shake the dish. It will continue to set as it cools. Overbaking can make the custard layer rubbery.
- Layer Formation: Don’t worry if you can’t see distinct layers while baking – they become more defined as the pie cools.
- Milk Temperature: Using room temperature milk helps the butter stay incorporated and prevents it from solidifying into small lumps.
- Coconut-Free Version: You can omit the coconut entirely, though the texture will be more like a custard pie. Add an extra 2 tablespoons of Bisquick to help with crust formation.
- High Altitude Adjustments: If baking above 3,500 feet, reduce sugar by 2 tablespoons and increase baking time by 5-8 minutes.
Nutrition
- Serving Size: 1 slice (⅛ of pie)
- Calories: 285
- Sugar: 22g
- Sodium: 215mg
- Fat: 16g
- Saturated Fat: 10g
- Unsaturated Fat: 5g
- Trans Fat: 0g
- Carbohydrates: 29g
- Fiber: 1g
- Protein: 6g
- Cholesterol: 120mg
Find it online: https://focialy.com/impossible-pie-recipe/