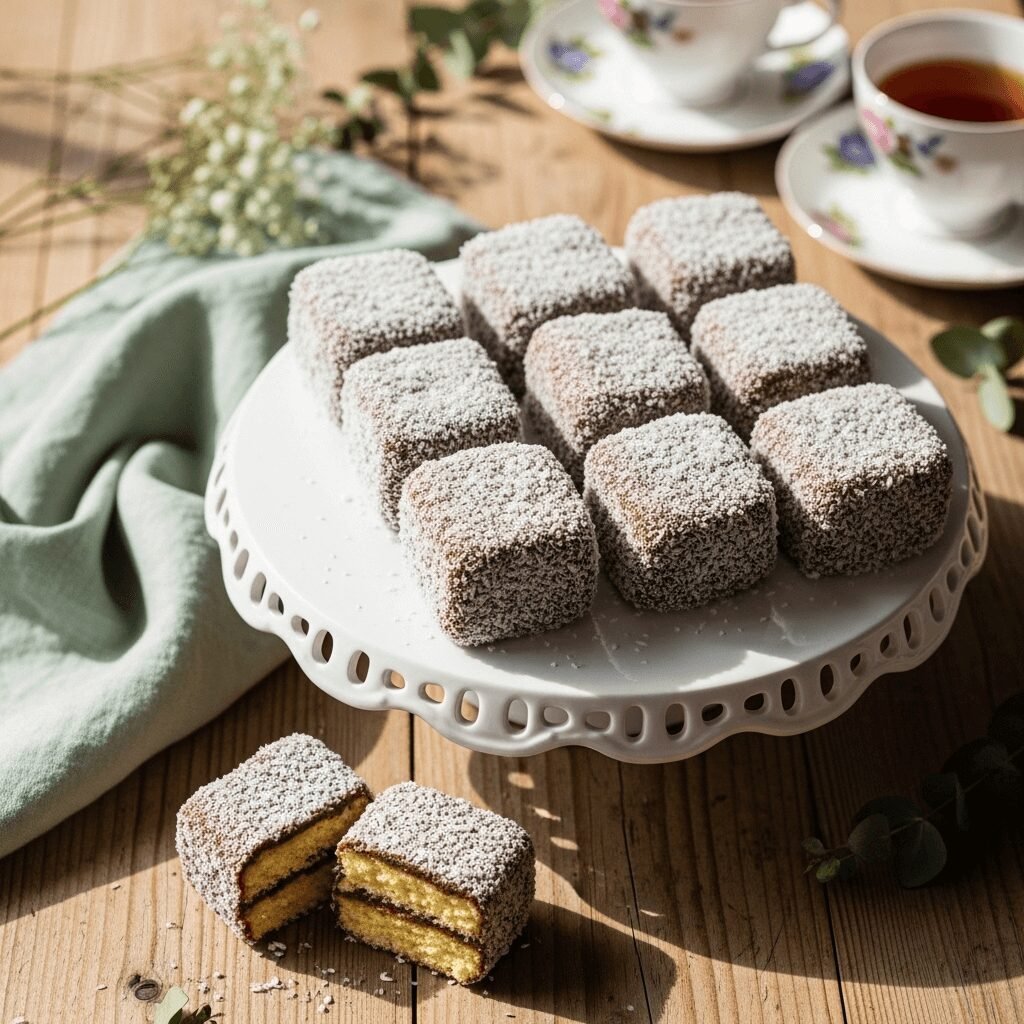
The Ultimate Australian Lamington Recipe – Fluffy Sponge Cake Squares Dipped in Chocolate & Coconut

There’s something absolutely magical about biting into a soft, pillowy sponge cake coated in rich chocolate icing and rolled in sweet, shredded coconut. That’s the beauty of lamingtons—Australia’s beloved national cake that’s been winning hearts for over a century. These delightful little squares are perfect for afternoon tea, birthday parties, bake sales, or any time you want to impress guests with minimal fuss.
If you’ve never made lamingtons before, don’t worry! This recipe breaks down every step so you can create bakery-quality treats right in your own kitchen. The sponge is light and airy, the chocolate coating is glossy and delicious, and the coconut adds that signature texture everyone loves. Whether you’re hosting a morning tea, packing lunch boxes, or simply craving something sweet, these lamingtons are about to become your new favorite go-to dessert.
History & Background of Lamingtons
The lamington holds a special place in Australian culinary history, and while its exact origins are delightfully debated, most food historians agree it emerged in the late 1800s or early 1900s in Queensland, Australia. The most popular story credits Lord Lamington, the Governor of Queensland from 1896 to 1901, with inspiring this iconic treat—though whether it was intentionally created or born from necessity remains a charming mystery.
One legend suggests that Lord Lamington’s chef invented these cakes when unexpected guests arrived, and he needed to make a plain sponge cake more presentable and go further. By cutting the cake into squares, dipping them in chocolate, and rolling them in coconut, he created something entirely new and utterly delicious. Another story claims Lord Lamington himself called them “those bloody poofy woolly biscuits,” though he later embraced them as they gained popularity.
Regardless of their true origin, lamingtons quickly became a fundraising staple across Australia and New Zealand. “Lamington drives” were community events where these cakes were sold to raise money for schools, churches, and local causes—a tradition that continues today. In 2006, lamingtons were even designated the “National Cake of Australia” by the National Trust of Queensland.
The classic version features vanilla sponge, chocolate icing, and desiccated coconut, but over the decades, creative bakers have introduced variations with jam filling, cream layers, pink icing, and even modern twists like salted caramel or Nutella. Despite these innovations, the original remains the most cherished, representing Australian hospitality and home baking at its finest.
Why You’ll Love This Lamington Recipe
This Australian lamington recipe delivers authentic bakery-quality results with straightforward techniques that any home baker can master. The sponge cake is incredibly light and tender—not dense or heavy—and the chocolate coating strikes the perfect balance between rich and not-too-sweet.
Here’s why this recipe stands out:
- Authentic texture and taste – The sponge is genuinely fluffy with that characteristic airy crumb that makes lamingtons so special
- Simple ingredients – You likely have everything you need already in your pantry
- Make-ahead friendly – The sponge actually tastes better when made a day ahead, making it perfect for party planning
- Crowd-pleasing dessert – Appeals to kids and adults alike, and looks impressive on any dessert table
- Perfect for gifting – These travel well and make thoughtful homemade presents
- Budget-friendly baking – Creates 16-20 generous squares without breaking the bank
- Customizable – Easy to adapt with different flavors or fillings once you master the basic technique
Ingredient Notes
Understanding your ingredients helps you achieve the best possible lamingtons. Here’s what you need and why each component matters:
For the Sponge Cake:
- All-purpose flour – Provides structure without making the cake heavy. You can substitute with self-rising flour and omit the baking powder.
- Eggs – Use large eggs at room temperature; they whip up better and create more volume. The eggs are the primary leavening agent.
- Caster sugar (superfine sugar) – Dissolves quickly when beaten with eggs, creating that light, airy texture. Regular granulated sugar works but takes longer to dissolve.
- Butter (melted) – Adds richness and moisture. Make sure it’s melted but not hot, or it will deflate your whipped eggs.
- Vanilla extract – Pure vanilla gives the best flavor, but imitation works in a pinch.
- Baking powder – Provides extra lift for a tall, fluffy sponge.
For the Chocolate Icing:
- Powdered sugar (icing sugar) – Creates a smooth, glossy coating that’s not too thick or thin.
- Cocoa powder – Use good-quality unsweetened cocoa for the best chocolate flavor. Dutch-processed cocoa gives a richer color.
- Butter – Adds shine and helps the icing coat smoothly.
- Milk – Thins the icing to the perfect dipping consistency. You can use any type of milk, including non-dairy alternatives.
For Coating:
- Desiccated coconut – This is finely shredded, unsweetened dried coconut. It’s different from sweetened shredded coconut, which is moister and coarser. Find it in the baking aisle or international section.
Equipment Needed
Having the right tools makes the lamington-making process much smoother:
- 8×8-inch or 9×9-inch square baking pan – For the sponge cake
- Electric hand mixer or stand mixer – Essential for whipping the eggs to maximum volume
- Large mixing bowls – At least two for separating wet and dry ingredients
- Wire cooling rack – Allows the sponge to cool completely and evenly
- Shallow bowls or dishes – For the chocolate icing and coconut coating
- Two forks or dipping tools – Makes dipping the cake squares much easier
- Parchment paper – To line your baking pan and prevent sticking
- Fine-mesh sieve – For sifting flour and cocoa powder
- Sharp serrated knife – For cutting clean, even squares
- Measuring cups and spoons – For accurate measurements
Lamington Recipe

Classic Australian lamingtons featuring light vanilla sponge cake squares dipped in rich chocolate icing and coated with sweet desiccated coconut. Perfect for afternoon tea, parties, or anytime you need an impressive yet simple dessert.
- Prep Time: 30 minutes
- Cook Time: 25 minutes
- Total Time: 2 hours (or overnight)
- Yield: 2 hours 55 minutes 1x
- Category: 16-20 lamington squares
- Method: Baking
- Cuisine: Australian
- Diet: Vegetarian
Ingredients
For the Sponge Cake:
- 4 large eggs, at room temperature
- ¾ cup (150g) caster sugar (superfine sugar)
- 1 cup (125g) all-purpose flour
- 1½ teaspoons baking powder
- ¼ teaspoon salt
- ¼ cup (60g) unsalted butter, melted and cooled
- 1 teaspoon pure vanilla extract
- 2 tablespoons hot water
For the Chocolate Icing:
- 4 cups (500g) powdered sugar (icing sugar)
- ½ cup (50g) unsweetened cocoa powder
- 3 tablespoons unsalted butter, melted
- ½ cup (120ml) milk (plus more if needed)
- 1 teaspoon vanilla extract
For Coating:
- 3 cups (270g) desiccated coconut (unsweetened shredded coconut)
Instructions
Step 1: Prepare the Pan
Preheat your oven to 350°F (175°C). Grease an 8×8-inch square baking pan and line it with parchment paper, leaving some overhang on the sides for easy removal. Set aside.
Step 2: Whip the Eggs and Sugar
In a large mixing bowl, combine the eggs and caster sugar. Using an electric mixer on high speed, beat for 8-10 minutes until the mixture is thick, pale, and tripled in volume. When you lift the beaters, the mixture should fall in thick ribbons that hold their shape for a few seconds. This step is crucial for a light, fluffy sponge.
Step 3: Prepare the Dry Ingredients
While the eggs are whipping, sift together the flour, baking powder, and salt in a separate bowl. Set aside.
Step 4: Combine Butter and Vanilla
In a small bowl, mix the melted (but cooled) butter with vanilla extract and hot water. This helps the butter incorporate more easily without deflating the eggs.
Step 5: Fold in Flour
Gently sift half the flour mixture over the whipped eggs. Using a large spatula, fold carefully from the bottom of the bowl up and over, turning the bowl as you go. Repeat with the remaining flour. Work gently to preserve all those air bubbles—they’re what makes your sponge light.
Step 6: Add Butter Mixture
Pour the butter mixture around the edge of the bowl, then fold it through the batter with the same gentle folding motion. Stop as soon as everything is combined—overmixing will deflate the batter.
Step 7: Bake the Sponge
Pour the batter into your prepared pan and gently smooth the top. Bake for 23-25 minutes, or until the cake is golden, springs back when lightly touched, and a toothpick inserted in the center comes out clean. Don’t overbake or the sponge will be dry.
Step 8: Cool Completely
Let the cake cool in the pan for 10 minutes, then use the parchment overhang to lift it onto a wire rack. Cool completely—at least 2 hours, or ideally overnight. Day-old sponge is actually easier to work with because it’s slightly firmer and less crumbly.
Step 9: Cut into Squares
Once completely cool, use a sharp serrated knife to trim the edges (baker’s treat!), then cut the cake into 16-20 even squares, depending on your preferred size. Traditional lamingtons are about 2 inches square.
Step 10: Prepare the Chocolate Icing
In a medium bowl, sift together the powdered sugar and cocoa powder. Add the melted butter, milk, and vanilla. Whisk until completely smooth. The icing should be thin enough to coat the cake but thick enough to cling—about the consistency of heavy cream. Add more milk by the tablespoon if needed.
Step 11: Set Up Your Coating Station
Pour the chocolate icing into a shallow bowl. Place the desiccated coconut in another shallow bowl or on a large plate. Line a baking sheet with parchment paper for the finished lamingtons.
Step 12: Dip and Coat
Working with one square at a time, use two forks to dip the cake into the chocolate icing, ensuring all sides are coated. Let excess icing drip off briefly, then immediately roll the square in the coconut, using your hands or forks to coat completely. Place on the prepared baking sheet. Repeat with remaining squares.
Step 13: Set the Coating
Let the lamingtons sit at room temperature for 30 minutes to 1 hour until the icing sets. They’re now ready to serve!
Notes
- Day-old sponge works best – The cake is firmer and easier to handle without crumbling. Make the sponge a day ahead if possible.
- Icing consistency is key – If your icing is too thick, add milk one tablespoon at a time. If too thin, add more powdered sugar.
- Keep your hands clean – Have a damp towel nearby to wipe chocolate and coconut from your fingers between dipping.
- Warm the icing – If the icing starts to thicken as you work, microwave it for 5-10 seconds to thin it out again.
- Jam-filled variation – Slice the sponge horizontally, spread with raspberry jam, then sandwich back together before cutting into squares.
Nutrition
- Serving Size: 1 lamington square
- Calories: 245
- Sugar: 28g
- Sodium: 95mg
- Fat: 10g
- Saturated Fat: 7g
- Unsaturated Fat: 2.5g
- Trans Fat: 0g
- Carbohydrates: 38g
- Fiber: 2g
- Protein: 4g
- Cholesterol: 55mg
Tips & Variations
Flavor Variations:
- Raspberry Lamingtons – Add 2 tablespoons of seedless raspberry jam between two layers of sponge before cutting into squares
- Pink Lamingtons – Swap the cocoa powder for strawberry powder or simply use vanilla icing with pink food coloring
- Chocolate Lamingtons – Add 2 tablespoons of cocoa powder to the sponge batter for a double-chocolate version
- Lemon Lamingtons – Add lemon zest to the sponge and use a lemon icing instead of chocolate
- Jaffa Lamingtons – Add orange zest to the sponge and chocolate icing for a chocolate-orange twist
Texture Customizations:
- Extra coconutty – Use 4 cups of coconut for a thicker coating
- Toasted coconut – Toast the coconut lightly before coating for a nuttier flavor
- Cream-filled – Slice squares horizontally and add whipped cream or buttercream before dipping
Dietary Adaptations:
- Gluten-free – Substitute with a 1:1 gluten-free flour blend
- Dairy-free – Use plant-based butter and your favorite non-dairy milk
- Lower sugar – Reduce the icing sugar by ¼ cup and add an extra tablespoon of cocoa for a less sweet coating
Pro Chef Tips
Achieve Maximum Sponge Height: The secret to a tall, fluffy sponge is all in the egg-whipping stage. Don’t rush this step—those 8-10 minutes of beating create countless tiny air bubbles that expand in the oven. Your mixture should nearly fill the bowl when properly whipped.
Room Temperature Ingredients Matter: Cold eggs don’t whip as well as room-temperature ones. If you forget to take them out ahead of time, place whole eggs in a bowl of warm (not hot) water for 5 minutes.
The Toothpick Test Isn’t Everything: Your sponge is done when it springs back when touched and just barely starts to pull away from the pan sides. A few moist crumbs on a toothpick are fine—totally clean means overbaked.
Dipping Technique: Use two forks to handle the cake squares, working quickly but gently. Hold the square with one fork while using the other to help coat all sides. The key is minimizing handling time so the cake doesn’t absorb too much icing and become soggy.
Fresh Coconut Is Better: While desiccated coconut lasts months in the pantry, fresher coconut gives better flavor and texture. Check the expiration date and store opened packages in the refrigerator.
Temperature Control: If your kitchen is very warm, refrigerate the icing for 10 minutes before dipping to help it set faster on the cakes. Conversely, if it’s cold, the butter in the icing might solidify—just microwave briefly to re-liquify.
Common Mistakes to Avoid
Deflating the Batter: The biggest mistake is overmixing once you add the flour and butter. Use gentle folding motions rather than stirring, and stop the moment you don’t see any more flour streaks. Every extra stir releases precious air bubbles.
Icing Too Hot or Too Cold: If your melted butter is too hot when you make the icing, it can seize up. Let butter cool slightly before mixing. Similarly, if the icing becomes too thick as it cools, gently reheat it in 5-second bursts in the microwave.
Cutting Warm Cake: This is tempting but results in crumbly, messy squares that fall apart when dipping. Always let the sponge cool completely—patience pays off with clean edges and intact lamingtons.
Not Preparing Your Station: Set up your chocolate icing, coconut, and receiving tray before you start dipping. Once you begin, you’ll have chocolate on your hands and need to work quickly. Having everything ready prevents chaos.
Using Sweetened Coconut: Sweetened shredded coconut from the baking aisle is too moist, coarse, and sweet. You need desiccated coconut, which is finely shredded and unsweetened. The texture and taste are completely different.
Storage & Meal Prep
Room Temperature Storage: Lamingtons keep beautifully at room temperature in an airtight container for 3-4 days. Place parchment paper between layers to prevent sticking. They actually taste better after sitting overnight as the flavors meld.
Refrigerator Storage: If your kitchen is very warm or humid, store lamingtons in the refrigerator for up to 5 days. Bring them to room temperature for 15-20 minutes before serving for the best texture and flavor.
Reheating: Lamingtons are traditionally served at room temperature, but if you prefer them slightly warm, microwave individual squares for 5-8 seconds. Don’t overdo it or the chocolate will melt and the coconut will become tough.
Maintaining Freshness: The coconut coating helps seal in moisture, but if you notice them drying out, place a piece of fresh bread in the storage container. The cakes will absorb moisture from the bread, staying soft and tender.
Make-Ahead & Freezer Notes
Make-Ahead Strategy: The beauty of lamingtons is that they’re actually better when components are made ahead. Bake the sponge 1-2 days in advance, wrap tightly in plastic wrap, and store at room temperature. The slightly drier texture makes dipping much easier and reduces crumbling.
Freezing Uncoated Sponge: Cut the cooled sponge into squares and freeze in a single layer on a baking sheet until solid (about 2 hours). Transfer to a freezer bag and freeze for up to 3 months. Thaw at room temperature before dipping—frozen squares can be dipped directly but may crack.
Freezing Finished Lamingtons: Completely finished lamingtons freeze exceptionally well for up to 2 months. Place them in a single layer in an airtight container with parchment between layers. They thaw at room temperature in about 30 minutes and taste freshly made.
Best Reheating Method: For frozen lamingtons, thaw overnight in the refrigerator, then bring to room temperature on the counter for 30 minutes. This gradual thawing prevents condensation from making the coconut soggy.
Partial Make-Ahead: You can make the sponge and chocolate icing the day before, store them separately, and dip the morning of your event. This gives you the best of both worlds—fresh coating with minimal day-of stress.
Serving Suggestions
Lamingtons shine brightest as part of a traditional Australian afternoon tea spread, but they’re versatile enough for any occasion.
Classic Afternoon Tea: Serve lamingtons alongside hot tea or coffee, small sandwiches, scones with jam and cream, and fresh fruit. This is how Australians have enjoyed them for generations.
Party Platter: Arrange lamingtons on a tiered stand with other small desserts like mini pavlovas, Anzac biscuits, or chocolate crackles for a stunning Australian-themed dessert table.
Beverage Pairings: Lamingtons pair wonderfully with Earl Grey tea, flat white coffee, hot chocolate, or even a glass of cold milk. The coconut and chocolate complement both robust and delicate beverages.
Ice Cream Enhancement: Crumble a lamington over vanilla ice cream for an incredible texture contrast—the cold creaminess with soft cake, chocolate, and coconut is absolutely divine.
Breakfast or Brunch: While traditionally a dessert or afternoon treat, lamingtons make a decadent addition to a special brunch spread alongside fresh fruit, yogurt, and pastries.
With Fresh Berries: Serve with a side of fresh strawberries, raspberries, or passion fruit. The tartness of fresh berries cuts through the sweetness beautifully.
FAQs Section
Can I make lamingtons without a mixer?
While possible, it’s extremely difficult to achieve the proper volume by hand-whisking. The eggs need to be beaten for 8-10 minutes at high speed to incorporate enough air. If you must, use a hand whisk and expect a significant arm workout and potentially denser results.
Why is my sponge dense instead of fluffy?
This usually happens from deflating the batter. Make sure you whip the eggs long enough (they should triple in volume), fold gently when adding flour and butter, and don’t overmix. Also check that your baking powder is fresh—expired leavening agents lose effectiveness.
Can I use regular shredded coconut instead of desiccated?
Sweetened shredded coconut is too coarse and moist for authentic lamingtons. If that’s all you have, pulse it in a food processor to make it finer, though the texture still won’t be quite the same. Desiccated coconut is worth seeking out at international markets or ordering online.
My chocolate icing is too thick—how do I fix it?
Simply add milk one tablespoon at a time, whisking well between additions, until you reach the right consistency. The icing should be pourable but coat a spoon. If you accidentally make it too thin, add more powdered sugar.
Why are my lamingtons falling apart when I dip them?
This happens when the sponge is too fresh and soft, or if it’s overbaked and dry. Day-old cake works best because it’s slightly firmer. Also ensure you’re working quickly with two forks and not over-handling the squares.
Can I make mini lamingtons?
Absolutely! Cut the sponge into smaller 1-inch squares for bite-sized treats perfect for parties. You’ll get 40-50 mini lamingtons from one batch. They’re adorable and easier to eat in social settings.
How do I prevent the coconut from clumping?
Make sure the coconut is at room temperature and fluff it up with your hands before using. If it’s clumpy from moisture, spread it on a baking sheet and dry it in a 200°F oven for 5-10 minutes, stirring occasionally, then cool completely.
Conclusion
Congratulations—you now have everything you need to create authentic Australian lamingtons that would make any Aussie proud! These delightful squares of sponge cake, chocolate, and coconut are more than just a dessert; they’re a piece of culinary history that brings people together over cups of tea and good conversation.
The beauty of lamingtons lies in their simplicity and versatility. Whether you’re making them for a special celebration, a bake sale, or simply because you’re craving something sweet and satisfying, this recipe delivers every single time. The fluffy sponge, rich chocolate coating, and sweet coconut create a flavor combination that’s truly irresistible.
Don’t be intimidated by the multiple steps—each one is straightforward, and the results are absolutely worth it. Once you’ve mastered the basic recipe, feel free to experiment with the variations and make them your own. Add a layer of jam, try different colored icings, or toast the coconut for extra flavor.
I’d love to hear about your lamington-making adventures! Did you try any variations? Are you serving them for a special occasion? Leave a comment below sharing your experience, and don’t forget to save this recipe to your Pinterest boards so you can find it easily next time that lamington craving hits. Happy baking!