The Ultimate Nanaimo Bars Recipe: A No-Bake Canadian Classic
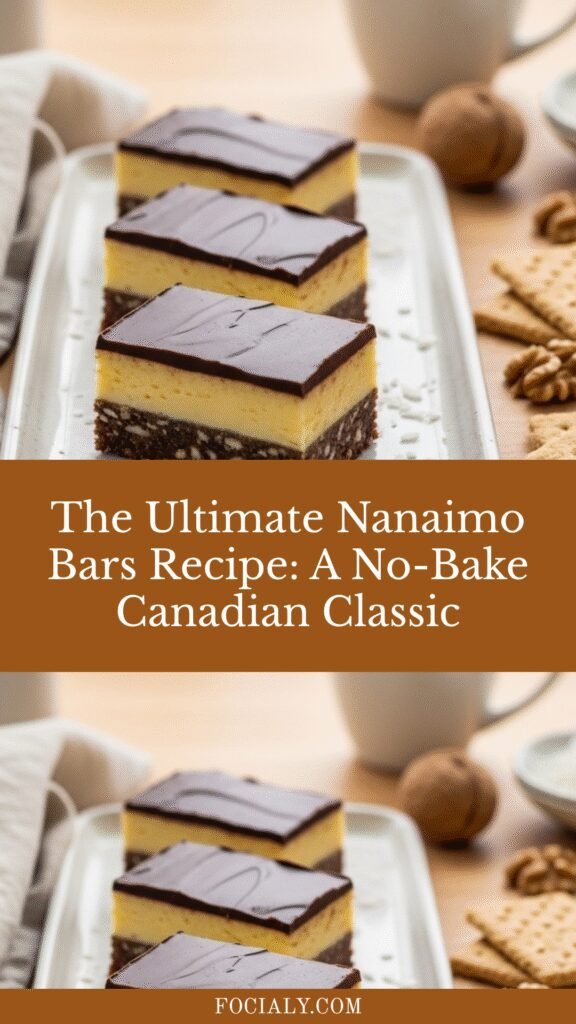
If you’ve ever craved a dessert that’s equal parts indulgent, impressive, and surprisingly easy to make, let me introduce you to Nanaimo bars! These iconic Canadian treats feature three luxurious layers: a rich chocolate-coconut base, a creamy custard-flavored middle, and a glossy chocolate ganache topping. They’re no-bake, require no special baking skills, and deliver that perfect balance of textures—crunchy, creamy, and smooth all in one bite.
Nanaimo bars are perfect for holiday cookie exchanges, potlucks, family gatherings, or whenever you want to impress guests without turning on your oven. They’re especially popular during Christmas and Thanksgiving, but honestly, these bars are so delicious that any occasion becomes special when you serve them. The best part? They taste like you spent hours in the kitchen, but they come together in about 30 minutes of hands-on time.
History / Background
Nanaimo bars are named after the beautiful city of Nanaimo, located on Vancouver Island in British Columbia, Canada. While the exact origin story is somewhat debated, most food historians agree that these bars emerged in the 1950s, though similar recipes appeared in Canadian cookbooks as early as the 1940s under different names like “chocolate fridge cake” or “smog bars.”
The city of Nanaimo has fully embraced this dessert as its culinary claim to fame. In 1986, the city held a contest to find the ultimate Nanaimo bar recipe, receiving entries from across Canada. Joyce Hardcastle’s recipe won, and it became the “official” version that many Canadians still follow today. The city even created a Nanaimo Bar Trail, where visitors can sample creative variations at local restaurants and bakeries.
These bars gained international recognition when they were featured in various American cooking magazines in the 1980s and 1990s. Today, they’re considered one of Canada’s most iconic desserts, right alongside butter tarts and beaver tails. What makes Nanaimo bars special is their no-bake convenience combined with their sophisticated, layered presentation—they look fancy but are actually quite forgiving to make, even for beginner bakers.
Why You’ll Love This Recipe
Nanaimo bars are the perfect combination of elegance and ease. They deliver that “wow factor” presentation that makes people think you’re a professional pastry chef, but the reality is that you’re simply pressing, spreading, and chilling. No baking means no risk of burning, no worrying about oven temperatures, and no heating up your kitchen on warm days.
Here’s why this recipe will become your go-to dessert:
- No-bake convenience – Everything comes together in the refrigerator, making these perfect for summer or when your oven is occupied with other dishes
- Make-ahead friendly – These bars actually taste better after sitting overnight, making them ideal for party planning
- Crowd-pleaser guaranteed – The combination of chocolate, coconut, and creamy custard appeals to almost everyone
- Impressive presentation – Those three distinct layers look professional and bakery-worthy
- Great for gifting – They travel well and make beautiful homemade gifts during the holidays
- Customizable flavors – Once you master the classic, you can experiment with mint, peanut butter, or coffee variations
- Budget-friendly – Uses everyday pantry ingredients without any expensive specialty items
- Perfect texture variety – Crunchy base, smooth cream center, and silky chocolate top create an amazing mouthfeel
Ingredient Notes
Let’s break down what makes each layer special and discuss some helpful substitutions:
For the Base Layer: Graham cracker crumbs form the foundation—you can buy pre-crushed crumbs or pulse whole graham crackers in a food processor. Sweetened shredded coconut adds texture and tropical flavor; avoid unsweetened coconut as it lacks the sweetness this layer needs. Chopped walnuts provide crunch, but you can substitute pecans or almonds if preferred. Cocoa powder gives that chocolate depth, while butter binds everything together. The egg in this layer is added to hot butter mixture, which cooks it gently to create a fudgy, cohesive base.
For the Custard Layer: Butter creates richness, while heavy cream adds luxurious smoothness. Bird’s Custard Powder is traditional and gives that distinctive vanilla-custard flavor—you can find it in the British section of grocery stores or online. If unavailable, you can substitute vanilla pudding mix (not instant). Powdered sugar is essential here for the right texture; granulated sugar won’t dissolve properly.
For the Chocolate Layer: Semi-sweet chocolate chips melt smoothly and provide the perfect level of sweetness. You can use chocolate bars chopped up instead. The butter addition makes the chocolate glossy and easier to spread without cracking.
Equipment Needed
You’ll need these tools to create perfect Nanaimo bars:
- 9×9-inch square baking pan (or 8×8 for thicker bars)
- Parchment paper or aluminum foil (for easy removal)
- Medium saucepan
- Mixing bowls (at least 2 medium-sized)
- Hand mixer or stand mixer (for the custard layer)
- Rubber spatula
- Sharp knife (for cutting clean bars)
- Measuring cups and spoons
- Double boiler or microwave-safe bowl (for melting chocolate)
- Cutting board
- Whisk
Nanaimo Bars Recipe

These classic Canadian Nanaimo bars feature three decadent layers: a chocolate-coconut-walnut base, creamy custard middle, and smooth chocolate ganache topping. No baking required for this impressive dessert!
- Prep Time: 30 minutes
- Cook Time: 3 hours
- Total Time: 3 hours 30 minutes
- Yield: 16-20 bars 1x
- Category: Dessert
- Method: No-Bake, Chilled
- Cuisine: Canadian
- Diet: Vegetarian
Ingredients
Bottom Layer:
- 1/2 cup (115g) unsalted butter
- 1/4 cup (50g) granulated sugar
- 5 tablespoons (35g) unsweetened cocoa powder
- 1 large egg, beaten
- 1 3/4 cups (175g) graham cracker crumbs
- 1 cup (85g) sweetened shredded coconut
- 1/2 cup (60g) chopped walnuts
Middle Layer:
- 1/2 cup (115g) unsalted butter, softened
- 3 tablespoons (45ml) heavy cream
- 2 tablespoons (15g) Bird’s Custard Powder (or vanilla pudding mix)
- 2 cups (240g) powdered sugar
Top Layer:
- 4 ounces (115g) semi-sweet chocolate chips
- 2 tablespoons (30g) unsalted butter
Instructions
Prepare the Pan:
- Line a 9×9-inch baking pan with parchment paper, leaving overhang on two sides for easy removal later. This is crucial for getting clean bars.
Make the Bottom Layer: 2. In a medium saucepan over low heat, melt 1/2 cup butter with sugar and cocoa powder, stirring constantly until smooth and well combined, about 3-4 minutes.
- Remove from heat and quickly whisk in the beaten egg. Return to very low heat and stir constantly for 2-3 minutes until the mixture thickens slightly. This cooks the egg safely.
- Remove from heat and stir in graham cracker crumbs, coconut, and walnuts until everything is evenly coated and combined.
- Press the mixture firmly and evenly into the prepared pan using the back of a spoon or your hands (slightly dampened hands work great). The firmer you press, the better the bars will hold together.
- Refrigerate for at least 15 minutes while you prepare the middle layer.
Make the Middle Layer: 7. In a mixing bowl, beat softened butter with an electric mixer on medium speed until fluffy, about 2 minutes.
- Add heavy cream and custard powder, beating until combined.
- Gradually add powdered sugar, one cup at a time, beating on low speed first then increasing to medium-high. Beat for 3-4 minutes until the mixture is light, fluffy, and smooth.
- Spread the custard layer evenly over the chilled bottom layer using an offset spatula or butter knife. Take your time to create a smooth, even surface.
- Refrigerate for at least 30 minutes until firm to the touch.
Make the Top Layer: 12. Create a double boiler by placing a heatproof bowl over a pot of simmering water (don’t let the bowl touch the water), or use a microwave-safe bowl.
- Melt chocolate chips and 2 tablespoons butter together, stirring frequently until completely smooth. If using microwave, heat in 20-second intervals, stirring between each.
- Let the chocolate mixture cool for 5 minutes—this prevents it from melting the custard layer beneath.
- Pour the chocolate over the custard layer and spread evenly using a spatula. Work quickly but gently to avoid disturbing the layer underneath.
- Refrigerate for at least 2 hours, or until the chocolate is completely set and firm.
Cut and Serve: 17. Using the parchment overhang, lift the entire bar out of the pan and place on a cutting board.
- For clean cuts, use a large sharp knife dipped in hot water and wiped dry between each cut. Cut into 16-20 squares.
- Let bars sit at room temperature for 5-10 minutes before serving for the best texture and flavor.
Notes
- The egg in the base layer is cooked by the hot butter mixture and gentle heating, making it safe to consume.
- Bird’s Custard Powder is the traditional ingredient, but vanilla pudding mix (not instant) works as a substitute.
- For easier cutting, score the chocolate layer lightly after it’s been chilling for 30 minutes, then finish chilling before cutting through completely.
- Bars can be stored in an airtight container in the refrigerator for up to 1 week or frozen for up to 3 months.
- If your kitchen is very warm, chill the knife between cuts to keep chocolate from melting.
Nutrition
- Serving Size: 1 bar (based on 16 servings)
- Calories: 285
- Sugar: 24g
- Sodium: 95mg
- Fat: 18g
- Saturated Fat: 10g
- Unsaturated Fat: 6g
- Trans Fat: 0g
- Carbohydrates: 30g
- Fiber: 2g
- Protein: 3g
- Cholesterol: 45mg
Tips & Variations
Flavor Variations:
- Mint Nanaimo Bars: Add 1/2 teaspoon peppermint extract to the custard layer and a few drops of green food coloring for a festive twist
- Peanut Butter Version: Replace custard powder with 3 tablespoons of creamy peanut butter in the middle layer
- Mocha Bars: Add 1 tablespoon of instant espresso powder to both the base and top chocolate layers
- Orange Chocolate: Add 1 teaspoon orange zest to the custard layer and use dark chocolate on top
- Coconut Lovers: Double the coconut in the base layer and toast it first for deeper flavor
Texture Modifications:
- For extra crunch, add 1/4 cup of toffee bits to the base layer
- Swap walnuts for pecans, almonds, or a mix of your favorite nuts
- Use dark chocolate instead of semi-sweet for a more intense chocolate flavor
- Add a pinch of sea salt to the top chocolate layer for salted chocolate bars
Pro Chef Tips
Temperature Control is Key: Always let your chocolate layer cool for 5-10 minutes before pouring it over the custard. If it’s too hot, it will melt the middle layer and create a mess. Test by touching the bowl—it should feel warm but not hot.
Press Firmly: The most common issue with Nanaimo bars is a crumbly base that falls apart when cutting. Really press that bottom layer down hard using the back of a measuring cup or your palm. Think of it like making a graham cracker crust for cheesecake.
Soften Butter Properly: For the custard layer, your butter should be truly softened (around 65-68°F), not melted. It should give slightly when pressed but still hold its shape. This is crucial for achieving that light, fluffy texture. Leave it out for 1-2 hours before using.
Use Quality Chocolate: Since the top layer is pure chocolate, quality matters. Avoid baking chips if possible and opt for a good chocolate bar chopped into pieces. Ghirardelli, Guittard, or Callebaut all melt beautifully.
The Hot Knife Trick: This really works! Run your knife under very hot water, dry it completely, then make one cut. Clean the knife, repeat the process. This creates those bakery-perfect clean edges with distinct layers visible.
Chill Time Matters: Don’t rush the chilling process. Each layer needs time to set properly, and the final product benefits from sitting overnight. The flavors meld together and the texture becomes perfectly firm but not rock-hard.
Common Mistakes to Avoid
Not Cooking the Egg Properly: The egg in the base must be stirred into the hot butter mixture and then gently heated for 2-3 minutes. Skipping this step or not stirring constantly can result in scrambled egg bits. Keep the heat low and stir continuously.
Making the Custard Layer Too Soft: If your middle layer is too loose, it won’t hold up when you add the chocolate and will be messy to cut. Beat it long enough (3-4 minutes) and use the full amount of powdered sugar specified. If it’s still too soft, add another 1/4 cup of powdered sugar.
Cutting Too Soon: Patience is essential! If you try to cut the bars before they’re fully chilled (at least 2 hours for the chocolate layer), the chocolate will smear and the layers won’t stay distinct. Plan ahead and give them adequate fridge time.
Uneven Layers: Take time to spread each layer evenly across the entire pan. Uneven layers create bars of different proportions, and some pieces will be all base while others are all custard. Use a spatula and take your time.
Storing at Room Temperature: These bars contain butter and cream, so they need refrigeration. Left at room temperature for more than 2 hours, they’ll become too soft and potentially unsafe to eat. Always store covered in the fridge.
Storage & Meal Prep
Nanaimo bars are actually meal prep champions because they store beautifully and taste even better after a day or two!
Refrigerator Storage: Store bars in an airtight container in the refrigerator for up to 1 week. Place parchment or wax paper between layers if stacking to prevent sticking. The bars will stay fresh and maintain their texture throughout the week.
Room Temperature: While Nanaimo bars can sit at room temperature for serving (they’re actually best enjoyed slightly cool, not ice cold), don’t leave them out for more than 2 hours due to the butter and cream content.
Freezer Storage: These bars freeze exceptionally well! Wrap individual bars in plastic wrap, then place in a freezer-safe container or zip-top bag. They’ll keep for up to 3 months. The texture remains perfect after thawing.
Reheating/Serving: No reheating needed! Simply remove from the refrigerator 10-15 minutes before serving for the best texture and flavor. If frozen, thaw overnight in the refrigerator, then let sit at room temperature for 10 minutes before enjoying.
Make-Ahead & Freezer Notes
Nanaimo bars are ideal make-ahead desserts, perfect for holiday preparation or party planning.
Make-Ahead Timeline:
- 2-3 Days Ahead: This is actually the sweet spot. Make the bars completely, chill them, and store covered in the refrigerator. The flavors develop beautifully and the texture is perfect.
- 1 Week Ahead: Absolutely doable. Make and store in the fridge in an airtight container.
- 1-3 Months Ahead: Make completely, cut into bars, wrap individually, and freeze.
Freezer Instructions: For best results, freeze the entire uncut slab first. Once completely frozen (about 4 hours), remove from the pan using the parchment overhang, wrap tightly in plastic wrap, then in aluminum foil, and place in a freezer bag. This prevents freezer burn and keeps them fresh for up to 3 months.
Alternatively, cut into bars first, freeze on a baking sheet until solid, then transfer to containers with parchment between layers.
Thawing Method: The best way to thaw is slowly in the refrigerator overnight. This prevents condensation from forming on the chocolate layer and maintains the perfect texture. If you need them faster, they’ll thaw at room temperature in about 1-2 hours, but may have slight condensation on top (which won’t affect taste).
Serving Suggestions
Nanaimo bars are rich and decadent, so a little goes a long way! Here’s how to serve them and what pairs beautifully:
Beverage Pairings:
- Hot coffee or espresso (the classic pairing)
- Cold milk for a nostalgic treat
- Hot chocolate for double chocolate lovers
- Earl Grey or English Breakfast tea
- Dessert wines like Port or sweet Riesling
Occasion Ideas:
- Holiday cookie trays (Christmas, Thanksgiving, Easter)
- Birthday parties (kids and adults love them)
- Potlucks and church socials
- Bake sales (they’re always bestsellers)
- Homemade gifts in decorative boxes
- Canada Day celebrations
- Cookie exchanges
Plating Suggestions: Serve on a simple white plate to let the layers shine. Add a small dollop of whipped cream and a fresh raspberry for an elegant presentation. Dust with a tiny sprinkle of cocoa powder or place a small mint leaf on top for color contrast. For parties, arrange bars on a tiered serving stand or rustic wooden board.
Complementary Desserts: If you’re creating a dessert table, pair Nanaimo bars with lighter options like lemon bars, fresh fruit salad, or angel food cake to balance the richness. They also look beautiful alongside other no-bake treats like chocolate truffles or peanut butter balls.
FAQs Section
Can I make Nanaimo bars without Bird’s Custard Powder? Yes! While Bird’s Custard Powder gives the authentic flavor, you can substitute with instant vanilla pudding mix (use the same amount, 2 tablespoons). Some people also use 2-3 tablespoons of cornstarch mixed with 1 teaspoon vanilla extract, though the flavor will be slightly different. The custard powder is worth seeking out if you want the traditional taste—check the British food section of your grocery store or order online.
Why is my middle layer too soft or runny? This usually happens when the butter wasn’t softened properly (it was too warm/melted) or the mixture wasn’t beaten long enough. Make sure your butter is at room temperature but still firm, then beat the custard layer for a full 3-4 minutes. If it’s still too soft, add more powdered sugar 1/4 cup at a time until it reaches a spreadable but firm consistency.
Can I use a different size pan? Yes, but it will affect thickness. An 8×8-inch pan will give you thicker bars (reduce servings to 12-16), while a 9×13-inch pan will give you thinner bars (increase servings to 24-30). Just keep the same ratios and adjust cutting accordingly.
Do Nanaimo bars need to be refrigerated? Absolutely, yes. These bars contain butter, cream, and egg, so they must be stored in the refrigerator. They can sit at room temperature for serving (1-2 hours maximum), but should be kept cold otherwise. They taste best slightly chilled anyway!
How do I get clean cuts when slicing? The hot knife method works wonders! Heat a large, sharp knife under hot running water, dry it completely, then make one cut. Wipe the blade clean, reheat under hot water, dry, and repeat. This melts through the chocolate cleanly. You can also score the chocolate layer lightly when it’s semi-set (after 30 minutes of chilling), then finish chilling and cut through completely.
Can I make these nut-free? Yes! Simply omit the walnuts and add an extra 1/4 cup of graham cracker crumbs and 1/4 cup of coconut to maintain the right consistency in the base layer. The bars will still taste amazing.
Why did my chocolate layer crack? Chocolate cracking usually means it was too cold when you cut, or the bars were moved from fridge to freezer too quickly (temperature shock). To prevent this, let bars sit at room temperature for 5-10 minutes before cutting. If cracks appear, you can smooth them with your finger or a small offset spatula—they’ll taste just as good!
Conclusion
There you have it—your complete guide to making authentic, bakery-quality Nanaimo bars right in your own kitchen! These Canadian classics prove that sometimes the best desserts don’t require an oven, just a little patience and three perfect layers of chocolate-coconut-custard heaven.
Whether you’re making these for a holiday gathering, a potluck, or just because you deserve something special, I promise these bars will disappear faster than you can say “seconds, please!” The combination of that crunchy, chocolatey base, the smooth vanilla custard middle, and that glossy chocolate top creates pure magic in every bite.
I’d love to hear how your Nanaimo bars turn out! Did you try any of the variations? What’s your favorite layer? Leave a comment below and let me know. And if you loved this recipe, please give it a star rating and save it to your Pinterest boards so you can find it again (and help other home bakers discover it too!).
Happy baking—or should I say, happy no-baking! 🍫