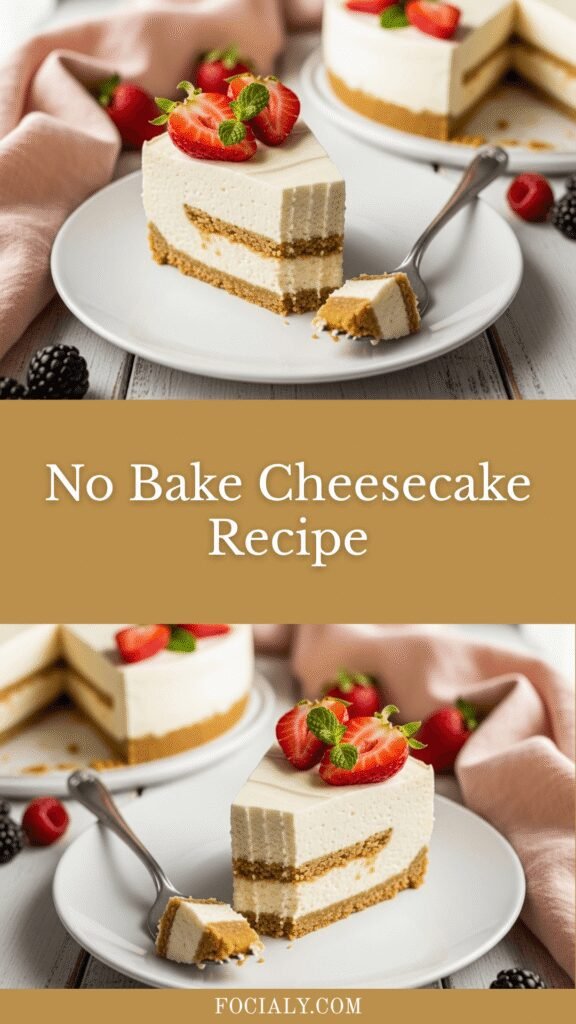
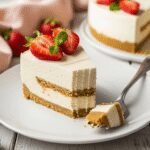
The Ultimate No Bake Cheesecake Recipe: Creamy, Dreamy, and Effortlessly Elegant
Imagine a dessert so creamy, so luscious, and so utterly irresistible that it disappears from the table in minutes—all without ever turning on your oven. That’s the magic of no bake cheesecake, a dessert that delivers all the rich, tangy, velvety goodness of traditional cheesecake without the stress of water baths, cracked tops, or precise oven temperatures.
This no bake cheesecake recipe is a game-changer for home bakers everywhere. It features a buttery graham cracker crust that provides the perfect crunchy contrast to an impossibly smooth, cloud-like cream cheese filling that’s stabilized with just a touch of gelatin (or you can skip it entirely for a softer set). The result? A dessert that tastes like you spent hours in the kitchen but actually comes together in about 20 minutes of active work.
Perfect for summer gatherings when you don’t want to heat up the kitchen, holiday celebrations when oven space is at a premium, last-minute dinner parties, or simply those moments when you’re craving something sweet and spectacular, this no bake cheesecake is your new secret weapon. Serve it plain for elegant simplicity, top it with fresh berries for a pop of color, drizzle it with chocolate or caramel sauce for pure decadence, or get creative with your favorite flavors. The best part? It actually tastes better when made ahead, making it the ultimate stress-free entertaining dessert.
History / Background
The story of no bake cheesecake is a fascinating journey through American culinary innovation and convenience cooking. While traditional baked cheesecake has ancient roots—with early versions traced back to ancient Greece around 776 B.C.—the no bake version is a distinctly modern American creation born from 20th-century ingenuity.
The evolution of no bake cheesecake began in earnest during the 1920s and 1930s when cream cheese became widely available in American households, thanks to the Philadelphia Brand Cream Cheese company’s aggressive marketing campaigns. However, the true revolution came after World War II during the 1950s and 1960s, America’s golden age of convenience cooking. This was the era that gave us Jell-O salads, casseroles, and an endless parade of “no bake” desserts that promised busy homemakers delicious results without the fuss.
The no bake cheesecake we know today gained tremendous popularity thanks to several factors: the invention and widespread availability of refrigerators in American homes, the rise of packaged foods like graham crackers and flavored gelatins, and the cultural shift toward easier, faster cooking methods. Women’s magazines like Good Housekeeping and Better Homes and Gardens published countless variations, each promising “the easiest cheesecake you’ll ever make.”
Kraft Foods played a significant role in popularizing no bake cheesecake recipes, featuring them prominently on their Philadelphia Cream Cheese packages beginning in the 1960s. These recipes became so iconic that many Americans learned to make cheesecake using these exact instructions, passing them down through generations.
Today, no bake cheesecake has evolved from a convenience shortcut into a legitimate dessert technique in its own right. Professional bakers and home cooks alike appreciate how the no bake method produces a lighter, airier texture compared to traditional baked versions, with a more pronounced tangy cream cheese flavor. It’s become a canvas for creativity, with endless variations spanning from classic vanilla to decadent Oreo, refreshing lemon, and indulgent peanut butter chocolate.
Why You’ll Love This Recipe
This isn’t just another no bake dessert—it’s the foolproof, crowd-pleasing showstopper that will make you look like a dessert genius with minimal effort. I’ve perfected this recipe through years of testing to ensure it sets perfectly every time, has the ideal creamy-yet-firm texture, and delivers that authentic cheesecake flavor without any shortcuts on taste.
Here’s why this no bake cheesecake will become your go-to impressive dessert:
- No Oven Required: Keep your kitchen cool and stress-free—perfect for hot summer days or when your oven is occupied with dinner
- Beginner-Friendly: If you can use a mixer and press crumbs into a pan, you can make this stunning cheesecake with zero baking experience needed
- Make-Ahead Marvel: Actually tastes better when made the day before, making it ideal for party planning and stress-free entertaining
- Foolproof Texture: No cracks, no water baths, no guessing if it’s done—just perfectly creamy cheesecake every single time
- Faster Than Traditional: Active prep time is just 20 minutes compared to hours for baked versions, though it does need chill time
- Budget-Friendly Elegance: Creates an impressive, bakery-quality dessert using affordable ingredients you can find at any grocery store
- Endlessly Customizable: Serves as a blank canvas for any flavor combination you can dream up—from fruity to chocolatey to nutty
- Crowd-Pleasing: That perfect balance of sweet, tangy, and creamy appeals to virtually everyone, making it ideal for gatherings
- Lighter Texture: Many people actually prefer the airier, mousse-like consistency of no bake cheesecake to the dense richness of baked versions
- No Special Equipment: No springform pan tricks or complicated techniques—just basic kitchen tools and refrigerator space
Ingredient Notes
The beauty of no bake cheesecake lies in its simplicity—just a handful of quality ingredients create this spectacular dessert. Here’s what you need to know about each component:
FOR THE CRUST:
Graham Crackers (2 cups crushed, about 16-18 full sheets): The classic choice for cheesecake crust provides the perfect sweet, slightly honey-flavored base. Buy pre-crushed graham cracker crumbs to save time, or crush whole crackers yourself for the freshest flavor. Can substitute with Oreo cookies (filling and all), digestive biscuits, vanilla wafers, or even pretzels for a sweet-salty twist.
Unsalted Butter (6 tablespoons, melted): Acts as the “glue” that holds your crust together while adding rich flavor. Unsalted lets you control the salt level. If using salted butter, reduce or omit the added salt. Melted coconut oil works as a dairy-free alternative.
Granulated Sugar (3 tablespoons): Adds sweetness to balance the graham crackers. Some bakers skip this if using sweeter cookies like Oreos. Light or dark brown sugar adds a deeper, caramel-like flavor.
Salt (Pinch): Enhances all the other flavors and keeps the crust from tasting flat. Don’t skip it!
FOR THE FILLING:
Cream Cheese (32 oz, four 8-oz blocks): The star ingredient that gives cheesecake its signature tangy richness. MUST be full-fat and at room temperature for smooth mixing—this is non-negotiable. Cold cream cheese creates lumps that won’t blend out. Let it sit at room temperature for 1-2 hours or quick-soften sealed packages in warm water for 10 minutes. Philadelphia is the gold standard, but any full-fat brick cream cheese works.
Granulated Sugar (¾ cup): Sweetens the filling and helps create that smooth, creamy texture. You can reduce to ⅔ cup if you prefer less sweet desserts. Superfine sugar dissolves even more easily but isn’t necessary.
Heavy Whipping Cream (1 cup, cold): Creates that light, airy, mousse-like texture that sets no bake cheesecake apart from baked versions. Must be cold for proper whipping. Don’t substitute with milk or half-and-half—you need the fat content for structure and richness.
Pure Vanilla Extract (2 teaspoons): Enhances all the flavors and adds depth. Pure vanilla is worth the investment here, but imitation works if needed. Vanilla bean paste creates gorgeous vanilla flecks.
Lemon Juice (2 tablespoons, fresh): The secret ingredient! Brightens the filling and enhances the tangy cream cheese flavor without making it taste lemony. Fresh is best, but bottled works.
Powdered Gelatin (1 envelope, 2¼ teaspoons) – OPTIONAL: Helps the cheesecake set more firmly, making it easier to slice neat pieces. If you prefer a softer, mousse-like texture, you can omit it entirely—the cream and cream cheese will still set up in the fridge, just more delicately. Vegetarian? Use agar agar powder instead (different amounts needed, follow package directions).
Sour Cream (½ cup, room temperature) – OPTIONAL: Adds extra tang and creaminess. Some recipes skip this, but I love what it does for flavor depth.
Equipment Needed
No fancy equipment required—just basic kitchen tools you probably already own:
- 9-inch Pie Pan or Springform Pan: Pie pans work beautifully for easy serving. Springform pans make for prettier presentation and easier release. A 9-inch square baking dish also works.
- Food Processor or Large Zip-Top Bag + Rolling Pin: For crushing graham crackers into fine crumbs.
- Large Mixing Bowl (2): One for crust, one for filling.
- Electric Mixer (Hand or Stand): Essential for whipping cream and beating cream cheese smooth. A whisk and strong arms work but require effort.
- Rubber Spatula: For scraping bowls and folding ingredients together.
- Measuring Cups and Spoons: Accuracy matters in desserts!
- Small Saucepan or Microwave-Safe Bowl: If using gelatin, you’ll need to dissolve it.
- Plastic Wrap or Aluminum Foil: To cover the cheesecake while it chills.
- Refrigerator Space: You’ll need room for your cheesecake to chill for at least 4 hours, preferably overnight.
No Bake Cheesecake Recipe

This creamy, dreamy no bake cheesecake features a buttery graham cracker crust and a silky-smooth cream cheese filling that’s light, tangy, and absolutely irresistible. No oven required! Perfect for summer gatherings, holiday entertaining, or anytime you want an impressive dessert without the stress. Make it ahead and top with your favorite fruits, sauces, or enjoy it perfectly plain.
- Prep Time: 20 minutes
- Cook Time: 0 minutes (no baking!)
- Total Time: 4 hours 20 minutes
- Yield: 12 servings 1x
- Category: Dessert
- Method: No Bake
- Cuisine: American
- Diet: Vegetarian
Ingredients
ScaleFOR THE CRUST:
- 2 cups (about 16-18 full sheets) graham cracker crumbs
- 6 tablespoons unsalted butter, melted
- 3 tablespoons granulated sugar
- Pinch of salt
FOR THE FILLING:
- 32 oz (four 8-oz blocks) full-fat cream cheese, at room temperature
- ¾ cup granulated sugar
- 1 cup cold heavy whipping cream
- 2 teaspoons pure vanilla extract
- 2 tablespoons fresh lemon juice
- 1 envelope (2¼ teaspoons) unflavored powdered gelatin (optional, for firmer set)
- 3 tablespoons cold water (if using gelatin)
- ½ cup sour cream, at room temperature (optional, for extra tang)
FOR TOPPING (OPTIONAL):
- Fresh berries (strawberries, blueberries, raspberries)
- Fruit compote or pie filling
- Chocolate ganache or caramel sauce
- Whipped cream
Instructions
MAKE THE CRUST:
- Prepare the Pan: If using a springform pan, wrap the outside bottom with aluminum foil to prevent any leaks. For a pie pan, lightly spray with cooking spray or line with parchment paper for easier serving.
- Make Graham Cracker Crumbs: If starting with whole graham crackers, break them into pieces and pulse in a food processor until you have fine, even crumbs. Alternatively, place crackers in a large zip-top bag, seal, and crush with a rolling pin until finely ground. You should have about 2 cups of crumbs.
- Combine Crust Ingredients: In a medium bowl, mix together the graham cracker crumbs, melted butter, sugar, and salt. Stir with a fork until the mixture resembles wet sand and holds together when squeezed.
- Press Into Pan: Pour the crumb mixture into your prepared pan. Using the bottom of a measuring cup or glass, firmly press the crumbs into an even layer on the bottom and partially up the sides (about 1 inch). Pack it tightly so it holds together. Place in the refrigerator while you make the filling.
MAKE THE FILLING:
- Bloom the Gelatin (If Using): In a small microwave-safe bowl, sprinkle the gelatin over 3 tablespoons of cold water. Let it sit for 5 minutes to bloom (it will look spongy). Microwave for 15-20 seconds until completely melted and clear. Set aside to cool slightly. (Skip this step if omitting gelatin.)
- Beat the Cream Cheese: In a large bowl using an electric mixer, beat the room-temperature cream cheese on medium speed for 2-3 minutes until completely smooth and fluffy with no lumps. Scrape down the sides of the bowl frequently.
- Add Sugar and Flavorings: Add the sugar, vanilla extract, and lemon juice to the cream cheese. Beat on medium speed for another 2 minutes until light and creamy. If using sour cream, add it now and beat until incorporated.
- Add Gelatin (If Using): With the mixer on low speed, slowly drizzle in the slightly cooled gelatin mixture. Beat until fully incorporated, about 30 seconds.
- Whip the Cream: In a separate clean bowl with clean beaters, whip the cold heavy cream on medium-high speed until stiff peaks form, about 3-4 minutes. The cream should hold its shape when you lift the beaters.
- Fold Together: Gently fold the whipped cream into the cream cheese mixture using a rubber spatula. Fold in three additions, using gentle swooping motions from the bottom up to maintain the airiness. Mix just until no white streaks remain and the mixture is smooth and uniform.
- Pour Into Crust: Pour the filling over the prepared crust and smooth the top with a spatula, creating gentle swirls if desired. Gently tap the pan on the counter a few times to release any air bubbles.
- Chill: Cover the cheesecake tightly with plastic wrap (press it directly onto the surface to prevent skin from forming, or tent it just above). Refrigerate for at least 4 hours, but preferably overnight, until completely set and firm.
SERVE:
- Release and Slice: If using a springform pan, run a thin knife around the edges before releasing the sides. For clean slices, dip your knife in hot water, wipe it dry, then slice. Wipe the knife clean and re-dip between each slice.
- Top and Enjoy: Top with your favorite toppings just before serving—fresh berries, fruit compote, chocolate sauce, caramel drizzle, or simply a dusting of powdered sugar. Serve chilled and watch it disappear!
Notes
Room Temperature is Key: Don’t skip bringing your cream cheese to room temperature! Cold cream cheese will create lumps that won’t smooth out, resulting in a grainy filling. Plan ahead and let it sit out for 1-2 hours.
Gelatin is Optional: The gelatin helps create firmer, cleaner slices, but it’s not mandatory. Without it, you’ll have a softer, more mousse-like texture that’s still delicious—just handle slices more delicately.
Crust Variations: Feel free to use Oreo cookies (24-26 cookies with filling), vanilla wafers, gingersnaps, or chocolate graham crackers for different flavors.
Make It Ahead: This cheesecake actually improves after a day in the fridge as the flavors meld. Make it 1-2 days ahead for best results and easiest entertaining.
Avoid Overbeating: Once you add the whipped cream to the cream cheese mixture, use a gentle folding motion. Overbeating will deflate the whipped cream and create a denser texture.
Storage: Keep covered in the refrigerator. The cheesecake stays fresh for up to 5 days.
Nutrition
- Serving Size: 1 slice (1/12 of cheesecake)
- Calories: 385
- Sugar: 24g
- Sodium: 290mg
- Fat: 28g
- Saturated Fat: 17g
- Unsaturated Fat: 9g
- Trans Fat: 0g
- Carbohydrates: 28g
- Fiber: 0g
- Protein: 6g
- Cholesterol: 95mg
Tips & Variations
Flavor Variations:
- Classic Strawberry No Bake Cheesecake: Top with fresh strawberry topping or macerated strawberries sweetened with a little sugar
- Chocolate No Bake Cheesecake: Add ½ cup melted and cooled semi-sweet chocolate to the cream cheese mixture, or use chocolate graham crackers for the crust
- Lemon No Bake Cheesecake: Increase lemon juice to ¼ cup and add 2 tablespoons lemon zest for a bright, citrusy version
- Oreo No Bake Cheesecake: Use crushed Oreos for the crust and fold 1 cup of chopped Oreos into the filling
- Peanut Butter No Bake Cheesecake: Beat ¾ cup creamy peanut butter into the cream cheese and top with chocolate ganache
- Pumpkin Spice No Bake Cheesecake: Replace ½ cup cream cheese with pumpkin puree and add 2 teaspoons pumpkin pie spice
- Key Lime No Bake Cheesecake: Use key lime juice instead of lemon and add lime zest for that tropical Florida flavor
Crust Variations:
- Use chocolate graham crackers, gingersnaps, vanilla wafers, or Biscoff cookies
- Add ½ cup finely chopped nuts (pecans, walnuts, or almonds) to the crust
- Make it gluten-free with gluten-free graham crackers or almond flour pressed with butter
- Skip the crust entirely and serve in individual cups or glasses for a no-crust mousse-style dessert
Dietary Adaptations:
- Reduced Sugar: Cut the sugar in the filling to ½ cup—it’ll still be delicious but less sweet
- Lighter Version: Use light cream cheese (Neufchâtel) and substitute half the heavy cream with Greek yogurt (texture will be slightly different but still good)
- Dairy-Free: Use vegan cream cheese, coconut cream (chilled can, cream only), and dairy-free butter substitute (results may vary)
Presentation Ideas:
- Make individual servings in small jars or glasses for parties
- Create a layered look by dividing the filling and making one layer vanilla and another chocolate
- Swirl fruit preserves into the top before chilling for a marbled effect
- Use a piping bag to create elegant swirls of filling for a bakery-style presentation
Pro Chef Tips
The Temperature Trinity: The three keys to smooth, lump-free filling are room temperature cream cheese, room temperature sour cream (if using), and cold heavy cream. This temperature contrast is crucial for proper texture.
Beat the Cream Cheese Solo First: Always beat your cream cheese alone before adding anything else. This ensures it’s completely smooth and fluffy. Adding sugar to cold or lumpy cream cheese will never fix the lumps—they must be beaten out first.
Watch Your Whipped Cream: Whip your cream to stiff peaks, but don’t overbeat or you’ll end up with butter. The cream should hold firm peaks when you lift the beaters, but still look smooth and glossy, not grainy.
The Gentle Fold: When combining the whipped cream with the cream cheese mixture, use a gentle hand. Fold from the bottom up in smooth motions, rotating the bowl as you go. This maintains the airiness that makes no bake cheesecake so light and dreamy.
Press That Crust Firmly: A loosely packed crust will fall apart when you slice. Use the bottom of a flat measuring cup or glass and really press down hard, especially at the corners where the bottom meets the sides. The crust should feel compact and solid.
The Hot Knife Trick: For professional-looking slices, dip a long, sharp knife in hot water, wipe it completely dry with a towel, then make one clean cut. Wipe the knife clean after each slice and repeat. This creates those pristine edges you see in bakeries.
Flavor Development Time: While your cheesecake is technically ready after 4 hours, the flavor actually improves significantly after 8-24 hours in the refrigerator. The ingredients meld together, the crust softens slightly, and everything harmonizes beautifully. If possible, always make it the day before serving.
The Smooth Top Secret: For that perfectly smooth, professional top, after spreading the filling, take a sheet of plastic wrap and press it gently directly onto the surface, smoothing any imperfections with your hand. Carefully peel it off before serving.
Add Toppings Last Minute: Wait until just before serving to add fresh fruit, sauces, or whipped cream toppings. Adding them too early can make the cheesecake soggy or cause fruit to bleed color into the filling.
Common Mistakes to Avoid
Using Cold Cream Cheese: This is the #1 mistake that ruins no bake cheesecakes! Cold cream cheese will never fully incorporate, leaving you with an eternally lumpy filling. Always let it sit at room temperature for 1-2 hours, or place sealed packages in warm (not hot) water for 10 minutes to quick-soften.
Overbeating After Adding Whipped Cream: Once you fold in your whipped cream, you’re done mixing. Overbeating deflates all those air bubbles you worked so hard to create, resulting in a dense, flat cheesecake instead of light and fluffy. Use gentle folding motions and stop as soon as no white streaks remain.
Not Chilling Long Enough: Patience is essential! Cutting into your cheesecake before it’s fully set results in a soupy mess. Give it the full 4 hours minimum, though overnight is ideal. If you’re in a rush, 6 hours is the absolute minimum for a properly set texture.
Adding Hot Gelatin Directly: If you’re using gelatin and add it while it’s still very hot, you risk slightly cooking the cream cheese mixture, creating an unpleasant texture. Let the dissolved gelatin cool for 2-3 minutes until it’s warm but not hot before adding it to your filling.
Loose, Crumbly Crust: If you don’t pack your crust firmly or don’t use enough butter, it will fall apart when you slice the cheesecake. Press down hard with the bottom of a measuring cup, and make sure your crumb mixture looks and feels like wet sand that holds together when squeezed.
Not Running a Knife Around the Edge: If using a springform pan, always run a thin knife around the inside edge before releasing the spring. The filling sticks to the sides, and if you don’t release it first, you’ll tear the sides of your beautiful cheesecake when you open the pan.
Cutting with a Dirty Knife: Each slice should be made with a clean, warm knife. Not doing this creates messy, jagged edges instead of clean, professional slices. Keep a tall glass of hot water and a towel nearby for dipping and wiping between each cut.
Storage & Meal Prep
Refrigerator Storage: No bake cheesecake keeps beautifully in the refrigerator for up to 5 days when properly stored. Cover it tightly with plastic wrap or aluminum foil, or keep it in an airtight container. The flavor actually improves over the first 2 days as everything melds together.
Best Covering Method: If you’ve already sliced the cheesecake, press plastic wrap directly against the cut surfaces to prevent them from drying out. For unsliced cheesecakes, tent plastic wrap or foil over the top without letting it touch the surface, or use a cake dome if you have one.
Individual Storage: If you’ve made individual portions in jars or glasses, simply cover each one with plastic wrap or a lid. These are perfect for meal prep—make on Sunday, enjoy throughout the week!
Room Temperature Serving: While no bake cheesecake must be stored in the refrigerator, it actually tastes best when allowed to sit at room temperature for 10-15 minutes before serving. This softens the texture slightly and allows the flavors to bloom.
Handling Leftovers: Once you’ve cut your cheesecake and served it, don’t leave it sitting out for more than 2 hours (1 hour if it’s over 90°F outside). Return leftovers to the refrigerator promptly. The cream cheese and whipped cream can spoil if left at room temperature too long.
Transporting Tips: If bringing your cheesecake to a party, keep it in a cooler with ice packs. A springform pan travels well—just keep the sides on for protection. You can also transport individual portions in jars with lids for zero-mess travel.
Make-Ahead & Freezer Notes
Make-Ahead Timing (Refrigerator): This is the ultimate make-ahead dessert! In fact, I always recommend making no bake cheesecake at least one day before serving. The texture improves as it sets more firmly, the flavors meld beautifully, and you eliminate all day-of stress. Make it up to 2 days ahead for optimal results.
Freezing Whole Cheesecake: No bake cheesecake freezes exceptionally well! Once completely set (after the initial chill), wrap the entire cheesecake (still in its pan for protection) tightly in two layers of plastic wrap, then one layer of aluminum foil. Freeze for up to 2 months. To thaw, transfer to the refrigerator and let thaw overnight (do not thaw at room temperature).
Freezing Individual Slices: Pre-slice your cheesecake, wrap each slice individually in plastic wrap, then place all slices in a freezer-safe container or zip-top bag. This gives you the flexibility to thaw just what you need. Thaw individual slices in the refrigerator for 3-4 hours or overnight.
Freezing Without Toppings: If you plan to freeze your cheesecake, do so before adding any toppings like fresh fruit, whipped cream, or sauces. Add these after thawing, just before serving. Fresh fruit in particular doesn’t freeze well and will become mushy and watery.
The Flash Freeze Method: For the cleanest freezing results, place your uncovered cheesecake in the freezer for 1-2 hours until the surface is frozen solid, then wrap it. This prevents the plastic wrap from sticking to the surface and ruining your smooth top.
Thawing Best Practices: Always thaw frozen cheesecake in the refrigerator, never on the counter. This maintains food safety and prevents the texture from becoming watery. Whole cheesecakes need 8-12 hours to thaw; individual slices need 3-4 hours.
Post-Thaw Quality: Properly frozen and thawed no bake cheesecake is virtually indistinguishable from fresh. The texture remains creamy and the flavor stays perfect. This makes it ideal for baking marathons—make several cheesecakes at once and freeze them for future celebrations!
Serving Suggestions
No bake cheesecake is stunning on its own, but these serving ideas take it from wonderful to absolutely unforgettable:
Classic Fruit Toppings:
- Fresh strawberry topping made by macerating sliced strawberries with sugar
- Mixed berry compote with blueberries, raspberries, and blackberries
- Cherry pie filling for an easy, classic diner-style presentation
- Fresh sliced peaches or nectarines in summer
- Mango or passion fruit coulis for tropical flair
Decadent Sauce Drizzles:
- Warm chocolate ganache or hot fudge sauce
- Salted caramel sauce (homemade or store-bought)
- Raspberry or strawberry coulis for elegant color contrast
- Lemon curd for bright, tangy richness
- Dulce de leche for indulgent caramel flavor
Textural Elements:
- Crushed graham crackers or cookie crumbs sprinkled on top
- Toasted sliced almonds, pecans, or pistachios
- Chocolate shavings or curls
- Toffee bits or crushed candy bars
- Toasted coconut flakes
- Fresh mint leaves for color and aroma
Complete Dessert Pairings:
- Serve alongside fresh whipped cream or a dollop of mascarpone
- Pair with a shot of espresso or strong coffee to cut the richness
- Offer with dessert wine, port, or champagne for celebrations
- Serve with hot tea—earl grey or chamomile complement cheesecake beautifully
- Add a scoop of vanilla ice cream or gelato for extra indulgence
Presentation Styles:
- Classic wedge slices on dessert plates with sauce drizzled artistically
- Individual portions layered in clear glass parfait cups or Mason jars
- Cheesecake squares for easier serving at large gatherings
- Mini cheesecakes in muffin cups for parties
- Deconstructed style with crumbled crust, dollops of filling, and fresh fruit
Seasonal Serving Ideas:
- Summer: Top with fresh berries and serve with iced tea
- Fall: Add caramel apples and cinnamon whipped cream
- Winter: Drizzle with peppermint chocolate sauce and crushed candy canes
- Spring: Crown with lemon curd and fresh flowers (edible ones like pansies or violets)
FAQs Section
Q: Why is my no bake cheesecake not setting?
A: The most common reasons are: not chilling long enough (give it the full 4 hours minimum, overnight is better), using low-fat or whipped cream cheese instead of full-fat brick cream cheese, or not whipping the heavy cream to proper stiff peaks before folding it in. Make sure you’re using cold, full-fat heavy whipping cream and beating it until it holds firm peaks. If you omitted the gelatin, the texture will be softer—that’s normal—but it should still set up enough to slice after adequate chilling time.
Q: Can I make no bake cheesecake without gelatin?
A: Absolutely! Gelatin helps create a firmer set that makes cleaner slices, but it’s completely optional. Without gelatin, your cheesecake will have a softer, more mousse-like texture that’s still delicious—just handle slices a bit more gently. Make sure to chill it for the full time (preferably overnight) to allow it to set properly. Many people actually prefer the lighter, softer texture without gelatin.
Q: My cheesecake filling is lumpy. How do I fix it?
A: Unfortunately, once you have lumps, they’re very difficult to remove completely. The best prevention is using room-temperature cream cheese and beating it thoroughly alone before adding anything else. If you have small lumps, you can try pressing the filling through a fine-mesh sieve before pouring it into the crust, though this is time-consuming. For future batches, let cream cheese sit out for 1-2 hours until it’s very soft, or quick-soften sealed packages in warm water for 10 minutes.
Q: Can I use a different pan size?
A: Yes, but adjust accordingly. This recipe works in a 9-inch pie pan, 9-inch springform pan, 9-inch square baking dish, or even an 8×8 inch pan (it will be thicker). If using a larger pan like 9×13 inches, the cheesecake will be thinner—you might want to double the recipe. For smaller individual servings, divide the filling among 8-12 glasses or jars (no crust needed, or layer in a spoonful of crust crumbs at the bottom).
Q: How do I prevent my crust from being too hard?
A: If your crust is rock-hard, you likely used too much butter or pressed it too thin. The correct ratio should feel like wet sand—it holds together when squeezed but isn’t dripping with butter. Also, letting the cheesecake sit at room temperature for 10-15 minutes before serving softens the crust slightly. Don’t refrigerate the crust alone for too long before adding the filling, as this can make it harder.
Q: Can I make this cheesecake dairy-free or vegan?
A: You can attempt it with substitutions, though results will vary. Use vegan cream cheese, coconut cream (the solid part from a chilled can of full-fat coconut milk) in place of heavy cream, and dairy-free butter for the crust. The texture won’t be identical to traditional no bake cheesecake—expect it to be slightly less stable and have a hint of coconut flavor. Chill it for the full overnight period and consider using the gelatin for better structure, or agar agar for a vegan gelling agent.
Q: Why did my cheesecake taste grainy or gritty?
A: A grainy texture usually comes from one of three issues: using cold cream cheese that didn’t fully incorporate (always use room temperature!), adding sugar to cold cream cheese before beating it smooth first, or accidentally overbeating the mixture after adding the whipped cream which can cause the fat to separate slightly. The solution is to always beat your cream cheese alone first until completely smooth, ensure all dairy ingredients are at proper temperature, and use gentle folding motions once the whipped cream is added.
Conclusion
There’s something truly special about a dessert that looks incredibly impressive yet comes together with such ease. This no bake cheesecake is exactly that kind of kitchen magic—the dessert that makes you look like a baking genius while actually being one of the easiest, most forgiving recipes in your repertoire.
The best part? Every single time you slice into that perfectly creamy filling and hear the delighted reactions from your family and friends, you’ll feel that little surge of pride. Whether you’re making this for a summer barbecue because you don’t want to heat up the kitchen, for Thanksgiving because your oven is already packed, for a last-minute birthday celebration, or simply for a Tuesday night because you deserve something wonderful, this no bake cheesecake delivers pure deliciousness with minimal stress.
I love how versatile this recipe is—dress it up with elegant fruit and sauces for special occasions, keep it simple and classic for everyday enjoyment, or get creative with all the flavor variations we’ve explored. The make-ahead friendly nature means you can prepare it when you have time and serve it when you need it, making you look effortlessly put-together.
Now it’s your turn to experience the joy of homemade no bake cheesecake! Give this recipe a try and let me know how it turns out in the comments below. Did you try any of the flavor variations? What toppings did you use? I absolutely love hearing about your dessert adventures, and your feedback helps other home bakers too.
Don’t forget to PIN this recipe to your favorite dessert board so you can find it whenever a cheesecake craving strikes! Take a photo of your beautiful creation and share it on Instagram—tag me so I can see your masterpiece and celebrate with you. And if you have friends who love cheesecake (and who doesn’t?), share this recipe with them. Everyone deserves to know how easy it is to make perfect no bake cheesecake at home.
Happy dessert making, and may your cheesecakes always be creamy and your slices always be clean! 🍰