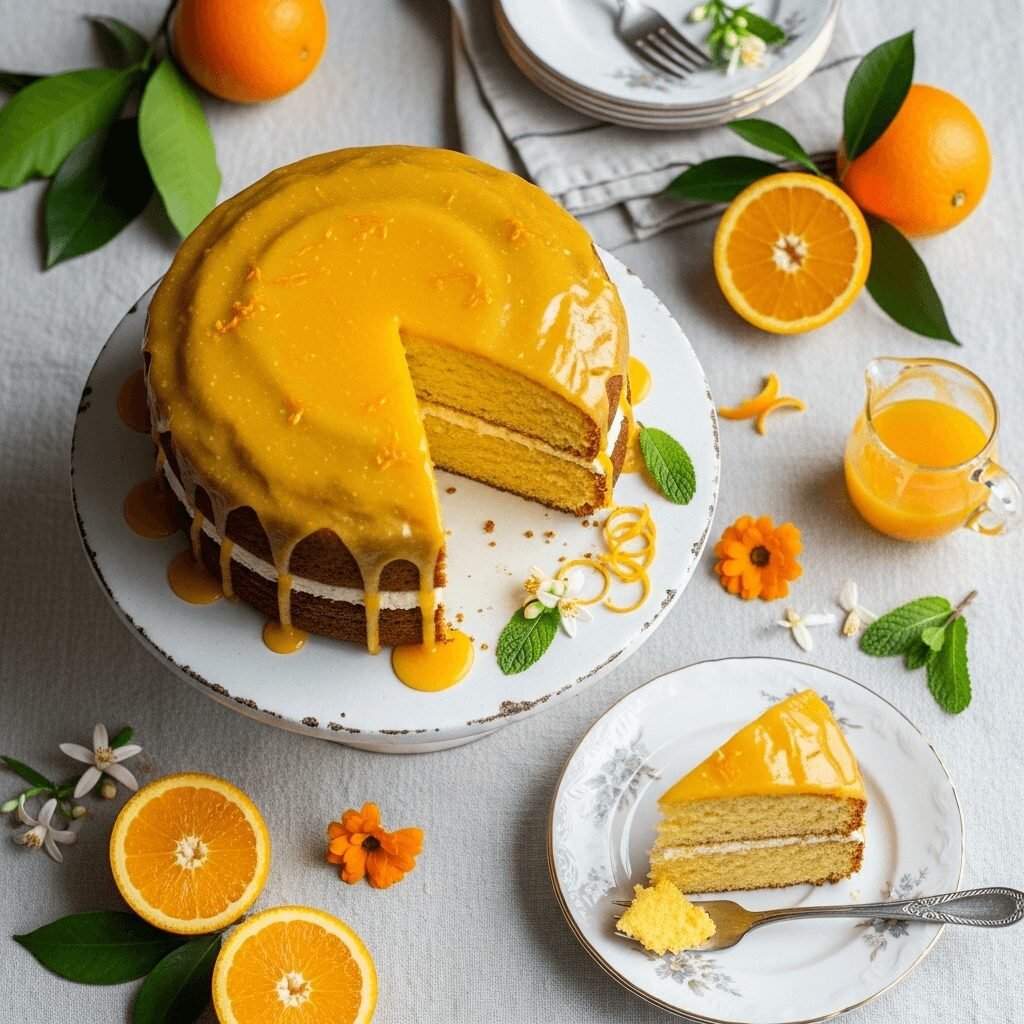
Sunny Orange Cake Recipe – Moist, Fluffy & Bursting with Citrus Flavor!

There’s something absolutely magical about a cake that tastes like sunshine in every bite. This Orange Cake Recipe is a stunning citrus dessert that’s incredibly moist, wonderfully fluffy, and packed with fresh orange flavor that’ll make your taste buds dance. Whether you’re looking for an elegant dessert for Sunday brunch, a show-stopping birthday cake, or just a sweet treat to brighten your week, this orange cake delivers every single time.
What makes this recipe truly special is its simplicity combined with restaurant-quality results. You don’t need fancy techniques or hard-to-find ingredients – just fresh oranges, basic pantry staples, and about an hour of your time. The result? A gorgeous golden cake with a tender crumb, natural citrus sweetness, and an optional glaze that takes it completely over the top. Trust me, once you make this orange cake, it’ll become your go-to recipe whenever you want to impress (or just treat yourself to something wonderful).
🍊 History & Background of Orange Cake
Orange cake has been gracing dessert tables across the world for centuries, with variations appearing in Mediterranean, Middle Eastern, and European cuisines long before it became an American favorite. The use of citrus in baking dates back to ancient times when oranges were considered precious commodities, often reserved for special occasions and celebrations.
In Southern Europe, particularly in Spain, Italy, and Greece, orange cakes became popular as a way to showcase the abundant citrus harvests. Spanish tarta de naranja and Italian torta all’arancia both celebrate the orange in all its glory, often incorporating the entire fruit – juice, zest, and sometimes even ground whole oranges – for maximum flavor.
The tradition traveled to America through European immigrants, where it evolved into the light, fluffy layer cakes we know today. During the mid-20th century, orange cake became a staple at American dinner parties and church socials, particularly in citrus-growing states like Florida and California. The advent of electric mixers and standardized baking measurements made these cakes more accessible to home bakers.
What’s fascinating is that orange cake has remained consistently popular through changing food trends. Unlike some vintage recipes that feel dated, orange cake has adapted beautifully to modern tastes. Today’s versions might include Greek yogurt for extra moisture, olive oil for a Mediterranean twist, or creative glazes featuring cream cheese or white chocolate. But at its heart, a great orange cake still celebrates that bright, sunny citrus flavor that’s been delighting dessert lovers for generations.
💛 Why You’ll Love This Orange Cake Recipe
This isn’t just another cake recipe – it’s the orange cake that’ll have everyone asking for seconds and begging for the recipe. The texture is absolutely perfect: moist enough to melt in your mouth, yet sturdy enough to stack into layers or transport to potlucks without worry.
Here’s why this recipe is about to become your new favorite:
- Incredible citrus flavor – Uses both fresh orange juice AND zest for maximum orange taste that’s never artificial
- Perfectly moist texture – Stays fresh and tender for days (if it lasts that long!)
- Easy enough for beginners – Simple mixing method with foolproof results every time
- Naturally beautiful color – That gorgeous golden-orange hue needs no food coloring
- Versatile for any occasion – Elegant enough for dinner parties, casual enough for weeknight dessert
- Budget-friendly – Uses affordable, everyday ingredients you probably have on hand
- Crowd-pleaser – Even people who don’t usually love cake rave about this one
- Customizable – Works beautifully as a sheet cake, layer cake, bundt, or cupcakes
- Make-ahead friendly – Actually tastes even better the next day as flavors develop
- Refreshing alternative – A lighter, brighter option compared to heavy chocolate or vanilla cakes
The best part? This cake tastes like you spent hours in the kitchen, but it comes together in less than 15 minutes of active prep time. That’s my kind of recipe!
🥣 Ingredient Notes
Let’s talk about what goes into making this spectacular orange cake. Each ingredient plays an important role, and understanding why helps you get perfect results every time.
Fresh Oranges – The star of the show! You’ll need both the juice and zest. Always use fresh oranges rather than bottled juice for the best flavor. Naval oranges or Valencia oranges work beautifully. You’ll need about 2-3 medium oranges to get enough juice and zest. Substitution: In a pinch, you can use 2 tablespoons of orange extract mixed with water, but fresh is always better.
All-Purpose Flour – Provides structure to the cake. Make sure to measure correctly by spooning flour into your measuring cup and leveling it off. Substitution: You can use a 1:1 gluten-free flour blend for a gluten-free version.
Granulated Sugar – Sweetens the cake and helps create that tender crumb. The sugar also helps the cake brown beautifully. Substitution: You can replace up to half with light brown sugar for a deeper flavor.
Eggs – Provide structure, moisture, and richness. Room temperature eggs incorporate better into the batter. Substitution: For each egg, you can use a flax egg (1 tablespoon ground flaxseed + 3 tablespoons water), though texture will be slightly different.
Butter – Adds rich flavor and keeps the cake moist. Unsalted butter is best so you can control the salt level. Substitution: You can use vegetable oil or melted coconut oil for a dairy-free version, though you’ll lose some of that buttery flavor.
Buttermilk or Sour Cream – Creates incredible tenderness and adds a slight tang that balances the sweetness. Substitution: Make DIY buttermilk by adding 1 tablespoon lemon juice or vinegar to regular milk and letting it sit 5 minutes. Greek yogurt also works wonderfully.
Baking Powder & Baking Soda – These leavening agents work together to give the cake its light, fluffy rise. Make sure they’re fresh (less than 6 months old) for best results.
Salt – Enhances all the other flavors and balances the sweetness. Don’t skip it!
Vanilla Extract – Complements the orange flavor without overpowering it. Pure vanilla extract is worth the investment.
🍴 Equipment Needed
Having the right tools makes baking so much easier! Here’s what you’ll need:
- 9-inch round cake pans (2) or one 9×13-inch baking pan – For layer cake or sheet cake respectively
- Mixing bowls (at least 2) – One large for wet ingredients, one medium for dry
- Electric mixer (stand or hand) – Makes creaming butter and sugar effortless
- Microplane or fine grater – For zesting oranges without getting the bitter white pith
- Citrus juicer – Manual or electric, makes getting fresh juice much easier
- Measuring cups and spoons – For accurate measurements
- Rubber spatula – For scraping down bowl sides and folding ingredients
- Whisk – For combining dry ingredients
- Cooling rack – Essential for properly cooling cakes
- Parchment paper – Prevents sticking and makes removal foolproof
- Toothpick or cake tester – For checking doneness
- Offset spatula (optional) – Makes frosting layer cakes much easier
- Sifter or fine-mesh strainer (optional) – For lump-free glaze
Orange Cake Recipe

This bright and beautiful Orange Cake is incredibly moist, fluffy, and packed with fresh citrus flavor. Made with fresh orange juice and zest, it’s the perfect dessert for any occasion – from casual family dinners to elegant celebrations. The optional orange glaze adds an extra layer of citrusy sweetness that takes this cake over the top!
- Prep Time: 20 minutes
- Cook Time: 30 minutes
- Total Time: 50 minutes
- Yield: 12 servings 1x
- Category: Dessert
- Method: Baking
- Cuisine: American
- Diet: Vegetarian
Ingredients
For the Cake:
- 2 ½ cups all-purpose flour
- 2 ½ teaspoons baking powder
- ½ teaspoon baking soda
- ½ teaspoon salt
- 1 cup unsalted butter, softened to room temperature
- 1 ¾ cups granulated sugar
- 4 large eggs, room temperature
- 2 tablespoons fresh orange zest (from about 2 oranges)
- ¾ cup fresh orange juice (from about 2-3 oranges)
- ½ cup buttermilk or sour cream, room temperature
- 2 teaspoons vanilla extract
For the Orange Glaze (Optional):
- 2 cups powdered sugar, sifted
- 3-4 tablespoons fresh orange juice
- 1 tablespoon orange zest
- 1 tablespoon melted butter
- Pinch of salt
Instructions
- Preheat and prepare: Preheat your oven to 350°F (175°C). Grease two 9-inch round cake pans with butter or cooking spray, then line the bottoms with parchment paper circles. Grease the parchment too. This double insurance prevents any sticking issues!
- Mix dry ingredients: In a medium bowl, whisk together the flour, baking powder, baking soda, and salt until well combined. Set this aside – you’ll add it to the wet ingredients later.
- Cream butter and sugar: In a large mixing bowl (or stand mixer), beat the softened butter on medium speed for about 1 minute until smooth and creamy. Add the sugar and beat on medium-high speed for 3-4 minutes until the mixture is light, fluffy, and pale in color. This step incorporates air and creates that tender crumb, so don’t rush it!
- Add eggs: Add eggs one at a time, beating well after each addition and scraping down the sides of the bowl as needed. The mixture should look smooth and cohesive after each egg is incorporated.
- Add orange zest: Beat in the fresh orange zest and vanilla extract. Your kitchen should smell absolutely amazing at this point!
- Combine wet ingredients: In a measuring cup or small bowl, whisk together the orange juice and buttermilk (or sour cream).
- Alternate dry and wet: With the mixer on low speed, add the flour mixture in three additions, alternating with the orange juice mixture in two additions. Start and end with the flour mixture. The pattern is: flour, liquid, flour, liquid, flour. Mix just until combined after each addition – overmixing can make the cake tough.
- Final mix: Once everything is added, give the batter a few gentle stirs with a rubber spatula to make sure everything is fully incorporated and scrape down the sides one last time. The batter should be smooth and pourable.
- Divide and bake: Divide the batter evenly between your prepared pans (use a kitchen scale for perfect layers if you have one – about 24 ounces per pan). Smooth the tops with your spatula. Bake for 28-32 minutes, or until a toothpick inserted in the center comes out clean or with just a few moist crumbs. The tops should spring back when lightly pressed.
- Cool properly: Let the cakes cool in the pans for 10 minutes on a cooling rack. This allows them to set up and makes them easier to remove. Then carefully run a knife around the edges and invert onto the cooling rack. Peel off the parchment paper. Let cool completely before frosting – this takes about 1 hour.
- Make the glaze (optional): While the cake cools, make your glaze. In a medium bowl, whisk together the sifted powdered sugar, orange juice (start with 3 tablespoons), orange zest, melted butter, and salt. Whisk until smooth, adding more orange juice if needed to reach your desired consistency. For a pourable glaze, it should be thin enough to drizzle but thick enough to cling to the cake.
- Assemble and glaze: If making a layer cake, place one layer on your serving plate, spread some glaze on top, add the second layer, then pour the remaining glaze over the top, letting it drip down the sides. If making a sheet cake, simply pour the glaze over the cooled cake and spread evenly. Let the glaze set for about 15 minutes before slicing.
Notes
- Room temperature ingredients are key! They mix together more easily and create a smoother, more uniform batter that bakes evenly.
- Don’t overbake! Check your cake a few minutes early. Overbaking is the #1 cause of dry cake.
- Zest before juicing – It’s much easier to zest whole oranges than to try zesting them after they’ve been cut.
- Avoid bitter pith – When zesting, only remove the colored part of the peel. The white pith underneath is bitter.
- Cake sticking? If your cake sticks despite greasing and parchment, try greasing and then dusting with flour, or use a baking spray that contains flour.
- For cupcakes: This recipe makes about 24 cupcakes. Bake at 350°F for 18-22 minutes.
- No buttermilk? Remember that DIY buttermilk works great: 1 tablespoon white vinegar or lemon juice + enough milk to make ½ cup. Let sit 5 minutes.
Nutrition
- Serving Size: 1 slice (1/12 of cake with glaze)
- Calories: 385
- Sugar: 38g
- Sodium: 245mg
- Fat: 17g
- Saturated Fat: 10g
- Unsaturated Fat: 5g
- Trans Fat: 0g
- Carbohydrates: 55g
- Fiber: 1g
- Protein: 5g
- Cholesterol: 105mg
Nutritional information is approximate and based on standard ingredient measurements. Values may vary based on specific brands used and portion sizes.
🎨 Tips & Variations
One of the best things about this orange cake is how adaptable it is! Here are some delicious ways to customize it:
Flavor Variations:
- Orange-Almond: Add ½ teaspoon almond extract and fold in ½ cup sliced almonds to the batter
- Orange-Cranberry: Fold 1 cup dried cranberries into the batter for a festive twist
- Orange-Coconut: Replace ½ cup flour with ½ cup coconut flour and add ½ cup shredded coconut
- Orange-Poppy Seed: Add 2 tablespoons poppy seeds for texture and visual appeal
- Blood Orange: Use blood orange juice and zest for a deeper color and slightly different flavor profile
- Orange-Cardamom: Add ½ teaspoon ground cardamom for a sophisticated, aromatic twist
Frosting Options:
- Cream Cheese Frosting: Beat 8 oz cream cheese with 4 oz butter, 3 cups powdered sugar, and orange zest
- Whipped Cream: Serve with vanilla or orange-scented whipped cream for a lighter option
- Chocolate Ganache: Believe it or not, chocolate and orange are an incredible combination!
- Orange Buttercream: Make classic American buttercream but use orange juice instead of milk
Dietary Modifications:
- Dairy-Free: Use coconut oil or vegetable oil instead of butter, and non-dairy milk with vinegar instead of buttermilk
- Reduced Sugar: You can reduce sugar by up to ¼ cup, though the cake will be slightly less tender
- Whole Wheat: Replace up to half the all-purpose flour with whole wheat pastry flour
👨🍳 Pro Chef Tips
Want to take your orange cake from great to absolutely spectacular? Here are the secrets professional bakers use:
1. Toast your flour: This might sound crazy, but toasting your flour for 5 minutes at 350°F before using it creates a deeper, nuttier flavor that complements the orange beautifully. Let it cool completely before measuring.
2. Use the reverse creaming method: Instead of creaming butter and sugar first, try mixing your dry ingredients with butter first, then adding your wet ingredients. This creates an even more tender crumb by coating the flour proteins with fat before they encounter liquid.
3. Add a touch of acidity: A tiny squeeze of lemon juice (about ½ teaspoon) enhances the orange flavor and makes it taste brighter and more complex.
4. Brush with simple syrup: After baking, while the cake is still warm, brush the layers with orange simple syrup (equal parts sugar and orange juice, heated until sugar dissolves). This keeps the cake incredibly moist and adds extra flavor.
5. Weigh your ingredients: Baking is science, and weighing ingredients (especially flour) ensures consistent results every time. 1 cup flour should weigh 125 grams.
6. Room temperature EVERYTHING: This isn’t just about eggs – butter, buttermilk, and eggs should all be at room temperature (about 70°F). They emulsify better and create a more uniform batter.
7. Don’t open the oven door: Every time you open the oven, the temperature drops by 25-50°F. Check your cake through the oven window until the minimum baking time has passed.
8. Invest in an oven thermometer: Most home ovens are off by 25°F or more. Knowing your true oven temperature prevents overbaking.
⚠️ Common Mistakes to Avoid
Even experienced bakers can run into trouble. Here’s how to avoid the most common orange cake pitfalls:
1. Overmixing the batter: Once you add the flour, mix only until just combined. Overmixing develops gluten, resulting in a tough, dense cake instead of a tender one. You should still see a few small flour streaks when you stop mixing – they’ll incorporate as you fold.
2. Using cold ingredients: Cold butter won’t cream properly, cold eggs can cause the batter to curdle, and cold buttermilk creates an uneven texture. Plan ahead and let everything sit at room temperature for 30-60 minutes before baking.
3. Overbaking: This is the #1 cake killer! Check your cake 5 minutes before the recipe says it should be done. A toothpick should come out with a few moist crumbs, NOT completely clean. The cake will continue cooking as it cools.
4. Not properly measuring flour: Scooping flour directly with your measuring cup packs it down, adding up to 25% more flour than needed. Always spoon flour into your measuring cup and level with a knife, or better yet, weigh it.
5. Frosting a warm cake: I know it’s tempting, but frosting a warm cake will melt your frosting and create a slidey mess. Wait until the cake is completely cool to room temperature – patience pays off!
6. Skipping the parchment paper: Even with greasing, cakes can stick. Parchment paper provides insurance for easy cake removal every single time.
7. Using old leavening agents: Baking powder and baking soda lose potency over time. If yours are more than 6 months old, do a quick test: Add a little baking powder to hot water (it should fizz vigorously) or add baking soda to vinegar (same fizz test).
🥡 Storage & Meal Prep
Proper storage keeps your orange cake fresh and delicious for days!
Room Temperature Storage:
Cover the cake with a cake dome or wrap tightly in plastic wrap. It will stay fresh at room temperature for 2-3 days. This is best for maintaining the cake’s texture, as refrigeration can dry it out.
Refrigerator Storage:
If your kitchen is very warm, or if you’ve used a cream cheese frosting, refrigerate the cake. Wrap it well in plastic wrap or store in an airtight container. It will keep for up to 5 days. Bring to room temperature before serving for the best flavor and texture.
Unfrosted Cake Storage:
If you’ve only made the cake layers without frosting, wrap them tightly in plastic wrap and then in aluminum foil. They’ll keep at room temperature for 2 days, or refrigerated for up to 5 days.
Reheating:
While orange cake is delicious at room temperature, you can warm individual slices in the microwave for 10-15 seconds for that fresh-from-the-oven experience. Just be careful not to overheat or it will dry out.
Glaze Storage:
If you’ve made extra glaze, store it in an airtight container in the refrigerator for up to 1 week. Rewarm gently and whisk in a splash of orange juice if it becomes too thick.
❄️ Make-Ahead & Freezer Notes
This orange cake is actually an excellent make-ahead dessert, which makes it perfect for entertaining!
Baking in Advance:
You can bake the cake layers 1-2 days ahead. Once completely cooled, wrap each layer tightly in plastic wrap and store at room temperature or in the refrigerator. Frost on the day you plan to serve for the freshest appearance.
Freezing Unfrosted Cake Layers:
Orange cake freezes beautifully! Wrap cooled cake layers individually in plastic wrap, then in aluminum foil or place in freezer bags. Label with the date. Freeze for up to 3 months. To thaw, leave wrapped at room temperature for 2-3 hours, or overnight in the refrigerator.
Freezing Frosted Cake:
You can freeze a fully frosted cake, though the appearance may not be quite as pristine. Place the frosted cake in the freezer uncovered for 30 minutes to firm up the frosting, then wrap carefully in plastic wrap and foil. Freeze for up to 2 months. Thaw in the refrigerator overnight, still wrapped, then bring to room temperature before serving.
Freezing Individual Slices:
This is my favorite method for portion control! Cut the cake into slices, wrap each slice individually in plastic wrap, then place all slices in a freezer bag. Pull out individual slices as needed and thaw for 1-2 hours at room temperature, or microwave for 20-30 seconds for a warm treat.
Best Reheating Method After Freezing:
Let the cake thaw completely at room temperature, still wrapped (this prevents condensation from forming on the cake). If desired, warm individual slices in the microwave for 10-15 seconds for that fresh-baked taste.
Make-Ahead Batter:
While I don’t recommend storing the batter (it contains baking powder and baking soda that will lose effectiveness), you can measure out your dry ingredients and wet ingredients separately up to 24 hours ahead. Store dry ingredients at room temperature and wet ingredients (except melted butter) in the refrigerator. Bring to room temperature and mix just before baking.
🍽️ Serving Suggestions
This sunny orange cake pairs beautifully with so many accompaniments! Here are some delicious ways to serve it:
Beverage Pairings:
- Hot tea – Earl Grey or chamomile tea complements the citrus perfectly
- Coffee – A medium roast coffee balances the cake’s sweetness
- Champagne or Prosecco – The bubbles and acidity cut through the richness for an elegant pairing
- Orange juice – Double down on the citrus for a refreshing brunch combination
- Sweet dessert wine – Moscato or late-harvest Riesling are lovely
Complementary Sides:
- Fresh berries – Strawberries, raspberries, or blueberries add color and freshness
- Vanilla ice cream – The classic pairing that never fails
- Greek yogurt – For a lighter option that adds protein
- Whipped cream – Light, fluffy, and lets the orange flavor shine
- Candied orange slices – Beautiful garnish that reinforces the citrus theme
Occasion Ideas:
- Mother’s Day or Easter brunch – Serve with mimosas and fresh fruit
- Summer picnics – Transport as a sheet cake in the pan for easy serving
- Birthday celebrations – Stack as a layer cake with cream cheese frosting
- Afternoon tea party – Cut into small squares and serve alongside finger sandwiches
- Holiday dessert table – Garnish with sugared cranberries for a festive touch
- Potluck contribution – This cake travels well and always impresses
Plating Suggestions: Dust with powdered sugar, add a dollop of whipped cream and fresh orange segments, drizzle with additional glaze, garnish with fresh mint leaves, or add edible flowers for an elegant presentation.
❓ Frequently Asked Questions
Q: Can I use bottled orange juice instead of fresh?
A: You can, but fresh-squeezed orange juice makes a noticeable difference in flavor. Bottled juice has been pasteurized which dulls the bright citrus taste. If you must use bottled, choose “not from concentrate” and consider adding extra zest to boost the orange flavor.
Q: Why did my cake sink in the middle?
A: This usually happens for one of three reasons: opening the oven door too early (which causes a sudden temperature drop), undermixing the batter (so the leavening isn’t evenly distributed), or expired baking powder/soda. Make sure your leavening agents are fresh and resist peeking until the minimum baking time has passed!
Q: Can I make this as cupcakes instead of a cake?
A: Absolutely! This recipe makes about 24 cupcakes. Fill cupcake liners about ⅔ full and bake at 350°F for 18-22 minutes. Start checking at 18 minutes with a toothpick. Cupcakes are done when the tops spring back when lightly pressed and a toothpick comes out with just a few moist crumbs.
Q: My glaze is too thick/thin. How do I fix it?
A: If your glaze is too thick, simply whisk in more orange juice, one teaspoon at a time, until it reaches your desired consistency. If it’s too thin, whisk in more sifted powdered sugar, a tablespoon at a time. Remember, the glaze will thicken slightly as it sits and as it cools on the cake.
Q: Can I make this cake ahead of time?
A: Yes! You can bake the layers up to 2 days ahead and keep them wrapped at room temperature, or freeze them for up to 3 months. You can also make the entire cake (frosted) a day ahead – it actually tastes even better as the flavors have time to develop. Just keep it covered at room temperature or in the refrigerator depending on your frosting choice.
Q: What’s the best way to get the cake layers out of the pan?
A: Let the cakes cool in the pans for exactly 10 minutes – this lets them set up enough to handle but prevents them from sticking. Run a knife around the edges, place a cooling rack on top, and quickly flip the whole thing over. Give the bottom of the pan a firm tap if needed. The parchment paper should peel right off!
Q: Can I add food coloring to make it more orange?
A: You can, but the natural golden-orange color from the orange zest and juice is already beautiful! If you want a deeper orange color, try using blood orange juice, which is naturally more pigmented, or add just 2-3 drops of orange gel food coloring to the batter (not liquid food coloring, which can affect texture).
Q: How do I know when the cake is done baking?
A: Use the toothpick test: Insert a toothpick or cake tester into the center of the cake. It should come out with just a few moist crumbs clinging to it – NOT completely clean (that means overbaked) and NOT with wet batter. The top should also spring back when lightly pressed, and the edges should be just starting to pull away from the pan.
🌟 Conclusion
There you have it – everything you need to make the most incredible, sunny, citrus-packed orange cake that’ll have everyone asking for the recipe! This beautiful cake proves that sometimes the simplest flavors are the most satisfying. With its tender crumb, bright orange taste, and gorgeous golden color, it’s a dessert that works for literally any occasion.
What I love most about this recipe is how it brings people together. There’s something about a homemade cake – especially one that smells as amazing as this one does while it’s baking – that makes everyone gravitate to the kitchen. Whether you’re making it for a special celebration, a weekend treat, or just because you need a little sunshine in your life, this orange cake delivers pure joy in every slice.
I hope you’ll give this recipe a try and experience that wonderful moment when you take your first bite and taste that perfect balance of sweet and citrus. Don’t forget to share how it turns out! Leave a comment below with your experience, any fun variations you tried, or questions you have. And please, if you loved this recipe as much as I do, share it on Pinterest so other home bakers can discover it too!
Happy baking, and enjoy every sunny, delicious bite! 🍊✨