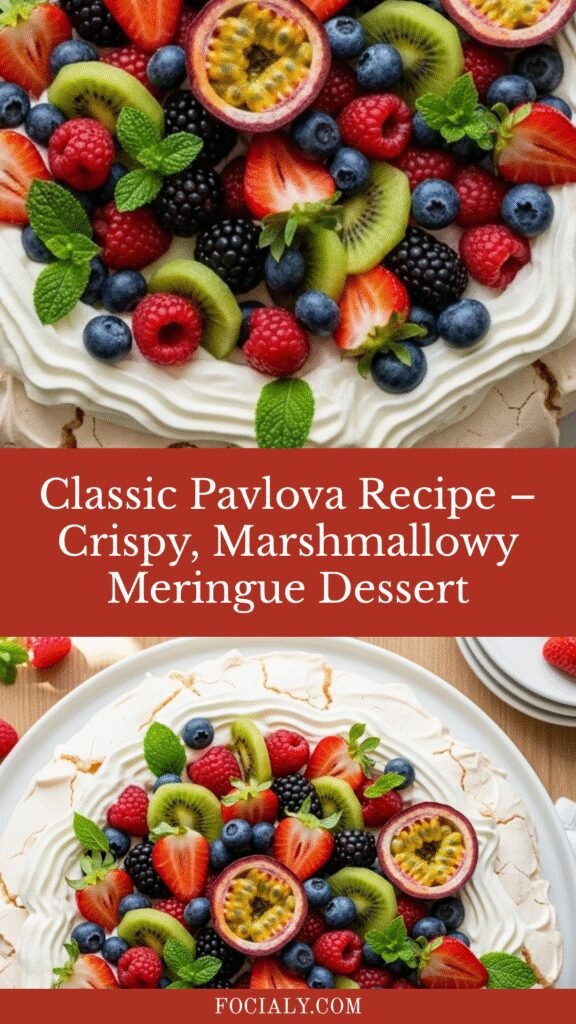
Classic Pavlova Recipe – Crispy, Marshmallowy Meringue Dessert
Pavlova is the showstopper dessert that looks like it came from a fancy bakery but is surprisingly simple to make at home. This stunning meringue-based dessert features a crispy outer shell that gives way to a soft, marshmallowy center, all topped with billows of whipped cream and fresh, vibrant fruit. It’s the kind of dessert that makes guests gasp when you bring it to the table—light, elegant, and absolutely delicious.
What makes pavlova so special is its incredible texture contrast. That delicate crunch as you break through the meringue shell, followed by the pillowy-soft interior, creamy whipped topping, and juicy fresh berries creates a symphony of sensations in every bite. Despite its impressive appearance, pavlova is actually one of the most forgiving desserts you can make, and it comes together with just a handful of basic ingredients you probably already have in your kitchen.
Perfect for summer gatherings, holiday celebrations, birthday parties, or any time you want to impress without stress, this classic pavlova recipe works beautifully for crowds because it can be made ahead and assembled just before serving. Whether you’re hosting a bridal shower, Easter brunch, Fourth of July barbecue, or Christmas dinner, pavlova brings that “wow factor” while accommodating various dietary needs since it’s naturally gluten-free. The blank canvas of meringue and cream also invites endless creativity with your favorite seasonal fruits and flavor combinations.
History / Background
The origin of pavlova is one of the most passionate culinary debates in the Southern Hemisphere, with both Australia and New Zealand claiming to have invented this iconic dessert. The controversy has sparked decades of friendly rivalry between these neighboring countries, each presenting historical evidence to support their claim as the birthplace of this beloved meringue creation.
What we know for certain is that pavlova was created in honor of the Russian ballerina Anna Pavlova during her tour of Australia and New Zealand in the 1920s. Anna Pavlova was arguably the most famous ballerina of her era, captivating audiences worldwide with her ethereal performances, particularly her iconic role in “The Dying Swan.” When she visited the Antipodean region in 1926 and 1929, her graceful performances inspired local chefs to create a dessert as light and delicate as her dancing.
New Zealand claims a Wellington hotel chef created pavlova in 1926, with the earliest published recipe appearing in New Zealand in 1929. Australians counter that a Perth hotel chef invented it in 1935, and point to similar meringue desserts appearing in Australian cookbooks earlier. Food historians have traced meringue cake recipes in both countries back to the early 1900s, suggesting pavlova may have evolved from existing meringue traditions rather than being a single invention.
Regardless of its exact birthplace, pavlova became deeply embedded in the culinary identity of both nations by the mid-20th century. It’s traditionally served at Christmas in Australia and New Zealand (which falls during their summer), making it the quintessential warm-weather holiday dessert Down Under. The dessert symbolizes celebration, national pride, and the art of turning simple ingredients into something extraordinary.
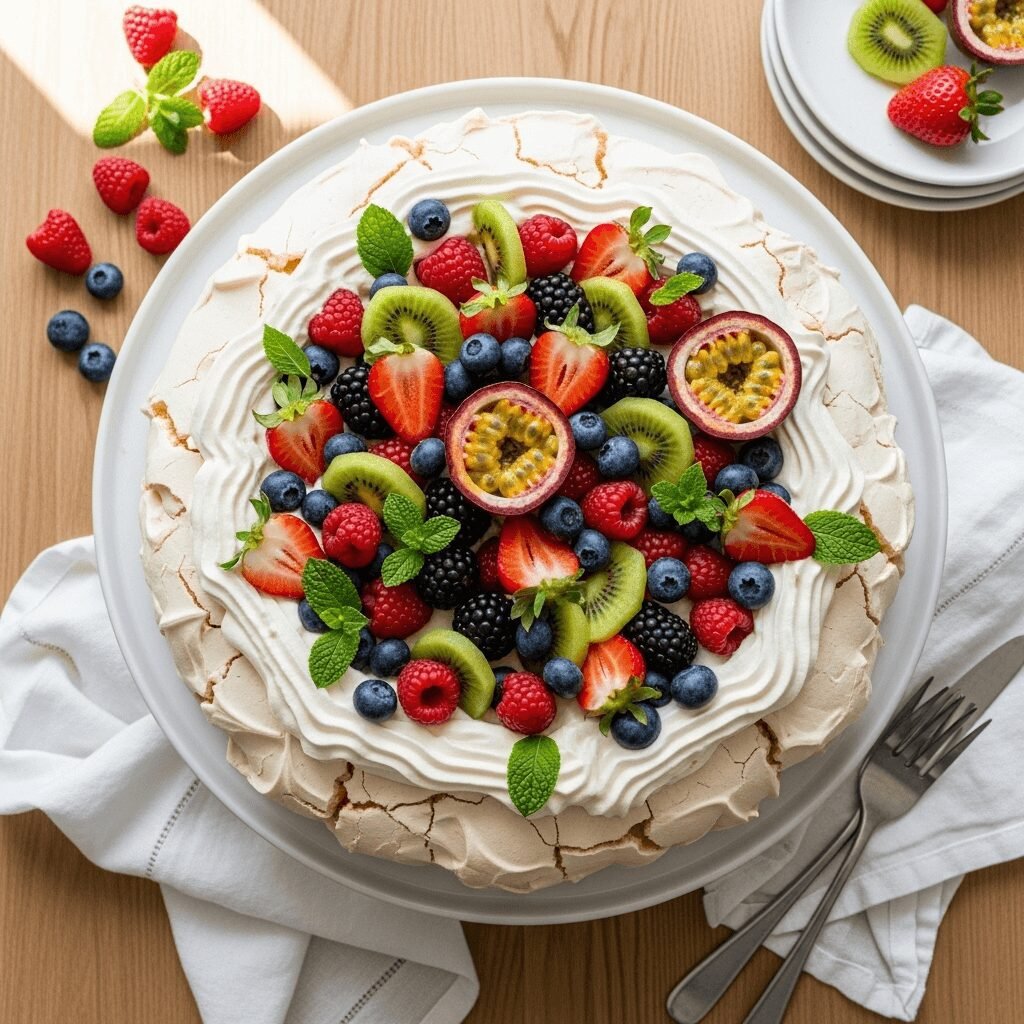
The pavlova we know today—with its characteristic crisp shell, marshmallowy center, and topping of whipped cream and fresh fruit, particularly passionfruit, strawberries, and kiwi—has remained remarkably consistent since the 1930s. Its enduring popularity has spread globally, and it’s now enjoyed across Europe, North America, and beyond. The dessert’s name itself is a tribute to how food can capture cultural moments, honoring an artist whose grace inspired culinary creativity that has delighted generations.
Why You’ll Love This Recipe
This foolproof pavlova recipe takes the intimidation out of meringue-making and delivers bakery-quality results every single time. I’ve tested this recipe dozens of times to perfect the technique, and the method I’m sharing ensures you get that signature crispy exterior with a soft, gooey center that makes pavlova so irresistible.
Here’s why this pavlova will become your go-to impressive dessert:
- Surprisingly simple with only 5 core ingredients – Despite its elegant appearance, pavlova requires just egg whites, sugar, cornstarch, vinegar, and vanilla—ingredients you likely already have
- Naturally gluten-free – Perfect for guests with gluten sensitivities or celiac disease, making it an inclusive dessert option for mixed gatherings
- Make-ahead friendly – The meringue base can be baked up to 2 days in advance, removing last-minute stress when entertaining
- Endlessly customizable – Top with any seasonal fruit you love, from classic berries to tropical options, or get creative with lemon curd, chocolate shavings, or caramel drizzle
- Looks expensive but costs pennies – Egg whites are incredibly affordable, and you can use whatever fruit is in season or on sale for toppings
- Impressive presentation guaranteed – This dessert always draws compliments and looks like you spent hours (our secret: you didn’t!)
- Light and refreshing – Unlike heavy cakes or rich chocolate desserts, pavlova feels airy and fresh, perfect for ending a meal without feeling overstuffed
- Feeds a crowd easily – One pavlova serves 8-10 people generously, making it ideal for parties and gatherings
- Fun to decorate – Get kids involved in arranging the fruit—it’s nearly impossible to make it look bad
- Room temperature stable – The meringue base doesn’t require refrigeration before topping, simplifying party logistics
Ingredient Notes
Egg Whites (6 large eggs, room temperature) – The foundation of any pavlova, egg whites whip up into voluminous meringue when beaten. Room temperature whites whip faster and more voluminously than cold eggs. Separate your eggs carefully—even a speck of yolk will prevent proper whipping since fat inhibits meringue formation. Age your eggs if possible; eggs that are 3-5 days old separate more cleanly and whip up better than super-fresh eggs. Save those yolks for custard, carbonara, or homemade mayonnaise!
Superfine/Caster Sugar (1½ cups) – Superfine sugar dissolves more completely into the egg whites, creating a smoother, more stable meringue. Regular granulated sugar works in a pinch, but you’ll need to beat the meringue longer to fully dissolve the crystals. You can make your own superfine sugar by pulsing regular sugar in a food processor for 30 seconds. Don’t substitute powdered sugar, which contains cornstarch that will alter the texture. The high sugar content is what gives pavlova its signature crispy shell and marshmallowy interior.
Cornstarch (1 tablespoon) – This is the secret ingredient that creates pavlova’s distinctive soft, marshmallowy center while maintaining a crispy exterior. Cornstarch stabilizes the meringue and prevents it from becoming completely dry throughout. Don’t skip this—it’s what differentiates pavlova from regular crispy meringue cookies. Some recipes use potato starch or arrowroot as alternatives, but cornstarch is most reliable.
White Vinegar or Lemon Juice (1 teaspoon) – The acid helps stabilize the egg white proteins, creating a more resilient meringue that’s less likely to collapse or weep. It also contributes to that chewy interior texture. White distilled vinegar is traditional and neutral-flavored. Lemon juice adds a subtle citrus note. Cream of tartar (½ teaspoon) can substitute if you prefer.
Vanilla Extract (1 teaspoon) – Pure vanilla extract adds depth and rounds out the sweetness. The flavor is subtle but important. You can also use vanilla bean paste for visible vanilla specks, or experiment with almond extract (use just ½ teaspoon as it’s stronger).
Heavy Whipping Cream (1½ cups, for topping) – Provides the luxurious, creamy layer that balances the sweet crunch of meringue. Heavy cream whips up thicker and more stable than whipping cream. For best results, chill your cream, bowl, and beaters before whipping. You can substitute coconut cream for a dairy-free version.
Powdered Sugar (2-3 tablespoons, for whipped cream) – Sweetens the whipped cream while helping it stay stable longer than granulated sugar. Also called confectioner’s sugar or icing sugar.
Fresh Fruit (2-3 cups assorted) – The crowning glory! Traditional choices include strawberries, raspberries, blueberries, kiwi, and passionfruit. Choose fruits that are ripe but firm, and pat them dry before arranging to prevent sogginess.
Equipment Needed
- Stand mixer or handheld electric mixer – Meringue requires sustained beating for 8-12 minutes; hand-whisking isn’t practical. Stand mixers are ideal for hands-free whipping
- Large mixing bowl – Must be completely clean, dry, and grease-free. Glass or metal bowls work best; plastic can retain oils that prevent proper whipping
- Baking sheet – Standard half-sheet pan (18×13 inches) is perfect
- Parchment paper or silicone baking mat – Essential for preventing sticking. Draw a 9-inch circle on the parchment as a guide before flipping it over
- Rubber spatula – For gently folding and spreading the meringue
- Small bowl – For separating eggs one at a time (safety check before adding to the main bowl)
- Measuring cups and spoons – Accuracy matters in meringue-making
- Offset spatula or large spoon – For creating the signature nest shape and swirls
- Cooling rack – For cooling the baked meringue
- Medium mixing bowl – For whipping cream topping
- Sharp knife – For slicing fruit
- Serving platter – Choose something flat and stable for presenting your finished pavlova
Classic Pavlova Recipe – Crispy, Marshmallowy Meringue Dessert

This classic pavlova recipe creates the perfect meringue dessert with a crispy outer shell and soft, marshmallowy center. Topped with freshly whipped cream and seasonal fruit, it’s an impressive yet surprisingly easy showstopper for any celebration or gathering.
- Prep Time: 20 minutes
- Cook Time: 90 minutes
- Total Time: 2 hours 10 minutes (plus cooling time)
- Yield: 8-10 servings 1x
- Category: Dessert
- Method: Baking
- Cuisine: Australian/New Zealand
- Diet: Gluten Free
Ingredients
For the Pavlova Meringue:
- 6 large egg whites, at room temperature
- 1½ cups (300g) superfine/caster sugar
- 1 tablespoon cornstarch
- 1 teaspoon white vinegar or fresh lemon juice
- 1 teaspoon pure vanilla extract
- Pinch of salt
For the Topping:
- 1½ cups heavy whipping cream, cold
- 2-3 tablespoons powdered sugar
- 1 teaspoon vanilla extract
- 3 cups fresh mixed berries (strawberries, raspberries, blueberries)
- 2 kiwis, peeled and sliced
- 2 passionfruit (optional, for drizzling)
- Fresh mint leaves for garnish (optional)
Instructions
- Prepare your oven and pan: Preheat oven to 300°F (150°C). Line a large baking sheet with parchment paper. Using a 9-inch plate or cake pan as a guide, trace a circle on the parchment with pencil, then flip the paper over so the pencil mark is on the bottom (this prevents graphite transfer to your meringue). This circle serves as your guide for shaping the pavlova.
- Separate eggs carefully: Separate your eggs one at a time into a small bowl first, then transfer each white to your large, completely clean mixing bowl. This prevents one bad egg or accidentally broken yolk from ruining the entire batch. Even the tiniest amount of yolk will prevent proper whipping. Let whites sit at room temperature for 15-20 minutes for best volume.
- Begin beating egg whites: Using a stand mixer with whisk attachment (or handheld mixer), beat egg whites and pinch of salt on medium speed until soft peaks form, about 2-3 minutes. Soft peaks should curl over when you lift the beater. Don’t rush this stage—proper aeration is crucial.
- Gradually add sugar: With mixer running on medium-high speed, add superfine sugar very gradually, about 1 tablespoon at a time, waiting 10-15 seconds between additions. This slow incorporation allows the sugar to fully dissolve into the egg whites, creating a stable, glossy meringue. Continue beating for 8-10 minutes total after all sugar is added. The meringue is ready when it’s thick, glossy, and holds stiff, upright peaks. Rub a small amount between your fingers—it should feel completely smooth with no sugar granules.
- Add stabilizers and flavorings: Sift cornstarch over the meringue. Add vinegar and vanilla extract. Using a rubber spatula, gently fold these ingredients into the meringue with just 3-4 strokes until barely combined. Don’t overmix—a few streaks are fine.
- Shape the pavlova: Spoon the meringue onto your prepared parchment, using the traced circle as a guide. Spread the meringue to fill the circle, then use the back of a spoon or offset spatula to create a shallow well in the center, building up the sides slightly higher (about 1 inch higher than the center). This nest shape will hold your cream and fruit later. Create decorative swirls and peaks around the edges with your spatula for a beautiful finish.
- Reduce oven temperature: Immediately reduce oven temperature to 250°F (120°C). This lower temperature is crucial for achieving the right texture.
- Bake low and slow: Place pavlova in the oven and bake for 90 minutes. The pavlova should be dry to the touch with a very pale cream color (not brown). It will sound hollow when tapped gently. The meringue will puff and crack slightly—this is normal and adds to its rustic charm.
- Cool completely in oven: Turn off the oven and crack the door open slightly (prop with a wooden spoon if needed). Let the pavlova cool completely inside the oven for at least 1 hour or overnight. This gradual cooling prevents cracking from temperature shock. Don’t rush this step—patience ensures the best texture.
- Prepare whipped cream: When ready to serve (no more than 2 hours before serving), beat cold heavy cream with powdered sugar and vanilla in a chilled bowl until soft peaks form, about 2-3 minutes. Don’t overbeat or you’ll end up with butter. The cream should be billowy and spreadable, not stiff.
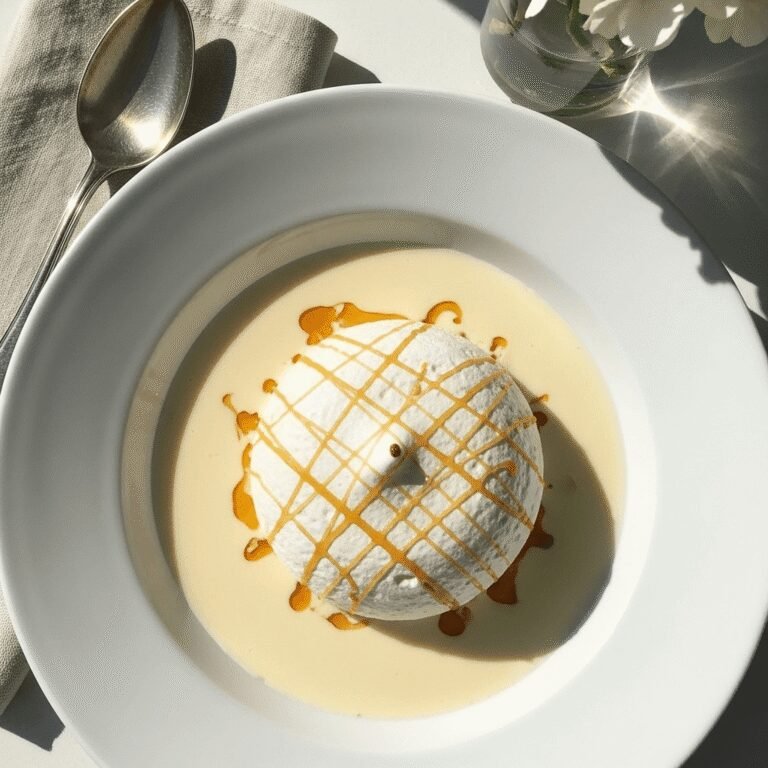
- Assemble the pavlova: Carefully transfer the cooled meringue to your serving platter. Spread whipped cream generously over the top, leaving a small border around the edges so some meringue shows. Pile fresh berries, sliced kiwi, and any other fruit on top of the cream. If using passionfruit, cut in half and drizzle the pulp and seeds over everything. Garnish with fresh mint leaves if desired.
- Serve immediately: Pavlova is best served within 2 hours of topping. Slice with a sharp knife, cutting through the crispy exterior to reveal the soft, marshmallowy interior. Each serving should include meringue, cream, and fruit.
Notes
- Room temperature eggs are crucial: They whip up with more volume than cold eggs. Separate while cold, then let sit for 15-20 minutes.
- Sugar must be fully dissolved: Rub meringue between fingers—it should feel completely smooth with no grittiness.
- Don’t skip the cooling in the oven: This prevents cracks and achieves the perfect texture contrast.
- Assemble just before serving: Once topped with cream and fruit, pavlova should be served within 2 hours to prevent sogginess.
- Cracks are normal and charming: Embrace them! Even experienced bakers get cracks. They add rustic character.
- Humidity affects meringue: Avoid making pavlova on very humid or rainy days if possible, as moisture in the air can prevent proper crisping.
Nutrition
- Serving Size: 1 slice (1/10 of pavlova)
- Calories: 245
- Sugar: 37g
- Sodium: 55mg
- Fat: 9g
- Saturated Fat: 6g
- Unsaturated Fat: 2.5g
- Trans Fat: 0g
- Carbohydrates: 39g
- Fiber: 1g
- Protein: 3g
- Cholesterol: 33mg
Nutrition information is calculated based on the pavlova with whipped cream and mixed berry topping. Values may vary depending on specific fruits used and portion sizes. Nutrition data provided is an estimate.
Tips & Variations
Tropical Pavlova: Top with sliced mango, fresh pineapple chunks, kiwi, and passionfruit for a taste of the islands. Add toasted coconut flakes and a drizzle of lime zest for extra tropical flair.
Chocolate Pavlova: Sift 3 tablespoons cocoa powder with the cornstarch before folding into meringue. Top with chocolate whipped cream, chocolate shavings, and fresh raspberries for a decadent twist.
Lemon Pavlova: Add 1 teaspoon lemon zest to the meringue. Top with lemon curd, whipped cream, and fresh blueberries for a bright, citrusy version perfect for spring.
Berry Compote Pavlova: Make a quick berry compote by simmering mixed berries with sugar and lemon juice until syrupy. Cool completely before drizzling over whipped cream-topped pavlova for intense berry flavor.
Mini Pavlovas: Instead of one large pavlova, pipe or spoon meringue into 8-10 individual nests on your baking sheet. Reduce baking time to 45-60 minutes. Perfect for dinner parties with individual servings.
Vegan Pavlova: Use aquafaba (chickpea liquid) instead of egg whites—3 tablespoons aquafaba equals 1 egg white. Whip exactly the same way. Top with coconut whipped cream for a completely plant-based version.
Autumn Spice Pavlova: Add ½ teaspoon cinnamon and ¼ teaspoon nutmeg to meringue. Top with roasted apples or pears, caramel drizzle, and chopped pecans.
Pavlova Roulade: Spread meringue in a rectangle, bake as directed, then roll up with cream and berries inside like a Swiss roll. Stunning presentation and easier to slice!
Coffee Pavlova: Fold 2 teaspoons instant espresso powder into meringue. Top with coffee-flavored whipped cream and chocolate-covered espresso beans for coffee lovers.
Nutty Pavlova: Fold ½ cup finely chopped toasted hazelnuts or almonds into meringue before shaping. Pairs beautifully with chocolate ganache and cherries.
Pro Chef Tips
The finger test for dissolved sugar: After beating in all the sugar, rub a small amount of meringue between your fingers. If you feel any grittiness, keep beating. Perfectly dissolved sugar feels completely smooth and silky. Undissolved sugar causes weeping and a less stable meringue.
Vinegar is your insurance policy: That teaspoon of vinegar (or lemon juice) helps stabilize the protein structure in egg whites, making your pavlova more resilient to humidity and handling. It also creates that distinctive chewy, marshmallowy interior that distinguishes pavlova from standard meringue.
The gradual cooling is non-negotiable: Rushing the cooling by removing pavlova from the oven while still hot causes dramatic cracking from sudden temperature change. Leaving it in the turned-off oven with the door cracked allows gentle, even cooling that minimizes cracks and perfects that contrasting texture.
Embrace the cracks: Even professional pastry chefs’ pavlovas crack. It’s part of the charm! The cream and fruit topping will cover most imperfections. In Australia and New Zealand, a cracked pavlova is considered perfectly normal and authentic.
Humidity is the enemy: Meringue absorbs moisture from the air, making humid days challenging for pavlova-making. If you live in a humid climate, run your air conditioning or make pavlova on drier days. Store the baked meringue in an airtight container if you’re not serving immediately.
The bowl must be spotless: Any trace of grease, oil, or egg yolk will prevent egg whites from whipping properly. Wipe your bowl and beaters with white vinegar or lemon juice before starting as an extra precaution. Glass and metal bowls work best; avoid plastic.
Room temperature eggs whip faster and higher: Plan ahead and remove eggs from the refrigerator 30 minutes before making pavlova. They’ll separate more cleanly when cold, then warm up quickly at room temperature, producing maximum volume when whipped.
Create visual interest with your shaping: Don’t just smooth the pavlova flat. Use the back of a spoon to create swoops, peaks, and valleys. These decorative touches catch the light beautifully and create textural interest even before topping.
Soft peaks for whipped cream: Unlike the stiff peaks needed for meringue, whipped cream should be beaten only to soft peaks for topping pavlova. Overbeaten cream becomes grainy and buttery. Stop when the cream holds its shape but still looks soft and billowy.
Fruit should be dry: Pat berries and cut fruit completely dry with paper towels before arranging on your pavlova. Excess moisture will make the meringue soggy faster. Hull strawberries and slice them shortly before serving to prevent juice release.
Common Mistakes to Avoid
Adding sugar too quickly: Dumping all the sugar in at once or adding it too rapidly prevents it from dissolving properly, resulting in a weepy, grainy meringue that won’t hold its structure. Always add sugar gradually, about 1 tablespoon at a time, allowing each addition to fully incorporate before adding more. The entire process should take 10-12 minutes of beating after all sugar is added.
Baking at too high a temperature: Meringue baked above 250°F will brown, develop a crusty exterior without the marshmallowy interior, and is more prone to cracking. Pavlova requires low, slow baking (250°F) to dry out gradually while developing that characteristic texture. If your oven runs hot, reduce temperature by 10-15 degrees.
Opening the oven door during baking: Resist the temptation to peek! Opening the door releases heat and introduces moisture, both of which can cause pavlova to collapse or crack dramatically. Trust the timing and only check after the full 90 minutes is complete. Similarly, don’t rush the cooling—leaving the pavlova in the turned-off oven prevents temperature shock.
Topping the pavlova too early: Once you add cream and fruit, the moisture begins softening the crispy meringue shell. Assembled pavlova should be served within 2 hours maximum. For best results, prepare your toppings in advance but don’t assemble until 30 minutes before serving. This preserves that delightful textural contrast.
Using greasy equipment: Even the smallest amount of grease, oil, or egg yolk will prevent egg whites from whipping to stiff peaks. This is the most common reason for meringue failure. Always wash bowls and beaters with hot soapy water, dry completely, then wipe with vinegar or lemon juice before starting. Use glass or metal bowls—plastic retains oils and should be avoided.
Storage & Meal Prep
Storing the Baked Meringue Base: The beauty of pavlova is that the meringue base can be made ahead, which is perfect for stress-free entertaining. Once completely cooled, store the un-topped meringue in an airtight container at room temperature for up to 2 days. Place parchment paper between layers if stacking. Don’t refrigerate the meringue—moisture in the refrigerator will make it soggy. Store in a cool, dry place away from humidity.
Assembled Pavlova Storage: Once topped with cream and fruit, pavlova should be served within 2 hours. The moisture from cream and fruit will gradually soften the crispy shell. If you must store an assembled pavlova briefly, keep it at cool room temperature (not refrigerated) and serve as soon as possible. Refrigeration makes the meringue weep and become unpleasantly chewy throughout.
Leftover Pavlova: If you have leftover assembled pavlova (rare but possible!), cover loosely and refrigerate for up to 24 hours. The texture won’t be as crisp, but it’s still delicious—think of it as a different dessert with a softer, more uniform texture. Some people actually prefer day-old pavlova for its softer consistency! It’s particularly good for breakfast with coffee.
Storing Components Separately: For maximum freshness and texture, store the meringue base separately from toppings until ready to serve. Whipped cream can be made 2-3 hours ahead and refrigerated in a covered bowl. Give it a quick whisk before spreading if it has separated slightly. Prepare fruit just before assembly to prevent juice release and browning.
Best Practices: Never store pavlova in a plastic container that’s been used for fatty foods—residual oils can affect the meringue. Glass or metal containers with tight lids work best. Keep away from strong-smelling foods as meringue absorbs odors easily.
Make-Ahead & Freezer Notes
Make-Ahead Timeline: Pavlova is an excellent make-ahead dessert that actually reduces entertaining stress. Here’s your timeline: Two days before: Bake the meringue base completely, cool, and store in an airtight container at room temperature. One day before: Prepare your fruit (wash, dry, hull strawberries, etc.) and store covered in the refrigerator. Morning of serving: Whip your cream and refrigerate in a covered bowl. One hour before: Remove cream from refrigerator to take off the chill slightly. Thirty minutes before: Assemble your pavlova with cream and fruit, then let it sit at room temperature until serving. This schedule allows you to enjoy your guests instead of being stuck in the kitchen!
Freezing the Meringue Base: Yes, you can freeze baked meringue! Once completely cooled, wrap the meringue carefully in plastic wrap, then again in aluminum foil to protect from moisture and freezer odors. Freeze for up to 1 month. To use, remove from freezer and let thaw at room temperature in its wrapping for about 1 hour. The texture remains remarkably similar to fresh-baked meringue. This is perfect for having dessert ready for unexpected guests or busy holiday seasons.
Do NOT Freeze Assembled Pavlova: Never freeze pavlova that’s already topped with cream and fruit. The cream will separate and become grainy, fruit will release too much water upon thawing, and the meringue will become unpleasantly soggy. Only freeze the plain meringue base.
Freezing Individual Portions: If you make mini pavlovas, freeze them individually wrapped in plastic wrap, then store together in a freezer bag. This allows you to thaw only the number you need for smaller gatherings without having to thaw an entire large pavlova.
Emergency Dessert Strategy: Keep a frozen pavlova base in your freezer alongside frozen berries. When unexpected guests arrive or you need a last-minute impressive dessert, thaw the meringue while you’re preparing dinner (about 1 hour at room temperature), whip fresh cream, and top with the frozen berries (which thaw quickly at room temperature). Instant impressive dessert with minimal effort!
Serving Suggestions
Classic Australian/New Zealand Style: Serve pavlova as the centerpiece dessert at your summer celebration, particularly for Christmas (if you want to eat like the Aussies and Kiwis!), or any warm-weather gathering. The traditional topping includes fresh strawberries, kiwifruit, and passionfruit pulp drizzled over the top. Accompany with iced tea, sparkling wine, or champagne for an elegant finish to your meal.
Tea Party Elegance: Pavlova is perfect for afternoon tea, baby showers, or bridal showers. Serve mini pavlovas on individual plates alongside scones, tea sandwiches, and your finest china. Pair with Earl Grey, English Breakfast, or fruit-infused herbal teas. The light, sweet meringue complements tea beautifully without overwhelming delicate tea flavors.
Dinner Party Finale: After a rich main course like roasted lamb, grilled steak, or pasta carbonara, pavlova provides a light, refreshing contrast that cleanses the palate without feeling heavy. Serve with dessert wine such as Moscato d’Asti, late-harvest Riesling, or a sparkling dessert wine. The wine’s sweetness complements without competing with the meringue.
Brunch Centerpiece: Pavlova makes a stunning brunch dessert, especially for Mother’s Day, Easter, or special birthday celebrations. Top with a mix of berries and sliced citrus fruits. Serve alongside brunch cocktails like mimosas, bellinis, or Aperol spritzes. The fruit-forward flavors work beautifully with brunch beverages.
Seasonal Variations: Spring—top with strawberries, rhubarb compote, and lemon curd. Summer—use mixed berries, stone fruits like peaches and plums, and fresh mint. Fall—try roasted apples or pears with caramel and cinnamon whipped cream. Winter—use pomegranate seeds, citrus segments, and sugared cranberries for festive color.
Coffee Service: Pavlova pairs wonderfully with strong coffee or espresso. The slight bitterness of coffee balances the sweet meringue perfectly. Serve small slices of pavlova alongside cappuccinos, lattes, or espresso for an Italian-inspired dessert course.
Kids’ Party Fun: Let children help decorate individual mini pavlovas with their favorite fruits and whipped cream. Set up a “pavlova bar” with various toppings and let kids create their own designs. Serve with milk or fruit punch. The interactive element makes dessert entertaining.
Romantic Dinner: A whole pavlova might be too much for two, but mini pavlovas or one regular pavlova (with leftovers for breakfast!) creates a romantic dessert. Top with strawberries and chocolate drizzle, serve by candlelight with champagne or prosecco, and you have an unforgettable date night at home.
FAQs Section
Why did my pavlova crack so much?
While some cracking is normal and adds to pavlova’s rustic charm, excessive cracking usually results from too-rapid temperature changes. The most common cause is removing the pavlova from the oven while still hot, rather than allowing it to cool gradually inside the turned-off oven. Other causes include baking at too high a temperature (which creates too much contrast between crispy exterior and soft interior), opening the oven door during baking, or placing a hot meringue in a cold room. To minimize cracking, always cool pavlova slowly in the oven with the door slightly cracked, and don’t stress if you still get some cracks—they’re authentic and easily covered with cream and fruit!
Can I make pavlova on a humid day?
Humidity is meringue’s enemy because egg whites absorb moisture from the air, making them difficult to whip properly and preventing the baked meringue from achieving that crispy exterior. If you live in a very humid climate or it’s a rainy day, you can still make pavlova but take extra precautions: run your air conditioning to reduce indoor humidity, add an extra ½ teaspoon of cornstarch for stability, and ensure the meringue is fully dried in the oven (you may need to add 15-30 minutes to baking time). Store the baked meringue in an airtight container immediately after cooling to protect from moisture. That said, slightly less-crispy pavlova is still absolutely delicious!
What’s the difference between pavlova and meringue?
While pavlova is technically a type of meringue, it has distinct characteristics that set it apart from standard meringues or meringue cookies. Pavlova contains cornstarch and vinegar, which aren’t typically found in traditional meringues. These ingredients create pavlova’s signature texture: crispy on the outside but soft and marshmallowy on the inside, almost like a chewy cloud. Regular meringues are usually crisp all the way through. Pavlova is also shaped into a large disc or nest to hold toppings, while meringues are typically piped into cookies or used as components in other desserts. Think of pavlova as meringue’s more substantial, textured cousin designed specifically to showcase cream and fruit.
Why is my meringue weeping or forming liquid droplets?
Weeping (also called “beading”) happens when moisture forms on the surface of meringue, creating amber-colored droplets. This occurs when sugar doesn’t fully dissolve into egg whites, or when the meringue is undercooked. To prevent weeping: add sugar very gradually while beating (never rush this step), beat for a full 8-10 minutes after all sugar is added to ensure complete dissolution, test by rubbing meringue between your fingers (should feel smooth, not grainy), and bake for the full 90 minutes to properly dry out the meringue. Some weeping can also occur in very humid conditions. While it doesn’t look perfect, weeping pavlova is still perfectly safe to eat and tastes delicious—the cream and fruit hide any imperfections!
How do I know when my pavlova is done baking?
A properly baked pavlova should be dry and crisp to the touch on the outside, with a very pale cream color (definitely not brown). Gently tap the surface—it should sound hollow and feel firm, not sticky. The pavlova will have small cracks on the surface, which is normal. When you peek at the base (carefully lift a corner with a spatula), it should easily release from the parchment and feel dry. The center will still feel slightly soft if you press gently, which is exactly what you want—that’s your marshmallowy interior developing. If the exterior feels at all tacky or sticky, bake for another 15-20 minutes. Remember that pavlova continues to dry as it cools in the oven, so don’t judge doneness immediately after removing from heat.
Can I make pavlova ahead and freeze it?
Yes! The plain baked meringue base freezes beautifully for up to 1 month, making it perfect for advance preparation. Once completely cooled, wrap the meringue carefully in plastic wrap, then wrap again in aluminum foil to protect from moisture and freezer odors. Freeze flat to prevent breakage. To use, remove from freezer and let thaw at room temperature in its wrapping for about 1 hour—do not unwrap while frozen as condensation will form on the cold meringue and make it soggy. Once thawed, the texture is virtually identical to fresh-baked. Never freeze assembled pavlova with cream and fruit—only freeze the plain meringue base. This freezer trick means you can always have an impressive dessert ready to assemble for unexpected guests!
Conclusion
And there you have it—the ultimate guide to creating a stunning, delicious pavlova that will have everyone asking for your secret! This elegant dessert proves that impressive doesn’t have to mean complicated. With just a handful of simple ingredients, a little patience during the cooling process, and your choice of beautiful toppings, you can create a bakery-worthy masterpiece right in your own kitchen.
The magic of pavlova isn’t just in its incredible texture contrast or its ability to showcase fresh seasonal fruit—it’s in the joy of sharing something special with people you love. Whether you’re celebrating a milestone, hosting a summer gathering, or simply treating yourself to something wonderful on a Tuesday evening, pavlova brings that sense of occasion to the table.
I hope this recipe empowers you to confidently whip up (pun intended!) this classic dessert. Remember, even if your pavlova cracks, weeps a little, or doesn’t look exactly like the photo, it will still taste absolutely divine. Some of the most delicious pavlovas I’ve eaten have been the most imperfect-looking ones. Embrace the rustic beauty!
Now it’s your turn to create some meringue magic! I’d absolutely love to see your pavlova creations—what fruits did you choose? Did you try any of the flavor variations? Snap a photo of your masterpiece and share it on Pinterest so other home bakers can be inspired by your work. Don’t forget to save this recipe to your dessert board so you can find it again for your next celebration!
Happy baking, and may your meringues always be crispy, your centers marshmallowy, and your guests thoroughly impressed! 🍓✨