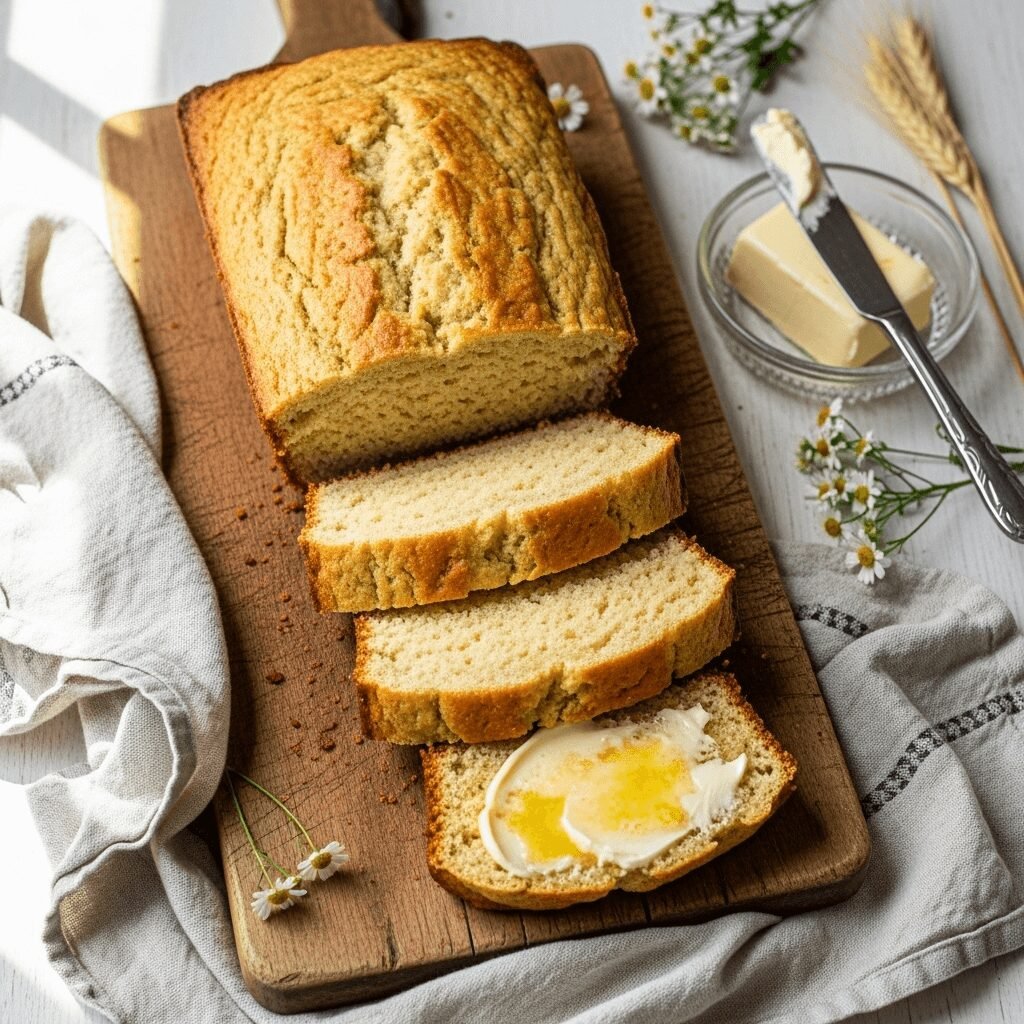
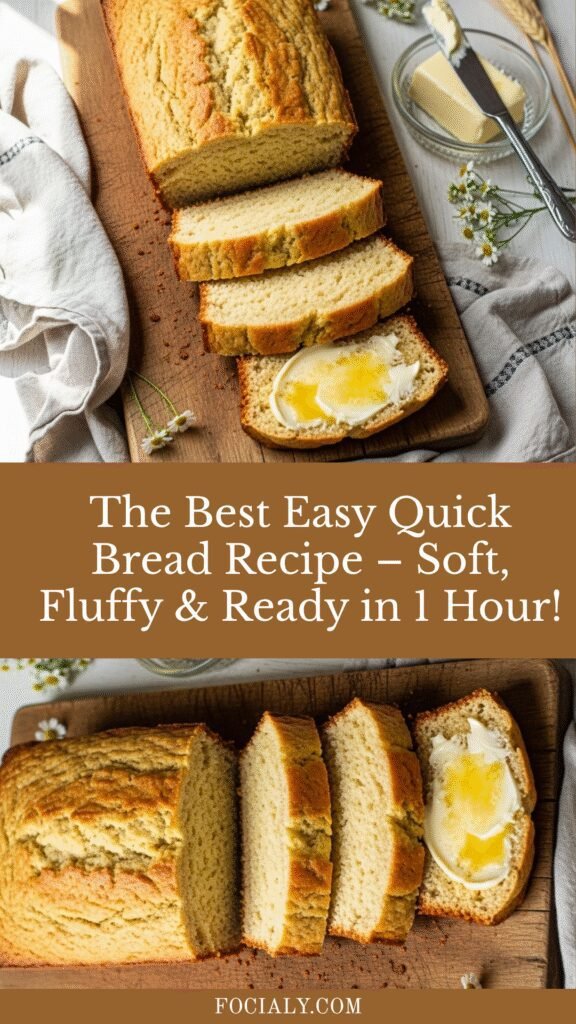
The Best Easy Quick Bread Recipe – Soft, Fluffy & Ready in 1 Hour!
There’s something absolutely magical about the aroma of freshly baked bread wafting through your kitchen, especially when you realize you didn’t need hours of waiting or complicated techniques to achieve it. Quick bread is exactly what busy home cooks dream about – a homemade, delicious loaf that comes together without yeast, kneading, or long rising times.
Unlike traditional yeast breads that require multiple rises and careful timing, quick bread uses baking powder or baking soda as leavening agents, meaning you can go from mixing bowl to warm slice in about an hour. This versatile recipe works beautifully for breakfast alongside butter and jam, as a side for soups and stews, or even as the base for creative sandwich creations. Whether you’re a baking novice or an experienced home cook looking for a reliable weeknight recipe, this quick bread delivers bakery-quality results with minimal effort. It’s moist, tender, slightly sweet, and endlessly adaptable to whatever flavors you’re craving.
History / Background
Quick breads have a fascinating place in American culinary history, dating back to the early 19th century when chemical leavening agents first became commercially available. Before baking powder was patented in 1856, home bakers relied exclusively on yeast or labor-intensive beaten eggs for lift. The introduction of baking soda (around the 1830s) and later baking powder revolutionized home baking, making fresh bread accessible to everyday cooks without the need for maintaining sourdough starters or waiting hours for dough to rise.
The term “quick bread” encompasses a wide family of baked goods including biscuits, muffins, scones, banana bread, and loaf-style breads like this one. These recipes became especially popular during westward expansion in America, when pioneer women needed efficient ways to provide fresh bread for their families without the luxury of time or predictable kitchen conditions. Quick breads could be mixed in one bowl, baked in a simple pan over a fire or in a wood stove, and required minimal skill or equipment.
During the Great Depression, quick bread recipes gained even more popularity because they were economical, used pantry staples, and could be made without expensive ingredients like butter or eggs (though they certainly taste better with them!). The 1950s saw a boom in quick bread creativity with the rise of home economics classes and community cookbooks, where women shared regional variations and family recipes. Today, quick bread represents comfort food at its finest – a connection to simpler times and the universal joy of homemade baking without intimidation.
Why You’ll Love This Recipe
This quick bread recipe has become my absolute go-to whenever I want the satisfaction of homemade baking without the time commitment. It’s the kind of recipe you’ll memorize after making it just a few times, and you’ll find yourself reaching for it again and again.
Here’s why this recipe deserves a permanent spot in your baking rotation:
- Ready in about an hour – Mix, bake, and enjoy without waiting for dough to rise multiple times
- One-bowl simplicity – Minimal dishes and straightforward mixing means easy cleanup
- Foolproof for beginners – No kneading skills, no yeast temperature worries, no proofing expertise required
- Budget-friendly ingredients – Uses basic pantry staples you probably already have on hand
- Incredibly versatile – Works as a breakfast bread, dinner side, or afternoon snack with coffee
- Customizable flavor profile – Easily adapt with herbs, cheese, sweet add-ins, or spices
- Makes your kitchen smell amazing – That fresh-baked bread aroma is pure comfort
- Perfect texture every time – Tender crumb with a golden, slightly crispy crust
- Great for meal prep – Bakes beautifully, freezes well, and reheats like a dream
- Kid-approved – Children love helping mix and seeing the transformation from batter to bread
- No special equipment needed – Just a bowl, a loaf pan, and your oven
Whether you’re baking for a crowd, meal prepping for the week ahead, or just craving something warm and homemade on a cozy afternoon, this recipe delivers every single time.
Ingredient Notes
Understanding your ingredients makes you a better baker, so let’s talk about what goes into this wonderful quick bread and why each component matters.
All-Purpose Flour – The foundation of your bread, providing structure through gluten development. All-purpose works perfectly here, but you can substitute up to half with whole wheat flour for a heartier, nuttier flavor. For gluten-free needs, use a 1:1 gluten-free baking flour blend.
Baking Powder – This is your leavening powerhouse, creating those air bubbles that give quick bread its tender, lifted texture. Make sure yours is fresh (check the expiration date!) because old baking powder won’t give you proper rise.
Baking Soda – Works alongside baking powder and reacts with acidic ingredients to create additional lift. Even a small amount makes a difference in texture.
Salt – Never skip the salt! It enhances all the other flavors and balances any sweetness. Use fine sea salt or regular table salt.
Sugar – Provides subtle sweetness, helps with browning, and keeps the bread moist. Granulated white sugar works best, but you can use light brown sugar for a deeper, more caramel-like flavor.
Butter – Melted butter adds richness, moisture, and that irresistible bakery flavor. Use real butter, not margarine, for best results. If dairy-free, substitute with melted coconut oil.
Eggs – Act as a binder, add structure, and contribute to the tender crumb. Room temperature eggs incorporate more easily into the batter.
Milk – Creates moisture and helps all ingredients come together into a smooth batter. Whole milk gives the richest result, but any percentage works. For dairy-free, use unsweetened almond milk or oat milk.
Vanilla Extract – Adds warm, aromatic depth that makes the bread taste homemade and special. Pure vanilla extract is worth the investment.
Equipment Needed
The beauty of quick bread is that you don’t need a fancy kitchen to make it! Here’s what you’ll use:
- 9×5-inch loaf pan – Standard size for perfect bread shape
- Large mixing bowl – For combining dry ingredients
- Medium mixing bowl – For whisking wet ingredients
- Whisk – For combining ingredients smoothly
- Rubber spatula – For folding batter and scraping bowl
- Measuring cups and spoons – Accurate measurements ensure consistent results
- Cooling rack – Allows air circulation for proper cooling
- Parchment paper (optional) – Makes removal from pan easier and cleanup simpler
- Toothpick or cake tester – For checking doneness
Quick Bread Recipe

This easy quick bread is a tender, moist loaf with a golden crust and soft crumb. Perfect for breakfast, snacking, or serving alongside dinner, it comes together in one bowl without yeast or kneading. A foolproof recipe that delivers bakery-quality bread in about an hour!
- Prep Time: 10 minutes
- Cook Time: 50-55 minutes
- Total Time: 1 hour 5 minutes
- Yield: 1 loaf (10-12 slices) 1x
- Category: Bread
- Method: Baking
- Cuisine: American
- Diet: Vegetarian
Ingredients
- 2 cups (250g) all-purpose flour
- 2 teaspoons baking powder
- ½ teaspoon baking soda
- ¾ teaspoon salt
- ½ cup (100g) granulated sugar
- 6 tablespoons (85g) unsalted butter, melted and slightly cooled
- 2 large eggs, room temperature
- 1 cup (240ml) whole milk, room temperature
- 1½ teaspoons pure vanilla extract
Instructions
- Preheat and prepare: Preheat your oven to 350°F (175°C). Grease a 9×5-inch loaf pan generously with butter or cooking spray, or line with parchment paper for easy removal.
- Mix dry ingredients: In a large mixing bowl, whisk together the flour, baking powder, baking soda, and salt until thoroughly combined. This ensures even distribution of leavening agents.
- Combine wet ingredients: In a separate medium bowl, whisk together the melted butter and sugar until well combined. Add the eggs one at a time, whisking after each addition. Stir in the milk and vanilla extract until the mixture is smooth and unified.
- Create the batter: Pour the wet ingredients into the bowl with the dry ingredients. Using a rubber spatula, gently fold the mixture together until just combined. You should still see a few small flour streaks – this is perfect! Overmixing develops too much gluten and creates tough, dense bread.
- Transfer to pan: Pour the batter into your prepared loaf pan, spreading it evenly with your spatula. Gently tap the pan on the counter a few times to release any air bubbles.
- Bake: Place the pan in the center of your preheated oven and bake for 50-55 minutes, or until the top is golden brown and a toothpick inserted into the center comes out with just a few moist crumbs (not wet batter).
- Cool properly: Remove from the oven and let the bread cool in the pan for 10 minutes. This allows it to set up properly. Then carefully turn it out onto a cooling rack to cool completely before slicing. Cutting into warm bread, while tempting, can result in gummy texture.
- Slice and serve: Once cooled, slice with a serrated bread knife and serve with butter, jam, honey, or however you prefer!
Notes
- Room temperature ingredients matter: They blend more smoothly and create better texture. Take eggs and milk out of the fridge 30 minutes before baking.
- Don’t overmix: Mix until ingredients are just combined. Overmixing creates tunnels and tough texture.
- Check doneness carefully: Oven temperatures vary. Start checking at 50 minutes, but your bread might need up to 60 minutes depending on your oven.
- Cool completely before storing: This prevents condensation and sogginess.
Nutrition
- Serving Size: 1 slice (1/10 of loaf)
- Calories: 215
- Sugar: 11g
- Sodium: 285mg
- Fat: 8g
- Saturated Fat: 5g
- Unsaturated Fat: 2.5g
- Trans Fat: 0g
Tips & Variations
The basic recipe is wonderful, but quick bread is incredibly adaptable to your taste preferences and what you have on hand. Here are some delicious ways to customize:
Savory Herb Bread: Reduce sugar to 2 tablespoons and add 2 tablespoons of fresh chopped herbs (rosemary, thyme, or basil) plus ½ cup shredded sharp cheddar cheese.
Cheddar Jalapeño: Fold in 1 cup shredded sharp cheddar and 2 tablespoons diced pickled jalapeños for a spicy kick perfect alongside chili or soup.
Cinnamon Swirl: After pouring half the batter into the pan, sprinkle with 2 tablespoons cinnamon-sugar mixture, add remaining batter, and swirl with a knife.
Lemon Poppy Seed: Add 2 tablespoons poppy seeds and replace vanilla with 2 tablespoons fresh lemon zest plus 1 tablespoon lemon juice (reduce milk to scant 1 cup).
Honey Whole Wheat: Replace ¼ cup sugar with honey, and substitute 1 cup whole wheat flour for half the all-purpose flour.
Garlic Parmesan: Add ½ cup grated Parmesan cheese, 2 teaspoons garlic powder, and 1 teaspoon Italian seasoning to the dry ingredients.
Apple Cinnamon: Fold in 1 cup diced apple and 1 teaspoon cinnamon for a fall-inspired breakfast bread.
Cranberry Orange: Add 1 cup dried cranberries and 2 tablespoons orange zest for a festive holiday variation.
Pro Chef Tips
These professional techniques will take your quick bread from good to absolutely exceptional:
Measure flour correctly: Too much flour is the most common quick bread mistake. Spoon flour into your measuring cup and level it off with a knife rather than scoking the cup into the flour bag, which compacts it and adds up to 25% more flour than needed.
Create a proper mixing technique: Mix wet and dry ingredients in separate bowls first. When combining them, use a folding motion with a spatula rather than aggressive stirring. Stop as soon as you no longer see dry flour – lumps are okay!
Master the butter temperature: Melted butter should be warm but not hot (about 90°F). If it’s too hot, it can cook the eggs when combined. Let it cool for 3-4 minutes after melting.
Use the tent method for even baking: If your bread is browning too quickly on top but isn’t done in the middle, loosely tent it with aluminum foil for the last 15-20 minutes of baking.
Test for doneness properly: A toothpick should come out with a few moist crumbs, not completely clean. Completely clean means you’ve likely overbaked it slightly.
Cool in stages: The 10-minute pan rest is crucial – it allows the bread to finish setting and makes it easier to remove without breaking. Then finish cooling completely on a rack to prevent a soggy bottom.
Enhance crust texture: For a slightly crunchier, more golden crust, brush the top with melted butter immediately when it comes out of the oven.
Common Mistakes to Avoid
Even with a simple recipe, there are pitfalls that can affect your results. Here’s what to watch for:
Overmixing the batter – This is the number one quick bread mistake. Overmixing develops gluten strands that should stay relaxed, resulting in tough, dense bread with tunnel-like holes. Mix only until dry ingredients are just moistened, even if the batter looks slightly lumpy.
Using expired leavening agents – Baking powder and baking soda lose potency over time. If yours are more than six months old, test them (baking powder should fizz in hot water, baking soda should fizz in vinegar). Weak leaveners create flat, dense bread.
Slicing too early – I know it’s tempting, but cutting into hot bread releases steam that’s still cooking the interior, resulting in gummy, underbaked texture. Wait until it’s completely cool, or at least room temperature.
Incorrect oven temperature – Oven thermometers are inexpensive and reveal the truth about your oven’s actual temperature. Many ovens run 25°F hotter or cooler than the dial suggests, which dramatically affects baking.
Not bringing ingredients to room temperature – Cold eggs and milk don’t emulsify properly with melted butter, creating a less cohesive batter and potentially affecting rise and texture. Take them out 30 minutes before you start.
Opening the oven door repeatedly – Every time you open the oven, the temperature drops by about 25°F and stays lower for several minutes. This disrupts the baking process and can cause collapse. Check only after the minimum baking time.
Storage & Meal Prep
Proper storage keeps your quick bread fresh and delicious for days:
Room Temperature Storage: Once completely cooled, wrap the bread tightly in plastic wrap or aluminum foil, or store in an airtight container. It will stay fresh at room temperature for 3-4 days. Avoid refrigerating, which actually dries out quick breads faster.
Maintaining Moisture: To keep bread extra moist, place a piece of bread or a few apple slices in the storage container. They’ll release moisture that the quick bread absorbs.
Reheating Individual Slices: For the best texture, wrap a slice in a damp paper towel and microwave for 15-20 seconds. This refreshes the moisture without drying it out. Alternatively, toast slices for a crispy exterior and warm interior.
Reviving Day-Old Bread: If your bread has dried out slightly, brush slices lightly with melted butter and warm in a 300°F oven for 5-7 minutes.
Shelf Life Indicators: Discard if you notice any mold, off smells, or if the texture becomes excessively dry and crumbly despite proper storage.
Make-Ahead & Freezer Notes
Quick bread is excellent for advance preparation and freezes beautifully:
Freezing Whole Loaf: Once completely cooled, wrap the entire loaf tightly in plastic wrap, then again in aluminum foil or place in a freezer-safe bag. Label with the date. It will keep in the freezer for up to 3 months without quality loss.
Freezing Individual Slices: Slice the bread completely, then place parchment paper squares between each slice. Wrap the stack tightly and freeze. This allows you to remove just one or two slices at a time for quick breakfasts or snacks.
Thawing Methods: For whole loaves, thaw overnight on the counter (still wrapped). For slices, remove from freezer and let sit for 20-30 minutes at room temperature, or toast directly from frozen.
Make-Ahead Batter: You can mix the batter up to 2 hours ahead and keep it covered in the refrigerator. Let it sit at room temperature for 10 minutes before baking, and add 3-5 minutes to the baking time.
Freezing Baked Muffin-Style: This batter also works beautifully as muffins (bake at 375°F for 18-22 minutes). Muffins freeze individually wrapped and thaw even faster than sliced bread – perfect for grab-and-go breakfasts.
Best Reheating from Frozen: Wrap frozen slices in foil and warm in a 300°F oven for 10-15 minutes, or microwave for 30-40 seconds until heated through.
Serving Suggestions
Quick bread is wonderfully versatile and pairs beautifully with both sweet and savory accompaniments:
Classic Breakfast Service: Serve warm slices with softened butter, fruit preserves, honey, or cream cheese. Pair with scrambled eggs, crispy bacon, and fresh fruit for a complete morning meal.
Soup and Stew Partner: This bread is perfect for soaking up hearty soups like tomato basil, chicken noodle, beef stew, or creamy chowders. The slightly sweet flavor complements savory dishes beautifully.
Sandwich Foundation: Use thick slices for creative sandwiches – try turkey and cranberry, grilled cheese, or BLTs. The sturdy texture holds up well to fillings without getting soggy.
Afternoon Tea or Coffee: Serve alongside hot coffee or tea with a spread of lemon curd, apple butter, or almond butter for a satisfying afternoon snack.
Bread Basket Addition: Slice and add to your dinner bread basket alongside cornbread or dinner rolls when serving family-style meals.
Beverage Pairings: The subtle sweetness pairs wonderfully with coffee, hot chocolate, chai tea, or even a glass of cold milk for the kids.
Dessert Presentation: Toast slices and top with vanilla ice cream, whipped cream and berries, or a drizzle of chocolate sauce for an easy dessert.
Brunch Spread: Include in a brunch buffet alongside fruit salad, quiche, breakfast casseroles, and pastries.
FAQs Section
Can I make this without eggs?
Yes! Replace each egg with ¼ cup unsweetened applesauce or mashed banana, or use a commercial egg replacer according to package directions. The texture will be slightly denser but still delicious.
Why did my bread sink in the middle?
The most common causes are: opening the oven door too early (wait until at least 45 minutes), expired leavening agents, overmixing the batter, or underbaking. Make sure your baking powder is fresh and the bread is fully baked before removing from the oven.
Can I use this recipe to make muffins instead?
Absolutely! Fill greased or lined muffin cups about ⅔ full and bake at 375°F for 18-22 minutes. This recipe makes approximately 12 standard muffins.
My bread is dry – what went wrong?
Common culprits include too much flour (remember to measure correctly by spooning and leveling), overbaking, or overmixing the batter. Also ensure you’re using room temperature ingredients for proper moisture incorporation.
Can I reduce the sugar?
You can reduce the sugar by up to half without dramatically affecting texture, though the bread will be less tender and brown less. Going below ¼ cup will significantly impact both flavor and texture.
Do I need to sift the flour?
Sifting isn’t necessary with all-purpose flour unless it’s particularly lumpy. Whisking the dry ingredients together accomplishes the same goal of even distribution.
Why does my bread have large holes or tunnels?
This is a classic sign of overmixing. Those tunnels are developed gluten strands. Mix only until you can no longer see dry flour, even if the batter looks lumpy.
How can I tell when it’s perfectly done?
The top should be golden brown and spring back when lightly pressed. A toothpick inserted in the center should come out with a few moist crumbs (not wet batter, but not completely clean either). The internal temperature should read 200-205°F on an instant-read thermometer.
Conclusion
There’s something truly special about pulling a golden loaf of homemade bread from your oven, especially when you realize how simple it was to create. This quick bread recipe is proof that you don’t need hours of rising time or professional baking skills to enjoy fresh, warm, delicious bread any day of the week.
Whether you’re serving it alongside Sunday soup, toasting it for breakfast, or adapting it with your favorite flavors, this versatile recipe is about to become one of your most-used kitchen staples. The ease, the aroma, the satisfaction of slicing into that perfect tender crumb – it all adds up to a baking experience that makes you feel accomplished without feeling stressed.
I’d love to hear how your quick bread turned out! Did you try any of the variations? Do you have a favorite way to serve it? Drop a comment below and share your experience. And if you loved this recipe, please save it to your Pinterest boards so you can find it easily next time that bread craving hits. Don’t forget to share with your friends who love easy, homemade baking – they’ll thank you for introducing them to their new favorite simple bread recipe!
Happy baking, and enjoy every warm, buttery slice! 🍞